
Popular categories
Looking for a yarn?


Comments / Questions (101)
![]() Marielle wrote:
Marielle wrote:
Ik wacht ook inderdaad al vanaf 1 oktober op een duidelijk antwoord. Heb al 2x dezelfde vraag gesteld (1x per ongeluk als Belgische). Fijn om te merken dat er meer met ditzelfde probleem zitten! Nu hopen dat er eens antwoord op komt. Wil zo graag door met mijn breiwerk!
22.10.2015 - 10:56DROPS Design answered:
Beste Marielle. De vraag ligt bij ons Design Team, ik kan helaas niet zeggen hoe lang het duurt voordat ik een antwoord heb, dus je moet wel even geduld hebben ;-)
22.10.2015 - 13:01
![]() J.van Ruler wrote:
J.van Ruler wrote:
Hallo, Ik werk aan het achterpand en volgens de beschrijving moet er na 10 herhalingen in patroon verder gebreid worden maar zonder kabel en zonder omslag. De gaatjes komen dus volgens de bschrijving te vervallen. Als ik naar de foto kijk, zie ik de gaatjes echter doorlopen. Ik zie dat hier meer vragen over gesteld zijn, maar het antwoord op die vragen zie ik niet. Graag uw hulp. Met vriendelijke groet,
21.10.2015 - 20:46
![]() Miriam wrote:
Miriam wrote:
In het patroon staat beschreven dat als 10x gevlochten is doorgegaan moet worden zonder kabels en omslagen. Klopt dit wel, want op de foto lijken de omslagen en kabels door te lopen?
20.10.2015 - 18:53DROPS Design answered:
Hoi Miriam. Brei je met de juiste stekenverhouding dan heb je ongeveer 45 cm hoog als je moet stoppen met de kabel. Op ca 47 cm begin je met minderen voor de hals - dus dat klopt (zie ook foto). Betreffend de omslagen heb ik aan mijn collega's van design moeten vragen. Ik weet niet wanneer ik een antwoord heb, maar ik zal dan reageren op één van de andere vragen.
22.10.2015 - 13:05
![]() Marielle wrote:
Marielle wrote:
Ik heb de video inderdaad bekeken. In het patroon staat dat er na de laatste kabel geen omslagen of kabels meer gebreid worden. Naar mijn idee is er op de foto nog duidelijk te zien dat het gaatjespatroon, dus de omslagen, gewoon boven de kabels doorgaat. Wordt er dan op de een of andere manier toch geminderd zodat het middenstuk toch smaller wordt?
13.10.2015 - 16:55
![]() GONZALEZ Marie-Pierre wrote:
GONZALEZ Marie-Pierre wrote:
J'avais une autre question : on fait 1 j au rg 1 et un autre au rg3 et on diminue de 4m dans la torsade on ne peut donc pas avoir le même nombre de m. Je suis désolée de vous ennuyer avec mes questions bêtes mais je trouve ce modèle superbe et je n'ai pas envie de laisser tomber parce que je ne comprends pas les explications.
03.09.2015 - 09:36DROPS Design answered:
Bonjour Mme Gonzalez, on augmente 1 m (= 1 jeté) tous les 2 rangs dans A.1 et A.2: on augmente ainsi le nombre de mailles de ces diagrammes. Quand on fait la torsade, on diminue effectivement 1 m mais cette diminution intervient dans la partie jersey du modèle = on diminue le nbe de m en jersey alors que le nombre de mailles en point fantaisie de chaque côté augmente. Tricotez les motifs comme indiqué en plaçant des marqueurs après A.1 et avant A.2, vous verrez après quelques rangs que votre nbe de m jersey va diminuer. Bon tricot!
03.09.2015 - 09:58
![]() GONZALEZ Marie-Pierre wrote:
GONZALEZ Marie-Pierre wrote:
Merci pour vos explications mais j'ai beau compter les mailles je ne parvient pas à comprendre où se fait le décalage. Au rg1 on fait 4m, 1j,3m=8m au rg2 on fait 5m+3m=8 m donc pas de décalage. A moins de décaler et ne pas compter les mailles en début et en fin de rang.
03.09.2015 - 09:31
![]() GONZALEZ Marie-Pierre wrote:
GONZALEZ Marie-Pierre wrote:
C'est encore moi, ma question précédente était longue et je tenais à vous dire que je suis une inconditionnelle de vos fils et que vos modèles sont superbes même si j'ai du mal avec les explications.
02.09.2015 - 06:21
![]() GONZALEZ Marie-Pierre wrote:
GONZALEZ Marie-Pierre wrote:
Bonjour, Sur le schémas les 3 mailles de jersey juste avant ou après la torsade se décalent tous les 2 rangs et sur la vidéo non. Que faut il suivre le schéma ou la vidéo ? D'autre par vous dites que la partie en jersey rétrécit tous les 2 rangs or je comprends plutôt que c'est tous les 8 rangs lorsque on tricote 2 mailles ens. dans la torsade. Il me semble que ça correspond alors au nombre d'aug. en jeté que l'on a faite. Je vous remercie par avance pour votre aide.
02.09.2015 - 06:19DROPS Design answered:
Bonjour Mme Gonzalez, le nombre de mailles dans A.1/A.2 augmente, comme on le voit dans la vidéo et dans le diagramme, et le motif se décale d'1 m côté jersey tous les 2 rangs. Le nombre de maille en jersey tricoté entre les 2 motifs va donc diminuer tous les 2 rangs, et celui tricoté pour chaque motif augmente et se décale. Bon tricot!
02.09.2015 - 10:09
![]() Concetta wrote:
Concetta wrote:
Buonasera.. leggo nelle spiegazioni che dopo aver intrecciato per un certo numero di vokte bisogna continuare secondo lo schema A1 e A2 senza i gettati e le trecce, ma guardando la foto noto che i gettati continuano anche sulla spalla.. come mai? Grazie per la risposta.
15.02.2015 - 15:49DROPS Design answered:
E' giusto così come indicano: "Quando A.1 e A.2 sono stati intrecciati 10-11-11-12 volte in totale in verticale a ogni lato, continuare A.1 e A.2 senza i gettati e le trecce (lavorare le m. sulle trecce a m. rasata)."
24.04.2015 - 16:40
![]() Concetta wrote:
Concetta wrote:
Salve! Non mi è chiaro questo passaggio del davanti destro: ALLO STESSO TEMPO aumentare 6 m. lavorando 2 m. in ognuna delle ultime 2 m. a m. rasata (= 6 aumenti). E' possibile avere ulteriori chiarimenti? Grazie anticipatamente.
10.02.2015 - 01:08DROPS Design answered:
Buongiorno Concetta. Abbiamo corretto il testo: si aumentano 6 m lavorando 2 m. in ognuna delle ultime 6 m. a m. rasata (= 6 aumenti). La ringraziamo per la segnalazione. Buon lavoro!
10.02.2015 - 08:33
|
||||||||||||||||
Dove#dovecardigan |
||||||||||||||||
 |
 |
|||||||||||||||
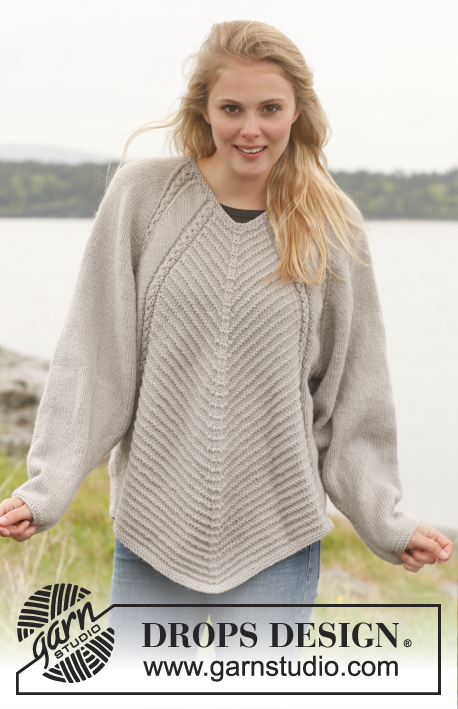
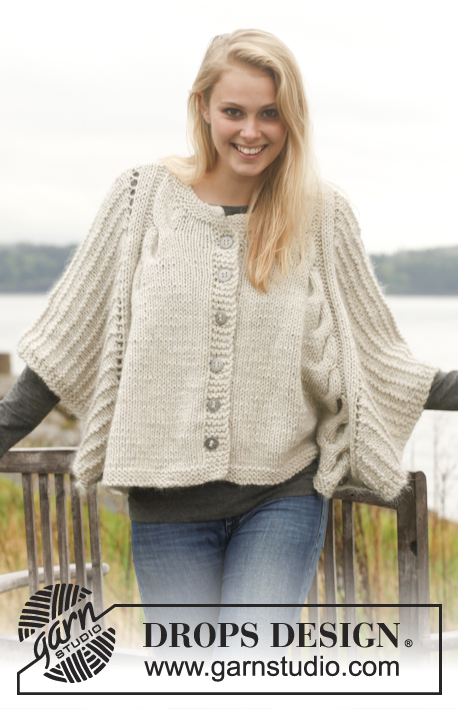
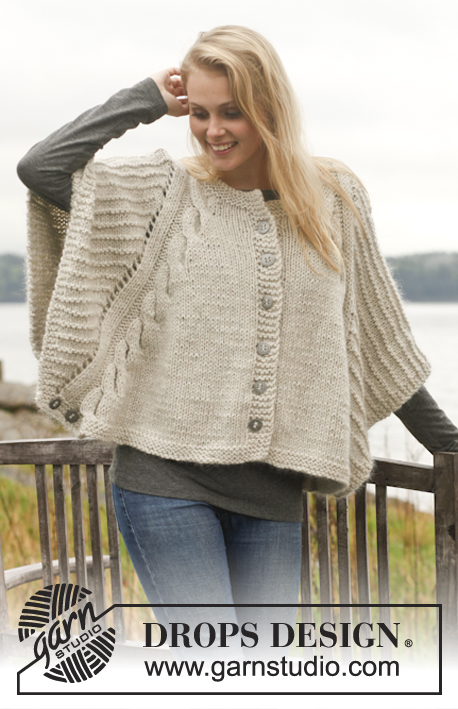
Knitted DROPS poncho with cables and textured pattern in "Nepal" and "Kid-Silk". Size: S - XXXL.
DROPS 150-12 |
||||||||||||||||
|
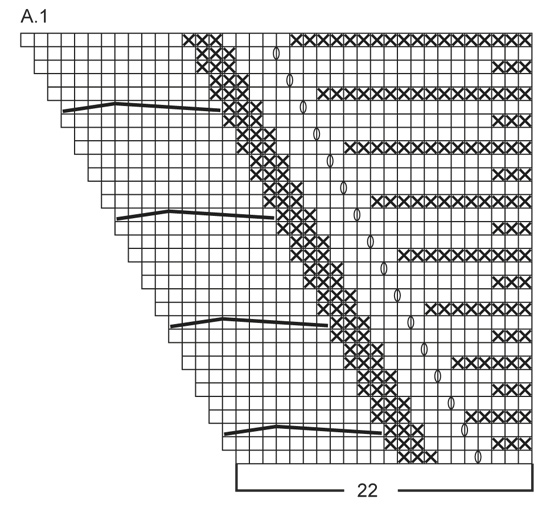
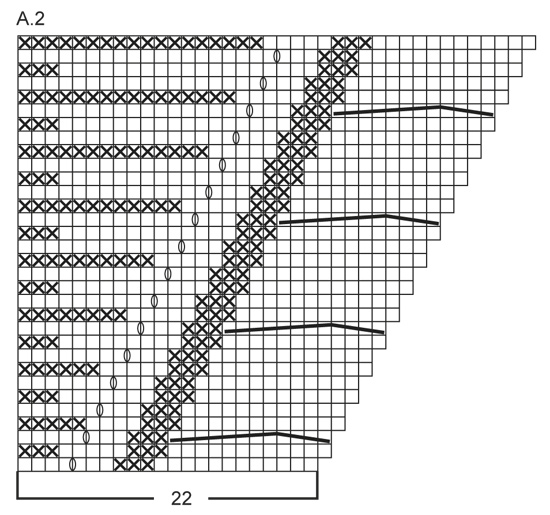
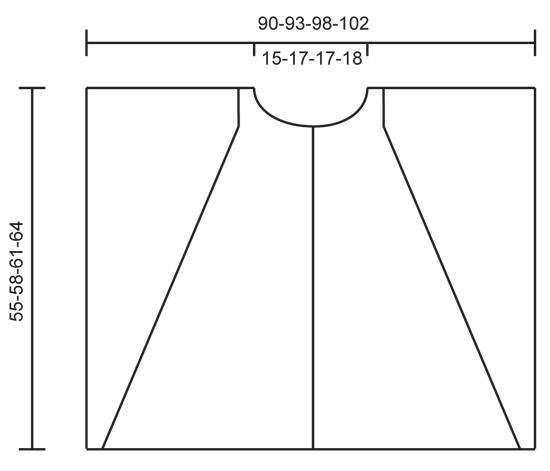
GARTER ST (back and forth on circular needle): K all rows. 1 ridge = K2 rows. PATTERN: See diagrams A.1 and A.2. The diagrams show all rows in pattern seen from RS. BUTTONHOLE: Dec for buttonholes on right band. 1 buttonhole = K tog third and fourth st from mid front and make 1 YO. Dec for buttonholes when piece measures: SIZE S/M: 7, 15, 23, 31, 39 and 47 cm / 2 ¾", 6", 9", 12¼", 15¼" and 18½" SIZE L: 8, 16, 25, 33, 42 and 50 cm / 3⅛", 6¼" 9¾", 13", 16½" and 19¾" SIZE XL/XXL: 7, 16, 25, 34, 43 and 52 cm / 2 ¾", 6¼", 9¾", 13⅜", 17" and 20½" SIZE XXXL: 8, 18, 27, 37, 46 and 55 cm / 3⅛", 7", 10⅝", 14½", 18" and 21⅝" ---------------------------------------------------------- BACK PIECE: Worked back and forth on circular needle. Cast on 108-112-118-122 sts on circular needle size 6 mm / US 10 with 1 strand of each yarn (= 2 strands). Work 3 ridges in GARTER ST - see explanation above. Switch to circular needle size 7 mm / US 10.75 and work next row from RS as follows: Work 4 sts in garter st, K 3, P 3, 88-92-98-102 sts in stockinette st, AT THE SAME TIME inc 12 sts by working 2 sts in each of the first 6 sts and 2 sts in each of the last 6 sts in stockinette st (= 12 sts inc), P 3, K 3, 4 sts in garter st = 120-124-130-134 sts in total on needle. Work 1 row as follows from WS: 4 sts in garter st, P 3, K 3, 100-104-110-114 sts in stockinette st, K 3, P 3, 4 sts in garter st. On next row from RS work as follows: Work A.1 (= 22 sts), work 76-80-86-90 sts in stockinette st and work A.2 (= 22 sts). Continue pattern like this, i.e. on every other row the section in stockinette st in the middle gets smaller while A.1 and A.2 get bigger – no of sts does not vary. When A.1 and A.2 have been worked 10-11-11-12 times in total vertically in each side, continue A.1 and A.2 without YOs and cable (work sts over cable in stockinette st). When piece measures 53-56-59-62 cm / 21"-22"-23¼"-24⅜", bind off the middle 16-18-18-20 sts for neck and finish each shoulder separately. Continue to bind off 1 st on the next row towards the neckline = 51-52-55-56 sts remain on each shoulder. Continue until piece measures 55-58-61-64 cm / 21⅝"-22¾"-24"-25¼" and bind off. Repeat on the other shoulder. RIGHT FRONT PIECE: Cast on 59-61-64-66 sts (includes 5 band sts towards mid front) on circular needle size 6 mm / US 10 with 1 strand of each yarn. Work 3 ridges in garter st. Switch to circular needle size 7 mm / US 10.75 and work as follows from RS: 5 band sts in garter st, work 44-46-49-51 sts in stockinette st, AT THE SAME TIME inc 6 sts by working 2 sts in each of the last 6 sts in stockinette st (= 6 sts inc), P 3, K 3, 4 sts in garter st = 65-67-70-72 sts in total on needle. Work 1 row as follows from WS: 4 sts in garter st, P 3, K 3, 50-52-55-57 sts in stockinette st, 5 band sts in garter st. On next row from RS work as follows: 5 band sts in garter st, 38-40-43-45 sts in stockinette st and then pattern according to diagram A.2 (= 22 sts). Continue pattern like this, i.e. section in stockinette st towards mid front gets smaller while A.2 gets bigger (no of sts does not vary). Remember BUTTONHOLES on band - see explanation above. NOTE: When A.2 have been worked 9-10-10-11 times in total vertically, continue A.2 without cable (work sts over cable in stockinette st) until A.2 has been worked for as many row as for back piece with increases, then continue without the increase, just as on back piece. AT THE SAME TIME when piece measures approx. 47-50-52-55 cm / 18½"-19¾"-20½"-21½" (make sure that 1 row has been worked after last buttonhole and plaiting in A.2 has been finished), slip the first 10-11-11-12 sts towards mid front on 1 stitch holder for neck (work sts before slipping them on stitch holder to avoid cutting the yarn in piece). Then bind off at beg of every row from neck: 2 sts 1 time and 1 st 2 times = 51-52-55-56 sts remain on shoulder. Continue until piece measures 55-58-61-64 cm / 21½"-22¾"-24"-25¼" - adjust according to back piece, bind off. LEFT FRONT PIECE: Cast on and work as right but reversed. Work pattern according to diagram A.1 instead of A.2. ASSEMBLY: Sew the shoulder seams. Sew 2 decorative buttons at the bottom of edge in garter st 3 and 9 cm / 1" and 3½" from edge in each side (sew through both layers so that front and back piece is tog at the edge in each side at the bottom of garment). NECK EDGE: Pick up approx. 60 to 70 sts from RS around the neck (includes sts on stitch holders mid front) with 1 strand of each yarn on circular needle size 6 mm / US 10. Work 3 ridges in garter st back and forth. Loosely bind off with K from WS. |
||||||||||||||||
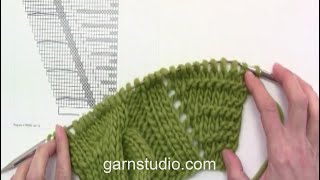
Diagram explanations |
||||||||||||||||
|
||||||||||||||||
 |
||||||||||||||||
 |
||||||||||||||||
 |
||||||||||||||||
Have you finished this pattern?Tag your pictures with #dropspattern #dovecardigan or submit them to the #dropsfan gallery. Do you need help with this pattern?You'll find 21 tutorial videos, a Comments/Questions area and more by visiting the pattern on garnstudio.com. © 1982-2026 DROPS Design A/S. We reserve all rights. This document, including all its sub-sections, has copyrights. Read more about what you can do with our patterns at the bottom of each pattern on our site. |
||||||||||||||||


With over 40 years in knitting and crochet design, DROPS Design offers one of the most extensive collections of free patterns on the internet - translated to 17 languages. As of today we count 324 catalogs and 12290 patterns - 12280 of which are translated into English (US/in).
We work hard to bring you the best knitting and crochet have to offer, inspiration and advice as well as great quality yarns at incredible prices! Would you like to use our patterns for other than personal use? You can read what you are allowed to do in the Copyright text at the bottom of all our patterns. Happy crafting!
Post a comment to pattern DROPS 150-12
We would love to hear what you have to say about this pattern!
If you want to leave a question, please make sure you select the correct category in the form below, to speed up the answering process. Required fields are marked *.