
Popular categories
Looking for a yarn?


Comments / Questions (101)
![]() Donna Hein wrote:
Donna Hein wrote:
What is the purpose of using the nepal yarn with kid silk? Can you just use the nepal?
06.10.2016 - 09:56DROPS Design answered:
Dear Mrs Hein, Kid-Silk will bring some mohair and silk to this project, using only Nepal will affect the tension. Read more about alternatives here. Happy knitting!
06.10.2016 - 10:12
![]() Gill wrote:
Gill wrote:
In the back piece instructions, in relation to the cable part, you state " slip 8 sts on cable needle behind piece (which I understand), k4, then k the 8sts from cable needle twisted tog 2 by 2" and it is this last part that I do not understand. Please will you advise? Thank you.
29.04.2016 - 17:26DROPS Design answered:
Dear Gill, this mean you will dec the sts from cable needle working them tog 2 by 2, ie the 8 sts will be dec to 4 sts (K2 tog a total of 4 times over the 8 sts = 4 sts remain). Happy knitting!
29.04.2016 - 19:12
![]() Marianne Jacobs wrote:
Marianne Jacobs wrote:
Ben een ervaren breister. Volgens het patroon staan zowel de heen-als teruggaande toer op het telpatroon. Zo gedaan had ik na 6 (in plaats van 11) kabels en een hoogte van 23cm het aantal te minderen steken voor de hals over..Heb vervolgens iedere teruggaande naald gebreid zoals de steken zich voordeden (behalve de ribbels aan de zijkant) en dan klopt het wel. Alleen liggen mijn gaatjes en kabels dan verder uit elkaar. Graag informatie hierover.
09.04.2016 - 11:46
![]() Emilia Buesing wrote:
Emilia Buesing wrote:
Hallo, laut Diagramm fängt man mit dem erste Zopf in der dritte Reihe. Nach zwei Umschläge werden vier M abgenommen (pro Zopf). Am Ende bleiben bei dem Rückenteil 116 M statt 120. Ich musste nach dem zehnten Zopf zwei zusätzlichen Umschläge stricken. Soll man mit dem erste Zopf in der fünfte Reihe anfangen? Vielen Dank!!
22.02.2016 - 10:43DROPS Design answered:
Liebe Emilia, ich denke das Diagramm ist richtig: bis zur 3. Reihe haben Sie bereits 2 Umschläge gemacht (in der 1. und in der 3. R), die die 2 zusammengestrickten Maschen ausgleichen.
02.03.2016 - 16:59Nyllie wrote:
If I stop yarn overs after the tenth (10th) cable I will be left with only 112 stitches. In order (when I reach 53 cm) to be able to cast of middle 16 and cast of one toward neckline on each side and have 51 stitches left for each shoulder that's 51+ 51+ 1+1+16= 120 stitches so I must continue yarn overs till I search the next cable and not do that cable.....is this correct?
13.02.2016 - 21:12DROPS Design answered:
Dear Nyllie, you have to get the 120 sts in first size, adjust pattern to get the correct number of sts at 53 cm. Happy knitting!
15.02.2016 - 10:38Sue wrote:
When completing back piece, the pattern states to complete cable (10 times for my size) on each side. The chart only shows 4 cables on each side. My question is when continuing on do you begin at bottom of chart each repeat( after the 32 rows showmen in chart) or continue so side sections get larger still and middle gets smaller?
11.02.2016 - 04:34DROPS Design answered:
Dear Sue, you continue diagrams so that the section in stocking st in the mid (between 2 cables) gets smaller and the sections on the sides becomes larger. Happy knitting!
11.02.2016 - 10:48
![]() E. Müller wrote:
E. Müller wrote:
Hallo , stricke gerade den Poncho in Nepal und Kid-Silk mit Zöpfen.In der Anleitung steht das ich nach A1 u. A2 die Zöpfe 10x drehen muß, beim Diagramm A1 u. A2 wird doch nur 4x gedreht.Wie geht es nun Weiter ? Vielen Dank im Vorraus für ihre Hilfe, MfG E. Müller
12.01.2016 - 20:16DROPS Design answered:
Es soll bedeuten, dass Sie die Diagramme mustergemäß so weiterstricken, bis Sie 10 Verzopfungen gemacht haben. Sie machen die Zunahmen in A.1 und A.2 dabei wie zuvor weiter (und stricken entsprechend weniger M glatt re, sodass die M-Zahl immer gleich bleibt).
09.02.2016 - 18:31
![]() Mougrichette wrote:
Mougrichette wrote:
J ai bien suivi à la lettre la diminution dans les torsades et les jetés tous les deux rangs. D ailleurs j ai toujours le même nombre de maille. Aussi' est ce normal que la partie en jersey soit si petite qu a partir du 42 ème rang les motifs a1 et a2 se touchent ?
25.11.2015 - 11:11
![]() Maria De Fátima Afonso wrote:
Maria De Fátima Afonso wrote:
Boa noite! Adorei! o poncho DROPS 150-12 Gostava de fazer com um fio mais fino, agulhas nº 4,5, para o tamanho xxl quantos pontos necessito por favor? Muito obrigado .....
19.11.2015 - 01:07DROPS Design answered:
Se quer usar um fio mais fino, aconselhamo-la a fazer amostras primeiro. Pode sempre tricotar 1 ou 2 números acima do seu número, mas, o corte e o efeito serão totalmente diferentes e da sua responsabilidade. Bom tricô!
19.11.2015 - 11:23
![]() Joke wrote:
Joke wrote:
N.a.v. Van mijn vraag over de gaatjes het volgende. Het antwoord laat nogal op zich wachten en voordat je het weet is het zomer. Daarom ben ik gewoon doorgegaan met de gaatjes. Daarbij moet het aantal steken gelijk blijven, dus heb ik op een plek in de tricotsteken van de kabel geminderd tot 51 st per schouder (maat s/m) en dat idem aan de voorpanden. Het was even uittellen, maar het ziet er bij mij uit zoals op de foto en alle centimeters kloppen.
16.11.2015 - 21:26DROPS Design answered:
Hoi Joke. Bedankt voor de input. Ik zal het doorgeven en ik hoop dat ik binnenkort een antwoord krijg, helaas duurt het op dit moment langer ivm het voorbereiden van de komende collectie.
17.11.2015 - 13:02
|
||||||||||||||||
Dove#dovecardigan |
||||||||||||||||
 |
 |
|||||||||||||||
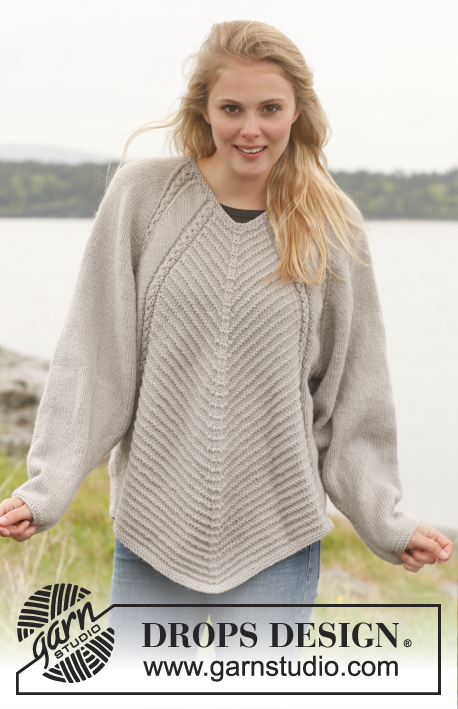
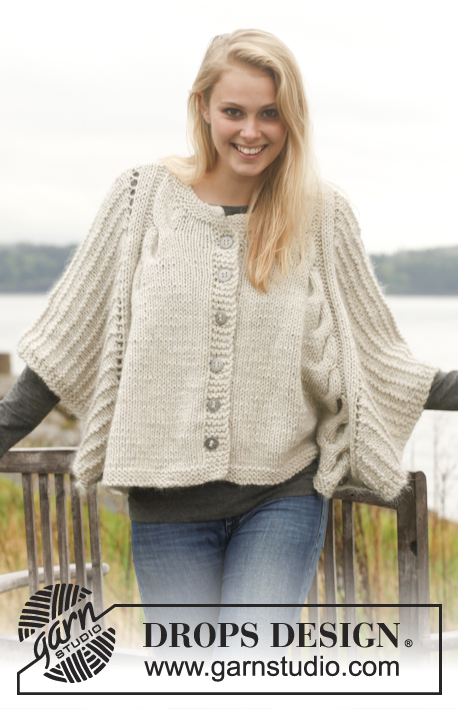
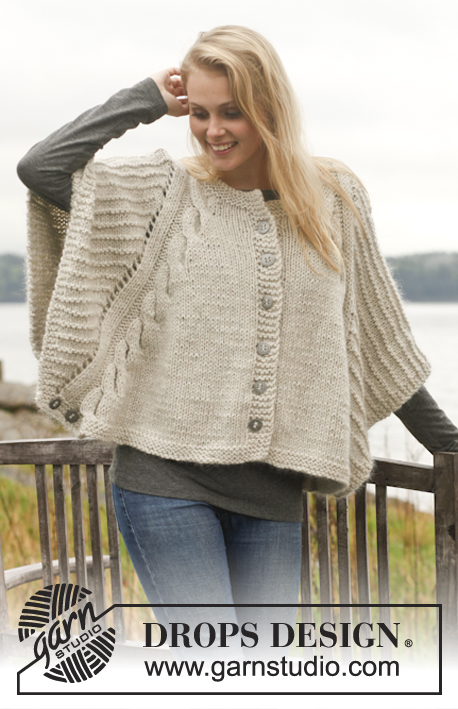
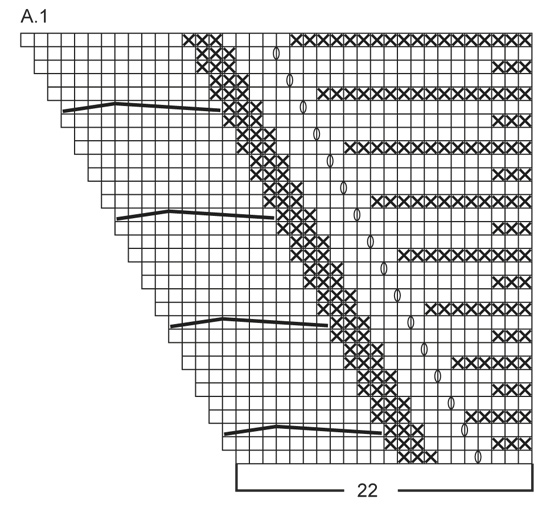
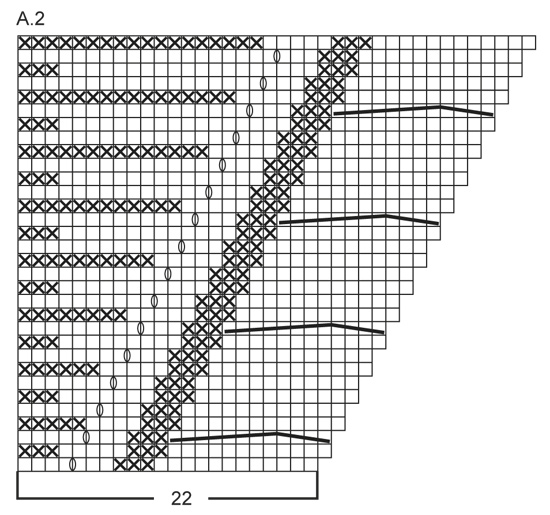
Knitted DROPS poncho with cables and textured pattern in "Nepal" and "Kid-Silk". Size: S - XXXL.
DROPS 150-12 |
||||||||||||||||
|
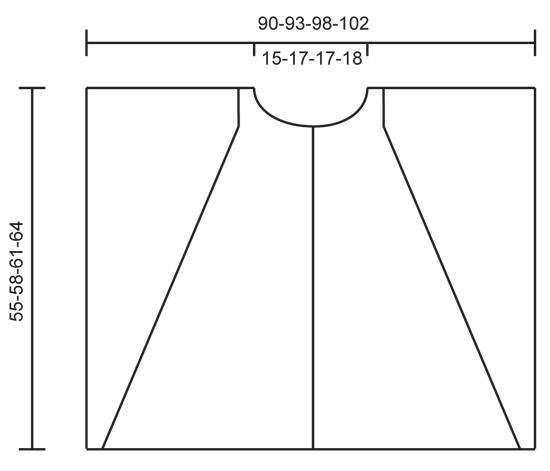
GARTER ST (back and forth on circular needle): K all rows. 1 ridge = K2 rows. PATTERN: See diagrams A.1 and A.2. The diagrams show all rows in pattern seen from RS. BUTTONHOLE: Dec for buttonholes on right band. 1 buttonhole = K tog third and fourth st from mid front and make 1 YO. Dec for buttonholes when piece measures: SIZE S/M: 7, 15, 23, 31, 39 and 47 cm / 2 ¾", 6", 9", 12¼", 15¼" and 18½" SIZE L: 8, 16, 25, 33, 42 and 50 cm / 3⅛", 6¼" 9¾", 13", 16½" and 19¾" SIZE XL/XXL: 7, 16, 25, 34, 43 and 52 cm / 2 ¾", 6¼", 9¾", 13⅜", 17" and 20½" SIZE XXXL: 8, 18, 27, 37, 46 and 55 cm / 3⅛", 7", 10⅝", 14½", 18" and 21⅝" ---------------------------------------------------------- BACK PIECE: Worked back and forth on circular needle. Cast on 108-112-118-122 sts on circular needle size 6 mm / US 10 with 1 strand of each yarn (= 2 strands). Work 3 ridges in GARTER ST - see explanation above. Switch to circular needle size 7 mm / US 10.75 and work next row from RS as follows: Work 4 sts in garter st, K 3, P 3, 88-92-98-102 sts in stockinette st, AT THE SAME TIME inc 12 sts by working 2 sts in each of the first 6 sts and 2 sts in each of the last 6 sts in stockinette st (= 12 sts inc), P 3, K 3, 4 sts in garter st = 120-124-130-134 sts in total on needle. Work 1 row as follows from WS: 4 sts in garter st, P 3, K 3, 100-104-110-114 sts in stockinette st, K 3, P 3, 4 sts in garter st. On next row from RS work as follows: Work A.1 (= 22 sts), work 76-80-86-90 sts in stockinette st and work A.2 (= 22 sts). Continue pattern like this, i.e. on every other row the section in stockinette st in the middle gets smaller while A.1 and A.2 get bigger – no of sts does not vary. When A.1 and A.2 have been worked 10-11-11-12 times in total vertically in each side, continue A.1 and A.2 without YOs and cable (work sts over cable in stockinette st). When piece measures 53-56-59-62 cm / 21"-22"-23¼"-24⅜", bind off the middle 16-18-18-20 sts for neck and finish each shoulder separately. Continue to bind off 1 st on the next row towards the neckline = 51-52-55-56 sts remain on each shoulder. Continue until piece measures 55-58-61-64 cm / 21⅝"-22¾"-24"-25¼" and bind off. Repeat on the other shoulder. RIGHT FRONT PIECE: Cast on 59-61-64-66 sts (includes 5 band sts towards mid front) on circular needle size 6 mm / US 10 with 1 strand of each yarn. Work 3 ridges in garter st. Switch to circular needle size 7 mm / US 10.75 and work as follows from RS: 5 band sts in garter st, work 44-46-49-51 sts in stockinette st, AT THE SAME TIME inc 6 sts by working 2 sts in each of the last 6 sts in stockinette st (= 6 sts inc), P 3, K 3, 4 sts in garter st = 65-67-70-72 sts in total on needle. Work 1 row as follows from WS: 4 sts in garter st, P 3, K 3, 50-52-55-57 sts in stockinette st, 5 band sts in garter st. On next row from RS work as follows: 5 band sts in garter st, 38-40-43-45 sts in stockinette st and then pattern according to diagram A.2 (= 22 sts). Continue pattern like this, i.e. section in stockinette st towards mid front gets smaller while A.2 gets bigger (no of sts does not vary). Remember BUTTONHOLES on band - see explanation above. NOTE: When A.2 have been worked 9-10-10-11 times in total vertically, continue A.2 without cable (work sts over cable in stockinette st) until A.2 has been worked for as many row as for back piece with increases, then continue without the increase, just as on back piece. AT THE SAME TIME when piece measures approx. 47-50-52-55 cm / 18½"-19¾"-20½"-21½" (make sure that 1 row has been worked after last buttonhole and plaiting in A.2 has been finished), slip the first 10-11-11-12 sts towards mid front on 1 stitch holder for neck (work sts before slipping them on stitch holder to avoid cutting the yarn in piece). Then bind off at beg of every row from neck: 2 sts 1 time and 1 st 2 times = 51-52-55-56 sts remain on shoulder. Continue until piece measures 55-58-61-64 cm / 21½"-22¾"-24"-25¼" - adjust according to back piece, bind off. LEFT FRONT PIECE: Cast on and work as right but reversed. Work pattern according to diagram A.1 instead of A.2. ASSEMBLY: Sew the shoulder seams. Sew 2 decorative buttons at the bottom of edge in garter st 3 and 9 cm / 1" and 3½" from edge in each side (sew through both layers so that front and back piece is tog at the edge in each side at the bottom of garment). NECK EDGE: Pick up approx. 60 to 70 sts from RS around the neck (includes sts on stitch holders mid front) with 1 strand of each yarn on circular needle size 6 mm / US 10. Work 3 ridges in garter st back and forth. Loosely bind off with K from WS. |
||||||||||||||||
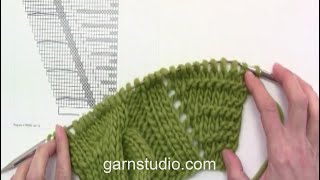
Diagram explanations |
||||||||||||||||
|
||||||||||||||||
 |
||||||||||||||||
 |
||||||||||||||||
 |
||||||||||||||||
Have you finished this pattern?Tag your pictures with #dropspattern #dovecardigan or submit them to the #dropsfan gallery. Do you need help with this pattern?You'll find 21 tutorial videos, a Comments/Questions area and more by visiting the pattern on garnstudio.com. © 1982-2026 DROPS Design A/S. We reserve all rights. This document, including all its sub-sections, has copyrights. Read more about what you can do with our patterns at the bottom of each pattern on our site. |
||||||||||||||||


With over 40 years in knitting and crochet design, DROPS Design offers one of the most extensive collections of free patterns on the internet - translated to 17 languages. As of today we count 324 catalogs and 12290 patterns - 12280 of which are translated into English (US/in).
We work hard to bring you the best knitting and crochet have to offer, inspiration and advice as well as great quality yarns at incredible prices! Would you like to use our patterns for other than personal use? You can read what you are allowed to do in the Copyright text at the bottom of all our patterns. Happy crafting!
Post a comment to pattern DROPS 150-12
We would love to hear what you have to say about this pattern!
If you want to leave a question, please make sure you select the correct category in the form below, to speed up the answering process. Required fields are marked *.