
Popular categories
Looking for a yarn?


Comments / Questions (74)
![]() Elixandra wrote:
Elixandra wrote:
Bonjour, Pour les deux premiers icônes dans la légende des diagrammes, (à savoir "1 m end sur l'end, env sur l'env" et 1 m env sur l'end, end sur l'env"), nous avons besoin de savoir si nous sommes sur un rang endroit ou envers, comment le sait-on en tricotant en rond avec des aiguilles circulaires? Peut-être j'interprète mal la légende? Merci pour votre aide.
27.05.2017 - 16:14DROPS Design answered:
Bonjour Elixandra, le poncho se tricote d'abord en rond, puis en allers et retours pour créer la fente d'encolure. Jusqu'à cette fente, vous tricotez sur l'endroit, quand vous diviserez l'ouvrage pour l'encolure, veillez à ajuster pour que les torsades soient toujours sur l'endroit. Bon tricot!
29.05.2017 - 09:07Nghia wrote:
I struggle to understand the instructions to do the neck vent (to divide the piece) on a circular needle. Perhaps I misunderstand. Please help as I am completely lost.
28.10.2016 - 22:43DROPS Design answered:
Dear Nghia, when you have inc in the mid front, work 4 rows in garter st over the 6 sts on mid front only (work remaining sts as before for these 4 rows) - adjust so that the RS rows will be the ones with the cables. Then divide piece from RS working first the last 3 sts in garter st, then all sts around until the last 3 sts in garter st, turn and work next row from WS. Continue then back and forth on needle in pattern as before. Happy knitting!
31.10.2016 - 09:16Brenda wrote:
I am allergic to wool. Is there any other wool you have there I can substitute? Thanks
09.07.2016 - 20:37DROPS Design answered:
Dear Brenda, please read more here about alternatives and remember your DROPS Store will help you with personnal tips & advices. Happy knitting!
11.07.2016 - 09:14Brenda wrote:
I want to make a few of your patterns but I find it hard to figure how much wool to get. Can you please put it in yards. Or how many balls to buy. I am afraid I can not figure it out. Please and thanks in advance Brenda
09.07.2016 - 20:28DROPS Design answered:
Dear Brenda, you will find total weight of yarn required for each size in our patterns under tab "materials", ie for size S you require 750 g Eskimo for the poncho / 50 g a ball Eskimo (read more here about this yarn) = 15 balls Eskimo are required in size S. Happy knitting!
11.07.2016 - 09:11
![]() Shirley In Canada wrote:
Shirley In Canada wrote:
Can this be made with a slightly smaller yarn and needle? I want to make this for my daughter and her girls as gifts for Christmas.
30.01.2016 - 17:52DROPS Design answered:
Dear Shirley, this pattern is worked with a tension of 10 sts x 18 rows with diagram A.4 = 10 x 10 cm - you will have to adjust & adapt the explanation to your own tension with the help of measurement chart at the end of the page. Or look for a pattern using the tension you have. Happy knitting!
01.02.2016 - 09:30Maria wrote:
Can the poncho be knitted in four parts without the circular needles that is with regular needles.
17.09.2015 - 15:27DROPS Design answered:
Dear Maria, please find here some informations about adapting a pattern for circular needle into straight needles. Remember you can also get tips & advices from your DROPS store. Happy knitting!
17.09.2015 - 18:07
![]() Liesbeth wrote:
Liesbeth wrote:
Er staat bij de uitleg van het telpatroon = recht aan de goede kant, averecht aan de verkeerde kant. En ook omgekeerd. Hoe weet ik nu wanneer ik aan de goede of de verkeerde kant bezig ben als ik rondbrei?
06.08.2015 - 00:11DROPS Design answered:
Hoi Liesbeth. Als je in de rondte breit, dan is elke naald op de goede kant. Dus elke rij is dan de goede kant en je leest van rechts naar links. Kijk ook hier hoe je onze telpatronen moet lezen
06.08.2015 - 11:51
![]() Therese wrote:
Therese wrote:
Samtidig med indtagningerne i midten - skal a7 så stadig strikkes med ( det er den 4. ) ? Hvad for en af opskrifter er den rettede ?
20.07.2015 - 17:20DROPS Design answered:
Hej Therese, Ja du tager ind ved mærketrådene - se på skitsen hvor mærketrådene sidder (ikke midt på hvor A7 strikkes) hele vejen op, først på hver 6.omg og så på hver 4 omg. God fornøjelse!
29.07.2015 - 13:13
![]() Gitte Marcussen wrote:
Gitte Marcussen wrote:
Nej jeg har nu læst opskriften utallige gange og kan ikke finde fejlen! Har sågar været i butikken, hvor garnet er købt uden de kunne finde fejlen.
01.12.2014 - 16:02DROPS Design answered:
Hej Gitte, Ifølge opskriften tager du ind 4 m 12 gange, 4 m 14 gange (ved mærketrådene), 4 m 6 gange (foran og bagpå) og så tages alle 2vr ind til 1 vrang. Har samme antal indtagninger?
02.12.2014 - 15:37
![]() Gitte Marcussen wrote:
Gitte Marcussen wrote:
Jeg kan ikke få maskeantallet til og passe! Kan det passe at, når alle indtagningen er færdige, så er der 47 masker tilbage? Jeg har næsten dobbelt så mange masker på pinden! Har talt og talt og taget ind som der står i opskrift! Er der fejl i opskriften?
30.11.2014 - 20:23DROPS Design answered:
Hej Gitte. Jeg har regnet efter str S og her ender jeg paa 47 m med alle indtagninger/udtagninger. Kan de vaere du har glemt et par indtagninger? D
01.12.2014 - 15:23
|
|||||||||||||||||||||||||||||||
Lulu#luluponcho |
|||||||||||||||||||||||||||||||
|
|
|||||||||||||||||||||||||||||||
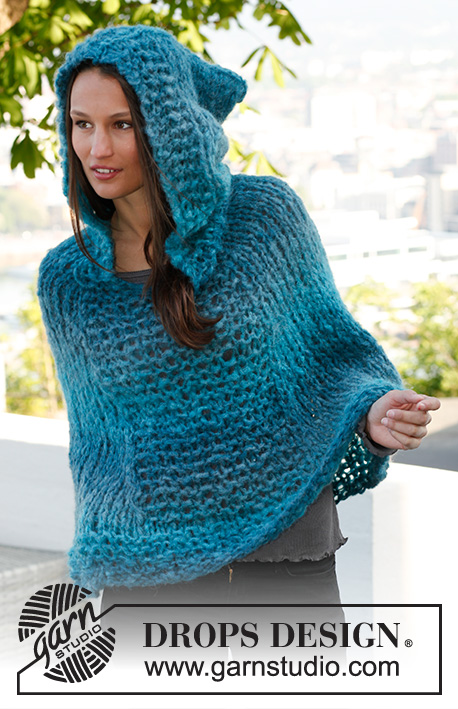
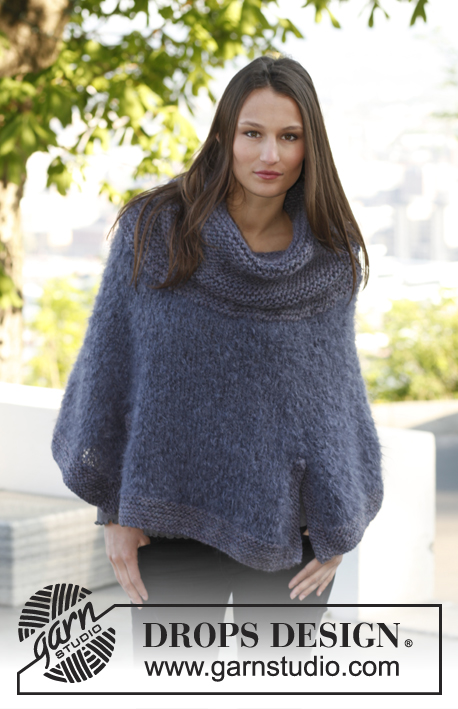
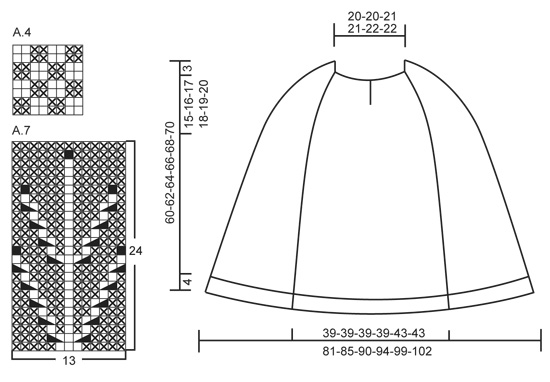
Knitted DROPS poncho with cables and textured pattern in ”Snow”. Size: S - XXXL.
DROPS 143-18 |
|||||||||||||||||||||||||||||||
|
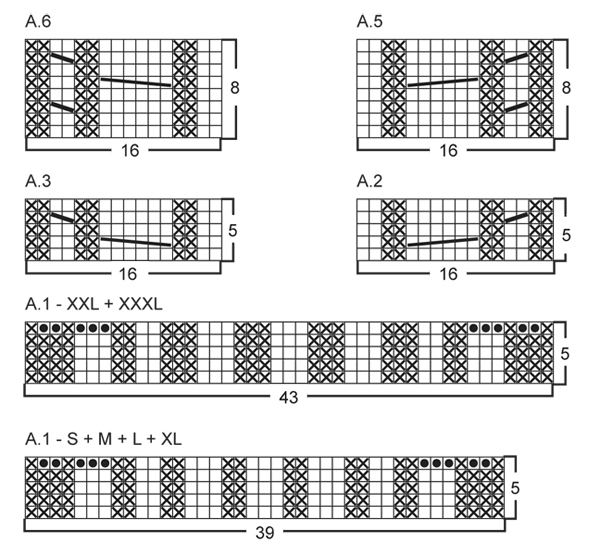
GARTER ST (in the round on circular needle): * K 1 round and P 1 round *, repeat from *-*. GARTER ST (back and forth on needle): K sts on all rows. 1 ridge = 2 K rows. PATTERN: See diagrams A.1 to A.7. Diagrams show all rows seen from RS. MEASURING TIP: All length measurements are made in A.4. DECREASE TIP 1 (applies to dec in diagram A.4): All dec are done from RS! DEC AS FOLLOWS AFTER MARKER: When first st is K: Slip 1 st as if to K, K 1, psso. When first st is P: P 2 twisted tog. DEC AS FOLLOWS BEFORE MARKER: When last st is K: K 2 tog. When last st is P: P 2 tog. DECREASE TIP 2 (applies to dec in P sts): All dec are done from RS. DEC AS FOLLOWS AFTER MARKER: P 2 twisted tog. DEC AS FOLLOWS BEFORE MARKER: P 2 tog. ---------------------------------------------------------- PONCHO: Worked in the round on circular needle from bottom up - READ MEASURING TIP. Cast on 194-202-218-226-234-258 sts on circular needle size 9 mm / US 13 with Snow. K 1 round. Work next round as follows: Work diagram A.1 (choose diagram for your size = 39-39-39-39-43-43 sts), * K 2, P 2 *, repeat from *-* over the next 56-60-68-72-72-84 sts, K 2, diagram A.1 (= 39-39-39-39-43-43 sts), * K 2, P 2 *, repeat from *-* until 2 sts remain and finish with K 2. When A.1 has been worked 1 time vertically there are now 214-222-238-246-254-278 sts on needle and piece measures approx. 4 cm / 1½". Now insert 4 markers in the piece as follows: Insert 1st marker at beg of round, 2nd marker after 49-49-49-49-53-53 sts (i.e. after A.1 on back piece), insert 3rd marker after another 58-62-70-74-74-86 sts (i.e. before A.1 on front piece) and insert 4th marker after another 49-49-49-49-53-53 sts (i.e. after A.1 on front piece) = 58-62-70-74-74-86 sts after last marker. READ ALL OF THE FOLLOWING SECTION BEFORE CONTINUING: Then work as follows: Work diagram A.2 (= 16 sts), P 17-17-17-17-21-21, diagram A.3 (= 16 sts), diagram A.4 over the next 58-62-70-74-74-86 sts, diagram A.2 (= 16 sts), P 17-17-17-17-21-21, diagram A.3 (= 16 sts) and diagram A.4 over the last 58-62-70-74-74-86 sts on round. AT THE SAME TIME on 2nd round with A.2 and A.3, dec 1 st after 2nd and 4th marker and 1 st before 3rd and 1st marker – READ DECREASE TIP 1 (= 4 sts dec). Repeat dec every 6th round, 11-11-10-10-11-9 more times and then every other round a total of 14-16-21-23-22-30 times (i.e. that section with A.4 in each side gets smaller and smaller – NOTE: When dec the pattern will not fit in the sides the entire way but make sure that the pattern fits otherwise. AT THE SAME TIME when A.2 and A.3 have been worked 1 time vertically, work next round as follows: Work diagram A.5 instead of A.2 (= 16 sts), P 2-2-2-2-4-4, A.7 (= 13 sts), P 2-2-2-2-4-4, diagram A.6 instead of A.3 (= 16 sts), diagram A.4 until 3rd marker, diagram A.5 (= 16 sts), P 2-2-2-2-4-4, A.7 (= 13 sts), P 2-2-2-2-4-4, diagram A.6 (= 16 sts) and diagram A.4 over the last sts on round. Continue pattern like this. AT THE SAME TIME when piece measures 43-43-44-45-46-47 cm / 17"-17"-17¼"-17¾"-18"-18½", insert 1 marker on each side of the middle 17-17-17-17-21-21 sts at the front and back, i.e. on each side of section with P sts and bobbles. Now dec 1 st on each side of this section – READ DECREASE TIP 2 (= 4 sts dec). Repeat dec every 4th round 5-5-5-5-7-7 more times (i.e. that middle section with P sts and bobbles mid front and mid back gets smaller and smaller). AT THE SAME TIME when piece measures 48-49-50-51-52-53 cm / 19"-19¼"-19¾"-20"-20½"-21", dec all 2 P sts in diagram A.5 and A.6 to 1 P st (P sts tog). AT THE SAME TIME when piece measures approx. 50-52-54-56-58-60 cm / 19¾"-20½"-21¼"-22"-22¾"-23⅝" - make sure that next round is 1st-3rd-5th or 7th round in A.5/A.6 (last bobble in diagram A.7 should now be done, i.e. that when diagram A.7 has been worked 3 times vertically, continue in reverse stockinette st (seen from RS) over the middle sts in "berry pattern") - inc 1 st in the middle P st at mid front on poncho by P 2 sts in front and back loop of 1 st. Then work 2 ridges in GARTER ST – see explanation above, over the middle 6 sts mid front (work the other sts as before). On next round after the 2 ridges, divide the piece mid front for neck vent and work back and forth on needle until finished measurements. NOTE: Work 1st row from RS and continue pattern as before but work the outermost 3 sts in each side in garter st. Continue to work until piece measures approx. 59-61-63-65-67-69 cm / 23¼"-24"-24¾"-25½"-26⅜"-27⅛". On next row from RS, K sts in the 2 cables in A.5 twisted tog 2 by 2 (= 4 sts dec) and K sts in the 2 cables in A.6 tog 2 by 2 (= 4 sts dec), in addition dec 12-12-10-10-8-8 sts evenly over the other sts (do not dec over the 3 sts in garter st in each side). After all dec are done, 47-47-49-49-51-51 sts remain on needle. K 1 row from WS. HOOD: Worked back and forth on circular needle from vent mid front. K 1 row from RS while AT THE SAME TIME inc 5-5-3-7-5-9 sts evenly (do not inc over the 3 sts in garter st in each side) = 52-52-52-56-56-60 sts. Then work pattern according to diagram A.4 with 3 sts in garter st in each side towards mid front until hood measures approx. 34-34-36-36-38-38 cm / 13½"-13½"-14¼"-14¼"-15"-15". Loosely bind off. ASSEMBLY: Sew hood tog at the top. |
|||||||||||||||||||||||||||||||
Diagram explanations |
|||||||||||||||||||||||||||||||
|
|||||||||||||||||||||||||||||||
 |
|||||||||||||||||||||||||||||||
 |
|||||||||||||||||||||||||||||||
Have you finished this pattern?Tag your pictures with #dropspattern #luluponcho or submit them to the #dropsfan gallery. Do you need help with this pattern?You'll find 10 tutorial videos, a Comments/Questions area and more by visiting the pattern on garnstudio.com. © 1982-2026 DROPS Design A/S. We reserve all rights. This document, including all its sub-sections, has copyrights. Read more about what you can do with our patterns at the bottom of each pattern on our site. |
|||||||||||||||||||||||||||||||


With over 40 years in knitting and crochet design, DROPS Design offers one of the most extensive collections of free patterns on the internet - translated to 17 languages. As of today we count 324 catalogs and 12290 patterns - 12280 of which are translated into English (US/in).
We work hard to bring you the best knitting and crochet have to offer, inspiration and advice as well as great quality yarns at incredible prices! Would you like to use our patterns for other than personal use? You can read what you are allowed to do in the Copyright text at the bottom of all our patterns. Happy crafting!
Post a comment to pattern DROPS 143-18
We would love to hear what you have to say about this pattern!
If you want to leave a question, please make sure you select the correct category in the form below, to speed up the answering process. Required fields are marked *.