
Popular categories
Looking for a yarn?


Comments / Questions (5)
![]() Marie-Thérèse Dulio wrote:
Marie-Thérèse Dulio wrote:
Et coucou, Je tricotte le modèle 76-29 Frosty Mist. Dos et devant impeccable ! Mais les manches posent un gros problème pour mon cerveau. Je monte les 55 m puis 6 fois M1=102 m, et est-ce que les m lis. Soient incorporées dans M1 ou à part ? Je ne comprends pas comment placer mes augmentations au fur et à mesure de manière à ce ques points soient bien en correspondance. Merci d\'avance et passez une très bonne journée !
17.11.2018 - 15:07DROPS Design answered:
Bonjour Mme Dulio, vous tricotez M.1 ainsi: 2 m lisière, 3 x M.1 en largeur, 2 m lisière = 55 m. Quand M.1 a été tricoté 6 fois en hauteur, répétez M.2. Les augmentations se tricotent en jersey, mais pour la continuité, vous pouvez les tricoter à l'endroit sur l'envers dans M.1 (= comme les mailles de M1). Bon tricot!
19.11.2018 - 09:40
![]() DULIO wrote:
DULIO wrote:
Bonjour, je vous remercie infiniment de vos explications, je vais essayer de suivre votre réponse et je froise les doigt ! 😄🙅 très bonne journée
19.09.2018 - 10:45
![]() Marie-Thérèse Dulio wrote:
Marie-Thérèse Dulio wrote:
Bonjour, pour ce modèle je tricotte la manche en rond et je n'est pas de mailles lisière. J'en suis à la 1ère aug. Et je dois les faire côte à côte pour ne pas décaler le point fantaisie. Est-ce la bonne façon ? Et avec ces aug. je n'aurais donc pas de points fantaisie à leur emplacement ? J'avoue que je suis un peu perdue. Merci de m'éclairer un peu sur cette situation. Cordialement, Mme Dulio
18.09.2018 - 21:10DROPS Design answered:
Bonjour Mme Dulio, pour augmenter en rond, vous pouvez augmenter 1 m avant la fin du tour, tricotez 2 m (votre marqueur de début de tour est entre ces 2 m), et augmenter 1 m après ces 2 m. Pensez juste à bien ajuster le point fantaisie pour bien conserver le bon nombre de mailles (augmentez par ex sur un rang en mailles endroit ou en mailles envers = pas un rang avec les jetés et les diminutions). Tricotez les augmentations en jersey (endroit ou envers en fonction des diagrammes). Bon tricot!
19.09.2018 - 09:52
![]() Simone R. wrote:
Simone R. wrote:
Oooohhh! Vielen, vielen Dank! In den Heften habe ich nicht gesucht. Ich freue mich sehr. Sofort ausgedruckt, damit ich sie nicht mehr verliere ;) Ich werde heute noch damit beginnen! Herzlichen Dank. LG, Simone R.
09.01.2014 - 22:31
![]() Simone R. wrote:
Simone R. wrote:
Liebes DROPS-Team, zuerst ein großes Dankeschön für die vielen, vielen schönen Modelle. Pulli und Schal- ein *Sommertraum* gefallen mir ausserordentlich gut. Leider finde ich die Anleitung für den Schal nicht unter der empfohlenen Modell-Nr. Es wäre nett, wenn Sie mir weiterhelfen würden. LG, Simone R.
07.01.2014 - 21:59DROPS Design answered:
Liebe Simone, Sie finden den Schal unter 76-13.
07.01.2014 - 22:47
|
|||||||||||||
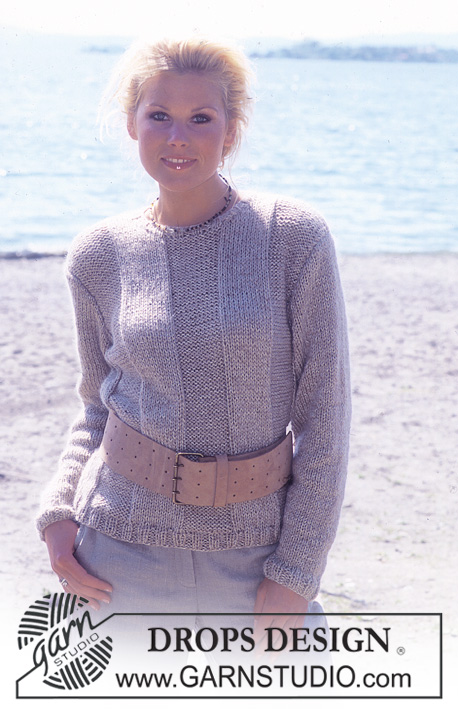
Frosty Mist |
|||||||||||||
|
|
|||||||||||||
DROPS Pullover and Scarf in Vivaldi
DROPS 76-29 |
|||||||||||||
|
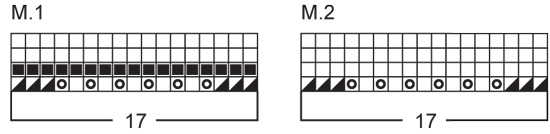
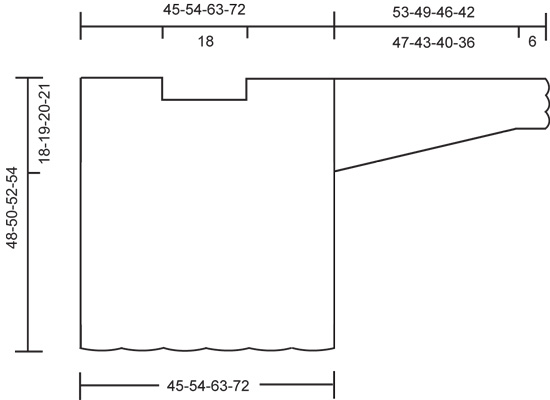
Gauge: 19 sts x 26 rows = 10 x 10 cm in pattern. 18 sts x 36 rows = 10 x 10 cm in garter st. Pattern: See charts. The pattern is seen from the right side. Front: Loosely cast on 89-106-123-140 sts with 2 strands Vivaldi. Take away one strand and knit Pattern 1 (row 1 = right side), but keep 2 edge sts at each side not in the pattern. Repeat Pattern 1 a total of 6 times, then repeat Pattern 2 to finished measurements. When the piece measures 30-31-32-33 cm bind off 1 edge st at each side for armhole = 87-104-121-138 sts. Continue with pattern as established, keeping 1 edge st at each side not in the pattern. When the piece measures 40-42-44-46 cm bind off the center 33-32-33-32 sts for the neck = 27-36-44-53 sts remain on each shoulder. Keep the st at neck edge in garter st. Note: In size XS + L/XL work in stocking sts the outhermost 8 sts inside the neck edge st; as follows: Size XS: Knit the shoulder sts as follows from side edge: K 1 (edge st), Pattern 2 for 17 sts, stockinette st for 8 sts, K 1 (neck edge st). Size L/XL: Knit the shoulder sts as follows from side edge: K 1 (edge st), Pattern 2 for 34 sts, stockinette st for 8 sts, K 1 (neck edge st). Bind off when the piece measures 48-50-52-54 cm. Back: Cast on and knit the same as the front. Bind off for armhole as on front. When the piece measures 46-48-50-52 cm bind off the center 33-32-33-32 sts for the neck = 27-36-44-53 sts remain on each shoulder. Continue as on front and bind off when the piece measures 48-50-52-54 cm. Sleeve: Loosely cast on 55-55-55-55 sts with 2 strands Vivaldi. Take away one strand and knit Pattern 1 (row 1 = right side), but keep 2 edge sts at each side not in the pattern. Repeat Pattern 1 a total of 6 times, then repeat Pattern 2 to finished measurements. At the same time when the piece measures 6-6-7-7 cm inc 1 st at each side a total of 9-11-13-14 times every 5.5-4-3-2.5 cm = 73-77-81-83 sts – knit the increased sts in stockinette st. When the piece measures 53-49-46-42 cm bind off all sts with double strands of yarn. Assembly: Sew shoulder seams. Collar: Pick up approx. 90 to 100 sts around the neck (start and end at center back) on short circular needles with 1 strand Vivaldi. Knit garter st back and forth on needles, increasing evenly distributed to 106 sts on the first row. When the collar measures 2 and 4 cm inc 10 sts evenly distributed = 126 sts. Then continue in garter st until the collar measures approx. 30 cm. Bind off with 3 strands Vivaldi. Sew neckband together at center back. Sew in sleeves using 1 edge st as seam allowance. Sew sleeve and side seams in one using 2 edge sts as seam allowance. Scarf - see pattern under model 13 |
|||||||||||||
Diagram explanations |
|||||||||||||
|
|||||||||||||
 |
|||||||||||||
 |
|||||||||||||
Have you finished this pattern?Tag your pictures with #dropspattern or submit them to the #dropsfan gallery. Do you need help with this pattern?You'll find 16 tutorial videos, a Comments/Questions area and more by visiting the pattern on garnstudio.com. © 1982-2026 DROPS Design A/S. We reserve all rights. This document, including all its sub-sections, has copyrights. Read more about what you can do with our patterns at the bottom of each pattern on our site. |
|||||||||||||


With over 40 years in knitting and crochet design, DROPS Design offers one of the most extensive collections of free patterns on the internet - translated to 17 languages. As of today we count 324 catalogs and 12290 patterns - 12280 of which are translated into English (US/in).
We work hard to bring you the best knitting and crochet have to offer, inspiration and advice as well as great quality yarns at incredible prices! Would you like to use our patterns for other than personal use? You can read what you are allowed to do in the Copyright text at the bottom of all our patterns. Happy crafting!
Post a comment to pattern DROPS 76-29
We would love to hear what you have to say about this pattern!
If you want to leave a question, please make sure you select the correct category in the form below, to speed up the answering process. Required fields are marked *.