
Popular categories
Looking for a yarn?


Comments / Questions (109)
![]() Zeline wrote:
Zeline wrote:
Ca y est j'ai compris !!! En regardant la photo plus précisement sur un modèle fait par qqn j'ai compris ! Dsl
27.04.2021 - 19:36
![]() Zeline wrote:
Zeline wrote:
Bonjour Je ne débute pas en tricot mais pourtant je n'arrive pas à comprendre les explications. Notamment par rapport aux bretelles ... a quel moment sont elles tricotées ? D'après un commentaire précédent les 100 mailles de départ correspondent à l'encolure et on tricote ensuite en top down; donc on part vers le bas .. Donc quand tricote-t-on les bretelles qui elles partent vers le haut depuis l'encolure. Merci
27.04.2021 - 17:14DROPS Design answered:
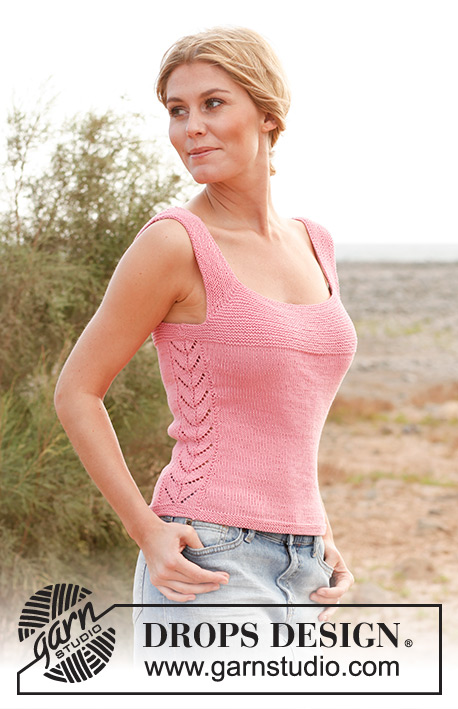
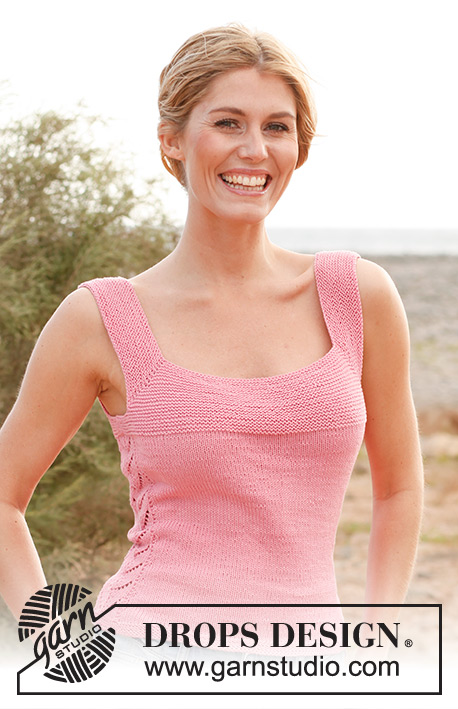
Bonjour Zeline, vous tricotez effectivement de haut en bas, à partir de la ligne d'encolure, d'une épaule à l'autre, et vous augmentez de chaque côté des 2 marqueurs pour créer 2 angles - on en voit un sur la 1ère photo, comme une légère ligne de raglan (ou bien la ligne diagonale noire dans le schéma). Les bretelles sont ainsi formées par les 26 mailles du début et de la fin du rang (+ les augmentations avant le 1er marqueur + après le 2ème marqueur) pour la hauteur et les 6-7 cm avant de rabattre ces mailles, ce sont ces 6-7 cm qui vont arriver au niveau de l'épaule et seront cousus à la bretelle du dos (cf schéma). Bon tricot!
28.04.2021 - 07:41
![]() Anita wrote:
Anita wrote:
Found the answer.... Sorry xD
24.04.2021 - 11:07
![]() Anita wrote:
Anita wrote:
Hello. I could use a little help with the diagram. If I knit where it says to knit, how could it be stockinette ?
24.04.2021 - 10:00DROPS Design answered:
Dear Anita, the diagram always show every row as you would see them from the right side. Thus the symbol showing the knit stitch should be knitted from the right side and purled from the wrong side, the symbol showing the purl stitchs should be purled from teh right side and knitted from the wrong side. Happy Knitting!
24.04.2021 - 11:03
![]() Evangelia wrote:
Evangelia wrote:
Hello! After knitting the two parts separately and putting them on the circular needle what is the first step before starting the M1? Are the stitch markers useful after finishing with the two parts or do they go along with the pattern? Ευχαριστώ!
03.04.2021 - 07:51DROPS Design answered:
Dear Evangelia, after putting the stitches together, put a marker in each side between the fron and back pieces. Then knit diagram M.1 over 16 sts in each side (i.e. 8 sts from back piece and 8 sts from front piece = mid under sleeve). All the other stitches are knitted (stockinett stitch). Hally Knitting!
04.04.2021 - 12:04
![]() Maruska wrote:
Maruska wrote:
Je možné urobiť tento model aj vo veľkosti XS? Ako mam postupovať?
27.12.2020 - 10:21DROPS Design answered:
Dear Maruska, unfortunately we are not able to adjust our patterns to any individual requests. Should you need any individual assistance, please contact the store where you bought the yarn, even per mail or telephone. Happy knitting!
05.01.2021 - 15:55
![]() Jk wrote:
Jk wrote:
This pattern seems erroneous. The increase/cast on/off instructions in "FRONT PIECE" doesn't seem to be working the top from top down. Neither does it mention any instructions for shoulder straps.
23.10.2020 - 15:56DROPS Design answered:
Dear JK, pattern is working (just remember to check your tension), you are working top down, and cast on the sts from a shoulder to the other shoulder (towards neck edge) and will increase first for shoulders/straps then cast off the first stitches on each side for straps, and then continue with body. Happy knitting!
23.10.2020 - 16:00
![]() Ewa wrote:
Ewa wrote:
Hej! Stickar denna för 3e gången å denna blir utan hålmönster! Så, var gör jag då minskningarna i sidorna bäst?! Har ju inget hålmönster att utgå ifrån? /Ewa
13.07.2020 - 12:22DROPS Design answered:
Hei Ewa. Om du har markert sidemasken i hver side kan du felle f.eks slik: Fell slik når det gjenstår 3 m før sidemerket: 2 rett sammen. Strikk 1 rett (masken med merke). Fell slik etter masken med merke: Ta 1 maske løs av pinnen som om den skulle strikkes rett, 1 rett, løft den løse m over. God Fornøyelse!
13.07.2020 - 14:54
![]() Corinne EUSTACHE wrote:
Corinne EUSTACHE wrote:
Bonjour, je suis bloquée au niveau du point fantaisie...une fois finie, est ce que le point fantaisie se trouve sur le coté gauche ainsi que sur le coté droit du top? ou bien juste d'un seul coté? Comment commencer ce point fantaisie une fois les mailles des deux aiguilles réunies? je me retrouve avec un dessin qui ne penche pas dans le bon sens et je ne comprends pas mon erreur...Merci de votre aide
22.05.2020 - 14:49DROPS Design answered:
Bonjour Mme Eustache, on doit tricoter le point ajouré M.1 de chaque côté, sur les 16 mailles sous chacune des manches/emmanchures, commencez le tour avant ces 16 mailles centrales (8 mailles du dos/devant ou 8 m du devant/dos) et tricotez le 1er M.1, tricotez jusqu'à ce qu'il reste 8 m avant le dos/devant et tricotez M.1 sur les 16 m suivantes et terminez le tour. Bon tricot!
22.05.2020 - 16:03
![]() Anna wrote:
Anna wrote:
Volevo sapere se c'è un video che fa vedere passo passo come fare, non sono molto esperta ma mi piacerebbe imparare a lavorare questo progetto, grazie
11.01.2020 - 19:54DROPS Design answered:
Buonasera Anna, per questo modello non è presente un tutorial generale, ma se scorre la pagina verso il basso può trovare i video delle tecniche utilizzate nel modello. Buon lavoro!
11.01.2020 - 22:11
|
||||||||||||||||
Simply Summer#simplysummertop |
||||||||||||||||
 |
 |
|||||||||||||||
Knitted DROPS top in garter st and with lace pattern, worked top down in ”Safran”. Size: S - XXXL
DROPS 137-2 |
||||||||||||||||
|
GARTER ST (back and forth on needle): K all rows. 1 ridge = K 2 rows. GARTER ST (in the round on circular needle): * K 1 round and P 1 round *, repeat from *-*. PATTERN: See diagram M.1 – the diagram shows 1 repetition of the pattern. DECREASE TIP (applies to side dec): Dec as follows when 2 sts remain BEFORE diagram M.1: K 2 tog. Dec as follows AFTER diagram M.1: Slip 1 st as if to K, K 1, psso. INCREASE TIP (applies to side inc): Work until 1 st in stockinette st remains before diagram M.1, make 1 YO, 1 st in stockinette st, work diagram M.1 and 1 st in stockinette st, make 1 YO. On next round K YOs twisted (i.e. work in back loop of st instead of front) to avoid holes. -------------------------------------------------------- TOP: Worked top down. Front and back piece are worked separately, then put tog and worked in the round. FRONT PIECE: Worked back and forth on circular needle. Cast on 100-100-108-108-115-121 sts on circular needle size 3 mm / US 2or3 with Safran. Switch to circular needle size 2.5 mm / US 1or2. Insert a marker in the 27th-27th-30th-30th-32nd-35th st in from each side (= 46-46-48-48-51-51 sts between sts with markers). K 1 row from WS. Continue with K on all rows (= garter st). AT THE SAME TIME on next row, inc 1 st on each side of the 2 sts with markers – inc by making 1 YO, on next row K YOs twisted (i.e. work in back loop of st instead of front) to avoid holes. Repeat inc every other row a total of 14-17-17-19-19-22 times = 156-168-176-184-191-209 sts. K 1 row from WS after last inc. REMEMBER THE GAUGE! Now piece measures approx. 6-7-7-8-8-9 cm / 2⅜"-2¾"-2¾"-3⅛"-3⅛"-3½". Work next row as follows (from RS): Loosely bind off the first 40-43-46-48-50-56 sts (= strap), K the next 76-82-84-88-91-97 sts (the first of these sts is already on right needle), and loosely bind off the last 40-43-46-48-50-56 sts (= strap), cut the yarn. Work next row from WS as follows: Cast on 7-9-13-16-20-24 new sts at beg of row, work the 76-82-84-88-91-97 sts from needle and cast on 7-9-13-16-20-24 new sts at the end of row = 90-100-110-120-131-145 sts. Work in garter st back and forth for 3-3-3-4-4-4 cm / 1⅛"-1⅛"-1⅛"-1½"-1½"-1½" – AT THE SAME TIME after 2-2-2-3-3-3 cm / ¾"-¾"-¾"-1⅛"-1⅛"-1⅛", dec 1 st in each side by K tog the 2 second outermost sts from RS = 88-98-108-118-129-143 sts. Put piece aside. BACK PIECE: Cast on and work as front piece. BODY: Slip front and back piece on to same circular needle size 3 mm / US 2or3 = 176-196-216-236-258-286 sts. NOW MEASURE PIECE FROM HERE! Then work diagram M.1 over 16 sts in each side (i.e. 8 sts from back piece and 8 sts from front piece = mid under sleeve). Work the other sts in stockinette st. AT THE SAME TIME when piece measures 2 cm / ¾", dec 1 st on each side of diagram M.1 in each side - SEE DECREASE TIP! Repeat dec every 2½ cm / ⅞" a total of 6-6-6-6-5-5 times = 152-172-192-212-238-266 sts. When piece measures 18 cm / 7", inc 1 st on each side of diagram M.1 - SEE INCREASE TIP! Repeat inc every 2 cm / ¾" a total of 6 times = 176-196-216-236-262-290 sts. When piece measures approx. 30-31-32-32-33-33 cm / 11¾"-12¼"-12½"-12½"-13"-13" (50-52-54-56-58-60 cm / 19¾"-20½"-21¼"-22"-22¾"-23⅝" in total) - stop after 1 full repetition of diagram M.1, switch to circular needle size 2.5 mm / US 1or2. Work in GARTER ST in the round over all sts for 2 cm / ¾" - see explanation above! Then loosely bind off with K – use circular needle size 3 mm / US 2or3 when casting/binding off (it is very important that the bind off edge is not too tight). The top measures approx. 52-54-56-58-60-62 cm / 20½"-21¼"-22"-22¾"-23⅝"-24⅜" vertically. ASSEMBLY: Sew shoulder seams and side seams edge to edge in front loop of outermost st to avoid chunky and visible seams. |
||||||||||||||||
Diagram explanations |
||||||||||||||||
|
||||||||||||||||
 |
||||||||||||||||
 |
||||||||||||||||
Have you finished this pattern?Tag your pictures with #dropspattern #simplysummertop or submit them to the #dropsfan gallery. Do you need help with this pattern?You'll find 7 tutorial videos, a Comments/Questions area and more by visiting the pattern on garnstudio.com. © 1982-2026 DROPS Design A/S. We reserve all rights. This document, including all its sub-sections, has copyrights. Read more about what you can do with our patterns at the bottom of each pattern on our site. |
||||||||||||||||


With over 40 years in knitting and crochet design, DROPS Design offers one of the most extensive collections of free patterns on the internet - translated to 17 languages. As of today we count 324 catalogs and 12290 patterns - 12280 of which are translated into English (US/in).
We work hard to bring you the best knitting and crochet have to offer, inspiration and advice as well as great quality yarns at incredible prices! Would you like to use our patterns for other than personal use? You can read what you are allowed to do in the Copyright text at the bottom of all our patterns. Happy crafting!
Post a comment to pattern DROPS 137-2
We would love to hear what you have to say about this pattern!
If you want to leave a question, please make sure you select the correct category in the form below, to speed up the answering process. Required fields are marked *.