
Popular categories
Looking for a yarn?


Comments / Questions (642)
![]() Patricia Goessaert wrote:
Patricia Goessaert wrote:
Ik heb het patroon opgeslagen ,maar je kan het niet openen ?spytig
23.11.2019 - 15:13
![]() Megumi wrote:
Megumi wrote:
Jeg er igang med at strikke kraven til højreforstyk. Der skal strikkes sådan: 1m ret, slå om, 1m ret, slå om, 4m ret, mønster.... Forstår jeg det rigtigt?
30.08.2019 - 00:29DROPS Design answered:
Hej Megumi, ja det stemmer - god fornøjelse! :)
06.09.2019 - 10:24
![]() MJ Van Zutphen wrote:
MJ Van Zutphen wrote:
Geachte Dames, Ik heb deze vest gebreid nu mijn vraag hoe moet ik dit opspannen zodat de vele kabels goed komen en niet zo in elkaar trekken? Met vriendelijke groet M.J. van Zutphen
20.08.2019 - 11:25
![]() Elisabeth wrote:
Elisabeth wrote:
J'ai tricoté ce modèle et il est magnifique j'adore le porter en hiver
20.08.2019 - 09:48
![]() Jennifer Jamison wrote:
Jennifer Jamison wrote:
I am working the XL size back and have reached the decrease/increase section. My piece is already 20.5". Will I be doing increase/decrease and the arm holes at the same time? Ty!
06.08.2019 - 02:20DROPS Design answered:
Dear Mrs Jamison, when piece measures 4¾" you start decreasing in the sides, then when it measures 15 3/4'' you start increasing, you should have now 132 sts on needle. When piece measures 22 ¾'' you bind off for armholes as explained. Happy knitting!
07.08.2019 - 11:45
![]() Guylaine wrote:
Guylaine wrote:
Bonjours que veux dire endroit sur envers et envers sur l'endroit.si on es a l'envers de notre tricot,ou une maille envers sur l'endroit
13.06.2019 - 02:45DROPS Design answered:
Bonjour Guylaine, sur l'endroit, vous tricoterez les cases vides à l'endroit (= jersey endroit) et les ronds noirs à l'envers (jersey envers) - sur l'envers, vous tricoterez les cases vides à l'envers et les ronds noirs à l'endroit. Bon tricot!
13.06.2019 - 09:12
![]() Falou wrote:
Falou wrote:
Bonjour Merci pour votre réponse rapide Cordialement
06.05.2019 - 10:31
![]() Falou wrote:
Falou wrote:
Bonjour je voudrais savoir pour les devants, la maille lisière, avant les 5 mailles de bordure, doit se tricoter avec 1 ou de fils ? Merci
04.05.2019 - 21:01DROPS Design answered:
Bonjour Falou, on n'a qu'une seule maille lisière pour chacun des devants: on a 5 m de bordure devant d'un côté (= 5 m point mousse) et 1 m lisière de l'autre côté (= 1 m au point mousse), les 5 mailles de bordure devant se tricotent avec 2 fils mais la maille lisière de l'autre côté se tricote avec 1 seul fil tout du long Bon tricot!
06.05.2019 - 09:48
![]() Gesina Veerling wrote:
Gesina Veerling wrote:
M,n vest is af bedankt voor het patroon
08.04.2019 - 17:34
![]() Danielle Souchet wrote:
Danielle Souchet wrote:
Bonjour je voudrais savoir combien utiliser de pelote de laine pour la taille M et L D'avance merci
02.04.2019 - 10:47DROPS Design answered:
Bonjour Mme Souchet, vous trouverez la quantité nécessaire pour chaque taille dans l'en-tête, soit 800 g en M et 900 g en L DROPS Karisma /50 g la pelote = 16 pelotes en M et 18 pelotes en L. Bon tricot!
02.04.2019 - 10:55
|
||||||||||||||||||||||
Bluebird#bluebirdcardigan |
||||||||||||||||||||||
 |
 |
|||||||||||||||||||||
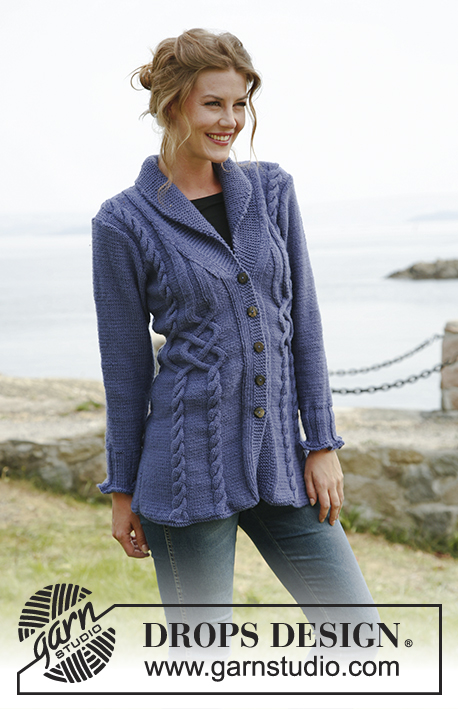
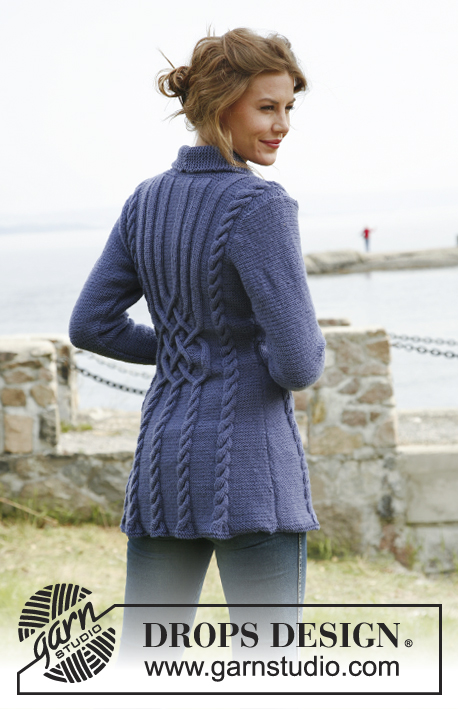
Knitted DROPS jacket with cables in ”Karisma”. Size: S to XXXL.
DROPS 134-1 |
||||||||||||||||||||||
|
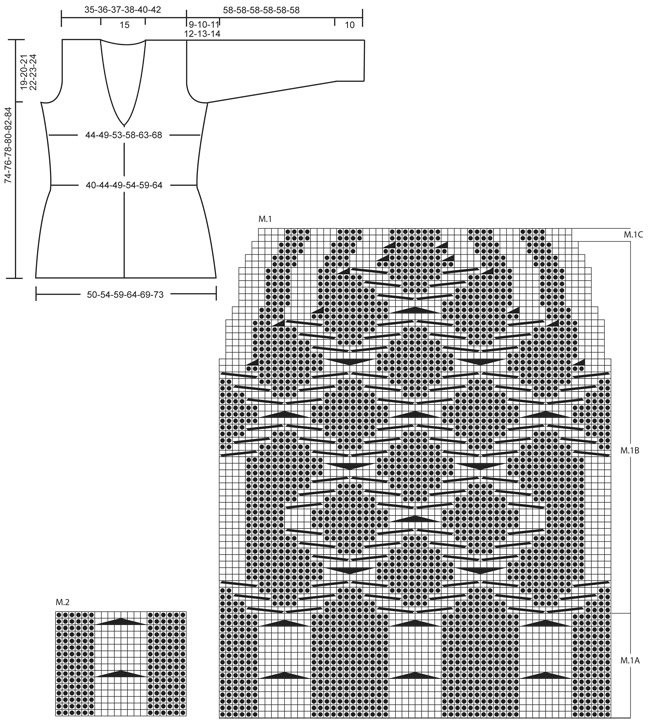
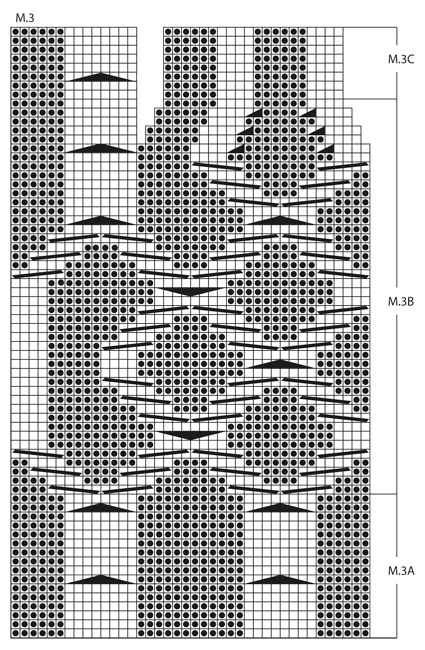
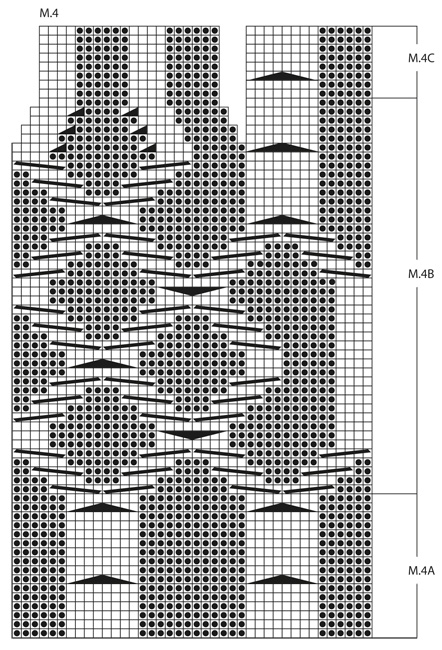
PATTERN: See diagram M.1 to M.4 – diagrams show all rows in pattern seen from RS (1st row = RS). GARTER ST (back and forth on needle): K all rows. KNITTING TIP (applies to band): Work the 5 band sts in garter st with double yarn the entire piece, i.e. have a little ball on the side that is only used on band. When inc for collar, work the inc sts with double yarn. This is done to make the band and the collar nice and firm. BUTTON HOLES: Bind off for button holes on right front band from RS. 1 BUTTON HOLE = bind off 3rd and 4th band st from mid front, on next row cast on 2 new sts over these sts. Bind off for button holes when piece measures: SIZE S: 18, 25, 32, 39 and 46 cm / 7",9¾",12½",15¼" and 18" SIZE M: 19, 26, 33, 40 and 47 cm / 7½",10¼",13",15¾" and 18½" SIZE L: 20, 27, 34, 41 and 48 cm / 8",10⅝",13⅜",16⅛" and 19" SIZE XL: 21, 28, 35, 42 and 49 cm / 8¼",11",13¾",16½" and 19¼" SIZE XXL: 22, 29, 36, 43 and 50 cm / 8¾",11⅜",14¼",17" and 19¾" SIZE XXXL: 23, 30, 37, 44 and 51 cm / 9",11¾",14½",17¼" and 20" INCREASE TIP (applies to collar): Inc inside outermost band st by making 1 YO, on next row K YO twisted (i.e. work in back loop of st instead of front) to avoid holes. DECREASE TIP (applies to neck): Dec from RS inside the sts inc for collar + the 5 band sts + the first 3 sts in stockinette st. Dec as follows AFTER these sts: Slip 1 st as if to K, K 1, psso. Dec as follows BEFORE these sts: K 2 tog. -------------------------------------------------------- -------------------------------------------------------- BACK PIECE: Worked back and forth on needle. Cast on 126-136-146-156-174-184 sts on straight needles size 3.5 mm / US 4 with Karisma. K 2 rows (1st row = RS), switch to needle size 4 mm / US 6. READ ALL OF THE FOLLOWING SECTION BEFORE CONTINUING: PATTERN: Continue as follows (from RS): 1 edge st in GARTER ST – see explanation above, 12-17-22-27-16-21 sts in reverse stockinette st, diagram M.2 (= 20 sts) 1-1-1-1-2-2 times, diagram M.1A (= 60 sts), diagram M.2 (= 20 sts) 1-1-1-1-2-2 times, 12-17-22-27-16-21 sts in reverse stockinette st and 1 edge st in garter st. When piece measures 29-30-31-32-33-34 cm / 11⅜"-11¾"-12¼"-12½"-13"-13⅜", work diagram M.1B over diagram M.1A, work the other sts as before (dec 12 sts in diagram M.1B as shown in diagram). After diagram M.1B, continue to work diagram M.1C over diagram M.1B. SIDE DEC AND SIDE INC: When piece measures 12 cm / 4¾", dec 1 st in each side. Repeat dec every 2½ cm / ⅞" a total of 10 times. When piece measures 40 cm / 15¾", inc 1 st in each side. Repeat inc every 3 cm / 1⅛" a total of 4 times (work inc sts in reverse stockinette st). After all dec and inc there are 102-112-122-132-150-160 sts on the needle. ARMHOLES: When piece measures 55-56-57-58-59-60 cm / 21⅝"-22"-22½"-22¾"-23¼"-23⅝", bind off and dec for armholes at the beg of every row in each side as follows: 5 sts 1 time in all sizes, 3 sts 0-1-1-2-3-4 times, 2 sts 1-2-4-4-5-5 times and 1 st 3-2-2-3-5-5 times = 82-84-86-88-92-96 sts. Continue the pattern as before with 1 edge st in garter st in each side. When piece measures 70-72-74-76-78-80 cm / 27½"-28⅜"-29⅛"-30"-30¾"-31½", K 4 rows over the middle 40 sts (work the other sts as before). Then bind off the middle 30 sts for neck. Finish each shoulder (= 26-27-28-29-30-31 sts) separately. Continue the pattern with 5 sts in garter st towards the neck. When piece measures 74-76-78-80-82-84 cm / 29⅛"-30"-30¾"-31½"-32¼"-33", work the 8 sts over the cable in diagram M.2 tog 2 by 2 = 22-23-24-25-26-27 sts remain on needle. On next row bind off all sts K over K and P over P. RIGHT FRONT PIECE: Worked back and forth on needle. Cast on 68-73-78-83-92-97 sts (includes 5 band sts towards mid front and 1 edge st in the side) on needles size 3.5 mm / US 4 with Karisma. READ KNITTING TIP! K 2 rows (1st row = RS), switch to needle size 4 mm / US 6. READ ALL OF THE FOLLOWING SECTION BEFORE CONTINUING! PATTERN: Continue as follows (= from RS): SIZE S, M, L and XL: 5 band sts in garter st, 4 sts in stockinette st, 6 sts in reverse stockinette st, diagram M.3A (= 40 sts), 12-17-22-27 sts in reverse stockinette st and 1 edge st in garter st. Size XXL and XXXL: 5 band sts in garter st, 4 sts in stockinette st, 6 sts in reverse stockinette st, diagram M.3A (= 40 sts), M.2 (= 20 sts), 16-21 sts in reverse stockinette st and 1 edge st in garter st. When piece measures 29-30-31-32-33-34 cm / 11⅜"-11¾"-12¼"-12½"-13"-13⅜", work diagram M.3B over diagram M.3A, work the other sts as before (dec 6 sts in diagram M.3B as shown in diagram). After diagram M.3B, continue to work diagram M.3C over these sts. SIDE DEC AND SIDE INC: When piece measures 12 cm / 4¾", dec 1 st in the side. Repeat dec every 2½ cm / ⅞" a total of 10 times. When piece measures 40 cm / 15¾", inc 1 st in the side. Repeat inc every 3 cm / 1⅛" a total of 4 times (work inc sts in reverse stockinette st). BUTTON HOLES: At the same time when piece measures 18-19-20-21-22-23 cm / 7"-7½"-8"-8¼"-8¾"-9", bind off for button holes - see explanation above. COLLAR: At the same time when piece measures 47-48-49-50-51-52 cm / 18½"-19"-19¼"-19¾"-20"-20½", from RS inc 2 sts for collar as follows: Make 1 YO after first st and 1 YO after second st, on next row K both YOs twisted to avoid holes. Continue to inc 1 st for collar on every other row a total of 12 times and then every 4th row a total of 6 times – SEE INCREASE TIP! After all inc, there are 20 inc collar sts and 25 sts in garter st in total (all these sts are worked with double yarn). NECKLINE: At the same time when piece measures 49-50-51-52-53-54 cm / 19¼"-19¾"-20"-20½"-21"-21¼", dec 1 st towards the neck - SEE DECREASE TIP! Repeat dec every other row a total of 12 times and then on every 4th row a total of 8 times. ARMHOLE: At the same time when piece measures 55-56-57-58-59-60 cm / 21⅝"-22"-22½"-22¾"-23¼"-23⅝", bind off and dec for armhole in the side as on back piece. After all inc and dec, there are 46-47-48-49-51-53 sts on needle. Work until piece measures 74-76-78-80-82-84 cm / 29⅛"-30"-30¾"-31½"-32¼"-33", adjust so that next row is worked from RS. Continue to work the 8 sts over the cable tog 2 by 2 = 42-43-44-45-47-49 sts on needle. On next row (= WS), bind off the first 22-23-24-25-27-29 sts for shoulder, K the rest of row. Continue like this over the remaining 20 collar sts: * K 2 rows over all sts, K 2 rows over only the outermost 14 sts (towards mid front) *, repeat from *-* until collar measures approx. 7-8 cm / 2¾"-3⅛" at the inside (it will then measure approx. 14-16 cm / 5½"-6¼" at the edge). Bind off. LEFT FRONT PIECE: Cast on and work as right front piece but reversed. I.e. after 2 rows K, work pattern as follows (from RS): SIZE S, M, L and XL: 1 edge st in garter st, P 12-17-22-27 sts, diagram M.4A (= 40 sts), P 6 sts, K 4 sts and 5 band sts in garter st. Size XXL and XXXL: 1 edge st in garter st, P 16-21 sts, diagram M.2 (= 20 sts), diagram M.4A, P 6 sts, K 4 sts and 5 band sts in garter st. Then work diagram M.4B and diagram M.4C instead of diagram M.3B and diagram M.3C. Sts over cable on shoulder are bind off from WS and shoulder sts from RS; this is done opposite from right front piece to avoid cutting the yarn when working the collar. SLEEVE: Worked back and forth on needle. Cast on 100-100-100-116-116-132 sts (includes 1 edge st in each side) on needle size 3.5 mm / US 4 with Karisma. K 1 row (1st row = RS) and P 1 row, then K all sts tog 2 by 2 = 50-50-50-58-58-66 sts. K 1 row from WS. Then work rib = K 4/P 4 with 1 edge st in garter st in each side. When piece measures 10 cm / 4", switch to needle size 4 mm / US 6 and continue in reverse stockinette st. AT THE SAME TIME when piece measures 13-13-13-13-11-11 cm / 5⅛"-5⅛"-5⅛"-5⅛"-4⅜"-4⅜"", inc 1 st each side, repeat inc every 3-2½-2-2-2-2 cm / 1⅛"-⅞"-¾"-¾"-¾"-¾" a total of 12-14-16-15-17-16 times = 74-78-82-88-92-98 sts. When piece measures 49-48-47-46-45-44 cm / 19¼"-19"-18½"-18"-17¾"-17¼" (shorter measurements in the larger sizes because of longer sleeve cap and wider shoulder width) bind off for sleeve cap at beg of every row in each side: 4 sts 1 time, 2 sts 3 times, 1 st 5-6-7-9-10-12 times and then 2 sts in each side until piece measures 57 cm / 22½". Continue to bind off 3 sts 1 time in each side, then bind off the remaining sts. Sleeve measures approx. 58 cm / 22¾". ASSEMBLY: Sew the shoulder seams. Sew collar tog mid back, edge to edge to avoid a chunky seam. Sew collar to the back of neckline. Sew in sleeves and sew under arm and side seams in one inside 1 edge st. Sew on buttons. |
||||||||||||||||||||||
Diagram explanations |
||||||||||||||||||||||
|
||||||||||||||||||||||
 |
||||||||||||||||||||||
 |
||||||||||||||||||||||
 |
||||||||||||||||||||||
Have you finished this pattern?Tag your pictures with #dropspattern #bluebirdcardigan or submit them to the #dropsfan gallery. Do you need help with this pattern?You'll find 11 tutorial videos, a Comments/Questions area and more by visiting the pattern on garnstudio.com. © 1982-2026 DROPS Design A/S. We reserve all rights. This document, including all its sub-sections, has copyrights. Read more about what you can do with our patterns at the bottom of each pattern on our site. |
||||||||||||||||||||||


With over 40 years in knitting and crochet design, DROPS Design offers one of the most extensive collections of free patterns on the internet - translated to 17 languages. As of today we count 324 catalogs and 12290 patterns - 12280 of which are translated into English (US/in).
We work hard to bring you the best knitting and crochet have to offer, inspiration and advice as well as great quality yarns at incredible prices! Would you like to use our patterns for other than personal use? You can read what you are allowed to do in the Copyright text at the bottom of all our patterns. Happy crafting!
Post a comment to pattern DROPS 134-1
We would love to hear what you have to say about this pattern!
If you want to leave a question, please make sure you select the correct category in the form below, to speed up the answering process. Required fields are marked *.