
Popular categories
Looking for a yarn?


Comments / Questions (642)
![]() Ellen.Hartmann wrote:
Ellen.Hartmann wrote:
Ik ben dit vest aan het breien. Ik heb het achterpand af. Maar het patroon in het midden van de rug ziet er niet zo mooi uit. De kabels die kruisen liggen er niet boven op. Het lijkt meer een rommeltje. Het patroon heb i netjes gevolgd.Wat doe ik fout?
16.01.2013 - 11:01DROPS Design answered:
Ik kan helaas hier niet zien wat er eventueel fout is gegaan met je kabeltje. Neem het werk mee naar je winkel en vraag voor persoonlijke ondersteuning. Ze kunnen waarschijnlijk zien waar het mis is gegaan.
16.01.2013 - 16:06
![]() Marie wrote:
Marie wrote:
Bon je me lance et qui le veut me suive!!!!!
10.01.2013 - 17:05
![]() Saskia wrote:
Saskia wrote:
Ik snap hier helemaal niks van. HELP. Ik snap de beschrijving van de kraag en hals niet. Wie kan mij dit uitleggen op een makkelijke manier?
16.12.2012 - 19:42DROPS Design answered:
Voor de kraag meerder je 2 st per keer: 1 omsl naast de buitenste st (= 1e st middenvoor) en nog een omslag na de 2e st middenvoor. Daarna meerder je 1 st naast de buitenste st (LEES TIP VOOR HET MEERDEREN) totaal 12 keer om de nld (elke 2e nld) en dan 6 keer in iedere 4e nld. Tegelijkertijd moet je minderen bij de hals naast de voorbiesst (LEES TIP VOOR HET MINDEREN).
19.12.2012 - 12:01
![]() Ruth wrote:
Ruth wrote:
Jetzt ist alles klar. Herzlichen Dank für die promte Antwort.
09.12.2012 - 18:55
![]() Ruth wrote:
Ruth wrote:
Ich bin gerade daran, diese Jacke zu stricken. Nun habe ich eine Frage zur Grösse. Bei 31 cm fange ich mit dem Muster 1B an. Nach 12 cm beginnen die Abnahmen. Nach 40 cm beginnen die Aufnahmen. Von wo messe ich die 40 cm? Bei 57 cm (über alles gemessen) muss ich ja mit dem Armloch beginnen?
08.12.2012 - 16:49DROPS Design answered:
Liebe Ruth, die Angaben beziehen sich alle auf die Gesamthöhe. Sie beginnen also schon während M1A mit den seitlichen Abnahmen (nach 12 cm Gesamthöhe) und nehmen dann nach 40 cm seitlich wieder auf. Unabhängig davon wird nach 31 cm das Muster M1B gestrickt. Viel Spass beim Stricken!
09.12.2012 - 08:32
![]() Sheila Tunstall wrote:
Sheila Tunstall wrote:
Hi, oh dear I’m not making myself very clear, so must appear to be a bit dim. Regarding the cables, I realise that the white squares correspond to knit stitches and that sloping lines show when cabling should be performed, however, despite following the pattern, ( cabling on odd rows) my cabling pattern is very pronounced on the wrong side of my garment .Am I doing something wrong, or is this correct for this particular pattern.
04.12.2012 - 21:41Tom answered:
Of course you knit cables on right side only as always!
05.12.2012 - 10:10
![]() Sheila Tunstall wrote:
Sheila Tunstall wrote:
Hello, I would like to clarify my problem with cabling in block M1b. I am performing the cables on the right side of the garment ( odd rows), yet they are appearing more pronounced on the wrong side, so wish to know if this is correct, or am I doing something very wrong, despite watching the tutorial many times.
03.12.2012 - 13:46DROPS Design answered:
Dear Mrs Tunstall, the white squares in the diagramm should be K from RS and cables are made on these sts, on odd rows. Happy knitting!
04.12.2012 - 09:30
![]() Linda wrote:
Linda wrote:
Mijn vest is af en is echt mooi en comfortabel om te dragen!
30.11.2012 - 12:22
![]() Gabi Fallnich wrote:
Gabi Fallnich wrote:
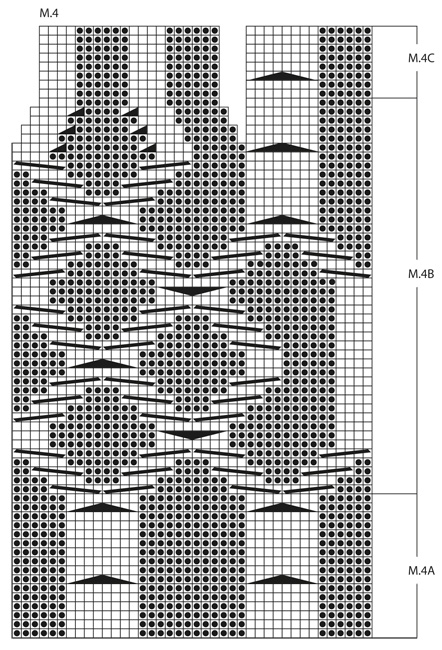
Ich stricke gerade diese schöne Weste und mir ist aufgefallen, dass die Strickanleitung des linken Vorderteils leider nicht spiegelverkehrt eingezeichnet ist. Bitte vergleichen Sie M4 mit M3 bevor Sie beginnen zu stricken.Die Zöpfe und Verkreuzungen laufen bei beiden Anleitungen in die gleiche Richtung!Ich denke dies ist falsch!LG Gabi Fallnich
23.11.2012 - 18:09DROPS Design answered:
Liebe Gabi, wir haben die Zöpfe in die gleiche Richtung laufen lassen (siehe Foto), Sie können das selbstverständlich ändern, wenn Sie es lieber anders haben.
26.11.2012 - 11:01
![]() Jette wrote:
Jette wrote:
Hej jeg kan ikke komme videre end til halsindtagning og udtagning forstår ikke måden det skal gøres på kan i hjælpe mig på forhånd tak.
19.11.2012 - 18:35
|
||||||||||||||||||||||
Bluebird#bluebirdcardigan |
||||||||||||||||||||||
 |
 |
|||||||||||||||||||||
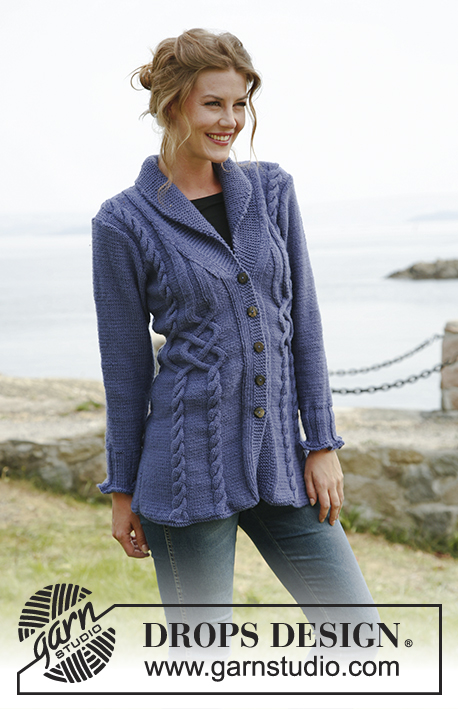
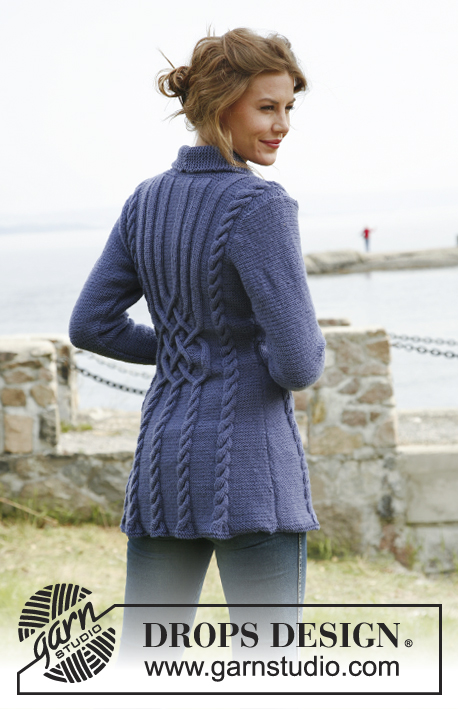
Knitted DROPS jacket with cables in ”Karisma”. Size: S to XXXL.
DROPS 134-1 |
||||||||||||||||||||||
|
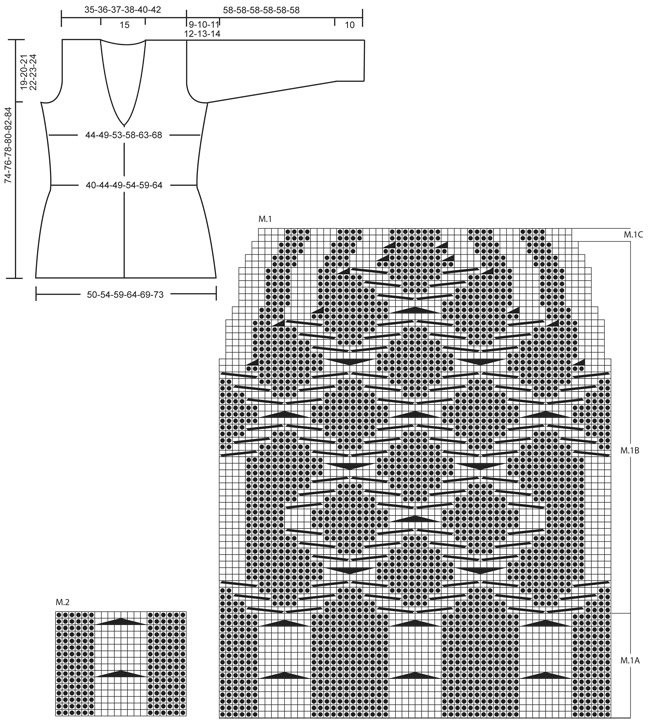
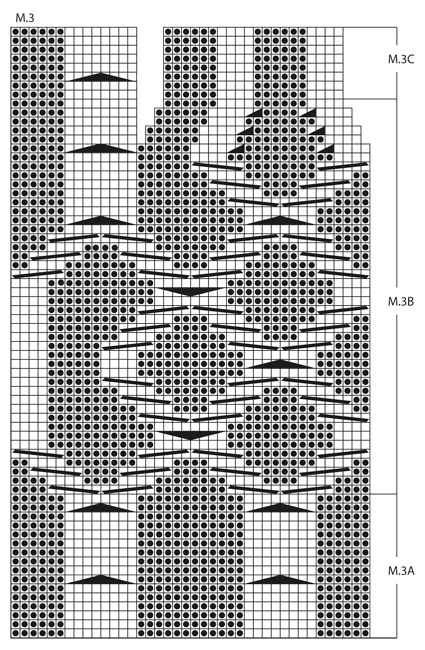
PATTERN: See diagram M.1 to M.4 – diagrams show all rows in pattern seen from RS (1st row = RS). GARTER ST (back and forth on needle): K all rows. KNITTING TIP (applies to band): Work the 5 band sts in garter st with double yarn the entire piece, i.e. have a little ball on the side that is only used on band. When inc for collar, work the inc sts with double yarn. This is done to make the band and the collar nice and firm. BUTTON HOLES: Bind off for button holes on right front band from RS. 1 BUTTON HOLE = bind off 3rd and 4th band st from mid front, on next row cast on 2 new sts over these sts. Bind off for button holes when piece measures: SIZE S: 18, 25, 32, 39 and 46 cm / 7",9¾",12½",15¼" and 18" SIZE M: 19, 26, 33, 40 and 47 cm / 7½",10¼",13",15¾" and 18½" SIZE L: 20, 27, 34, 41 and 48 cm / 8",10⅝",13⅜",16⅛" and 19" SIZE XL: 21, 28, 35, 42 and 49 cm / 8¼",11",13¾",16½" and 19¼" SIZE XXL: 22, 29, 36, 43 and 50 cm / 8¾",11⅜",14¼",17" and 19¾" SIZE XXXL: 23, 30, 37, 44 and 51 cm / 9",11¾",14½",17¼" and 20" INCREASE TIP (applies to collar): Inc inside outermost band st by making 1 YO, on next row K YO twisted (i.e. work in back loop of st instead of front) to avoid holes. DECREASE TIP (applies to neck): Dec from RS inside the sts inc for collar + the 5 band sts + the first 3 sts in stockinette st. Dec as follows AFTER these sts: Slip 1 st as if to K, K 1, psso. Dec as follows BEFORE these sts: K 2 tog. -------------------------------------------------------- -------------------------------------------------------- BACK PIECE: Worked back and forth on needle. Cast on 126-136-146-156-174-184 sts on straight needles size 3.5 mm / US 4 with Karisma. K 2 rows (1st row = RS), switch to needle size 4 mm / US 6. READ ALL OF THE FOLLOWING SECTION BEFORE CONTINUING: PATTERN: Continue as follows (from RS): 1 edge st in GARTER ST – see explanation above, 12-17-22-27-16-21 sts in reverse stockinette st, diagram M.2 (= 20 sts) 1-1-1-1-2-2 times, diagram M.1A (= 60 sts), diagram M.2 (= 20 sts) 1-1-1-1-2-2 times, 12-17-22-27-16-21 sts in reverse stockinette st and 1 edge st in garter st. When piece measures 29-30-31-32-33-34 cm / 11⅜"-11¾"-12¼"-12½"-13"-13⅜", work diagram M.1B over diagram M.1A, work the other sts as before (dec 12 sts in diagram M.1B as shown in diagram). After diagram M.1B, continue to work diagram M.1C over diagram M.1B. SIDE DEC AND SIDE INC: When piece measures 12 cm / 4¾", dec 1 st in each side. Repeat dec every 2½ cm / ⅞" a total of 10 times. When piece measures 40 cm / 15¾", inc 1 st in each side. Repeat inc every 3 cm / 1⅛" a total of 4 times (work inc sts in reverse stockinette st). After all dec and inc there are 102-112-122-132-150-160 sts on the needle. ARMHOLES: When piece measures 55-56-57-58-59-60 cm / 21⅝"-22"-22½"-22¾"-23¼"-23⅝", bind off and dec for armholes at the beg of every row in each side as follows: 5 sts 1 time in all sizes, 3 sts 0-1-1-2-3-4 times, 2 sts 1-2-4-4-5-5 times and 1 st 3-2-2-3-5-5 times = 82-84-86-88-92-96 sts. Continue the pattern as before with 1 edge st in garter st in each side. When piece measures 70-72-74-76-78-80 cm / 27½"-28⅜"-29⅛"-30"-30¾"-31½", K 4 rows over the middle 40 sts (work the other sts as before). Then bind off the middle 30 sts for neck. Finish each shoulder (= 26-27-28-29-30-31 sts) separately. Continue the pattern with 5 sts in garter st towards the neck. When piece measures 74-76-78-80-82-84 cm / 29⅛"-30"-30¾"-31½"-32¼"-33", work the 8 sts over the cable in diagram M.2 tog 2 by 2 = 22-23-24-25-26-27 sts remain on needle. On next row bind off all sts K over K and P over P. RIGHT FRONT PIECE: Worked back and forth on needle. Cast on 68-73-78-83-92-97 sts (includes 5 band sts towards mid front and 1 edge st in the side) on needles size 3.5 mm / US 4 with Karisma. READ KNITTING TIP! K 2 rows (1st row = RS), switch to needle size 4 mm / US 6. READ ALL OF THE FOLLOWING SECTION BEFORE CONTINUING! PATTERN: Continue as follows (= from RS): SIZE S, M, L and XL: 5 band sts in garter st, 4 sts in stockinette st, 6 sts in reverse stockinette st, diagram M.3A (= 40 sts), 12-17-22-27 sts in reverse stockinette st and 1 edge st in garter st. Size XXL and XXXL: 5 band sts in garter st, 4 sts in stockinette st, 6 sts in reverse stockinette st, diagram M.3A (= 40 sts), M.2 (= 20 sts), 16-21 sts in reverse stockinette st and 1 edge st in garter st. When piece measures 29-30-31-32-33-34 cm / 11⅜"-11¾"-12¼"-12½"-13"-13⅜", work diagram M.3B over diagram M.3A, work the other sts as before (dec 6 sts in diagram M.3B as shown in diagram). After diagram M.3B, continue to work diagram M.3C over these sts. SIDE DEC AND SIDE INC: When piece measures 12 cm / 4¾", dec 1 st in the side. Repeat dec every 2½ cm / ⅞" a total of 10 times. When piece measures 40 cm / 15¾", inc 1 st in the side. Repeat inc every 3 cm / 1⅛" a total of 4 times (work inc sts in reverse stockinette st). BUTTON HOLES: At the same time when piece measures 18-19-20-21-22-23 cm / 7"-7½"-8"-8¼"-8¾"-9", bind off for button holes - see explanation above. COLLAR: At the same time when piece measures 47-48-49-50-51-52 cm / 18½"-19"-19¼"-19¾"-20"-20½", from RS inc 2 sts for collar as follows: Make 1 YO after first st and 1 YO after second st, on next row K both YOs twisted to avoid holes. Continue to inc 1 st for collar on every other row a total of 12 times and then every 4th row a total of 6 times – SEE INCREASE TIP! After all inc, there are 20 inc collar sts and 25 sts in garter st in total (all these sts are worked with double yarn). NECKLINE: At the same time when piece measures 49-50-51-52-53-54 cm / 19¼"-19¾"-20"-20½"-21"-21¼", dec 1 st towards the neck - SEE DECREASE TIP! Repeat dec every other row a total of 12 times and then on every 4th row a total of 8 times. ARMHOLE: At the same time when piece measures 55-56-57-58-59-60 cm / 21⅝"-22"-22½"-22¾"-23¼"-23⅝", bind off and dec for armhole in the side as on back piece. After all inc and dec, there are 46-47-48-49-51-53 sts on needle. Work until piece measures 74-76-78-80-82-84 cm / 29⅛"-30"-30¾"-31½"-32¼"-33", adjust so that next row is worked from RS. Continue to work the 8 sts over the cable tog 2 by 2 = 42-43-44-45-47-49 sts on needle. On next row (= WS), bind off the first 22-23-24-25-27-29 sts for shoulder, K the rest of row. Continue like this over the remaining 20 collar sts: * K 2 rows over all sts, K 2 rows over only the outermost 14 sts (towards mid front) *, repeat from *-* until collar measures approx. 7-8 cm / 2¾"-3⅛" at the inside (it will then measure approx. 14-16 cm / 5½"-6¼" at the edge). Bind off. LEFT FRONT PIECE: Cast on and work as right front piece but reversed. I.e. after 2 rows K, work pattern as follows (from RS): SIZE S, M, L and XL: 1 edge st in garter st, P 12-17-22-27 sts, diagram M.4A (= 40 sts), P 6 sts, K 4 sts and 5 band sts in garter st. Size XXL and XXXL: 1 edge st in garter st, P 16-21 sts, diagram M.2 (= 20 sts), diagram M.4A, P 6 sts, K 4 sts and 5 band sts in garter st. Then work diagram M.4B and diagram M.4C instead of diagram M.3B and diagram M.3C. Sts over cable on shoulder are bind off from WS and shoulder sts from RS; this is done opposite from right front piece to avoid cutting the yarn when working the collar. SLEEVE: Worked back and forth on needle. Cast on 100-100-100-116-116-132 sts (includes 1 edge st in each side) on needle size 3.5 mm / US 4 with Karisma. K 1 row (1st row = RS) and P 1 row, then K all sts tog 2 by 2 = 50-50-50-58-58-66 sts. K 1 row from WS. Then work rib = K 4/P 4 with 1 edge st in garter st in each side. When piece measures 10 cm / 4", switch to needle size 4 mm / US 6 and continue in reverse stockinette st. AT THE SAME TIME when piece measures 13-13-13-13-11-11 cm / 5⅛"-5⅛"-5⅛"-5⅛"-4⅜"-4⅜"", inc 1 st each side, repeat inc every 3-2½-2-2-2-2 cm / 1⅛"-⅞"-¾"-¾"-¾"-¾" a total of 12-14-16-15-17-16 times = 74-78-82-88-92-98 sts. When piece measures 49-48-47-46-45-44 cm / 19¼"-19"-18½"-18"-17¾"-17¼" (shorter measurements in the larger sizes because of longer sleeve cap and wider shoulder width) bind off for sleeve cap at beg of every row in each side: 4 sts 1 time, 2 sts 3 times, 1 st 5-6-7-9-10-12 times and then 2 sts in each side until piece measures 57 cm / 22½". Continue to bind off 3 sts 1 time in each side, then bind off the remaining sts. Sleeve measures approx. 58 cm / 22¾". ASSEMBLY: Sew the shoulder seams. Sew collar tog mid back, edge to edge to avoid a chunky seam. Sew collar to the back of neckline. Sew in sleeves and sew under arm and side seams in one inside 1 edge st. Sew on buttons. |
||||||||||||||||||||||
Diagram explanations |
||||||||||||||||||||||
|
||||||||||||||||||||||
 |
||||||||||||||||||||||
 |
||||||||||||||||||||||
 |
||||||||||||||||||||||
Have you finished this pattern?Tag your pictures with #dropspattern #bluebirdcardigan or submit them to the #dropsfan gallery. Do you need help with this pattern?You'll find 11 tutorial videos, a Comments/Questions area and more by visiting the pattern on garnstudio.com. © 1982-2026 DROPS Design A/S. We reserve all rights. This document, including all its sub-sections, has copyrights. Read more about what you can do with our patterns at the bottom of each pattern on our site. |
||||||||||||||||||||||


With over 40 years in knitting and crochet design, DROPS Design offers one of the most extensive collections of free patterns on the internet - translated to 17 languages. As of today we count 324 catalogs and 12290 patterns - 12280 of which are translated into English (US/in).
We work hard to bring you the best knitting and crochet have to offer, inspiration and advice as well as great quality yarns at incredible prices! Would you like to use our patterns for other than personal use? You can read what you are allowed to do in the Copyright text at the bottom of all our patterns. Happy crafting!
Post a comment to pattern DROPS 134-1
We would love to hear what you have to say about this pattern!
If you want to leave a question, please make sure you select the correct category in the form below, to speed up the answering process. Required fields are marked *.