
Popular categories
Looking for a yarn?


Comments / Questions (63)
![]() Grethe wrote:
Grethe wrote:
Jeg får ikke fellingen til å stemme. Jeg strikker str.S, og det står at når jeg er ferdig med alle fellingene så skal jeg ha mellom 64-100m igjen. Men jeg har mange flere igjen enn det. Hvis jeg leser oppskriften rett, så skal jeg ha 344 m når ermene er satt på. Så skal raglan felles til sammen 20 ganger, dvs 160 m, og så felling til hals, som for min del blir 18 m. Det vil si at når jeg er ferdig med fellingen, så har jeg 166 m igjen på pinnen. Er det jeg som leser oppskriften så veldig feil?
21.11.2013 - 10:50DROPS Design answered:
Hej Grethe. Du feller til raglan og til hals, men du skal ogsaa huske at du feller paa ermene (= hullraden fortsetter midt foran/midt bak og midt oppå begge ermene - se FELLETIPS-2, men det økes ingen m). Saa har du mellem 64-100 m naar du er klar.
21.11.2013 - 13:52
![]() Grethe wrote:
Grethe wrote:
Grethe 14.11.2013 kl. 20:55: Jeg lurer litt på oppskriften på bærestykket. Skal jeg ta av 6 masker til hals selv når jeg ikke har felt alt jeg skal? Jeg strikker str. small, og har kommet til felling nr. 13. Og hvis jeg skal begynne å felle til halsen nå, skal jeg fortsette med mønsteret på ermene og bake til jeg er ferdig?
14.11.2013 - 20:56DROPS Design answered:
Ja det gør du samtidigt som de andre fellinger. God fornøjelse!
15.11.2013 - 09:03
![]() Grethe wrote:
Grethe wrote:
Jeg lurer litt på oppskriften på bærestykket. Skal jeg ta av 6 masker til hals selv når jeg ikke har felt alt jeg skal? Jeg strikker str. small, og har kommet til felling nr. 13. Og hvis jeg skal begynne å felle til halsen nå, skal jeg fortsette med mønsteret på ermene og bake til jeg er ferdig?
14.11.2013 - 20:55DROPS Design answered:
Ja det gør du samtidigt som de andre fellingerne. God fornøjelse!
20.11.2013 - 09:23
![]() S Jos wrote:
S Jos wrote:
Puis-je tricoter ce modèle avec des aiguilles normales et non circulaires. concernant le nombre de mailles faut les diviser en 2? Merci
22.09.2013 - 09:16DROPS Design answered:
Bonjour Mme SJos, vous pouvez tout à fait tricoter sur des aiguilles droites en allers et retours - divisez en 2 le nbe de mailles et ajoutez les m lis (pour les coutures). Faites bien attention à vos calculs car l'empiècement se tricote en rond. Les vidéos décrivant les différentes techniques utilisées dans ce modèle ont été ajoutées sous l'onglet à droite de la photo, elles pourront vous aider à apprendre à tricoter en rond sans tout avoir à recalculer. Bon tricot!
23.09.2013 - 09:33
![]() Lone Vilhelmsen wrote:
Lone Vilhelmsen wrote:
Hej Tak for svar, jeg er stadigvæk ikke helt klar på de ærmer, forsætter jeg med og tage ud og ind på hveranden pind? og som jeg læser opskriften er der 2 ret på undersiden af ærmet og 2 vrang på den ene pind og to ret på den anden pind ved de 2 midterste masker på forsiden af ærmet mvh Lone
24.08.2013 - 07:36DROPS Design answered:
Ja du fortsætter med at tage ud under ærmet og ind ovenpå ærmet SAMTIDIG som du tager 2 ekstra masker ud under ærmet ifølge opskriften.
03.10.2013 - 10:22
![]() Lone Vilhelmsen wrote:
Lone Vilhelmsen wrote:
Skal de 2 ret masker ved udtagning midt under ærmet fortsætte hele vejen op?
15.08.2013 - 15:12DROPS Design answered:
De 2 retmasker er oven på ærmet.
22.08.2013 - 09:19
![]() Aulikki Botting wrote:
Aulikki Botting wrote:
Minulle jaa epaselvaksi neulotaanko hihat suljettuna neuleena vai tasona?
13.08.2013 - 10:53
![]() Torill wrote:
Torill wrote:
Hei Jeg sliter også med ermene på denne genseren. Strikkefastheten stemmer, med 48 riller på 10cm oppover. Det er det vanligste, er det ikke? Men når mønsteret skal måles på skrått stemmer det ikke, siden skråsiden blir lenger enn kortsiden. 48 riller er 10 cm oppover, men det blir 13-14cm på skrå. Måler vi strikkefastheten feil?
12.08.2013 - 23:57DROPS Design answered:
Du måler langs siden på plagget (ikke på skrå) men LES også MÅLETIPS!
04.10.2013 - 09:45
![]() Lone Vilhelmsen wrote:
Lone Vilhelmsen wrote:
Hej jeg forstår ikke rigtig er der glat strik på selve over stykket og ærmerne, eller er der vrang på hveranden pind?
04.08.2013 - 07:36DROPS Design answered:
Hej Lone. Baerestykket bliver strikket i retstrik, saa det er 1 p ret/1 p vrang naar du strikker paa rundpind. God fornöjelse videre
22.08.2013 - 14:48
![]() Tree wrote:
Tree wrote:
I have been having a hard time getting the Decreasing Tip 2 to come out correctly on the right side of the pattern, ie the part that says slip 1 st as if to k, K1, psso. This does not continue the same 'look' as the decreasing tip 1 does. Is it possible that the tip 2 is incorrect?
06.07.2013 - 01:14DROPS Design answered:
Dear Tree, Decreasing Tip 2 applies to garter st mid front and mid back on body + top of sleeve, starting 3 sts before marker (on the right side ie before marker), but this time, you dec 1 st compensated with 1 yo while before you dec 2 sts for 1 yo. Happy knitting!
06.07.2013 - 11:50
|
|
Rib Romance#ribromancesweater |
|
|
|
|
Knitted DROPS jumper in rib and garter st in ”Alpaca”. Size S - XXXL.
DROPS 122-18 |
|
|
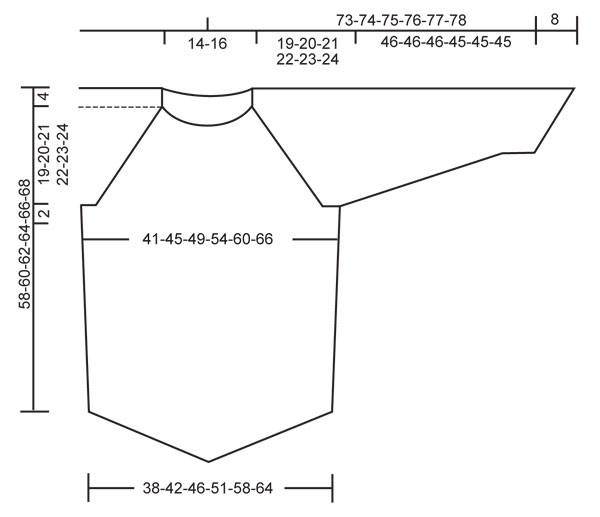
GARTER ST (in the round): K 1 round, P 1 round. MEASUREMENT TIP: Because of the weight of the yarn make all measurements while the garment is hanging. INCREASING TIP: Inc 1 st each side of the 2 K sts each side on body piece and each side of the 2 K sts mid under sleeve. Inc 1 st by making 1 YO, on next row work YO into back of loop to avoid a hole – incorporate inc sts in rib/garter st as you go along. DECREASING TIP-1 (applies to the rib mid front and mid back on body piece): Beg 4 sts before marker and dec as follows: Slip 1 st as if to K, K2 tog, psso, 1 YO, K2 (marker sits mid between these 2 sts), 1 YO, K3 tog. On next round K the middle 6 sts. DECREASING TIP-2 (applies to garter st mid front and mid back on body piece and at top of sleeves – hole pattern): Beg 3 sts before marker and dec as follows: slip 1 st as if to K, K1, psso, 1 YO, K2 (marker sits mid between these 2 sts), 1 YO, K2 tog. On next round work the 6 middle sts as follows: K2, P2, K2. DECREASING TIP-3 (applies to garter st on bottom part of sleeve): Dec as described under DECREASING TIP-1, but work the 6 sts as follows on next round: K2, P2, K2 (instead of K6). DECREASING TIP-4 (applies to raglan): Dec as follows in each transition between body piece and sleeves (beg 3 sts before marker): K2 tog, K2 (marker sits mid between these 2 sts), slip 1 st as if to K, K1, psso. -------------------------------------------------------- JUMPER: Worked in the round. BODY PIECE: Cast on 272-304-336-368-416-464 sts on circular needle size 3 mm / US 2or3 with Alpaca. Work 2 rounds rib as follows: K1, * P2, K2 *, repeat from *-* to end and finish with P2 and K1. Now insert 4 markers in piece with 68-76-84-92-104-116 sts between each (insert first marker at beg of round). Continue in rib AT THE SAME TIME inc 1 st each side of 1st and 3rd marker (= at the sides) - See INCREASING TIP - and dec 1 st each side of 2nd and 4th marker (= mid front/mid back) - See DECREASING TIP-1. Continue the inc and dec on every other round (no of sts will be constant). When piece measures 33-34-35-36-37-38 cm / 13"-13⅜"-13¾"-14¼"-14½"-15" - See MEASUREMENT TIP (measured along the side) – K 1 round AT THE SAME TIME dec 76-88-104-112-128-148 sts evenly – NOTE: 19-22-26-28-32-37 sts on left front piece, 19-22-26-28-32-37 sts on right front piece, 19-22-26-28-32-37 sts on right back piece and 19-22-26-28-32-37 sts on left back piece (i.e. 38-44-52-56-64-74 sts in total on front piece and on back piece) – do not dec on the 6 sts mid front and mid back = 196-216-232-256-288-316 sts. Continue in GARTER ST - see above - AT THE SAME TIME continue the hole pattern mid front and mid back - See DECREASING TIP-2 (the side inc are now complete). REMEMBER THE GAUGE! When piece measures 35-36-37-38-39-40 cm / 13¾"-14¼"-14½"-15"-15¼"-15¾" bind off 12-12-12-16-16-16 sts each side for armhole (i.e. 6-6-6-8-8-8 sts each side of marker 1 and 3) = 86-96-104-112-128-142 sts left on front and back piece. Put piece aside and knit the sleeves. SLEEVE: Cast on 64-66-68-68-70-70 sts on double pointed needles size 3 mm / US 2or3 with Alpaca. Insert a marker after 32-33-34-34-35-35 sts (= mid upper sleeve), and let the marker follow the piece as you go along. Work first round as follows: K 29-30-31-31-32-32, slip 1 st as if to K, K1, psso, K2 (marker sits mid between these 2 sts), K2 tog and K 29-30-31-31-32-32. P 1 round. Now work next round as follows: K 29-30-31-31-32-32, slip 1 st as if to K, K1, psso, K2 tog and K 29-30-31-31-32-32. There are now 60-62-64-64-66-66 sts on needle. P 1 round and now continue in garter st. AT THE SAME TIME inc 2 sts mid under sleeve - See INCREASING TIP - and dec 1 st each side of marker mid upper sleeve - See DECREASING TIP-3. Continue the inc and dec on every other round (no of sts will be constant). When piece measures 9-8-8-8-6-9 cm / 3½"-3⅛"-3⅛"-3⅛"-2⅜"-3½" inc 2 extra sts mid under sleeve – NOTE: inc these each side of the middle 6 sts under sleeve. Repeat this inc a total of 19-21-22-24-26-28 times in SIZE S: on every 9th round, SIZE M + L: on every 8th round, SIZE XL + XXL: on every 7th round and SIZE XXXL: on every 6th round = 98-104-108-112-118-122 sts. When piece measures 46-46-46-45-45-45 cm / 18"-18"-18"-17¾"-17¾"-17¾", measured mid under sleeve – see MEASUREMENT TIP and adjust to the same no of garter st rows as on body piece – work shortened rows back and forth as follows (NOTE: K every row and continue the hole pattern mid upper sleeve on every row from RS acc to DECREASING TIP-2 – discontinue the inc mid under sleeve): Beg from RS mid under sleeve and work 16-16-18-18-20-20 sts past marker, turn piece, slip first st as if to K, tighten thread and work 32-32-36-36-40-40 sts. Turn piece, slip 1 st as if to K, tighten thread and work 48-48-54-54-60-60 sts, turn piece, slip 1 st as if to K, tighten thread and work 64-64-72-72-80-80 sts. Turn piece, slip first st as if to K, tighten thread and work 80-80-90-90-100-100 sts, turn piece, slip first st as if to K, tighten thread and work row back to mid under sleeve. Now bind off the first 6-6-6-8-8-8 sts at beg of round, work 86-92-96-96-102-106 sts and bind off the remaining 6-6-6-8-8-8 sts. Put piece aside and knit the other sleeve. YOKE: Slip sleeves on the same circular needle as body piece where bind off for armholes = 344-376-400-416-460-496 sts. Insert a marker in each transition between body piece and sleeves (= 4 markers). READ ALL OF THE FOLLOWING SECTION BEFORE CONTINUING! Continue in garter st and hole pattern as before (on sleeves continue hole pattern acc to DECREASING TIP-2 as on body piece, i.e. the hole pattern continues mid front/mid back and mid upper sleeves, but no inc are made). AT THE SAME TIME dec for raglan as follows - See DECREASING TIP-4: Beg on the first K round and then dec on every 4th round (i.e. on every other K-round) a total of 13-13-13-16-15-15 times and then on every other round (i.e. on every K-round) a total of 20-23-25-22-26-28 times. AT THE SAME TIME when piece measures 53-54-56-57-59-60 cm / 21"-21¼"-22"-22½"-23¼"-23⅝" – measured along the side - slip the middle 6-6-10-12-12-24 sts on a stitch holder for neck. Continue back and forth on circular needle from mid front, AT THE SAME TIME bind off for neck at beg of row each side as follows: 2 sts 1-1-2-3-3-4 times and 1 st until piece measures 58-60-62-64-66-68 cm / 22¾"-23⅝"-24⅜"-25¼"-26"-26¾" - measured along the side all the way to shoulder - REMEMBER MEASUREMENT TIP. After all dec for raglan and neck there are approx 64 to 100 sts left on needle, bind off loosely. NECKLINE: Pick up approx 80-100 sts round neck (includes sts on stitch holder at front) on small circular needle size 3 mm / US 2or3 with Alpaca. K 1 round AT THE SAME TIME dec evenly to 78-82-86-90-94-96 sts. P 1 round. Then K 1 round, AT THE SAME TIME inc evenly to 120-128-132-132-136-140 sts. Work rib, K2/P2 - make sure to have K2 mid front. When rib measures 8-8-9-9-10-10 cm / 3⅛"-3⅛"-3½"-3½"-4"-4" bind off loosely with K over K and P over P. ASSEMBLY: Sew openings under sleeves. |
|
 |
|
Have you finished this pattern?Tag your pictures with #dropspattern #ribromancesweater or submit them to the #dropsfan gallery. Do you need help with this pattern?You'll find 22 tutorial videos, a Comments/Questions area and more by visiting the pattern on garnstudio.com. © 1982-2026 DROPS Design A/S. We reserve all rights. This document, including all its sub-sections, has copyrights. Read more about what you can do with our patterns at the bottom of each pattern on our site. |


With over 40 years in knitting and crochet design, DROPS Design offers one of the most extensive collections of free patterns on the internet - translated to 17 languages. As of today we count 324 catalogs and 12290 patterns - 12280 of which are translated into English (US/in).
We work hard to bring you the best knitting and crochet have to offer, inspiration and advice as well as great quality yarns at incredible prices! Would you like to use our patterns for other than personal use? You can read what you are allowed to do in the Copyright text at the bottom of all our patterns. Happy crafting!
Post a comment to pattern DROPS 122-18
We would love to hear what you have to say about this pattern!
If you want to leave a question, please make sure you select the correct category in the form below, to speed up the answering process. Required fields are marked *.