
Popular categories
Looking for a yarn?


Comments / Questions (53)
Annie82 wrote:
Aaaaaa.... now I am enlightened! :-D Thanks a lot! One just have to read a little more carefully. Happy knitting for everyone!
31.10.2017 - 11:53Annie wrote:
Dear DROPS Design, as a beginner I chose this sweater to knit, but know I don't really understand how to knit the armpit. The L size instructions sais, that I should decrease from 64 sts to 52 sts (which means 12 sts) by casting off 2 sts 2 times and 1 st 2 times- but that's just 6 sts. Do I have to repeat this patter of castin off (2stsX2 + 1 stsX2)? I just doesn't add up in my head. Thank you for your kind answer. Best regards, Annie
31.10.2017 - 08:12DROPS Design answered:
Dear Annie, you will have to bind off the stitches for armhole at the beginning of each row (both from RS and WS), ie you will bind off on each side 2 sts 2 times and 1 st 2 times = 6 sts dec on each side x 2 sides = 12 sts decreased = 52 sts remain. Happy knitting!
31.10.2017 - 09:52Brigitte Beaney wrote:
Thank you so much for getting back to me. But now I'm just wondering how many rows to do for the neck to get the fold seen in the picture?
05.08.2016 - 05:58DROPS Design answered:
Dear Mrs Beany, number of rows to neck will depend on your tension in height. Cast off sts in M.1 when neck measures 24-26 cm from pick up sts. You can also try on the jumper to check measurements on you before casting off. Happy knitting!
05.08.2016 - 09:53Brigitte Beaney wrote:
Hi, I am currently knitting this sweater but am struggling to understand decrease: "Continue in pattern as before AT THE SAME TIME bind off for armhole at the beg of every row each side: 2 sts 1-2-2-4-5-7 times and 1 st 1-2-2-1-2-1 times = 46-46-52-52-55-55 sts." This is my first jumper, because I feel to get down to the required 46 stitches I think I should follow the second decrease instructions but am then clueless about what to do with the first set? Please help.
03.08.2016 - 01:45DROPS Design answered:
Dear Mrs Beaney, in 2nd size you will bind off at the beg of every row (= both from RS and from WS): 2 sts 2 times and 1 st 2 times (= 6 sts bound off on each side for armholes). Happy knitting!
03.08.2016 - 09:38
![]() Tara Caldwell wrote:
Tara Caldwell wrote:
Forgive me, I understand the pattern. No need to reply.
06.02.2016 - 06:04
![]() Tara Caldwell wrote:
Tara Caldwell wrote:
I am knitting the woman's sweater number 125-10. I see the photo of the pattern, though the directions under "PATTERN: See diagram M.1" does not tell me how to knit the pattern. Am I missing the directions? Please help with how to knit the pattern. Your help is appreciated.
06.02.2016 - 06:01DROPS Design answered:
Dear Mrs Caldwell, you will work in pattern following diagram M.1 - see at the end of the pattern below the sleeve and diagram text just above. Read more about diagrams here. Happy knitting!
08.02.2016 - 11:09Karin wrote:
Dann? Das was unter dem Ärmel des Diagramms steht!
24.11.2013 - 18:25
![]() Bianca B. wrote:
Bianca B. wrote:
Hallo Liebes Drops Team Was ist das für ein Muster? Rippe und dann? Liebe Grüße
23.11.2013 - 21:28Runa wrote:
Diagram: below the sleeve diagram ( right side) as usual.
03.11.2013 - 16:42
![]() Viktoria wrote:
Viktoria wrote:
Hej. Håller nu på och stickar på den här tröjan, den blir lång och jättemysig. Har en fråga angående antalet maskor man ska plocka upp runt halsringningen. Hur ska man veta hur många man ska plocka upp eftersom det inte står något exakt antal? Tack på förhand /Viktoria
13.09.2013 - 14:58DROPS Design answered:
Plocka upp 40 till 60 m dvs 40 i den minsta str osv... blir det för många m går det att justera på 1:a varvet. Lycka till!
18.09.2013 - 13:20
|
|||||||
DROPS 125-10 |
|||||||
|
|
|||||||
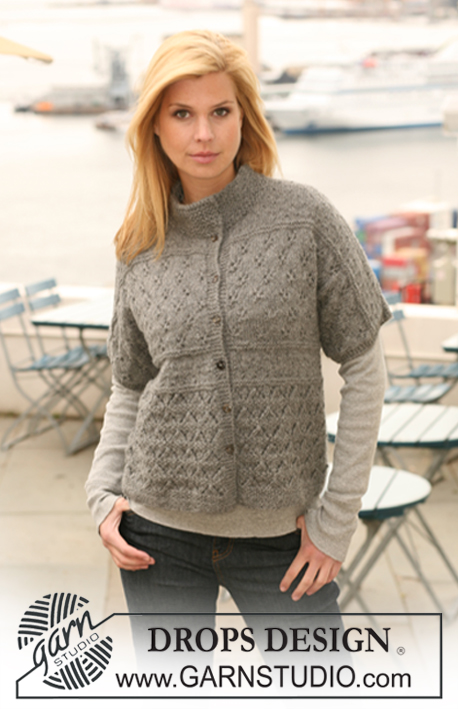
DROPS jumper in ”Snow”. Size S to XXXL.
DROPS 125-10 |
|||||||
|
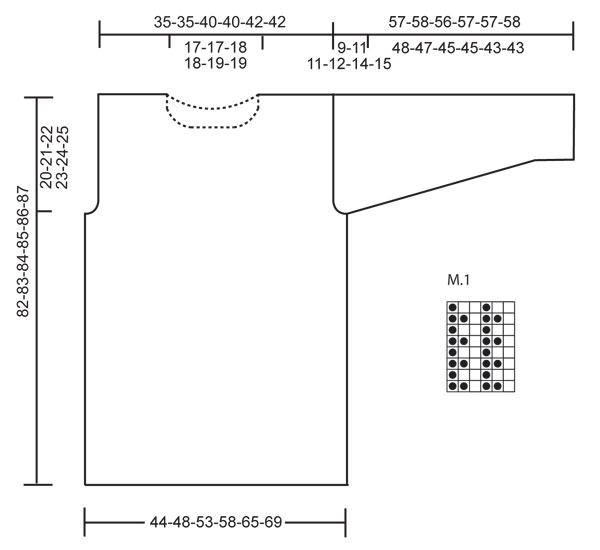
PATTERN: See diagram M.1. Diagram shows the pattern from RS. GARTER ST (in the round): K 1 round, P 1 round. INCREASING TIP-1: Inc 1 st by making 1 YO. On next round work YO into back of loop to avoid a hole. INCREASING TIP-2: Inc 1 st inside 1 edge st by making 1 YO. On next round work YO into back of loop to avoid a hole). Incorporate inc sts in M.1 as you go along. ------------------------------------------------------- BODY PIECE: Worked in the round. Cast on 97-106-117-128-143-152 sts on circular needle size 8 mm / US 11 with Snow. Work 6 rows GARTER ST - see above. AT THE SAME TIME on last row inc 17-20-21-22-25-28 sts evenly - See INCREASING TIP-1 = 114-126-138-150-168-180 sts. Insert a marker in first st and in st no 57-63-69-75-84-90 (mark the sides). Continue in M.1 in the round. REMEMBER THE GAUGE! When piece measures 62 cm / 24⅜" bind off 5 sts each side for armhole (the st with marker is the middle of these 5 sts). Cut the thread. Now complete each side separately. BACK PIECE: = 52-58-64-70-79-85 sts. Continue in pattern as before AT THE SAME TIME bind off for armhole at the beg of every row each side: 2 sts 1-2-2-4-5-7 times and 1 st 1-2-2-1-2-1 times = 46-46-52-52-55-55 sts. Continue until piece measures 79-80-81-82-83-84 cm / 31"-31½"-32"-32¼"-32¾"-33". Now bind off the middle 20-20-22-22-23-23 sts for neck and bind off 2 sts on neckline on next row = 12-12-14-14-15-15 sts left on shoulder. Continue until piece measures 82-83-84-85-86-87 cm / 32¼-32¾"-33"-33½"-33⅞"-34¼", bind off. FRONT PIECE: = 52-58-64-70-79-85 sts. Continue in pattern and bind off for armhole each side as described for back piece = 46-46-52-52-55-55 sts. When piece measures 79 cm / 31" slip the middle 18-18-18-18-19-19 sts on a stitch holder for neck and complete each side separately. Bind off to shape the neckline at beg of every row from mid front: 2 sts 1 times and 1 st 0-0-1-1-1-1 times = 12-12-14-14-15-15 sts left on shoulder. Continue until piece measures 82-83-84-85-86-87 cm / 32¼-32¾"-33"-33½"-33⅞"-34¼", bind off. SLEEVE: Worked back and forth on needle. Cast on 27-28-29-30-31-32 sts (includes 1 edge st each side) on needle size 8 mm / US 11 with Snow. Work 6 rows GARTER ST - see above, AT THE SAME TIME on last row inc 2-4-6-8-7-9 sts evenly = 29-32-35-38-38-41 sts. Continue in M.1 with 1 edge st each side. When piece measures approx 7 cm / 2¾" inc 1 st each side, and repeat the inc on every 4.5-4.5-4-4-3-3 cm / 1¾"-1¾"-1½"-1½"-1⅛"-1⅛" a total of 9-9-9-9-12-12 times - See INCREASING TIP-2 = 47-50-53-56-62-65 sts. Continue until piece measures approx 48-47-45-45-43-43 cm / 19"-18½"-17¾"-17¾"-17"-17" (NOTE! less for the larger sizes because of longer sleeve cap and wider shoulders). Now bind off 3 sts beg of following 2 rows for sleeve cap and bind off to shape the sleeve cap at the beg of every row each side: 2 sts 2-2-3-3-4-4 times and 1 st 0-0-0-1-1-0 times, then 2 sts at beg of every row each side until piece measures approx 55-56-54-55-55-56 cm / 21⅝"-22"-21¼"-21⅝"-21⅝"-22". Now bind off 3 sts each side 1 time and bind off remaining sts. Piece measures approx 57-58-56-57-57-58 cm / 22½"-22¾"-22"-22½"-22½"-22¾". ASSEMBLY: Sew shoulder seams. Set in sleeves. Sew sleeve seams inside 1 edge st. NECK: Worked in the round. Pick up 40 to 60 sts (includes sts on stitch holder) round neck on circular needle size 7 mm / US 10½ with Snow. P 1 round, K 1 round and P 1 round, AT THE SAME TIME adjust no of sts to 50-56-62-68-74-76 on last round. Now K 1 round and continue in rib K1/P1. When rib measures approx 4 cm / 1½", inc 1 st after every K1 (inc by making 1 YO). On next round K YO into back of loop = 75-84-93-102-111-114 sts. Now work M.1 on all sts. Continue until neck measures approx 24 to 26 cm / 9½" to 10¼" and bind off in M.1. |
|||||||
Diagram explanations |
|||||||
|
|||||||
 |
|||||||
Have you finished this pattern?Tag your pictures with #dropspattern or submit them to the #dropsfan gallery. Do you need help with this pattern?You'll find 22 tutorial videos, a Comments/Questions area and more by visiting the pattern on garnstudio.com. © 1982-2026 DROPS Design A/S. We reserve all rights. This document, including all its sub-sections, has copyrights. Read more about what you can do with our patterns at the bottom of each pattern on our site. |
|||||||


With over 40 years in knitting and crochet design, DROPS Design offers one of the most extensive collections of free patterns on the internet - translated to 17 languages. As of today we count 324 catalogs and 12290 patterns - 12280 of which are translated into English (US/in).
We work hard to bring you the best knitting and crochet have to offer, inspiration and advice as well as great quality yarns at incredible prices! Would you like to use our patterns for other than personal use? You can read what you are allowed to do in the Copyright text at the bottom of all our patterns. Happy crafting!
Post a comment to pattern DROPS 125-10
We would love to hear what you have to say about this pattern!
If you want to leave a question, please make sure you select the correct category in the form below, to speed up the answering process. Required fields are marked *.