
Popular categories
Looking for a yarn?


Comments / Questions (100)
![]() Diana wrote:
Diana wrote:
As well I want to add that my garter stitch boarder come out on the both sides of the shawl while in the image it’s at the top (the longest side) and M2 diagram was knitted in the image as a boarders. How this could happen?
05.03.2020 - 18:23DROPS Design answered:
Dear Diana, this shawl is worked top down, ie the 3 sts in garter stitch on each side will be on the top of the shawl when finished, and M.2 will be worked over all increased stitches along both sides of shawl, just before the crocheted edge. Happy knitting!
06.03.2020 - 09:29
![]() Diana wrote:
Diana wrote:
I’ve knitted this shawl and it came out totally different than in picture. My leaves are facing up while in the image it’s facing down. Also the rows in the diagrams show WS and RS, but instruction for diagrams says it’s from the RS! M2 diagram shows 2ktog, double yo and K1, while in the image the ending is 2ktog, double yo. How is this possible. The shawl is really nice but the instructions are written very poorly and confusing.
05.03.2020 - 17:58DROPS Design answered:
Dear Diana, remember your DROPS store will always provide you any individual assistance (even per mail or telephone) when you have worries with a pattern. And you can also ask your question there. Happy knitting!
06.03.2020 - 09:32
![]() Diana wrote:
Diana wrote:
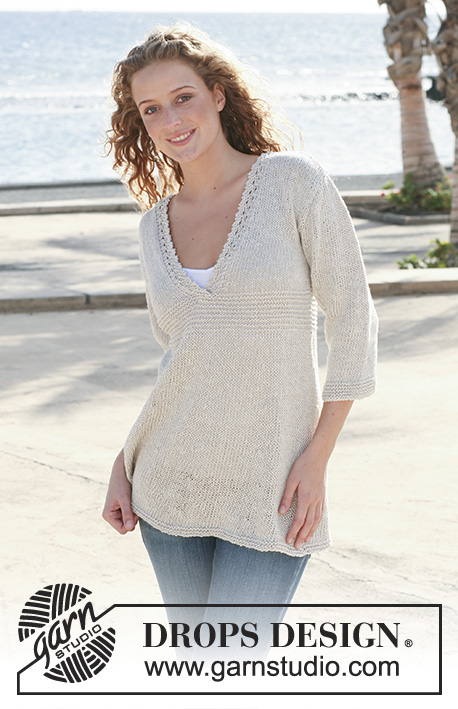
Hello, I’ve got totally lost in the pattern. I have followed your description of 3 garter stitches, 1 double YO, M1 A, M1C, 1 double YO, K1, 1 double YO, M1C, M1A, 1 double YO, 3 garter stitches. Then the pattern says to continue in Fig 1, so it should be as follows 3 garter stitches, 1 double YO, K2 tog, 1 double YO, K1, 1 double YO, K2 tog, 1 double YO, K1, and so on. Can you please let me know if I have understood the pattern correctly.
26.02.2020 - 17:21DROPS Design answered:
Dear Diana, Fig. 1 shows how to work the beginning of the shawl, this means you work as explained in the written pattern with M.1A, M.1C and double yos to increase and the 3 sts in garter st on each side. On 3rd row you will work as shown in fig: 3 sts in garterst, double yo, row 3 in M.1A, M1C, Double YO, K1, 3rd row in M.1A and M.1C, double YO, 3 sts in garter st. And so on. Happy knitting!
27.02.2020 - 08:56
![]() Ghislaine Ethier wrote:
Ghislaine Ethier wrote:
Bonjours c'est encore moi les explication que vous me donner ne fonctionne vraiment pas je suis très déçu car j'aime beaucoup ce modèle mais je bloque après la figure 1 quand je regarde le schéma m1 m1 b et m1c au troisième rang il y a 4 mailles ensuite au rang 5 il y a 5 mailles au rang 7 il y a 6 mailles et au rang 9 il y a 7 mailles !!!! Dommage je l'aimais beaucoup mais j'abandonne il est très très mal expliqué !!!!
10.05.2019 - 14:26DROPS Design answered:
Bonjour Mme Ethier, après fig. 1, vous avez tricoté de chaque côté de la m centrale: M.1A, 2 x M.1B en largeur, M.1C - au rang suivant, tricotez: M.1A, 3xM.1B en largeur, M.1C (de chaque côté de la m centrale, avec 3 m point mousse de chaque côté). On augm. comme avant 1 m à 3 m des bords + 1 m de chaque côté de la m centrale. Les modèles DROPS sont réalisés par des milliers de personnes du monde entier. Nous comprenons toutefois qu’en fonction du pays, les explications puissent être formulées différemment. Pour toute assistance individuelle complémentaire, n'hésitez pas à contacter votre magasin. Bon tricot!
10.05.2019 - 15:51
![]() Ghislaine Ethier wrote:
Ghislaine Ethier wrote:
Bonjour merci pour la réponse mais ce que vous me dites ça fonctionne pour la moitié du Chale après la maille centrale ca marche pas le nombre de mailles que vous dites n'arrive pas et aussi mon autre question est çe que le schéma m1A a toujours 3 mailles le m1C 2 mailles je le comprends vraiment pas SVP me mettre plus de détails merci !!!
09.05.2019 - 12:09DROPS Design answered:
Bonjour Mme Ethier, une erreur de calcul de ma part dans la 2ème moité (sur l'endroit), on répéète M.1B jusqu'à ce qu'il reste 5 m, puis on tricote M.1C (= 2 m), 1 double jeté et 3 m point mousse. Le nombre de mailles indiqué ici et précédemment se rapporte au 1er rang. Tous les rangs, on augmente d'1 m en plus dans chaque M.1A et M.1C (cf diagrammes) = le double jeté avant M.1A/Après M.1C à 3 m point mousse des bords et de chaque côté de la m centrale. Bon tricot!
09.05.2019 - 14:13
![]() Ghislaine Ethier wrote:
Ghislaine Ethier wrote:
Bonjour je trouve çe Chale super beau mais je comprend pas le schéma pour le diagramme fig 1 pas de problème mais après je ne sais plus quoi faire j'aurais besoin de votre aide pour le continuer le diagramme m1 je le comprend vraiment pas !!! Merci
09.05.2019 - 01:10DROPS Design answered:
Bonjour Mme Ethier, quand vous avez fini la fig. 1 vous continuez comme avant: 3 m point mousse, 1 double jeté, M1A (= 3 m), répétez M1B jusqu'à ce qu'il reste 2 m avant la maille centrale, M1C (= 2m), 1 double jeté, 1 m jersey end (= m centrale), 1 double jeté, M1A, répétez M1B jusqu'àu ce qu'il reste 6 m, M1C (= 2 m), 1 double jeté, 3 m point mousse. À chaque fois que vous tricotez 1 fois les diagrammes M.1A à M.1C en hauteur, vous avez suffisamment de mailles pour tricoter 1 motif de plus de M.1B entre M.1A et M.1C de chaque côté de la m centrale. Bon tricot!
09.05.2019 - 10:47
![]() Hélène wrote:
Hélène wrote:
Bonjour, au moment où je dois tricoter un motif de M1B en plus de chaque côté de la maille centrale, je me retrouve avec 2 doubles jetés à la suite (celui qui vient après la maille centrale et celui du début de M1B). Au rang suivant, les tricote-t-on de la même façon que les autres ?
24.01.2019 - 16:33DROPS Design answered:
Bonjour Hélène, tricotez les augmentations au milieu comme la Fig. 1 le montre: vous terminez la 1ère moitié du châle par 1 jeté, puis vous tricotez la maille centrale, et commencez la 2ème moitié du châle par 1 jeté, 1 m end. Vous ne devez pas avoir 2 jetés à suivre au milieu du châle. Bon tricot!
25.01.2019 - 08:34
![]() Hélène wrote:
Hélène wrote:
Bonjour, est-ce que les jetés entre 2 mailles qui se trouvent à la fin de M1A et au début de M1C font partie de ces diagrammes ou de M1B ?
11.01.2019 - 12:27DROPS Design answered:
Bonjour Hélène, le jeté au début de M.1B appartient à M.1B et compense la diminutions, le jeté au début de M.1C appartient à M.1C et vient compenser la diminution également. Regardez dans Fig.1 comme se tricote M.1 et le début du châle pour mieux comprendre les motifs. Bon tricot!
11.01.2019 - 12:34
![]() Monica wrote:
Monica wrote:
Buongiorno, non capisco cosa vuol dire "incorporare gli aumenti" quando sto lavorando M2. Non li devo fare? Dalla figura non si capisce molto ... Grazie per una risposta - Monica
24.11.2018 - 16:37DROPS Design answered:
Buongiorno Monica. Continua ad aumentare anche quando lavora M2. Lavora poi le nuove maglie come indicato nella riga del diagramma M2 che sta lavorando. Buon lavoro!
24.11.2018 - 16:49
![]() Marechal wrote:
Marechal wrote:
Je comprend pas tres bien dois je suivre la fig1 ou les diagramme fait les augmentations jusqu a 17 m au total puis il faut passer au M1A et M1C et la je bloque cela ne corresponds pas a la fig 1 je pense que M1A correspond donc au rang 3 de la fig 1 est ce bien cela ? svp au secours aider moi rapidement car c 'est pour un mariage et rapidement merci merci cordialement annick en francais svp
12.02.2017 - 21:36DROPS Design answered:
Bonjour Mme Marechal, quand vous avez les 17 m, tricotez ainsi: 3 m point mousse, 1 double jeté, M1A (= 3 m), M1C (= 2 m), 1 double jeté, 1 m jersey end (= m centrale), 1 double jeté, M1A, M1C et terminer par 1 double jeté, 3 m point mousse, c'est-à-dire comme indiqué dans fig. 1 où les jetés sont représentés après les 3 m point mousse, de chaque côté de la m centrale et avant les 3 m point mousse. Bon tricot!
13.02.2017 - 12:02
|
|||||||||||||||||||||||||||||||
Folie#folieshawl |
|||||||||||||||||||||||||||||||
|
|
|||||||||||||||||||||||||||||||
Knitted DROPS shawl with lace pattern in ”Snow”.
DROPS 112-2 |
|||||||||||||||||||||||||||||||
|
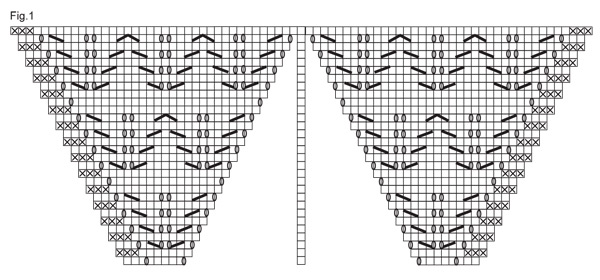
PATTERN: See diagram M.1, M.2 and M.3. The diagrams show the pattern from the RS. Fig-1 shows how to work the beg of the shawl. GARTER ST (back and forth on needle): K all rows. INCREASING TIP: Make all inc from RS. Inc 4 sts on every other row until finished measurements as follows: Inc 1 st at beg of row as follows: 3 garter st, 1 double YO. On return row P 1 YO and slip the other YO off needle. Inc 2 sts mid piece as follows: 1 double YO, 1 stockinette st (= st with marker), 1 double YO. On return row P 1 YO and slip the other YO off needle each side of st with marker. Inc 1 st at the end of row as follows: 1 double YO, 3 garter sts. On return row P 1 YO and slip the other YO off needle. -------------------------------------------------------- SHAWL: To fit in all sts work shawl back and forth on circular needle. The piece is worked from the top down mid back. NOTE: Make sure to start a new ball at the beg of row and not mid piece. Cast on 7 sts on circular needle size 8 mm / US 11 with Snow. Insert a marker in the 4th st (marks the middle). Work first row as follows (= RS): 3 garter sts, 1 double YO, K1, 1 double YO, 3 garter sts = 9 sts. Continue in stockinette st with 3 garter sts each side, AT THE SAME TIME inc 4 sts on every other row (= every row from RS) – SEE INCREASING TIP! Continue like this until there are 17 sts on row. REMEMBER THE KNITTING GAUGE! Now continue as follows from RS: 3 garter sts, 1 double YO, M.1 A (= 3 sts), M.1 C (= 2 sts), 1 double YO, K1 (= middle st), 1 double YO, M.1 A, M.1 C and finish with 1 double YO and 3 garter sts. Continue the inc at the sides and mid back - see Fig 1. After 1 vertical repeat of M.1 (= 37 sts) continue as follows: 3 garter sts, 1 double YO, M.1 A (= 3 sts), M.1 B on the next 10 sts, M.1 C (= 2 sts), 1 double YO, K1 (= middle st), 1 double YO, M.1 A, M.1 B on the next 10 sts, M.1 C, 1 double YO, 3 garter sts. Continue in pattern like this, but for every vertical repeat of M.1 work 1 extra repeat of M.1 B on each side of the middle. When piece measures 70 cm / 27½", adjust to a full repeat of M.1, continue in stockinette st on all sts until piece measures 75 cm / 29½" (continue the inc at the sides and mid back), then work M.2 on all sts – incorporate the inc sts in pattern as you go along. Bind off loosely. CROCHET BORDER: Crochet a border along bind off row (crochet along one short side towards the point and up along the other short side) as follows with crochet hook size 8 mm / L/11: M.3 A, then repeat M.3 B and finish with M.3 C. Make sure to have a full repeat of M.3 B on both sides of point. Cut the thread and fasten. |
|||||||||||||||||||||||||||||||
Diagram explanations |
|||||||||||||||||||||||||||||||
|
|||||||||||||||||||||||||||||||
 |
|||||||||||||||||||||||||||||||
 |
|||||||||||||||||||||||||||||||
Have you finished this pattern?Tag your pictures with #dropspattern #folieshawl or submit them to the #dropsfan gallery. Do you need help with this pattern?You'll find 18 tutorial videos, a Comments/Questions area and more by visiting the pattern on garnstudio.com. © 1982-2026 DROPS Design A/S. We reserve all rights. This document, including all its sub-sections, has copyrights. Read more about what you can do with our patterns at the bottom of each pattern on our site. |
|||||||||||||||||||||||||||||||


With over 40 years in knitting and crochet design, DROPS Design offers one of the most extensive collections of free patterns on the internet - translated to 17 languages. As of today we count 324 catalogs and 12290 patterns - 12280 of which are translated into English (US/in).
We work hard to bring you the best knitting and crochet have to offer, inspiration and advice as well as great quality yarns at incredible prices! Would you like to use our patterns for other than personal use? You can read what you are allowed to do in the Copyright text at the bottom of all our patterns. Happy crafting!
Post a comment to pattern DROPS 112-2
We would love to hear what you have to say about this pattern!
If you want to leave a question, please make sure you select the correct category in the form below, to speed up the answering process. Required fields are marked *.