
Popular categories
Looking for a yarn?


Comments / Questions (29)
![]() Federica wrote:
Federica wrote:
Buona sera, nel titolo del modello si parla di "cardigan lungo con coda" ma leggendo le spiegazioni non riesco a capire: la parte dietro è più lunga? Grazie
10.10.2025 - 21:40DROPS Design answered:
Buonasera Federica, abbiamo aggiornato il titolo: è semplicemente un cardigan lungo. Buon lavoro!
11.10.2025 - 19:47
![]() SIMONNET Jacqueline wrote:
SIMONNET Jacqueline wrote:
Super modèle de béret réalisé en aig. 3 après avoir doublé le nbre de mailles (68) et donc celles entre les marqueurs. Je le conserve précieusement car je voudrai en faire un autre plus grand et ainsi pouvoir le feutrer.MERCI
08.05.2025 - 18:17
![]() VALERIE VATIN wrote:
VALERIE VATIN wrote:
Bonjour je ne trouve pas la repartition .des marqueur pour la réalisation du beret. Sur la diagramme il n y a ni notion de maille, ni de cm. Est-ce possible de l avoir? Merci
13.12.2022 - 10:12DROPS Design answered:
Bonjour Mme Vatin, les marqueurs sont placés juste après le rang de montage, cf Répartir 5 marqueurs ainsi : le 1er après 2 m, le 2ème à 6 m .... . Les rangs raccourcis se tricotent en suivant les explications écrites ou le schéma fig.1 - où chaque chiffre correspond au marqueur et A le début de rang sur l'endroit, B la fin de rang sur l'endroit/le début de rang sur l'envers. Bon tricot!
13.12.2022 - 11:27
![]() Marion wrote:
Marion wrote:
Hallo. Ich versuche gerade die Abnahmen für den Halsausschnitt zu verstehen. \"Innerhalb der äussersten M. und den neuen Kragenmaschen abn. \" Dann kommt kurz danach die Unterscheidung ob nach oder vor den Blenden/Kragenmaschen die Abnahmen erfolgen, dann so oder so abn. Aber wenn ich innerhalb der äussersten M und den neuen Kragenmaschen abn, dann ist das ja weder vor noch nach den Blendenblabla M. sondern direkt in den neuen Kragenmaschen.
18.02.2019 - 22:24DROPS Design answered:
Liebe Marion, die neuen Maschen für den Kragen sind nach der 1. Masche der Reihe /vor der 1. Masche der Reihe zugenommen. Für den Halsausschnitt nehmen Sie so ab: Re. Vorderteil: nach den Kragenmaschen (= die zugenommen Maschen) + den Blendemaschen - Li.Vorderteil: vor den Blendemaschen + den Kragenmaschen - dh die Maschenanzahl der Partien glatt rechts gestrickt wird abnehmen. Viel Spaß beim stricken!
19.02.2019 - 09:23
![]() Laure wrote:
Laure wrote:
Je démarre le projet et suis confuse avec la première notion de l explication : "VESTE point mousse tricoté en aller retours: tricoter tous les rangs à l'endroit" Et le fait que le corps du travail est en jersey (je comprends cela comme un rang endroit un rang envers en aller-retour). Ce projet n'est donc pas fait au point mousse? Merci
19.01.2019 - 10:32DROPS Design answered:
Bonjour Laure, les explications de la veste commencent avec "Réalisation/Dos". Au début des explications du modèle lui même, on ajoute toujours quelques explications sur les techniques utilisées dans le modèle, par ex ici comment tricoter du point mousse, les côtes etc.. Cette veste se tricote bien en jersey après les côtes du bas. Bon tricot!
21.01.2019 - 09:54
![]() Victoria wrote:
Victoria wrote:
Hola. Preciosa chaqueta. ¿Sois conscientes que en español falta parte del patrón escrito? Por ejemplo el inicio de la espalda. Gracias.
03.02.2018 - 00:40DROPS Design answered:
Hola Victoria. Gracias por avisar, ya está publicado el texto completo.
04.02.2018 - 19:44
![]() Helle Kalmar wrote:
Helle Kalmar wrote:
Når man tager ud til kraven, er det så med samme garn som forkanten (dvs. Både Alpaca og Vivaldi garn?). Eller tager man kun ud i alpaca garnet?
05.01.2018 - 20:34DROPS Design answered:
Hei Helle. Når vrangborden måler 12 cm, byttes det til pinne 5 og man strikker videre med bare Alpaca (1 tråd sort + 1 tråd mørk grå), men stolpen strikkes hele veien med 3 tråder (1 tråd Vivaldi + 1 tråd sort Alpaca + 1 tråd mørk grå Alpaca). Når du starter med økningen til kragen, strikkes den med garn lik stolpen. God Fornøyelse
10.01.2018 - 11:10
![]() Laura wrote:
Laura wrote:
Non capisco come confezionare il basco Z-349
22.09.2017 - 18:21DROPS Design answered:
Buonasera Laura, il basco è lavorato in piano nel senso della lunghezza utilizzando la tecnica dei ferri accorciati: alla fine lo deve cucire al centro dietro e deve cucire l'apertura in alto facendo passare un filo nelle maglie, tirando e affrancando. Buon lavoro!
22.09.2017 - 19:46
![]() Guddi wrote:
Guddi wrote:
Hallo, ich bin jetzt hier: Von der rechten Seite: * 1 Krausrippe über alle M., 1 Krausrippe nur über die äussersten 8 M. (= gegen die Mitte) *, von *-* wiederholen bis der Kragen von der Schulter her, an der kurzen Seite 6-6-6-7-7-7 cm misst. 1 Krausrippe über alle M gestrickt, werden jetzt die 8 M von der Mitte her gestrickt? Wenn ja, dann wie weiter? Jetzt bin ich mitten in der Reihe, jetzt Arbeit wenden? Und dann? So komme ich nicht mehr dazu alle M zu stricken!? Bitte bitte Hilfe
05.03.2016 - 10:18DROPS Design answered:
Liebe Guddi, ja Sie wenden die Arbeit dann. Es sind verkürtze Reihen, damit der Kragen schön fällt und die Kante nicht spannt. Schauen Sie sich am besetn die beiden verlinkten Videos zum Thema "Verkürzte Reihen kraus rechts" an, dann wird es sicher klarer, wie gestrickt werden soll.
06.03.2016 - 08:03
![]() Lecat wrote:
Lecat wrote:
Bonjour je n arrive pas à poster au bonne endroit je voudrais savoir si je peux remplacer le fils vivaldi par le fils alpaca merci
07.10.2015 - 09:22DROPS Design answered:
Voir réponse ci-dessous.
07.10.2015 - 10:10
|
|
DROPS 110-5 |
|
 |
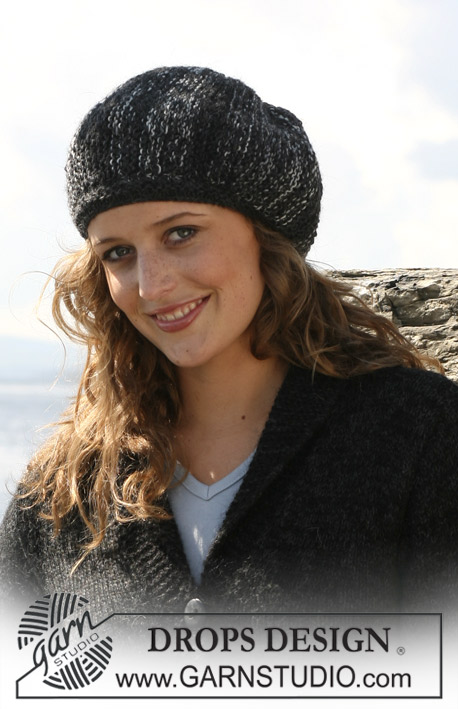 |
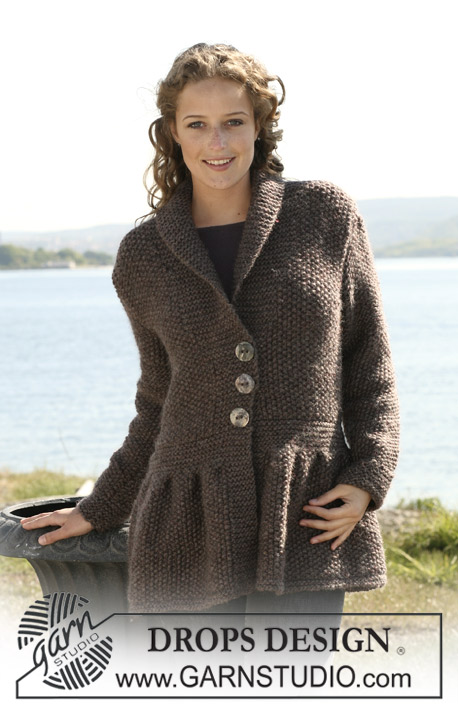
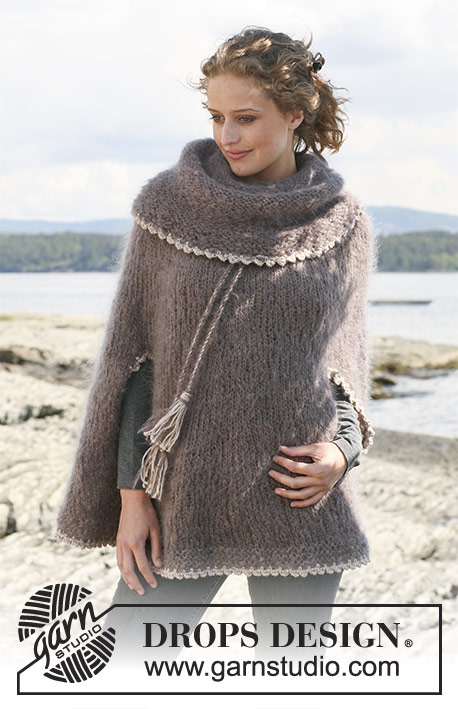
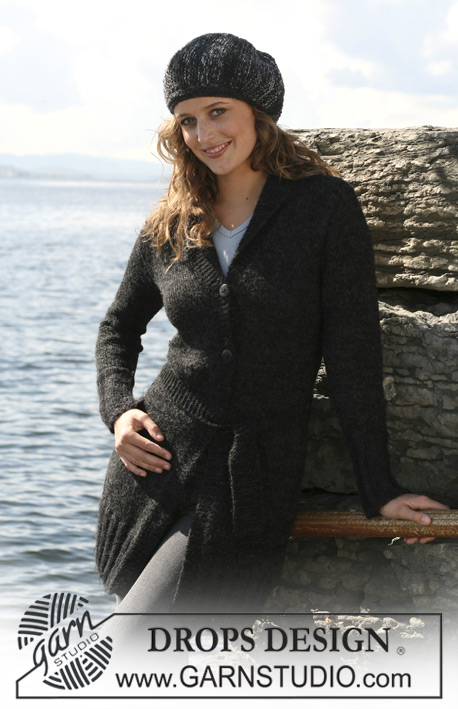
DROPS long, tailored jacket in ”Alpaca” and ”Vivaldi” with belt and Basque hat in ”Fabel” and ”Alpaca”, worked from side to side. Size S - XXXL
DROPS 110-5 |
|
|
JACKET Garter st, back and forth on needle: K all rows. Rib: * K3, P3 *, repeat from *-*. Front band: Worked in 3 threads - 1 Vivaldi + 1 Alpaca of each color – in garter st on 6 sts towards mid front. The rest of the jacket is worked in 2 threads. Buttonholes: bind off for buttonholes on right front band. 1 buttonhole = cast of 4th and 5th st from mid front and cast on 2 new sts on return row. Bind off for buttonholes when piece measures 36, 48 and 60 cm [14¼", 19" and 23⅝"] for all sizes. Increasing tip, applies to collar: Inc 1 st by making 1 YO inside 1 st. On return row work into back of yo-loop to avoid a hole. Decreasing tip, applies to neckline: Dec for neckline inside the front band + inc sts for collar. Make all dec from the RS as follows: After front band + collar sts: Slip 1 st as if to K, K1, psso. Before front band + collar sts: K2 tog. BACK PIECE Cast on 95-101-113-125-137-149 sts (includes 1 edge st each side) on needle size 4.5 mm [US 7] with 1 thread dark gray Alpaca + 1 thread black Vivaldi. Work rib as follows (first row = RS): Size S: 1 edge st, P3, * K3, P3 *; repeat from *-*, and finish with 1 edge st. Size M, L, XL, XXL and XXXL: 1 edge st, K3, * P3, K3 *, repeat from *-*, and finish with 1 edge st. When rib measures 12 cm [4¾"’] change to needle size 5 mm [US 8] and 1 thread black + 1 thread dark gray Alpaca. Continue in stockinette st, at the same time dec 15-16-18-20-22-24 sts evenly on first row = 80-85-95-105-115-125 sts. Remember the knitting gauge! When piece measures 14 cm [5½"] dec 1 st each side on every 4-4-4-5-5-5 cm [1½"-1½"-1½"-2"-2"-2"] a total of 8-8-8-7-7-7 times = 64-69-79-91-101-111 sts. When piece measures 47-47-47-48-48-48 cm [18½"-18½"-18½"-19"-19"-19"] inc 1 st each side on every 4-4-5-6-6-6 cm [1½"-1½"-2"-2⅜"-2⅜"-3⅜"] a total of 5-5-4-3-3-3 times = 74-79-87-97-107-117 sts. When piece measures 66 cm [26"] for all sizes bind off for armhole each side at the beg of every row: 4 sts 0-0-0-0-1-1 time, 3 sts 1-1-1-2-2-3 times, 2 sts 1-2-3-3-3-3 times and 1 st 2-2-3-3-3-4 times = 60-61-63-67-69-71 sts. When piece measures 83-84-85-86-87-88 cm [32¾"-33"-33½"-33⅞"-34¼"-34⅝"] bind off the middle 16-17-17-19-19-19 sts for neck and complete each shoulder separately. Dec 1 st on neckline on next row = 21-21-22-23-24-25 sts left on each shoulder. Bind off when piece measures 85-86-87-88-89-90 cm [33½"-33⅞"-34¼"-34⅝"-35"-35½"]. RIGHT FRONT PIECE Cast on 52-55-61-67-73-79 sts (includes 1 edge st at side and 6 front band sts towards mid front) on needle size 4.5 mm [US 7] with 1 thread dark gray Alpaca + 1 thread black Vivaldi. Work first row as follows from the RS: 6 front band sts – see explanation above, * K3 P3 *, repeat from *-* and finish with 1 edge st. When rib measures 12 cm [4¾"], change to needle size 5 mm [US 8] and 1 thread black and 1 thread dark gray Alpaca. Continue in stockinette st, at the same time dec 7-8-9-10-11-12 sts evenly on first row (do not dec on front band sts) = 45-47-52-57-62-67 sts. When piece measures 14 cm [5½"] dec at side as described for back piece = 37-39-44-50-55-60 sts. At the same time when piece measures 36 cm [14¼"] bind off for buttonhole on front band – see above. Now read all of the following section before continuing! When piece measures 47-47-47-48-48-48 cm [18½"-18½"-18½"-19"-19"-19"] inc at side as described for back piece. Collar: At the same time when piece measures 63 cm [24¾"] inc 1 st for collar – see Increasing tip - on every other row 8 times and then on every 4th row 6 times = 20 garter sts in total. Neckline: At the same time when piece measures 65 cm [25½"] bind off to shape the neckline – see Decreasing tip: 1 st on every other row 6 times and then 1 st on every 4th row 8-8-8-9-9-9 times = 35-35-36-37-38-39 sts. Armhole: At the same time when piece measures 66 cm [26"] bind off for armhole as described for back piece. When piece measures 85-86-87-88-89-90 cm [33½"-33⅞"-34¼"-34⅝"-35"-35½"] bind off 21-21-22-23-24-25 sts on shoulder towards the neckline - the remaining 14 sts = collar. Continue as follows from the RS: * 2 rows garter st on all sts, 2 rows garter st on the 8 sts towards mid front only *, repeat from *-* until collar measures 6-6-6-7-7-7 cm [2⅜"-2⅜"-2⅜"-2¾"-2¾"-2¾"] on the shorter side from shoulder. Slip sts on a stitch holder. LEFT FRONT PIECE Like right front piece, but mirrored and without buttonholes. SLEEVE Cast on 44-44-44-50-50-50 sts (includes 1 edge st each side) on needle size 4.5 mm [US 7] with 1 thread dark gray Alpaca + 1 thread black Vivaldi. Work 15 cm [6"] rib, K3/P3, with 1 edge st each side. Change to needle size 5 mm [US 8] and 1 thread black + 1 thread dark gray Alpaca. Continue in stockinette st. When piece measures 17 cm [6¾"] inc 1 st each side on every 4-3-2.5-3-2-1.5 cm [1½"-1⅛"-⅞"-1⅛"-¾"-½"] a total of 8-10-11-10-12-14 times = 60-64-66-70-74-78 sts. When piece measures 49-48-47-46-45-44 cm [19¼"-19"-18½"-18"-17¾"-17¼"] (less on the larger sizes because longer sleeve cap) bind off for sleeve cap each side at the beg of every row: 3 sts 1 time, 2 sts 3 times, 1 st 2-3-4-5-6-7 times, then 2 sts each side until piece measures 57 cm [22½"], now bind off 3 sts each side 1 time and bind off remaining sts. Sleeve measures approx 58 cm [22¾"]. ASSEMBLY Sew shoulder seams. Sew collar tog mid back (sew tog sts from stitch holders with duplicate sts) and sew to neckline. Set in sleeves. Sew side and sleeve seams inside 1 edge st. Sew on buttons. BELT Cast on 10 sts with 1 thread black Vivaldi + 1 thread dark gray Alpaca on needle size 4.5 mm [US 7]. Work garter st until belt measures 130-140-150-160-170-180 cm [51"-55"-59"-63"-67"-71"] and bind off. ______________________________________________________________________ BASQUE HAT Worked from side to side. Loosely cast on 34 sts with 1 thread of each quality on needle size 5 mm [US 8]. Insert 5 Marking Threads (MT) as follows: MT-1 after 2 sts, MT-2 6 sts from MT-1, MT-3 8 sts from MT-2, MT-4 12 sts from MT-3, MT-5 4 sts from MT-4 = 2 sts left. K 2 rows on all sts and now continue with shortened rows – see below. Remember the knitting gauge! When hat measures 48 cm [19"] at bottom edge (by A) bind off loosely. Pick up 80 sts along bottom edge on needle size 5 mm [US 8] with 2 threads Alpaca. K 4 rows, P 1 row and bind off loosely from the RS. Sew hat tog mid back. Sew a thread through hat at the top, pull tight and fasten. Shortened rows: To shape the hat and make it wider in the middle work shortened rows as follows – also see fig-1, beg by A. It is important to tighten thread when turning mid piece: * work row to MT-4, turn piece, work row to MT-1, turn piece, work row to MT-3, turn piece, work row to MT-2, turn piece, work row to MT-5, turn piece, work all sts on row (= to A), turn piece, work row to MT-4, turn piece, work row to MT-1, turn piece, work row to MT-3, turn piece, work row to MT-2, turn piece, work all sts on row (= to B), turn piece, work all sts on row (= to A) *, repeat from *-*. I.e. 1 repeat = 12 rows. |
|
 |
|
Have you finished this pattern?Tag your pictures with #dropspattern or submit them to the #dropsfan gallery. Do you need help with this pattern?You'll find 19 tutorial videos, a Comments/Questions area and more by visiting the pattern on garnstudio.com. © 1982-2026 DROPS Design A/S. We reserve all rights. This document, including all its sub-sections, has copyrights. Read more about what you can do with our patterns at the bottom of each pattern on our site. |
|


With over 40 years in knitting and crochet design, DROPS Design offers one of the most extensive collections of free patterns on the internet - translated to 17 languages. As of today we count 324 catalogs and 12291 patterns - 12281 of which are translated into English (US/in).
We work hard to bring you the best knitting and crochet have to offer, inspiration and advice as well as great quality yarns at incredible prices! Would you like to use our patterns for other than personal use? You can read what you are allowed to do in the Copyright text at the bottom of all our patterns. Happy crafting!
Post a comment to pattern DROPS 110-5
We would love to hear what you have to say about this pattern!
If you want to leave a question, please make sure you select the correct category in the form below, to speed up the answering process. Required fields are marked *.