
Popular categories
Looking for a yarn?


Comments / Questions (3)
![]() Anne Wickel wrote:
Anne Wickel wrote:
Ich verstehe die Anleitung nicht. Könnten Sie mir das evtl. genauer erklären, wie man die Maschen nach dem Kreis einarbeitet und was ist mit den Hilfsfäden gemeint und mit welcher von den 5 Nadeln fange ich an. LG Anne wicke
02.11.2024 - 19:32DROPS Design answered:
Liebe Frau Wickel, nach dem Kreis, den Faden abschneiden, dann 7 bis 13 M (siehe Größe) anschlagen und am Ende jeder Hinreihe zuerst 2 dann 3 Mal dazu stricken bis 35-49 M auf der Nadeln sind; dann die andere Seite genauso aber spiegelverkehrt stricken: die stillgelegten Maschen werden am Ende einer Rückreihe dazugestrickt. Wenn Alle Maschen vom beiden Seiten gestrickt sind = 70-98 M strickt man das obere Teil weiter mit Armlöcher und Halsausschnitt. Viel Spaß beim Stricken!
04.11.2024 - 08:37
![]() DROPS Design wrote:
DROPS Design wrote:
Kommer hullerne når du flytter maskerne fra tråden og tilbage til pinden ? Kan sidste omg inden du satte m på tråden være strikket for løst ? Hvis det er overgangen imellem maskerne på tråden og de nye m. Så kan du gøre det at du samler en m op i hullet og strikker den sammen med næste maske på næste omgang. Mvh Drops Design
14.02.2007 - 08:50
![]() Lilli Larsen wrote:
Lilli Larsen wrote:
Når jeg har strikket rundt og skal til at strikke resten af forstykket bliver der huller når jeg skal strikke masker fra tråd og hen på pinden.
13.02.2007 - 13:05
|
|||||||
DROPS 80-3 |
|||||||
|
|
|||||||
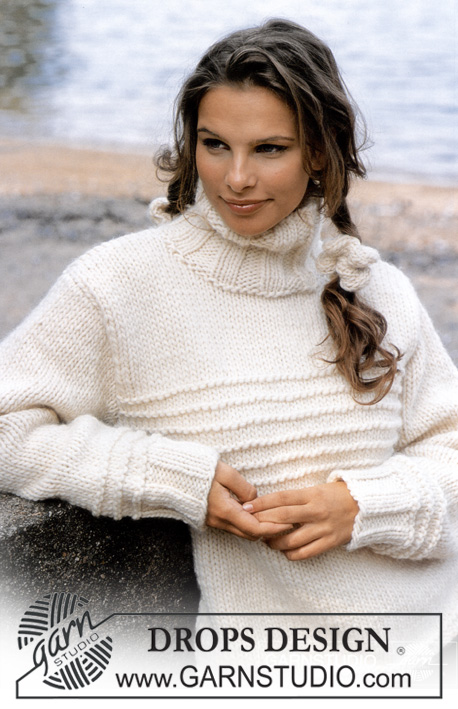
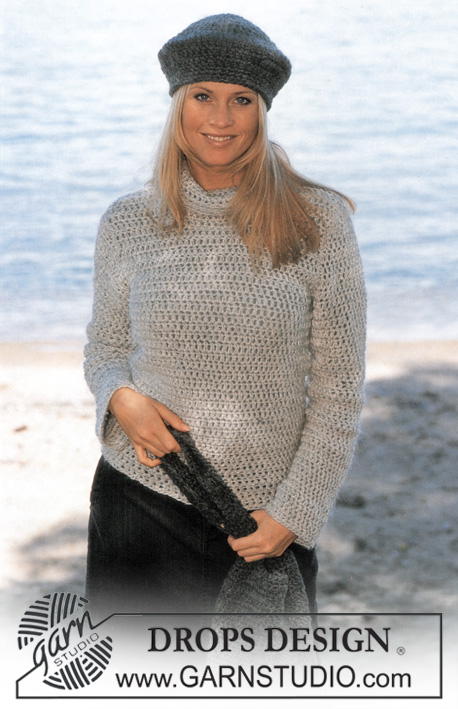
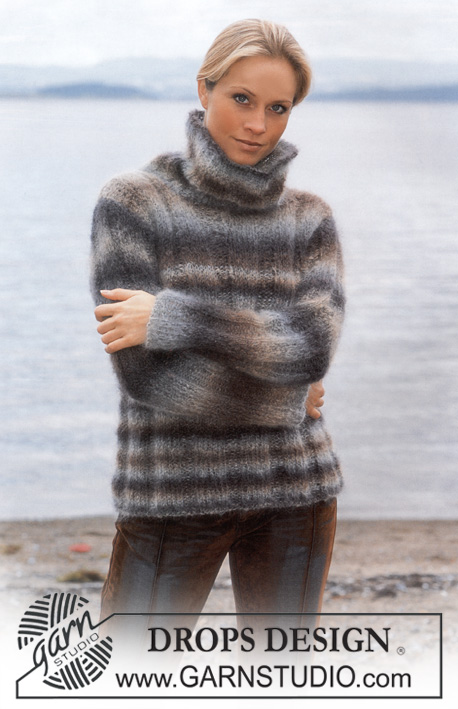
DROPS Pullover in Alaska, Scarf in Vienna
DROPS 80-3 |
|||||||
|
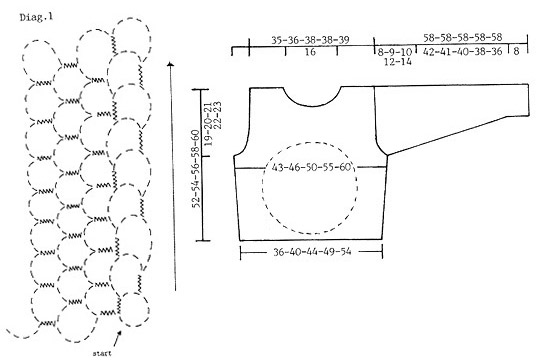
PULLOVER: Gauge: 16 sts x 20 rows in stockinette st = 10 x 10 cm Knitting tips (for lower division on front): From right side dec 1 st as follows: At end of row: put yarn in back of work, put 1 st from holding needle onto left needle, sl that st as if to K, K 1, psso. At beginning of row: put yarn in back of work, put 1 st from holding needle onto left needle and K 2 tog. From wrong side dec 1 st as follows: At end of row: put yarn in front of work, put 1 st from holding needle onto left needle, P 2 tog. At beginning of row: put yarn in front of work, put 1 st from holding needle onto left needle and P 2 tog, twisting sts (or if this is easier: slip 2 sts to right needle, return to left needle one by one, twisting each, then P 2 tog). Knitting tip (for adding in sts): When adding in 2 or 3 sts (for lower front), put them onto the left needle and knit those sts first on the row. Front: The front is knit from the center of the circle out. Change from double-pointed needles to short circular needles and then long circular needles as needed to accommodate sts. When knitting on circular needles put markers in to correspond to the division on the 5 double-pointed needles. Circle: Cast on 10 sts and divide onto 5 double-pointed needles. Knit 2 rows garter st. Then knit stockinette st, increasing in the last st on each needle (by knitting 2 sts in 1 st). This increases 5 sts per row. Inc every row 26-28-30-32-34 times = 140-150-160-170-180 sts. The work now measures approx. 26-28-30-32-34 cm in diameter. Put all sts on 2 circular needles as follows: start at the 1st marker and put 56-60-64-68-72 sts onto holding needle-1 and then 84-90-96-102-108 sts onto holding needle-2. Upper side of front: Cast on 7-8-9-11-13 sts on circular needles. Knit stockinette st, adding sts from one side of holding needle-1 every other row – see Knitting tip: 2 sts 8-6-4-2-0 times and then 3 sts 4-6-8-10-12 times = 35-38-41-45-49 sts. Repeat on the other side of holding needle-1. When all sts on holding needle-1 have been knit onto new needle, plus new sts cast on at each side = 70-76-82-90-98 sts. Bind off for armhole at each side every other row: 3 sts 1-1-1-2-2 times, 2 sts 1-2-3-3-4 times and 1 st 2-2-2-3-4 times = 56-58-60-60-62 sts. Continue in stockinette st until the piece measures 12-13-14-15-16 cm beginning of armholes. Now bind off the center 10 sts for the neck. Then bind off at each neck edge every other row: 3 sts 1 time, 2 sts 1 time and 1 st 3 times = 15-16-17-17-18 sts remain on each shoulder. Continue in stockinette st until armhole measures 19-20-21-22-23 cm (neck will be approx. 7 cm deep), then bind off. Lower side of front: Pick up 1 st in each of the 7-8-9-11-13 sts cast on for upper side on circular needles. Knit stockinette st, adding 1 st from one side of holding needle-2 on alternately every and every other row – see knitting tips – you are adding and decreasing at the same time so that you always have 7-8-9-11-13 sts. Continue until you have added in 19-20-21-22-23 sts from holding needle = 65-70-75-80-85 sts remain on holding needle-2. Then add in sts every other row – do not dec these sts, but just add in: 2 sts 3-2-1-3-2 times and 3 sts 1-2-3-2-3 times = 16-18-20-23-26 sts – see knitting tip. Put aside and repeat on the other side of circle. Then put all sts on lower edge on needle as follows: 16-18-20-23-26 sts from one side, 28-30-32-34-36 sts from holding needle-2, 16-18-20-23-26 sts from the other side = 60-66-72-80-88 sts. Knit stockinette st until the piece measures 51-53-55-57-59 cm from shoulder. Knit 4 rows garter st, bind off. Back: Cast on 60-66-72-80-88 sts and knit 4 rows garter st, then knit stockinette st. When the piece measures 12 cm inc 1 st at each side every 4 cm 5 times = 70-76-82-90-98 sts. When the piece measures 33-34-35-36-37 cm bind off for armhole at each side every other row: 3 sts 1-1-1-2-2 times, 2 sts 1-2-3-3-4 times and 1 st 2-2-2-3-4 times = 56-58-60-60-62 sts. When the piece measures 50-52-54-56-58 cm bind off the center 24 sts for the neck. On the next row dec 1 st at each neck edge = 15-16-17-17-18 sts remain on each shoulder. Bind off when the piece measures 52-54-56-58-60 cm. Sleeve: Cast on 34-36-38-42-42 sts. Knit 4 rows stockinette st (= rolled edge) – measure the work from here. Knit garter st for 6 cm, then knit stockinette st to finished measurements. When the piece measures 8 cm inc 1 st at each side every 4-3.5-3-3-2.5 cm a total of 11-12-13-13-14 times = 56-60-64-68-70 sts. When the piece measures 50-49-48-46-44 cm bind off for sleeve cap at each side every other row: 3 sts 1 time, 2 sts 3 times and 1 st 0-1-2-4-6 times, then bind off 2 sts at each side until sleeve measures 57 cm, then bind off 3 sts at each side 1 time. The piece measures approx. 58 cm, bind off the remaining sts. Assembly: Sew shoulder seams. Neckband: Pick up approx. 60-70 sts around the neck on short circular needles; join and place a marker at the join. P 1 right side row and then K 4 rows and bind off – the edge will roll.. Sew in sleeves; sew sleeve and side seams using edge sts as a seam allowance. Embroider around circle with light brown – the sts should go over approx. 2 cm in height and 2 cm in width. SCARF: Sizes: approx. 30 cm x 2 meters [11.75" x 78.75"] Materials: DROPS VIENNA from Garnstudio 100 gr nr 62, grey/brown variegated DROPS 6 mm [US J] crochet hook, or size needed to obtain correct gauge. Scarf: The scarf is crocheted lengthwise. See the diagram. 1st row: Crochet circles as follows: ch 8, join into a ring with 1 dc, * ch 8, turn piece and fasten to previous ring with 1 dc on left side of previous dc, ch 8, turn piece and fasten to previous ring with 1 dc on left side of previous dc *, repeat from * - * until the piece measures 2 meter – measured when piece is lying flat (= length of scarf). Turn the work. 2nd row: Crochet back as follows: ch 8, fasten with 1 dc in the next to last circle on Row 1, * ch 4, 1 dc in the next dc from previous row, ch 4, 1 dc in the next circle from previous row *, repeat from * - *, finish with ch 4 and 1 dc in 1st dc from previous row. Turn the work. 3rd row: ch 8, 1 dc in last circle from previous row, * ch 4, 1 dc in the next circle *, repeat from * - *, finish with ch 4 and 1 dc in last circle from previous row. Repeat row 3 (see diagram) until scarf measures 30 cm in width. |
|||||||
Diagram explanations |
|||||||
|
|||||||
 |
|||||||
Have you finished this pattern?Tag your pictures with #dropspattern or submit them to the #dropsfan gallery. Do you need help with this pattern?You'll find 24 tutorial videos, a Comments/Questions area and more by visiting the pattern on garnstudio.com. © 1982-2026 DROPS Design A/S. We reserve all rights. This document, including all its sub-sections, has copyrights. Read more about what you can do with our patterns at the bottom of each pattern on our site. |
|||||||


With over 40 years in knitting and crochet design, DROPS Design offers one of the most extensive collections of free patterns on the internet - translated to 17 languages. As of today we count 325 catalogs and 12298 patterns - 12288 of which are translated into English (US/in).
We work hard to bring you the best knitting and crochet have to offer, inspiration and advice as well as great quality yarns at incredible prices! Would you like to use our patterns for other than personal use? You can read what you are allowed to do in the Copyright text at the bottom of all our patterns. Happy crafting!
Post a comment to pattern DROPS 80-3
We would love to hear what you have to say about this pattern!
If you want to leave a question, please make sure you select the correct category in the form below, to speed up the answering process. Required fields are marked *.