
Popular categories
Looking for a yarn?


Comments / Questions (127)
![]() Diana wrote:
Diana wrote:
Buenos días, os ruego me ayudeis quiero hacer este proyecto pero quiero hacerlo más largo, que llegue a mitad de muslo, cómo puedo hacer? Espero vuestra respuesta. Buen día.
10.10.2018 - 10:48DROPS Design answered:
Hola Diana. Debido a que el patrón tiene una forma especifica, no se puede alargar solo trabajando unos cm de más. Habría que reescribir el patrón.
12.10.2018 - 14:14
![]() Cecilia wrote:
Cecilia wrote:
Salve vorrei sapere se posso farlo tutto a maglia rasata magari mi sfina un po'.grazie
01.12.2017 - 15:33DROPS Design answered:
Buongiorno Cecilia, può apportare le modifiche che desidera al modello, ma di sicuro a maglia rasata non otterrà lo stesso risultato della foto: il particolare di questo modello è la costruzione e il motivo, a maglia rasata perderà sicuramente di struttura. Buon lavoro
02.12.2017 - 11:44
![]() Cecilia wrote:
Cecilia wrote:
Salve mi piace molto questo modello,ma sono una 52 di tg ho seno e stomaco,vorrei un consiglio e un informazione:mi starebbe bene?potrei reaizzarlo in maglia rasata?cioè semplice?e come.grazie buona serata
27.11.2017 - 19:20
![]() Emilie wrote:
Emilie wrote:
Bonjour, Je voudrai savoir a quoi correspond "diminuer a chaque autre rang" est ce pareil que "tous les 2 rangs" ou que "tous les rangs"? Merci de votre reponse!
22.10.2017 - 16:42DROPS Design answered:
Bonjour Émilie, tout à fait, c'est que qu'il faut comprendre ici. Bon tricot!
23.10.2017 - 11:44
![]() Rajka Stirjan wrote:
Rajka Stirjan wrote:
Ich habe ein Problem bei rechten Vorderteil. Die Stelle bei Größe S, nach 38 cm den Kragen mit Krausrippen auf 16 M verbreiten. Von wo werden 38 cm gemessen? Welche Anschlagseite meint man. Ich messe vom 1. Maschenanschlag Beginn der Arbeit oder wird die Krausrippendiagonale auf 38 cm gemessen? Nach Stilllegung der 16 Krausm. weiß ich nicht von wo man abkettet von Hals zu Schulter oder von Schulter Richtung Hals. Ein Schema wäre wirklich hilfreich davon. Bitte helfen Sie mir!
13.11.2015 - 09:15DROPS Design answered:
Libe Rajka. Sie messen in Strickrichtung von der Anschlagskante. Wegen des Abkettens: es steht: ..."weiter vom Kragen gegen die Schulter abk". Haben Sie diese Stelle gemeint?
08.03.2016 - 14:37
![]() Natalie Laube wrote:
Natalie Laube wrote:
Hi, ich habe eine Frage zum Rückenteil und zwar ab der Stelle, an der ich zum Hals abketten muss. Mir ist nicht ganz klar was nach dem Abketten der 15 mittleren Maschen kommt und wie ich da zählen muss. An welcher Stelle kette ich die 1 Masche ab und wie komme ich dann auf 22 Maschen?
30.11.2014 - 18:42DROPS Design answered:
Wenn Sie die mittleren 15 M abgekettet haben, müssen Sie ja jede Schulter einzeln zu Ende stricken. Am Anfang der nächsten R, die am Halsrand beginnt (also neben den gerade abgeketteten 15 M) ketten Sie nun 1 M ab, das machen Sie an beiden Schulterstücken, auf diese Weise wird der Halsausschnitt etwas abgerundet. Die M-Zahl ergibt sich dann wie folgt: 61 M - 15 M = 46 M, d.h. 23 M pro Schulter, dann 1 M abketten pro Schulter = 22 M pro Schulter.
01.12.2014 - 12:07
![]() Tineke Van Rijn-Smits wrote:
Tineke Van Rijn-Smits wrote:
Heb ook een vraag m.b.t. dit patroon. Minder je bij het voorpand na de 12 afgekante steken steeds 1 steek naast de kantsteek en 2 steken aan kant 2 tot alle steken op zijn? Ziet er een beetje raar uit ...
15.08.2014 - 18:16DROPS Design answered:
Hoi Tineke. Ja, dat klopt. Je gaat door met de minderingen aan kant 1 tot de vereiste afmetingen (dus tot aan het eind). Aan de andere kant (Kant 2) heb je de 17-18 st ribbelst op een draad of stekenhouder voor de kraag. Daarna minder je ook aan deze kant door tot alle st afgekant zijn.
21.08.2014 - 16:41
![]() Gailliot wrote:
Gailliot wrote:
J'ai du mal évaluer la quantité de laine qu'il va me falloir pour la taille XL d'anciens ce modèle. À l'aide ! Et je trouve les modèles vraiment trop beaux, c'est difficile de choisir ....Bravo
06.06.2014 - 19:50DROPS Design answered:
Bonjour Mme Gailliot et merci. Pour trouver la bonne taille, référez-vous au schéma des mesures en bas de page et comparez-les à un vêtement analogue. Les quantités de laine sont indiquées au poids à droite de la photo sous l'onglet "Fournitures", soit en XL: 300 g Alpaca(= 6 pelotes de 50 g) + 250 Vivaldi (= 5 pelotes de 50 g). Bon tricot!
07.06.2014 - 11:19
![]() Betsy Boere wrote:
Betsy Boere wrote:
Ik ben nog steeds bezig met dit model. heb nu het linkerpand een heel eind af, maar kom weer bij hetzelfde probleem. Moeten die 18 steken wel in 1x afkant worden? Ik krijg na de 9x1 st. een haakse hoek en dan de 18 afgekante steken. Op de tekening staat een heel ander armsgat.
05.11.2013 - 10:55DROPS Design answered:
Hoi Betsy. Ja, je moet de 18 st in één keer afkanten: Kant in de volgende nld 6-12-12-18-18 st aan Kant 1 voor het armsgat (genomen van de beschrijving voor het rechter voorpand). Daarna ga je minderen naast de 1 ribbelst zoals beschreven in Tips voor het minderen.
07.11.2013 - 17:50
![]() Paolafi wrote:
Paolafi wrote:
Cari signori ho comprato la lana per fare questo stupendo modello ma alle spiegazioni scalfo manica scollo dav dt e spalle nn torna mi potete aiutare grazie infinite ennesima spesa a vuoto purtroppo io nn so come fare grazie ancora
07.06.2013 - 09:49DROPS Design answered:
Il davanti dinisce in punta davanti e deve essere cucito al dietro, poi si riprendono le m per il collo.
21.06.2013 - 14:39
|
||||||||||||||||
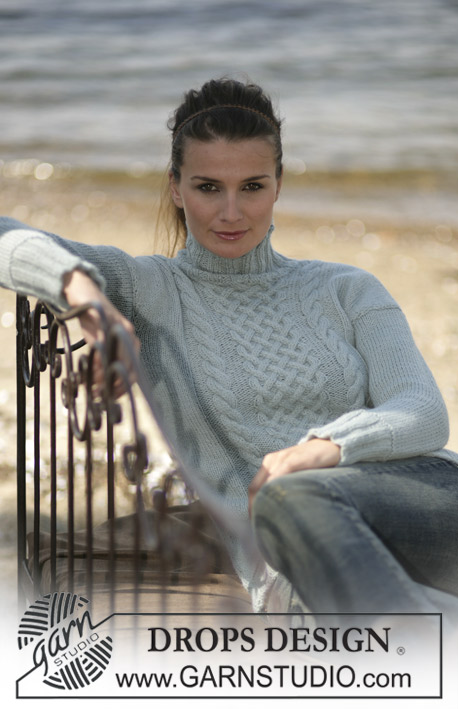
Sweet Snuggle |
||||||||||||||||
|
|
||||||||||||||||
DROPS Sweater with cable pattern and wrap-round at front in Alpaca and Vivaldi
DROPS 96-1 |
||||||||||||||||
|
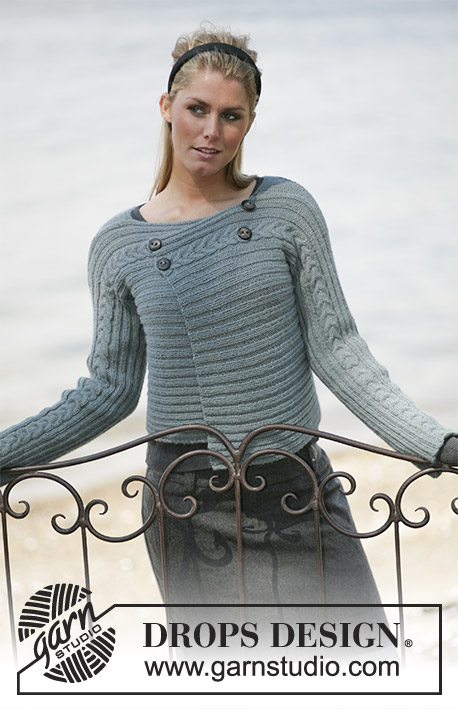
Knitting Gauge: 16 stitches x 20 rows on needle size 5 mm = US 8 and 1 thread of each quality in stockinette stitch = 10 x 10 cm = 4" x 4" Measurement tips: Place piece flat on table when measuring. Rib: *K3, P5*, repeat from *-*. Pattern: See diagrams M.1 and M.2. Increasing tips (applies to collar): All increases are done from the RS. Inc within 1 garter st by making a yo, on the return row knit into back of yo to avoid creating a hole. Decreasing tips (applies to armhole): Dec as follows before 1 st: K2 tog Dec as follows after 1 st: slip 1 st as if to knit, K1, psso. Back: Cast on 61-69-77-85-93 sts (incl 1 edge st each side, knitted in garter sts throughout) on needle size 4.5 mm = US 7 with 1 thread of each yarn quality (double thread). Knit 6 cm = 2⅜" Rib with 1 edge st and 3 garter sts each side. Change to needle size 5 mm = US 8 and continue as follows: 1 edge st, 19-19-19-27-27 sts in stockinette sts, 21-29-37-29-37 sts in Rib, 19-19-19-27-27 sts in stockinette sts, 1 edge st. When back measures 10 cm = 4", inc 1 st on both sides of the rib sts on every 4 cm = 1½" a total of 5 times – knit the inc sts in stockinette sts = 71-79-87-95-103 sts. When piece measures 29-30-31-32-33 cm = 11⅜"-11¾"-12¼"-12½"-13" dec for armhole each side on every other row as follows: 3 sts 1-1-1-2-2 times, 2 sts 1-2-3-3-4 times and 1 st 2-3-4-4-5 times = 57-59-61-63-65 sts. When piece measures 46-48-50-52-54 cm = 18"-19"-19¾"-20½"-21¼" bind off the middle 13-13-15-15-17 sts for neck and dec 1 st on neckline on next row = 21-22-22-23-23 sts left on each shoulder. Bind off when back measures 48-50-52-54-56 cm = 19"-19¾"-20½"-21¼"-22". Right Front: Knitted diagonally! Read all of the following section + measuring tips before continuing. Cast on 20-26-26-32-32 sts on needle size 5 mm = US 8 with 1 thread of each yarn quality (= double thread). Knit 2 rows garter sts (1st row = WS). Continue as follows: 4 sts in garter sts, M.1 (see arrow for appropriate size). NB! As 1st row is knitted from the WS, begin at arrow and knit pattern in diagram from left to right. Left side of diagram (= towards lower edge) = Side 1. Inc the other side (= towards side seam) = Side 2 – incorporate new sts in M.1 as you go along. Inc on every other row (at beginning of row): 1 st 4-4-6-5-7 times, 2 sts 7-8-7-10-9 times, 3 sts 3-3-3-2-2 times and 4 sts 1 time = 51-59-59-67-67 sts. Piece now measures approx 15-16-17-18-19 cm = 6"-6¼"-6¾"-7"-7½". Continue in pattern until finished measurements. At the same time when piece measures 38-40-42-44-46 cm = 15"-15¾"-16½"-17¼"-18" inc 1 st on Side 2 for collar – see Increasing tips – on every other row a total of 12-13-14-15-16 times and knit new sts in garter sts = 16-17-18-19-20 sts in garter sts towards mid front. At the same time when piece measures 41-45-48-51-55 cm = 16⅛"-17¾"-19"-20"-21⅝" dec on Side 1 on every other row: 1 st 7-8-8-9-9 times. Piece now measures approx 48-53-56-60-64 cm = 19"-21"-22"-23⅝"-25¼". Insert a marking thread in Side 1 (marking the side seam). On next row bind off 6-12-12-18-18 sts on Side 1 for armhole. Knit 1 st towards armhole in garter sts and dec 1 st within this on every other row – see decreasing tips – until finished measurements. At the same time when piece measures approx 50-53-57-61-64 cm = 19¾"-21"-22½"-24"-25½" put the 16-17-18-19-20 sts in garter sts towards mid front on a thread for collar and bind off from collar towards shoulder as follows: 2 sts on every other row until all sts have been bind off. Piece measures approx 60-64-68-72-76 cm = 23⅝"-25¼"-26¾"-28⅜"-30" from cast-on row to top of shoulder. Put sts from thread back on needle and knit 5-5-6-6-6 cm = 2"-2"-2⅜"-2⅜"-2⅜" garter sts. Bind off. Left Front: Cast on and knit as right front, but mirrored – knit M.2 instead of M.1, see start arrow for appropriate size. NB! As 1st row is knitted from the WS begin by arrow for appropriate size and knit pattern in diagram from left to right until there are 4 sts left on row, these are knitted in garter sts throughout. Sleeves: Cast on 42-42-42-50-50 sts (incl 1 edge st each side) on needle size 4.5 mm = US 7 with 1 thread of each yarn quality (= double thread). Knit 12 cm = 4¾" Rib with 1 edge st each side. Continue in stockinettests and when piece measures 13 cm = 5⅛" inc 1 st each side on every 5.5-4-3-3.5-2.5 cm = 2⅛"-1½"-1⅛"-1¼"-1" a total of 7-9-11-9-11 times = 56-60-64-68-72 sts. When sleeve measures 49-47-46-44-43 cm = 19¼"-18½"-18"-17¼"-17" dec for sleeve cap each side on every other row as follows: 3 sts 1 time, 2 sts 3 times, 1 st 1-2-3-5-6 times and then 2 sts each side until piece measures 56 cm = 22". Now dec 3 sts each side and bind off remaining sts on next row. Sleeve measures approx 57 cm = 22½". To make up: Join shoulders. Place right front piece over the left front piece on back piece as follows: the 4 garter sts at the top of Side 1 on right front piece over the 4 garter sts at the start of sloping edge on Side 2 on left front piece and the 4 garter sts at the start of sloping edge on Side 2 on right front piece over the 4 garter sts on Side 1 on left front piece. Sew side seams up to marking threads on front pieces – sew through all 3 layers by the sts in garter sts. Sew collar mid back and attach to neckline with the seam on the WS. Sew sleeve seams and sew in sleeves. |
||||||||||||||||
Diagram explanations |
||||||||||||||||
|
||||||||||||||||
 |
||||||||||||||||
 |
||||||||||||||||
Have you finished this pattern?Tag your pictures with #dropspattern or submit them to the #dropsfan gallery. Do you need help with this pattern?You'll find 20 tutorial videos, a Comments/Questions area and more by visiting the pattern on garnstudio.com. © 1982-2026 DROPS Design A/S. We reserve all rights. This document, including all its sub-sections, has copyrights. Read more about what you can do with our patterns at the bottom of each pattern on our site. |
||||||||||||||||


With over 40 years in knitting and crochet design, DROPS Design offers one of the most extensive collections of free patterns on the internet - translated to 17 languages. As of today we count 324 catalogs and 12290 patterns - 12280 of which are translated into English (US/in).
We work hard to bring you the best knitting and crochet have to offer, inspiration and advice as well as great quality yarns at incredible prices! Would you like to use our patterns for other than personal use? You can read what you are allowed to do in the Copyright text at the bottom of all our patterns. Happy crafting!
Post a comment to pattern DROPS 96-1
We would love to hear what you have to say about this pattern!
If you want to leave a question, please make sure you select the correct category in the form below, to speed up the answering process. Required fields are marked *.