
Popular categories
Looking for a yarn?


Comments / Questions (42)
![]() Snja wrote:
Snja wrote:
Hei Lurer på om det er rett at det skal felles 6 masker i kvar side på både framstykket og på bakstykke? Lurer fordi det på ermene kun blir felt 3 i kvar side, dermed blir det vel dobbelt så mange felt på bolen? Mvh Anja
06.09.2018 - 16:22DROPS Design answered:
Hei Sonja. Ja det stemmer. Du feller først 3 masker i hver side på ermet, men så fortsetter du å felle masker på hver annen pinne oppover - Dette danner en ermkuppel. Tilslutt har du felt av alle maskene på ermet. God fornøyelse.
10.09.2018 - 09:55
![]() Anjq wrote:
Anjq wrote:
Vil denne snart komme i større størrelse?
17.05.2018 - 10:00DROPS Design answered:
Hej, den største måler 120 cm i brystvidde, men vi kan skrive den på ønskelisten i endnu større størrelser :)
17.05.2018 - 14:40
![]() Anja wrote:
Anja wrote:
Vil denne snart komme i større størrelse?
07.05.2018 - 14:05
![]() Kim Markey wrote:
Kim Markey wrote:
I would love to see this pattern in 3XL. From a design standpoint, the V-neck & the ribbed pattern is perfect for Plus. It needs to be truly PLUS, as in bust measurement of around 60 in. & not smaller. I would recommend NOT having it shaped.This would sell very well for the large gals; it's a great design w/the vertical lines& the V. I would also rib the sleeves, & still keep the feminine sleeve cuff.
19.07.2016 - 14:39
![]() Nelleke wrote:
Nelleke wrote:
Stefanie, volgens mij moeten het 108 steken zijn! (zie eerdere opmerking over 08 steken)
05.02.2014 - 14:40DROPS Design answered:
Hoi Nelleke. Je hebt gelijk - er staat ook 108 in het originele patroon ;-) Fout is nu helemaal hersteld
05.02.2014 - 15:42
![]() Stefanie Canninga wrote:
Stefanie Canninga wrote:
Deze werkbeschrijving is onvolledig, bijv. in het voorpand wordt begonnen met 80 steken, vervolgens blijkt in de laatste alinea dat er 6 st afgekant moeten worden en er ineens 96st moeten zijn.
05.02.2014 - 12:02DROPS Design answered:
Hoi Stefanie. Het is helaas een foutje in het patroon - het is aangepast.
05.02.2014 - 15:42
![]() Ineke wrote:
Ineke wrote:
Er staat:wegens motief wordt de trui wordt wat smaller dan op het diagram is weergegeven. Als ik normaal maat L zou breien wat raadt u mij dan aan?
29.09.2013 - 12:45DROPS Design answered:
Hoi Ineke. Kijk onderaan het patroon voor de maattekening in cm per maat. Vergelijk deze afmetingen met je eigen en kies je maat. Het model moet een beetje strak zitten.
30.09.2013 - 21:07
![]() Ineke wrote:
Ineke wrote:
Ik denk dat er fout staat en wel:voorpand zet 08 steken op. Hoeveel steken moeten dit zijn?
29.09.2013 - 12:40DROPS Design answered:
Hoi Ineke. Het moet 80 zijn. Ik heb het gewijzigd. Bedankt voor het melden!
30.09.2013 - 21:08
![]() DROPS Design wrote:
DROPS Design wrote:
Pattern explains pattern seen ffrom RS. On rows from WS do opposite. V-nec is 16-17-17-18 cm deep according to pattern and picture. Very important to have right gauge both in width and hight!
05.02.2008 - 21:27
![]() Sandy wrote:
Sandy wrote:
Front: problem with the diagram,to get a rib pattern you knit what you see so the even rows must be reverse from odd rows. I started the front and the v shape is not right. A small area front and center. It doesn't match the picture,and it doesn't make a Rib-2 pattern (K2, P4). Can anyone re-translate this pattern? Missing a coma in pattern last = should have a coma after "YO, on back:..."
05.02.2008 - 05:55
|
|||||||||||||||||||||||||
DROPS 74-7 |
|||||||||||||||||||||||||
|
|
|||||||||||||||||||||||||
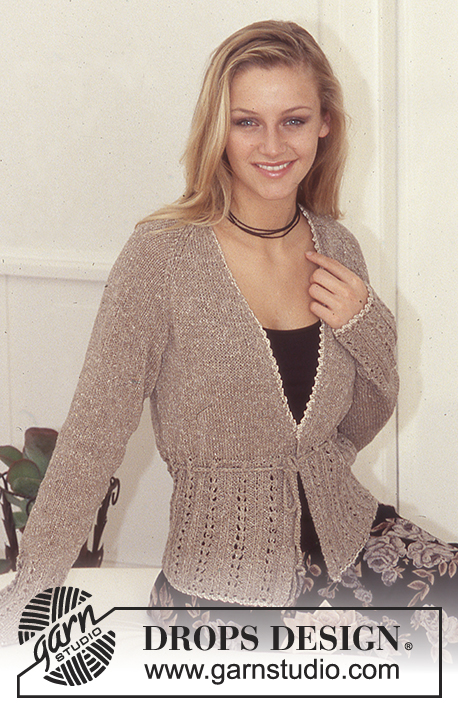
DROPS Ribbed pullover in Safran.
DROPS 74-7 |
|||||||||||||||||||||||||
|
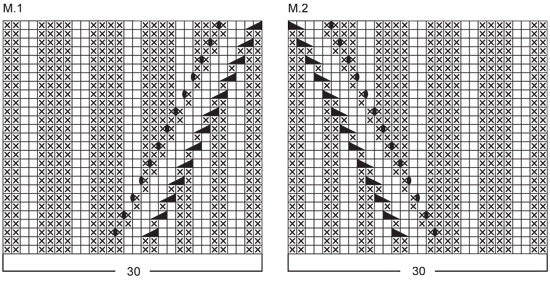
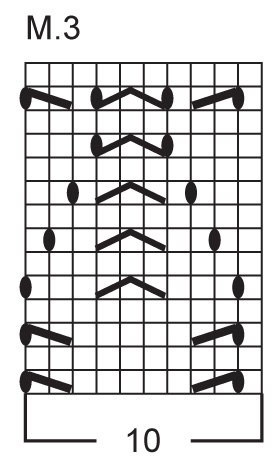
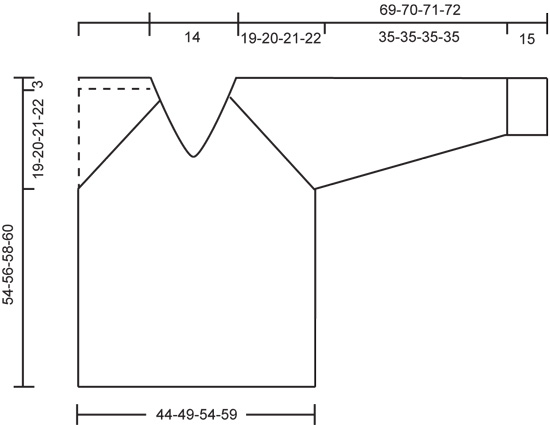
Gauge: 24 sts x 32 rows = 10 x 10 cm in stockinette st. Pattern: See charts. The pattern is seen from the right side. Rib-1: * K 2, P 2 *, repeat from * - *. Rib-2: * K 2, P 4 * , repeat from * - *. Knitting tips for decreasing (for raglan shaping on Body): Dec 1 st for raglan shaping inside 5 sts knit as follows from edge: K 1 (edge st), P 1, K 2 and P 1. On right side rows: After 5 sts: P 2 tog. Before 5 sts: Slip 2, return to left needle 1 by 1, twisting each st, P 2 tog. On wrong side rows: After 5 sts: Slip 1 st as if to knit, K 1, psso. Before 5 sts: K 2 tog. Tucked Ridges on sleeves: Knit first row as follows (right side row): * K 1, yo *, repeat from * - *, finish with K 1. Knit 4 rows stockinette st, letting yo loops drop on 1st row (long sts). Knit the next row (wrong side row) as follows: * pull up the top of sts from rows with long sts. Put loop on right needle, P 1, pull loop over purled st so that the loop binds the st off *, repeat from * - *. ____________________________________________________________________ Front: Cast on 108-120-132-144 sts. Establish pattern on the first row as follows: Rib-1 over 24-30-36-42 sts: Sizes S and L: start with P 2 Sizes M and XL: start with K 2 then (all sizes): Pattern 1 (30 sts), Pattern 2 (30 sts), and Rib-1 over 24-30-36-42 sts (starting with K 2). Continue in pattern as established until all the rows of Pattern 1 and Pattern 2 are complete – these sts are now in Rib-2. Continue until the piece measures 33-34-35-36 cm, then bind off 6 sts at each side for armhole = 96-108-120-132 sts. Read the entire next section before knitting: Raglan shaping: Dec for raglan inside 5 sts at each side - see knitting tips. Dec 1 st every other row 30-28-25-22 times and then 1 st every row until the neck shaping overlaps raglan shaping - NOTE: for size S the neck shaping will overlap the raglan while still decreasing every other row, so that you will not need to dec every row. Neck shaping: When the piece measures 38-39-41-42 cm purl and bind off the 2 center sts for the neck. Put left side on a st holder. Right side: Dec 1 st for the neck every other row until all sts are bound off - the neck shaping will overlap the raglan shaping. when all sts are bound off the piece measures approx. 51-53-55-57 cm. Left side: Put sts on st holder back on needles and knit the same as the right side, reversing all shaping - knit the 1st row from center front on wrong side row - start by picking up 1 st in the first bound-off st and knit together with 1st st on needles. Back: Cast on and knit the same as the front, but instead of yo in the pattern, inc by pulling up a st from the previous row (see «Pattern» symbol description). Shape raglan as on front as follows: dec 1 st every other row 30-28-25-22 times and then 1 st every row 0-8-17-26 times. Put the remaining 36 sts on a st holder, the piece measures approx. 51-53-55-57 cm. Sleeve: Cast on loosely 62-62-72-72 sts. Knit 1 row (wrong side row), on the next row begin Pattern 3, keeping 1 st at each edge in garter st throughout. Repeat pattern 3 times total. The piece measures approx. 13 cm. Knit 2 rows stockinette st. Then knit 1 tucked ridge - see instructions above, then 2 rows stockinette st, then knit 1 tucked ridge. The piece measures approx. 15 cm, continue with stockinette st to finished measurements. At the same time (after tucked ridges) inc 1 st at each side 16-18-15-18 times every 7-6-7-6 rows = 94-98-102-108 sts. When the piece measures 50 cm bind off 3 sts at each side for sleeve cap = 88-92-96-102 sts. Then dec 1 st at each edge every other row 25-26-27-27 times and then every row 7-8-9-12 times. Now dec 1 st every row at the side which will be seamed to the back 4 times and at the same time bind off 8 sts every other row 2 times at the side which will be seamed to the front, bind off remaining sts. Sleeve measures approx. 69-70-71-72 cm. Assembly: Sew raglan seams using edge sts as seam allowance (there will be 2 stockinette st sts at the raglan transition). Sew sleeve and side seams using edge sts as a seam allowance. Neckband: The neckband is knit in the round from center front. Pick up from center front, approx. 116-132 sts (divisible by 4) around the neck. K 1 row on wrong side row. Then knit rib-1 keeping 1 st in garter st + K 2 at each side at the center front. When neckband measures 2 cm bind off all sts in rib. Lay one side over the other at center front and stitch down. |
|||||||||||||||||||||||||
Diagram explanations |
|||||||||||||||||||||||||
|
|||||||||||||||||||||||||
 |
|||||||||||||||||||||||||
 |
|||||||||||||||||||||||||
 |
|||||||||||||||||||||||||
Have you finished this pattern?Tag your pictures with #dropspattern or submit them to the #dropsfan gallery. Do you need help with this pattern?You'll find 27 tutorial videos, a Comments/Questions area and more by visiting the pattern on garnstudio.com. © 1982-2026 DROPS Design A/S. We reserve all rights. This document, including all its sub-sections, has copyrights. Read more about what you can do with our patterns at the bottom of each pattern on our site. |
|||||||||||||||||||||||||


With over 40 years in knitting and crochet design, DROPS Design offers one of the most extensive collections of free patterns on the internet - translated to 17 languages. As of today we count 325 catalogs and 12298 patterns - 12288 of which are translated into English (US/in).
We work hard to bring you the best knitting and crochet have to offer, inspiration and advice as well as great quality yarns at incredible prices! Would you like to use our patterns for other than personal use? You can read what you are allowed to do in the Copyright text at the bottom of all our patterns. Happy crafting!
Post a comment to pattern DROPS 74-7
We would love to hear what you have to say about this pattern!
If you want to leave a question, please make sure you select the correct category in the form below, to speed up the answering process. Required fields are marked *.