
Popular categories
Looking for a yarn?


Comments / Questions (62)
![]() Cornelia wrote:
Cornelia wrote:
Schon merkwürdig, dass alle Anderen Antwort erhalten und ich nicht. werden Schweizer jetzt diskriminiert ?
18.07.2025 - 12:46
![]() Cornelia wrote:
Cornelia wrote:
Warum antwortet mir Niemand ? ich kann mein Top nicht fertig machen so . bitte helfen sie mir .
15.07.2025 - 13:12
![]() Cornelia wrote:
Cornelia wrote:
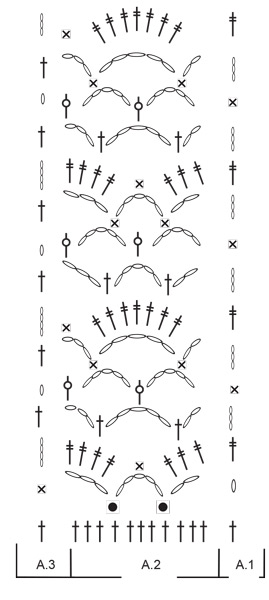
Hilfe ! kann mir Jemand helfen ? bedeutet diese Zeile unten , dass ich einfach 1 runde Stäbchen darüber häkeln soll ? Wie folgt weiterhäkeln: A.1 (= 1 Stäbchen), A.2 über die nächsten 198-220-242-264-297-330 Stäbchen, A.3 (1 Stäbchen). Den Faden abschneiden und vernähen, wenn A.1, A.2 und A.3 1 x in der Höhe gehäkelt wurden.
13.07.2025 - 12:08DROPS Design answered:
Liebe Cornelia, jetzt häkeln Sie die Diagramme bei den Hinreihen So: beginnen Sie mit A.1 (= 1 Lm bei der 1. Reihe), dann wiederholen Sie A.2 bis nur noch 1 Masche übrig ist, dann häkeln Sie A.3. Bei den Rückreihen lesen Sie links nach rechts: mit A.3 anfangen, A.2 wiederholen und mit A.1 enden. Wenn das ganze Diagram fertig ist, schneiden Sie den Faden ab. Viel Spaß beim Häkeln!
23.07.2025 - 11:37
![]() Aurélie wrote:
Aurélie wrote:
Comment crocheter vous les mailles en l'air dans le motif A1 et A3 suivi des mails de se même motif sur le rang suivant ? Si le rang fini par 1 maille en l'air dans le motif A1, une fois le travail tourné, dans quel mail crochette t'on la double bride du motif A1 par exemple ? Merci
01.07.2025 - 14:53DROPS Design answered:
Bonjour Aurélie, crochetez les diagrammes ainsi: commencez sur l'endroit par A.1 (= 1 maille en l'air au 1er rang par ex), répétez A.2 jusqu'à ce qu'il reste 1 maille et terminez par A.3 (1 ms dans la maille), sur l'envers, lisez les diagrammes de gauche à droite: A.3 (4 ml au 2ème rang), puis répétez A.2 et terminez par A.1 (1 double-bride dans la 1ère maille en l'air du début du rang précédent au 2ème rang). Continuez ainsi, alternativement sur l'endroit et sur l'envers, en lisant de droite à gauche sur l'endroit et de gauche à droite sur l'envers. Bon crochet!
01.07.2025 - 15:08
![]() Kasia wrote:
Kasia wrote:
Czy liczba łuków przy przerabianiu brzegów samej miseczki też ma być podzielna przez 2+1 czy chodzi tu o łączną długość boku miseczki razem z szelką? Jak powinna wypadać sekwencja słupków między miseczkami? Czy na ostatnim łuku pierwszej miseczki powinien wypaść półsłupek, czy słupki? Rozłożenie ozdobnego brzegu wychodzi mi niesymetrycznie w porównaniu do pierwszej szelki, czy tak ma być?
29.06.2025 - 15:18DROPS Design answered:
Witaj Kasiu, chodzi tu o łączną długość boku miseczki razem z szelką. Brzeg powinien wyjść symetrycznie, troszkę trzeba tu działać na wyczucie, uważając aby brzeg nie był zbyt luźny. Pozdrawiamy!
30.06.2025 - 08:24
![]() Léa wrote:
Léa wrote:
Bonjour, Dans le diagramme, les doubles brides sont-elles crochetées autour ou dans les mailles en l'air ? Merci d'avance !
29.06.2025 - 15:01DROPS Design answered:
Bonjour Léa, les double-brides vont être crochetées en piquant dans les arceaux, autrement dit, autour des mailles en l'air. Bon crochet!
30.06.2025 - 09:22
![]() Ulrike wrote:
Ulrike wrote:
Hallo, ich habe andere Körpermaße: bei den Brüsten brauche ich Grösse XXL und vom Umfang Größe M. Wie kann ich die Anleitung entsprechend anpassen? Evtl. die Dreiecke in der Brustmitte nicht ganz nach unten häckeln, damit man sie vorher (enger) zusammennähen kann???
29.06.2025 - 12:17DROPS Design answered:
Liebe Ulrike, leider können wir nicht jede Anleitung nach jeder Anfrage anpassen, aber gerne kann Ihnen Ihr Wollladen damit helfen, die Anleitung nach Ihrer eigenen Größe/Körpermaße anzupassen bzw umzurechnen. Danke im voraus für Ihr Verständnis. Viel Spaß beim Häkeln!
30.06.2025 - 08:56
![]() Aurélie wrote:
Aurélie wrote:
Bonjour, est-ce que la consigne dans infos crochets sur "remplacer la première bride de chaque rang par 3 mailles en l'air" est applicable pour crocheter le diagramme ?
24.06.2025 - 14:25DROPS Design answered:
Bonjour Aurélie, pas exactement, car les diagrammes A.1 et A.3 montrent comment commencer les diagrammes: A.1 en début de rang sur l'endroit et A.3 en début de rang sur l'envers. Bon crochet!
24.06.2025 - 18:05
![]() Josefine wrote:
Josefine wrote:
Hallo, ich habe eine Frage zum Muster A2 in der 1. Reihe. Ist es richtig, dass ich abwechselnd 3 und 6 Maschen überspringe, also von Beginn an: 2 Lm, 3 M überspringen, 1 feste Masche in die nächste Masche, 5 Lm, 3 M überspringen, eine feste Masche in die nächste Masche, 5 Lm, 6 Maschen überspringen, eine feste Masche in die nächste Masche usw.?
24.06.2025 - 09:27DROPS Design answered:
Liebe Josefine, wenn man A.2 häkelt wird man ja genau jeweils 3 und 6 Maschen überspringen, so stimmt es. Viel Spaß beim Häkeln!
24.06.2025 - 18:15
![]() Anna wrote:
Anna wrote:
Ho lavorato Il triángolo taglia S con uncinetto 2,5, fatto 11 righe , finito con 80 maglie, ma il mío misura 10 cm. non 7
08.06.2025 - 14:37DROPS Design answered:
Buonasera Anna, deve provare con un'altra misura di uncinetto. Buon lavoro!
10.06.2025 - 00:05
|
|||||||||||||||||||
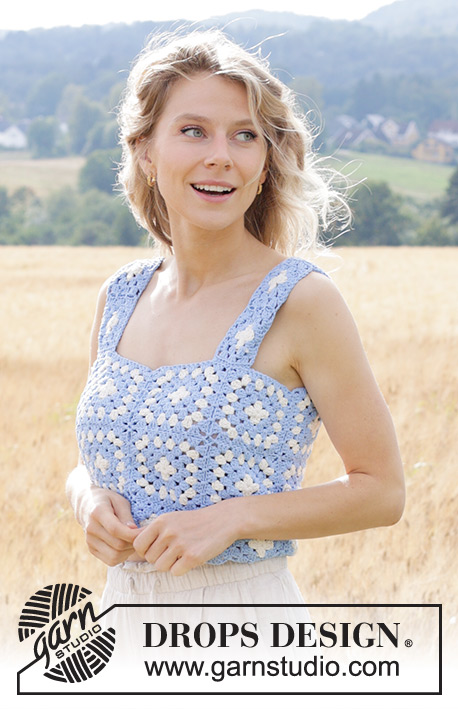
Dreamcatcher Top#dreamcatchertop |
|||||||||||||||||||
 |
 |
||||||||||||||||||
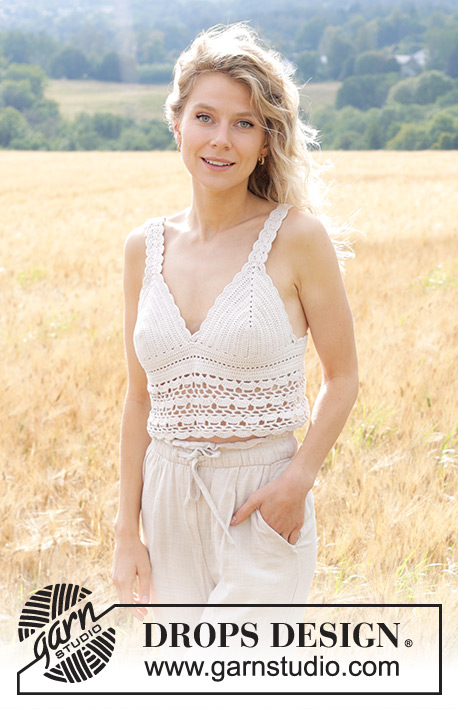
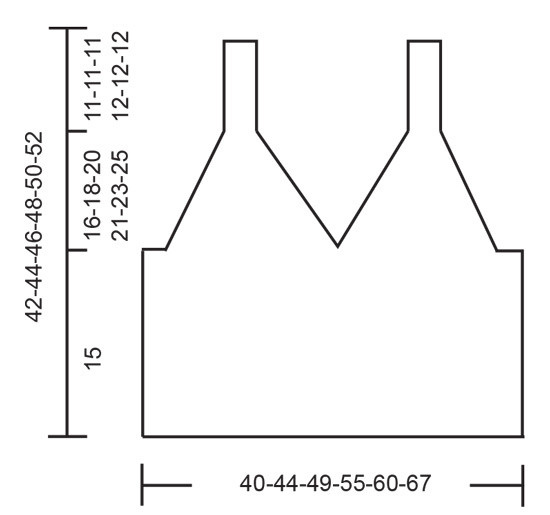
Crocheted top in DROPS Safran. The piece is worked top down with fan pattern. Sizes S - XXXL.
DROPS 248-1 |
|||||||||||||||||||
|
------------------------------------------------------- EXPLANATIONS FOR THE PATTERN: ------------------------------------------------------- CROCHET INFORMATION: At the beginning of each row of double crochets work 3 chain stitches, which replace the first double crochet. At the beginning of each row of single crochets work 1 chain stitch, which replaces the first single crochet. CHAIN STITCH: If you work outermost on the hook the chain stitch will often be too tight; 1 chain stitch should be as long as 1 double crochet is wide. PATTERN: See diagrams A.1 to A.3. ------------------------------------------------------- START THE PIECE HERE: ------------------------------------------------------- TOP - SHORT OVERVIEW OF THE PIECE: 2 triangles are worked to start with, one for the right side and one for the left side. The 2 pieces are crocheted together, then the bottom section is worked downwards. A strap is worked on each triangle. The top opens mid-back and is closed with a twisted cord. TRIANGLE: Work 21-24-27-27-32-38 chain stitches with hook size 3 MM = US C and DROPS Safran. Work as follows back and forth (row 1 = right side): Work 1 double crochet in the 5th chain stitch from the hook (= 2 double crochets) - read CROCHET INFORMATION, then 1 double crochet in each of the next 15-18-21-21-26-32 chain stitches, work (2 double crochets, 1 chain stitch, 2 double crochets) in the last chain stitch on the row, rotate the piece and skip the first chain stitch (i.e., the chain stitch you just worked in), work 1 double crochet in each of the 17-20-23-23-28-34 chain stitches on the other side of the row of chain stitches = 38-44-50-50-60-72 double crochets + 1 chain stitch. Turn and continue back and forth with 1 double crochet in each double crochet on each side of the row of chain stitches, working (2 double crochets, 1 chain stitch, 2 double crochets) around the chain stitch at the top of the row. REMEMBER THE CROCHET GAUGE! Work like this for a total of 11-12-13-14-14-15 rows of double crochets, but on the last row adjust the stitch count so you have 40-44-48-52-56-64 double crochets on each side of the chain stitch at the top (= 80-88-96-104-112-128 double crochets). The piece measures approx. 7-7½-8-9-9-9½ cm = 2¾"-2⅞"-3⅛"-3½"-3½"-3⅝" from the row of chain stitches out. Work 1 more triangle in the same way. BOTTOM SECTION: Work the 2 triangles together. NOTE: Make sure you work over both triangles from the right side! Work 47-56-65-75-84-98 loose chain stitches, then 48-50-53-56-59-62 single crochets evenly spaced over the outermost double crochets (i.e., along the bottom edge of one triangle), work 48-50-53-56-59-62 single crochets evenly spaced over the other double crochets (along the bottom edge of the second triangle), then work 47-56-65-75-84-98 loose chain stitches at the end of the row = 190-212-236-262-286-320 stitches. Work back and forth as follows: Row 1 (wrong side): Work 1 double crochet in each single crochet / chain stitch– remember CROCHET INFORMATION. Row 2 (right side): Work 1 double crochet in each double crochet. Row 3 (wrong side): * Work 1 double crochet, 1 chain stitch, skip 1 double crochet *, work from *-* until there are 2 double crochets left, work 1 double crochet in each of the 2 last double crochets. Row 4 (right side): Work 1 double crochet in each double crochet and 1 double crochet around each chain stitch. Row 5 (wrong side): Work 1 double crochet in each double crochet, AT THE SAME TIME increase 10-10-8-4-13-12 double crochets evenly spaced = 200-222-244-266-299-332 double crochets. Work as follows: A.1 (= 1 stitch), A.2 over the next 198-220-242-264-297-330 double crochets, A.3 (1 stitch). When A.1, A.2 and A.3 are finished in height, cut and fasten the strand. STRAP: Work 1 strap in the top of each triangle: Start at the top of the triangle, work 1 double crochet in the double crochet before the chain-space, 2 double crochets around the chain-space and 1 double crochet in the double crochet after the chain-space = 4 double crochets. Work these 4 double crochets back and forth for 40-42-44-46-48-50 cm = 15¾"-16½"-17¼"-18"-19"-19¾". Cut and fasten the strand. Try the top on and adjust the length of the strap if necessary – it is fastened to the top back edge. CROCHET EDGE: Start from the wrong side at the bottom of the right side of the back piece. Work as follows: 1 single crochet, * 3 chain stitches, skip 1½ cm =½", 1 single crochet *, work from *-* as far as the corner on the back piece, making sure you work a single crochet in the corner and the number of chain-spaces is divisible by 2 + 1, work * 3 chain stitches, skip 2 double crochets, 1 single crochet *, work from *-* as far as the right triangle, making sure you work a single crochet in the corner and the number of chain-spaces is divisible by 2 + 1. Work to the top of the triangle and continue along the strap, finishing with 1 single crochet, making sure the number of chain-spaces is divisible by 2 + 1. At the top of the strap work as follows: 1 single crochet in the first double crochet, 3 chain stitches, skip 2 double crochets, 1 single crochet in the last double crochet. Continue down the strap and down the other side of the right triangle (finishing with 1 single crochet, making sure the number of chain-spaces is divisible by 2 + 1), work 1 single crochet between the pieces. Continue in the same way along the left triangle and strap, then continue over the single crochets on the back piece (making sure the number of chain-spaces is divisible by 2 + 1), finish with 1 single crochet. Work * 3 chain stitches, skip 1½ cm =½", 1 single crochet *, work from *-* down the left side of the back piece, making sure you work a single crochet in the corner and the number of chain-spaces is divisible by 2+ 1. Turn. ROW 2: Work 1 chain stitch + 1 slip stitch to the middle of the first chain-space, 1 single crochet around this chain-space, * work 5 double crochets around the next chain-space, 1 single crochet around the next chain-space *, work from *-*. Cut and fasten the strand. TWISTED CORD: Cut 2 strands of 2.5 metres. Twist the strands together until they begin to resist, fold the cord single and it will continue to twist. Tie a knot in each end. Start at the top mid-back and thread the ends of the cord through each side, then thread the ends back and forth across the opening – through the fan pattern, making sure the ends are of equal length at the bottom. Tie a bow. ASSEMBLY: Sew 2 buttons to the wrong side, top of each side at the back. Fasten each strap through a hole in the fan pattern. |
|||||||||||||||||||
Diagram explanations |
|||||||||||||||||||
|
|||||||||||||||||||
 |
|||||||||||||||||||
 |
|||||||||||||||||||
Have you finished this pattern?Tag your pictures with #dropspattern #dreamcatchertop or submit them to the #dropsfan gallery. Do you need help with this pattern?You'll find 12 tutorial videos, a Comments/Questions area and more by visiting the pattern on garnstudio.com. © 1982-2026 DROPS Design A/S. We reserve all rights. This document, including all its sub-sections, has copyrights. Read more about what you can do with our patterns at the bottom of each pattern on our site. |
|||||||||||||||||||


With over 40 years in knitting and crochet design, DROPS Design offers one of the most extensive collections of free patterns on the internet - translated to 17 languages. As of today we count 324 catalogs and 12290 patterns - 12280 of which are translated into English (US/in).
We work hard to bring you the best knitting and crochet have to offer, inspiration and advice as well as great quality yarns at incredible prices! Would you like to use our patterns for other than personal use? You can read what you are allowed to do in the Copyright text at the bottom of all our patterns. Happy crafting!
Post a comment to pattern DROPS 248-1
We would love to hear what you have to say about this pattern!
If you want to leave a question, please make sure you select the correct category in the form below, to speed up the answering process. Required fields are marked *.