
Popular categories
Looking for a yarn?


Comments / Questions (7)
![]() Evelyn wrote:
Evelyn wrote:
Hallo, ich finde das Modell sehr schön und überlege es zu stricken, aber die Übersetzung finde ich sehr schwer zu lesen. Sonst kann ich Strickanleitungen sehr gut lesen. Vielleicht nochmal überarbeiten. Liebe Grüße Evelyn
07.10.2021 - 18:06
![]() Bloem wrote:
Bloem wrote:
Goedemiddag, ik heb 3 vragen: Kan deze trui ook alleen met Karisma gebreid worden, dus zónder Vivaldi, of gaat er dan een bepaald effect verloren? En hoe zit het dan met de stekenverhouding? En is het per se nodig om er een rits in te maken?
13.01.2020 - 12:39DROPS Design answered:
Dag Bloem,
De rits lijkt me inderdaad niet perse nodig, dus dan zou je de linker schouder net als de rechter schouder kunnen maken. Vivaldi geeft wat een extra 'dimensie' aan het breiwerk door het harige karakter, met alleen Karisma wordt het zeg maar wat platter/vlakker. Je zou ook met 2 draden Karisma kunnen breien en evt. de naalddikte aanpassen zodat de stekenverhouding klopt.
17.01.2020 - 18:16
![]() Tineke Van Rijn-Smits wrote:
Tineke Van Rijn-Smits wrote:
Dank voor uw snelle reactie. Ik denk dat het slim is om de trui op mijn heupen/zitvlak wat wijder te maken. Vraag is alleen hoe ik dat dan aanpak. Opzetten en beginnen voor maat XL tot ik die drie herhalingen heb gedaan? Kom ik dan weer makkelijk in mijn 'eigen' maat M? Het lijkt mij een lastige puzzel! Heeft u een suggestie?
22.11.2017 - 23:19DROPS Design answered:
Hoi Tineke, Je kan het beste uitgaan van maat M en dan in de averechte delen meer steken verwerken ter hoogte van de heupen. Deze minder je vervolgens richting de taille.
13.12.2017 - 18:31
![]() Tineke Van Rijn-Smits wrote:
Tineke Van Rijn-Smits wrote:
Ik wil dit patroon graag gaan breien, maar dan 30 cm langer zodat de trui makkelijk op een legging kan worden gedragen. Brei ik dan eerst 30 cm voordat ik de overige aanwijzingen in het patroon ga toepassen of krijg ik dan een heel raar model?
22.11.2017 - 11:07DROPS Design answered:
Hallo Tineke, Het mooiste is om de kabel naar beneden door te laten lopen en dus gelijk met de kabel te beginnen. Met ongeveer 3 herhalingen van A.1 heb je ongeveer 25 cm erbij. Maar misschien wil je hem ook iets wijder hebben. Daarvoor moet je meer steken opzetten en deze in de averechte delen verwerken.
22.11.2017 - 19:38
![]() Achoth wrote:
Achoth wrote:
Thank you! That helps.
18.02.2008 - 04:43
![]() DROPS Design wrote:
DROPS Design wrote:
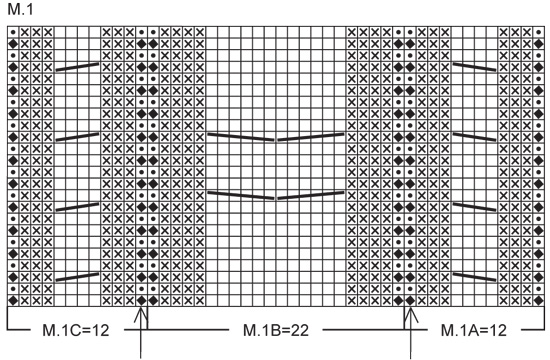
The translations for the Diagrams for all Garnstudio patterns are included within the text of the Pattern itself. If you look you will find lines starting with an = sign. These are the translations, and they are given in the same vertical order as the chart symbols within the diagram.
18.02.2008 - 04:01
![]() Achoth wrote:
Achoth wrote:
The pattern was translated, but the stitch diagram was not. Could someone translate this, or let me know where I could find something similar in English? Thanks.
18.02.2008 - 03:52
|
|||||||||||||||||||||||||
DROPS 83-16 |
|||||||||||||||||||||||||
|
|
|||||||||||||||||||||||||
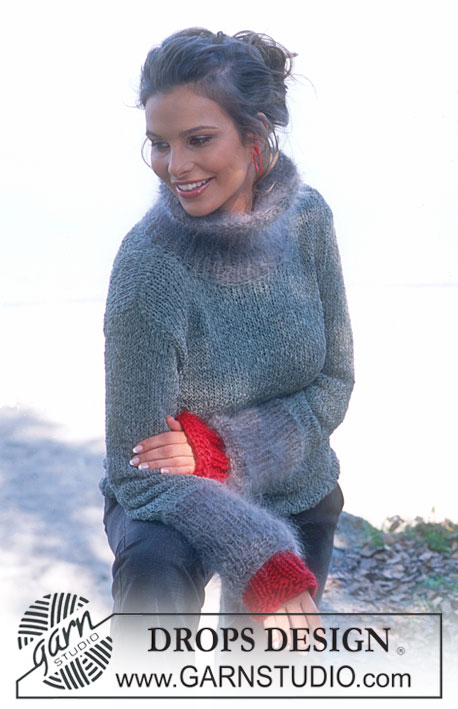
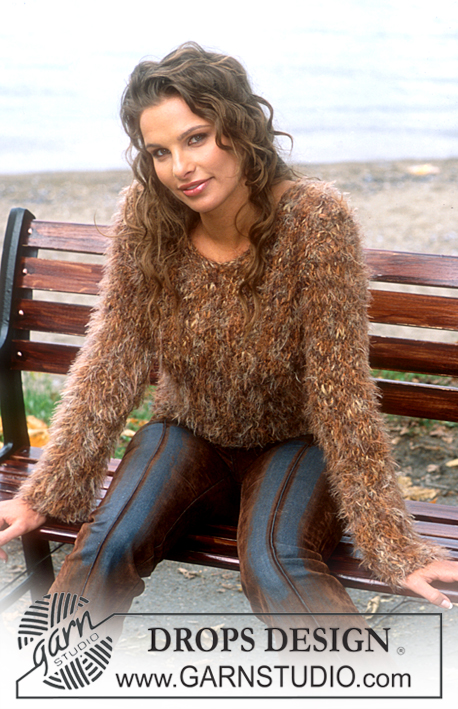
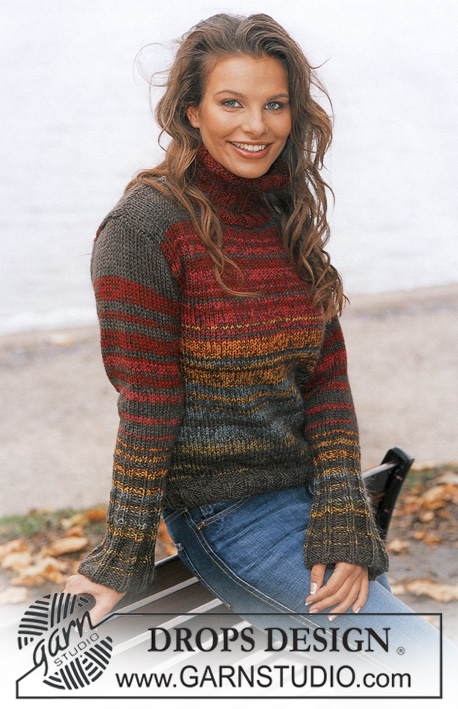
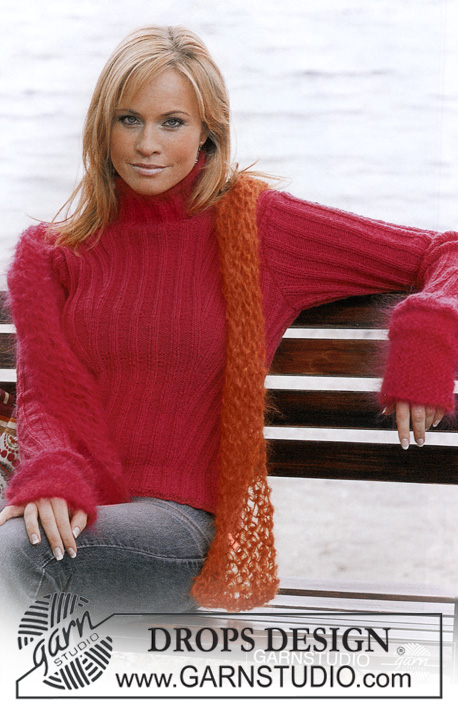
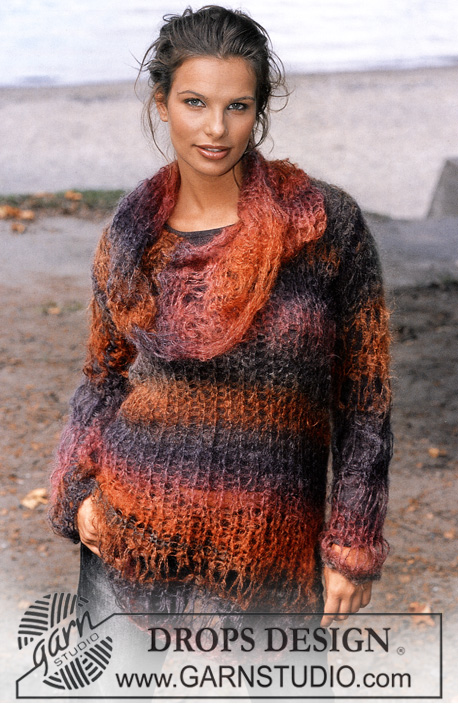
DROPS Pullover and hat in Karisma Superwash and Vivaldi
DROPS 83-16 |
|||||||||||||||||||||||||
|
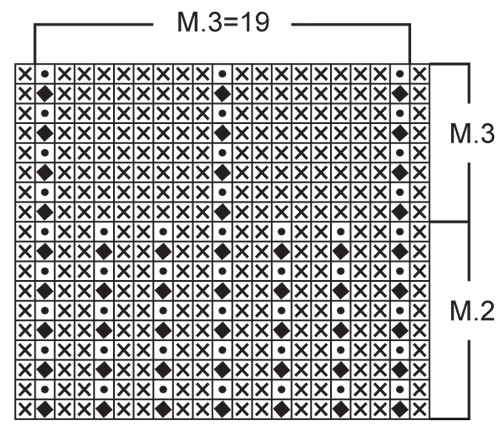
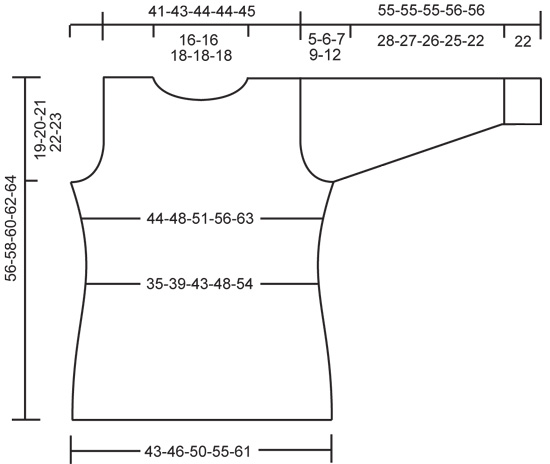
PULLOVER: Gauge: 16 sts x 20 rows with 1 strand of each yarn (2 strands) in stockinette st = 10 x 10 cm. Pattern: See charts. The pattern is seen from the right side. Increasing tips (for darts on Body): Inc 1 st at either side of the center front cable, inside of the sts marked with arrows on the chart, by pulling up a st from the previous row and P the pulled up st. All incs are made on right side rows. Decreasing tips (for darts on Body): Dec at either side of the center front cable, inside of the sts marked with arrows on the chart for Pattern 1 (M.1). All decs are made on right side rows. Dec 1 st as follows: After the st with arrow: P 2 tog, twisting sts Before the st with arrow: P 2 tog Front: Cast on 76-82-88-96-106 sts with 1 strand Karisma Superwash + 1 strand Vivaldi (= 2 strands). K 2 rows (1st row = right side), then establish pattern on the next row as follows: K 1 (edge st knit in garter st), 6-8-10-14-18 sts reverse stockinette st, Pattern 1A (= 12 sts), 8-9-10-10-11 sts reverse stockinette st («dart panel»), Pattern 1B (= 22 sts), 8-9-10-10-11 sts reverse stockinette st («dart panel»), Pattern 1C (= 12 sts), 6-8-10-14-18 sts reverse stockinette st, and K 1 (edge st knit in garter st). When the piece measures 4-4-4-6-6 cm dec 1 st in each «dart panel» inside of the sts marked with arrows on the chart – see decreasing tips above. Dec every 4 rows 6 times = 64-70-76-84-94 sts. Continue in pattern as established. Read the entire next section before knitting: Incs: When the piece measures 18-19-20-21-22 cm inc inside of the sts marked with arrows in chart – see increasing tips above. Inc every 6 rows 10 times (the incs continue during armhole shaping). Armhole: When the piece measures 37-38-39-40-41 cm – you should have increased 7 sts in each dart panel – bind off for armhole at each side every other row: 3 sts 1-1-1-2-2 times, 2 sts 1-1-2-2-4 times and 1 st 1-3-3-4-4 times. Continue in pattern as established, keeping 1 edge st at each side in garter st as before. After all shaping is complete, 72-74-76-76-78 sts remain. Neck: When the piece measures 47-49-51-53-55 cm – adjust so that you end after approx. 3 to 5 rows after a cable at center front – dec 4 sts over the center cable 12 sts as follows: * K 1, K 2 tog * , repeat * - * a total of 4 times = 68-70-72-72-74 sts. On the next row put the center 12-12-14-14-14 sts on a st holder for the neck. Then bind off at each neck edge every other row: 2 sts 2 times and 1 st 3 times = 21-22-22-22-23 sts remain on each shoulder. Right shoulder: When the piece measures 55-57-59-61-63 cm dec 1 st over cable = 20-21-21-21-22 sts remain on shoulder. P 2 rows (1st row wrong side) then bind off. Left shoulder: Knit the same as the right shoulder, but start binding off 1 cm sooner, when the piece measures 54-56-58-60-62 cm (for zipper opening). Back: Cast on and knit the same as the front. Bind off for armhole as on front. When the piece measures 53-55-57-59-61 cm – adjust so that you end 3 to 5 rows after a cable. Dec sts over the center cable as on front = 68-70-72-72-74 sts. On the next row bind off the center 24-24-26-26-26 sts for the neck. On the next row dec 1 st at each neck edge = 21-22-22-22-23 sts remain on each shoulder. When the piece measures 54-56-58-60-62 cm – match front – dec 1 st over cable on left shoulder = 20-21-21-21-22 sts remain. P 2 rows (1st row wrong side) and bind off. Repeat on right shoulder to match measurements on the front. Sleeve: Cast on 53-53-53-61-61 sts with 1 strand Karisma Superwash + 1 strand Vivaldi (= 2 strands). K 2 rows (1st row = right side), then knit 1st row of Pattern 2 keeping 1 st at each edge in stockinette st – but on the 1st row of pattern, P 3 instead of P 2 between each yo, slip 1. On the 3rd row dec all P 3 to P 2 = 41-41-41-47-47 sts, continue with Pattern 2 as shown in chart. When the piece measures 22 cm - adjust so that the next row is worked from wrong side - P 3 rows, and then continue with Pattern 3 over the center 19 sts until finished measurements - remaining sts works in reverse stockinette. At the same time when the piece measures 24 cm inc 1 st at each side every 3-2,5-2nd-2nd-1,5 cm a total of 8-10-11-10-12 times = 57-61-63-67-71 sts - purl the increased sts. When the piece measures 50-49-48-47-44 cm bind off for sleeve cap at each side every other row: 3 sts 2-2-2-1-1 times, 2 sts 1-1-1-2-2 times and 1 st 0-1-1-3-6 times, then 2 sts at each side until the piece measures 54-54-54-55-55 cm, then bind off 3 sts 1 time at each side. Bind off the remaining sts, the piece measures approx. 55-55-55-56-56 cm. Assembly: Sew right shoulder. Collar: Pick up approx. 72-81 sts (incl. sts on st holder, divisible by 3) around the neck with 1 strand Karisma Superwash + 1 strand Vivaldi. Knit 3 rows garter st (row 1 = wrong side), then knit Pattern 2 keeping 1 st at each edge in garter st – see that the pattern starts and ends alike at each side. When the collar measures 7-7-8-8-8 cm knit 2 rows stockinette st then bind off. Zipper: Sew zipper in left shoulder collar – start at the top on the collar and down along shoulder. If the zipper does not reach the armhole/shoulder seam, sew the shoulder together at armhole. Sew in sleeves using edge sts as seam allowance. Sew sleeve and side seams using edge sts as a seam allowance. HAT: Sizes: S/M - M/L Materials: DROPS KARISMA SUPERWASH from Garnstudio 100 gr nr 62, brown and use: DROPS VIVALDI from Garnstudio 50 gr nr 02, brown + leftover black Snow nr 02, for crocheted edge DROPS 5 mm [US 8] needles, or size needed to obtain correct gauge. DROPS 7 mm [US K] crochet hook, or size needed to obtain correct gauge. Gauge: 16 sts x 20 rows in stockinette st = 10 x 10 cm. Reverse crochet: Crochet sc from right side of work, from left to right. Hat: Cast on 79-86 sts with 1 strand Karisma Superwash + 1 strand Vivaldi (= 2 strands) and knit garter st. When the piece measures 18-20 cm put 7 markers in work as follows: 2 sts, * 1 marker, 11-12 sts *, repeat * - * a total of 7 times – after last marker there are 11-12 sts. Change to stockinette st, decreasing on the left side of each marker by K 2 tog. Dec in the same manner every other row until 9 sts remain on needles. Pull a strand of yarn through the remaining sts, pull tight and fasten neatly. Assembly: Sew hat at center back inside of 1 edge st. The 8-9 cm of garter st folds out to right side, so the seam for those 8-9 cm should be on the other side so it isn’t seen when folded out. Hat measures approx. 20-22 cm when edge is folded out. Crocheted edge: Crochet 1 row reverse crochet with black Snow along folding edge – see instructions above. |
|||||||||||||||||||||||||
Diagram explanations |
|||||||||||||||||||||||||
|
|||||||||||||||||||||||||
 |
|||||||||||||||||||||||||
 |
|||||||||||||||||||||||||
 |
|||||||||||||||||||||||||
Have you finished this pattern?Tag your pictures with #dropspattern or submit them to the #dropsfan gallery. Do you need help with this pattern?You'll find 20 tutorial videos, a Comments/Questions area and more by visiting the pattern on garnstudio.com. © 1982-2026 DROPS Design A/S. We reserve all rights. This document, including all its sub-sections, has copyrights. Read more about what you can do with our patterns at the bottom of each pattern on our site. |
|||||||||||||||||||||||||


With over 40 years in knitting and crochet design, DROPS Design offers one of the most extensive collections of free patterns on the internet - translated to 17 languages. As of today we count 324 catalogs and 12290 patterns - 12280 of which are translated into English (US/in).
We work hard to bring you the best knitting and crochet have to offer, inspiration and advice as well as great quality yarns at incredible prices! Would you like to use our patterns for other than personal use? You can read what you are allowed to do in the Copyright text at the bottom of all our patterns. Happy crafting!
Post a comment to pattern DROPS 83-16
We would love to hear what you have to say about this pattern!
If you want to leave a question, please make sure you select the correct category in the form below, to speed up the answering process. Required fields are marked *.