
Popular categories
Looking for a yarn?


Comments / Questions (13)
![]() Philippe Evelyne wrote:
Philippe Evelyne wrote:
Bonjour, Pouvez vous me dire comment crocheter en rond pour réaliser ce petit top je suis débutante. Un grand merci
16.05.2026 - 16:43DROPS Design answered:
Bonjour Mme Philippe, vous allez ici crocheter de haut en bas: d'abord les épaules du devant l'une après l'autre puis on les réunit pour crocheter le devant jusqu'aux emmanchures avant de mettre en attente et de crocheter les épaules du dos l'une après l'autre avant de les réunir et de crocheter jusqu'aux emmanchures, puis maintenant on crochètera en rond: après les emmanchures, le dos et le devant. À la fin de chaque rang, vous terminez par 1 mc dans la 1ère m du tour et vous tournez pour crocheter sur l'envers (ainsi la texture reste la même qu'au début). Bon crochet!
18.05.2026 - 09:24
![]() GS wrote:
GS wrote:
Edge instructions : 1 double crochet in the first stitch - OK, * 3 chain stitches - OK, 1 treble crochet in the 3rd chain stitch from the hook - do you mean, 3rd STITCH, instead?, skip 1 cm -HOW?? My each stitch is 0.7 cm , 1 double crochet in the next stitch* - OK.
02.04.2026 - 15:19DROPS Design answered:
Dear GS, with a tension of 9 rows treble crochets = 10 cm, 1 treble crochet should measure approx. 1 cm in height, but just adjust to your own tension to avoid edge tigthening piece together. Happy crocheting!
07.04.2026 - 17:11
![]() Elise wrote:
Elise wrote:
Bonjour, je ne comprends pas la partie oû l'on rejoint l'avant et l'arrière. J'ai refais une ligne de bride à l'arrière, 8 mailles en l'air, une ligne de bride à l'avant et à nouveau 8 mailles en l'air que j'ai rattaché à l'arrière. Comment faut il continuer ? Merci d'avance
22.02.2026 - 23:10DROPS Design answered:
Bonjour Élise, vous tournez votre ouvrage pour crocheter maintenant sur l'envers, vous crochetez 1 mc dans chacune des 4 m premières mailles en l'air, puis vous crochetez en brides (commencez par 3 ml comme avant), à la fin du tour, terminez par 1 mc dans la 3èmedes mailles en l'air, puis tournez et crochetez maintenant sur l'endroit. Continuez ainsi alternativement sur l'endroit et sur l'envers (pour que la texture soit la même qu'au début). Bon crochet!
23.02.2026 - 09:16
![]() Rosa wrote:
Rosa wrote:
Buonasera, non comprendo come leggere il diagramma A1. Cioé al termine della prima riga (1 maglia alta nella prima maglia, 1 catenella, saltare 1 maglia, 1 maglia alta nella maglia successiva, saltare 1 maglia), cosa devo fare? Come faccio a tornare a destra per lavorare le tre maglie alte nella catenella sottostante appartenente alla prima riga?
06.02.2026 - 18:56DROPS Design answered:
Buonasera Rosa, il diagramma mostra tutte le righe del motivo, deve lavorare la riga di ritorno. Buon lavoro!
26.04.2026 - 13:33
![]() Kathy wrote:
Kathy wrote:
Love this pattern, unfortunately I cannot understand directions.
07.07.2025 - 05:35
![]() Manuela Seehaus wrote:
Manuela Seehaus wrote:
Hallo, ich bin gerade dabei das Modell nachzuarbeiten. Und es ist soweit gut erklärt. Allerdings komme ich mit den Armausschnitt und diesen 6 Luftmaschen leider nicht klar. Ich mache das irgendwie verkehrt. Mit dieser Kettmasche in die 3. Luftmasche des Rückenteils. Gibt es dazu eventuell eine Videoanleitung? Das wäre sehr hilfreich
19.05.2025 - 16:11DROPS Design answered:
Liebe Frau Seehaus, diese 6 Luftmaschen werden zwischen Vorder und Rückenteil genauso gehäkelt, wie Sie die Luftmaschen zwischen Schulter früher gehäkelt haben, nun beginnen die Runden mit Rückenteil (und nicht in der Mitte der Seite), so häkeln Sie zuerst Rückenteil wie zuvor, dann 6 Lm (1. Seite), dann häkeln Sie Vorderteil wie zuvor, dann 6 Lm (2. Seite), dann schliessen Sie die Runde mit 1 Kettmasche in die 1. Masche de Runde (= in die 3. Lm am Anfang Rückenteil). Hier zeigt man, wie man Stäbchen in der Runde häkelt, das kann vielleicht helfen. Viel Spaß beim Häkeln!
20.05.2025 - 08:53
![]() Giovanna wrote:
Giovanna wrote:
Se con il mio filato il campione misura 9x9 e non posso aumentare l’uncinetto altrimenti risulterebbe troppo lento, come mi regolo per le maglie?
06.05.2025 - 07:24DROPS Design answered:
Buonasera Giovanna, il lavoro non diventa "molle" se raggiunge il campione indicato. Deve utilizzare la misura di uncinetto che le permette di lavorare il campione come indicato. Buon lavoro!
09.05.2025 - 23:14
![]() JUGLARET wrote:
JUGLARET wrote:
Bonjour Je ne sais pas lire les grilles pourriez-vous me donner plus de détails Premier rang maillé en l’air ? Pas maillé coulée puis deuxième une maille en l’air et trois brides désolée je suis perdue Merci d’avance
01.05.2025 - 11:15DROPS Design answered:
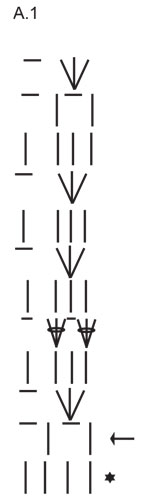
Bonjour Mme Juglaret, chaque symbole représente une maille/un groupe de mailles comme indiqué dans la légende; lisez le diagramme en commençant par le rang avec la flèche et de droite à gauche tous les rangs, ex au 1er rang de A.1: (1 bride dans la 1ère m, 1 maille en l'air, sautez 1 m, 1 bride dans la m suivante, sautez 1 m), répétez de (à) tout le tour; au 2ème rang: *3 brides dans le 1er arceau, 1 m, sautez (1 bride, 1 ml du rang précédent)*, répétez de *à*. Retrouvez ici plus d'infos sur les diagrammes. Bon crochet!
02.05.2025 - 08:15
![]() Isabelle wrote:
Isabelle wrote:
Bonjour. Je fais du crochet depuis longtemps mais je n'avais encore jamais fait de vêtements. Voilà qui est fait. Très beau modèle, facile et rapide à réaliser. Merci
12.03.2025 - 13:24
![]() Shirley wrote:
Shirley wrote:
I don’t understand the increase for the armhose on each side. Increase on every row as follows: 1 double crochet 3-4-4-4-0-0 times, then 2 double crochets 2-3-4-5-9-10 times = 76-84-90-96-106-114 stitches. Could you please explain. Thanks!
03.09.2023 - 02:13DROPS Design answered:
Dear Shirley, you can see the INCREASE TIP above: When increasing 1 double crochet, work 2 double crochets in 1 stitch (increase inside 1 stitch on each side of the piece). When increasing 2 double crochets work 2 double crochets in each of the next 2 stitches (increase inside 1 stitch on each side of the piece). Happy crochetting!
03.09.2023 - 23:40
|
|||||||||||||||||||
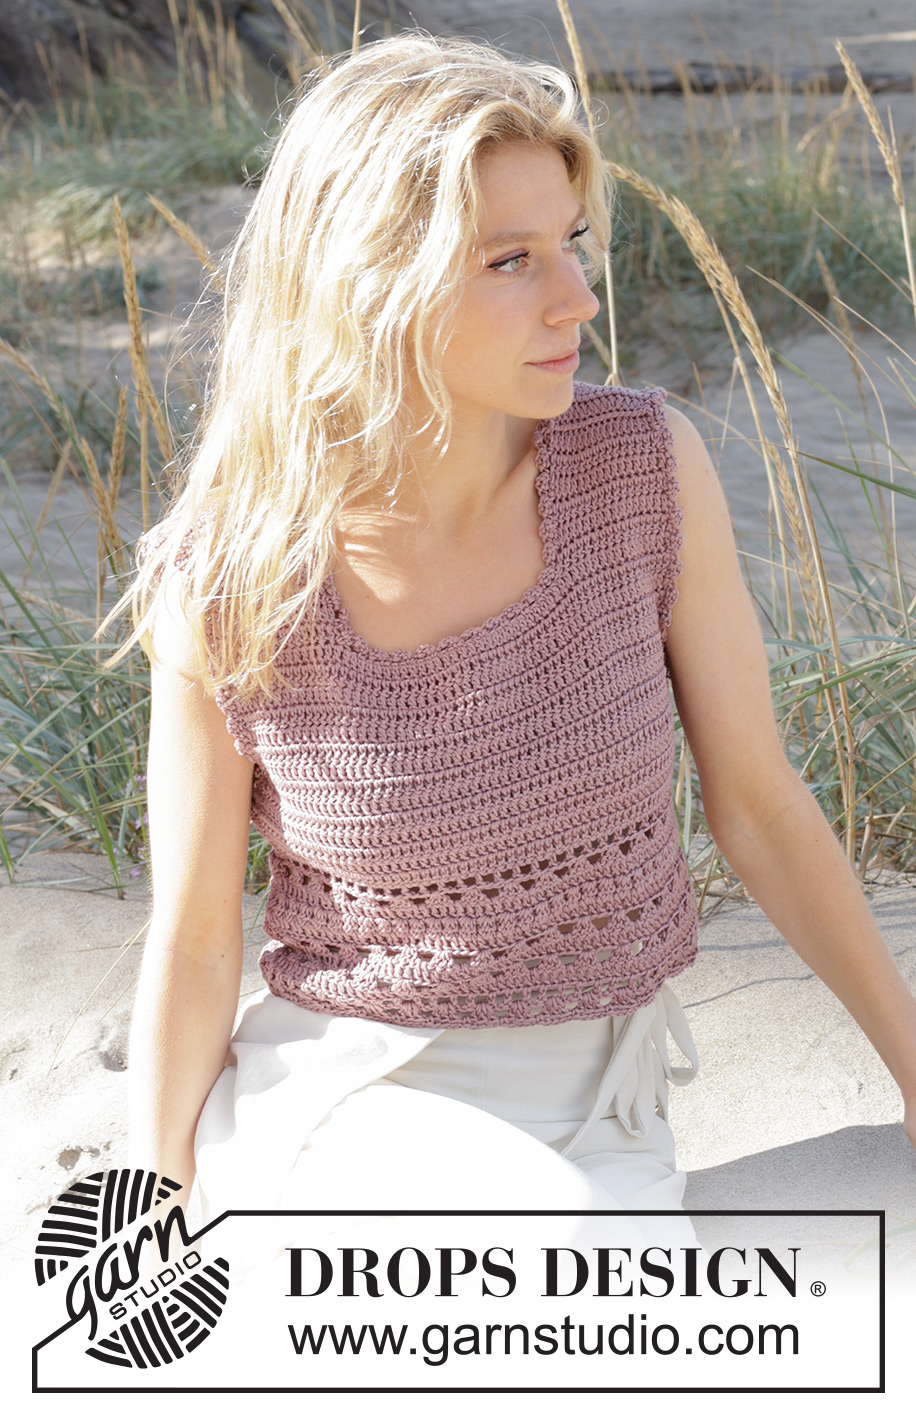
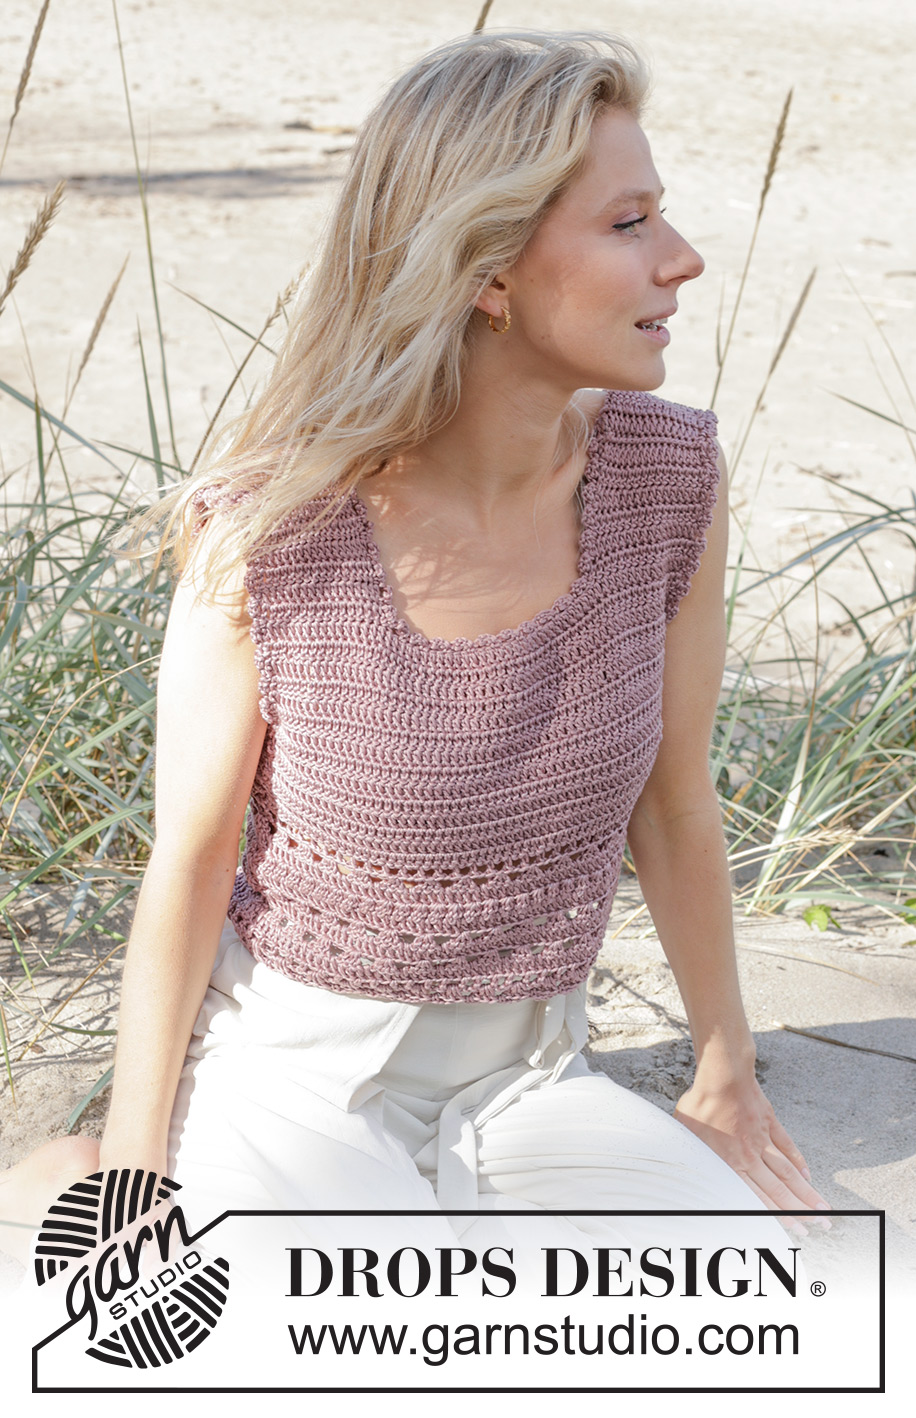
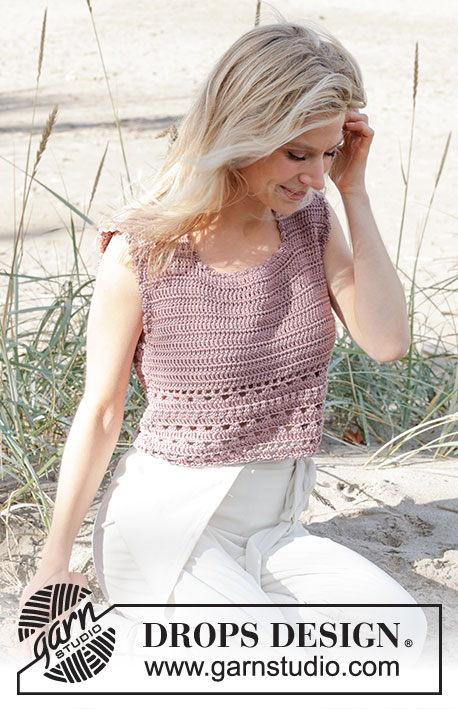
Beach Rendezvous Top#beachrendezvoustop |
|||||||||||||||||||
 |
 |
||||||||||||||||||
Crocheted top in DROPS Muskat. The piece is worked top down with lace pattern. Sizes S - XXXL.
DROPS 239-29 |
|||||||||||||||||||
|
------------------------------------------------------- EXPLANATIONS FOR THE PATTERN: ------------------------------------------------------- CHAIN STITCH: If you work outermost on the hook the chain stitch will often be too tight; 1 chain stitch should be as long as 1 single/double crochet is wide. PATTERN: See diagram A.1. CROCHET INFORMATION: At the beginning of each row/round of double crochets work 3 chain stitches, which do not replace the first double crochet. When working in the round, turn after each round, working back and forth alternately from the right and wrong side. This gives you the same texture as when you work rows back and forth. Start each round with 3 chain stitches and finish with 1 slip stitch in the 3rd chain stitch. INCREASE TIP: When increasing 1 double crochet, work 2 double crochets in 1 stitch (increase inside 1 stitch on each side of the piece). When increasing 2 double crochets work 2 double crochets in each of the next 2 stitches (increase inside 1 stitch on each side of the piece). DECREASE TIP: Decrease 1 double crochet by working 2 double crochets together. Work 1 double crochet in the first stitch but wait with the last yarn over and pull-through (2 loops on hook), work 1 double crochet in the next stitch/around the chain stitch and pull the last yarn over through all 3 loops on the hook (1 double crochet decreased). -------------------------------------------------------- TOP - SHORT OVERVIEW OF THE PIECE: Each shoulder is worked separately, back and forth. The piece is joined after the armholes and continued in the round, turning after each round and working alternately from the right and wrong side so the texture remains the same. FRONT PIECE: Right shoulder: Work 20-21-21-22-22-23 CHAIN STITCHES – read description above, work 1 double crochet in the 4th chain stitch from the hook, then 1 double crochet in each of the next 16-17-17-18-18-19 chain stitches = 17-18-18-19-19-20 double crochets and 3 chain stitches to turn. Continue back and forth with double crochets – read CROCHET INFORMATION. REMEMBER THE CROCHET GAUGE! When the piece measures 10-10-10-10-12-12 cm = 4"-4"-4"-4"-4¾"-4¾" (finishing after a row from the right side), cut the strand and lay the piece to one side. Left shoulder: Work 20-21-21-22-22-23 chain stitches, work 1 double crochet in the 4th chain stitch from the hook, then 1 double crochet in each of the next 16-17-17-18-18-19 chain stitches = 17-18-18-19-19-20 double crochets and 3 chain stitches to turn. Continue back and forth with double crochets. When the piece measures approx. 10-10-10-10-12-12 cm = 4"-4"-4"-4"-4¾"-4¾" work the next row from the wrong side as follows: Work 1 double crochet in each of the 17-18-18-19-19-20 double crochets on the left shoulder, work 28-28-30-30-32-34 chain stitches (neck), 1 double crochet in each of the 17-18-18-19-19-20 double crochets on the right shoulder. There are 62-64-66-68-70-74 stitches. Continue back and forth with 1 double crochet in each stitch and, on the first row, begin to increase for the armholes on each side – read INCREASE TIP. Increase on every row as follows: 1 double crochet 3-4-4-4-0-0 times, then 2 double crochets 2-3-4-5-9-10 times = 76-84-90-96-106-114 stitches. When the increases are finished the piece measures approx. 17-19-21-22-23-24 cm = 6¾"-7½"-8¼"-8¾"-9"-9½", continue working if necessary to the correct length. Finish after a row from the wrong side. Lay the piece to one side. BACK PIECE: Left shoulder: Work 20-21-21-22-22-23 chain stitches, work 1 double crochet in the 4th chain stitch from the hook, then 1 double crochet in each of the next 16-17-17-18-18-19 chain stitches = 17-18-18-19-19-20 double crochets and 3 chain stitches to turn. Continue back and forth with double crochets. When the piece measures approx. 3 cm = 1⅛" (finishing after a row from the right side), cut the strand and lay the piece to one side. Right shoulder: Work 20-21-21-22-22-23 chain stitches, work 1 double crochet in the 4th chain stitch from the hook, then 1 double crochet in each of the next 16-17-17-18-18-19 chain stitches = 17-18-18-19-19-20 double crochets and 3 chain stitches to turn. Continue back and forth with double crochets. When the piece measures approx. 3 cm = 1⅛", work the next row from the wrong side as follows: Work 1 double crochet in each of the 17-18-18-19-19-20 stitches on the right shoulder, work 28-28-30-30-32-32 chain stitches (neck), work 1 double crochet in each of the 17-18-18-19-19-20 stitches on the left shoulder. There are 62-64-66-68-70-74 stitches. Continue back and forth with 1 double crochet in each stitch. When the piece measures 11-11-11-11-13-13 cm = 4⅜"-4⅜"-4⅜"-4⅜"-5⅛"-5⅛", start to increase for the armholes on each side. Increase on every row as follows: 1 double crochet 3-4-4-4-0-0 times, then 2 double crochets 2-3-4-5-9-10 times = 76-84-90-96-106-114 stitches. When the increases are finished the piece measures approx. 17-19-21-22-23-24 cm = 6¾"-7½"-8¼"-8¾"-9"-9½", continue working if necessary to the correct length. Finish after a row from the wrong side. On the next row from the right side work as follows: Work double crochets over the stitches on the back piece, 6-6-8-10-12-14 chain stitches, double crochets over the stitches from the front piece, 6-6-8-10-12-14 chain stitches, finish with 1 slip stitch in the 3rd chain stitch at the beginning of back piece = 164-180-196-212-236-256 stitches. The piece is now measured from here! Turn and work 1 slip stitch in each of the first 3-3-4-5-6-7 chain stitches, the round starts here. Continue in the round, working 1 double crochet in each double crochet and in each chain stitch – read CROCHET INFORMATION. Insert 1 marker-thread in the middle of the 6-6-8-10-12-14 new stitches in each side. When the piece measures 4 cm = 1½", decrease 1 stitch on each side of both marker-threads (4 stitches decreased) – read DECREASE TIP. Repeat this decrease when the piece measures 6 and 8 cm = 2⅜" and 3⅛" = 152-168-184-200-224-244 double crochets. When the piece measures 10 cm = 4", decrease 8-12-12-12-12-12 stitches evenly spaced = 144-156-172-188-212-232 stitches. Work A.1 over all stitches. When A.1 is finished, the piece measures approx. 23 cm = 9". Work the next round as follows: 1 single crochet around the first chain stitch, * 3 chain stitches, 1 single crochet around the next chain stitch *, work from *-* to the end of the round. The top measures approx. 40-42-44-45-47-48 cm = 15¾"-16½"-17¼"-17¾"-18½"-19". Cut and fasten the strand. ASSEMBLY: Sew the shoulder seams edge to edge so the seam is flat. EDGE: Work an edge around the neck and armholes with hook size 4 MM = US 6 as follows: 1 single crochet in the first stitch, * 3 chain stitches, 1 double crochet in the 3rd chain stitch from the hook, skip 1 cm = ⅜", 1 single crochet in the next stitch*, work from *-* to the end of the round and finish with 1 slip stitch in the first single crochet from the beginning of the round. |
|||||||||||||||||||
Diagram explanations |
|||||||||||||||||||
|
|||||||||||||||||||
 |
|||||||||||||||||||
 |
|||||||||||||||||||
Have you finished this pattern?Tag your pictures with #dropspattern #beachrendezvoustop or submit them to the #dropsfan gallery. Do you need help with this pattern?You'll find 12 tutorial videos, a Comments/Questions area and more by visiting the pattern on garnstudio.com. © 1982-2026 DROPS Design A/S. We reserve all rights. This document, including all its sub-sections, has copyrights. Read more about what you can do with our patterns at the bottom of each pattern on our site. |
|||||||||||||||||||


With over 40 years in knitting and crochet design, DROPS Design offers one of the most extensive collections of free patterns on the internet - translated to 17 languages. As of today we count 325 catalogs and 12298 patterns - 12288 of which are translated into English (US/in).
We work hard to bring you the best knitting and crochet have to offer, inspiration and advice as well as great quality yarns at incredible prices! Would you like to use our patterns for other than personal use? You can read what you are allowed to do in the Copyright text at the bottom of all our patterns. Happy crafting!
Post a comment to pattern DROPS 239-29
We would love to hear what you have to say about this pattern!
If you want to leave a question, please make sure you select the correct category in the form below, to speed up the answering process. Required fields are marked *.