
Popular categories
Looking for a yarn?


Comments / Questions (98)
![]() María Jesús wrote:
María Jesús wrote:
Buenas noches. En qué se diferencia seguir el patrón A1 y A2 de hacer 3 puntos derechos y tres reves? Gracias
21.10.2024 - 23:53DROPS Design answered:
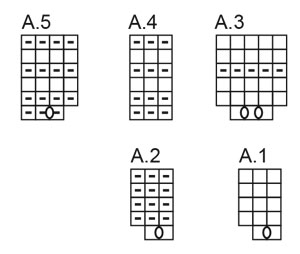
Hola María Jesús, en la 1ª fila trabajas todos los puntos de derecho (A.2 también)y haces una hebra. Entonces trabajas: 1 derecho, 1 hebra, 1 derecho (tanto en A.1 como en A.2) tantas veces como sea necesario según la talla. Después de esta fila con aumentos, el patrón A.2 y A.1 consiste en trabajar: en A.1 3 derechos por el lado derecho o 3 reveses por el lado revés. En A.2, 3 reveses por el lado derecho o 3 derechos por el lado revés. Es decir, los diagramas incluyen la fila de derecho con aumentos.
27.10.2024 - 18:21
![]() Winnie wrote:
Winnie wrote:
Een vraagje voor de zekerheid; bij het lijf staat dat je het lijf moet breien en dan staat er dat je steken moet meerderen. Ik neem aan dat je de steken moet meerderen voordat je het lijf gaat breien en dan de boord moet breien. Ik brei het vestje
16.10.2024 - 10:45DROPS Design answered:
Dag Winnie,
Je meerdert gelijk in het begin van het lijf verdeeld steken terwijl je 1 naald recht breit aan de goede kant.
16.10.2024 - 20:22
![]() Cornelia Keller wrote:
Cornelia Keller wrote:
Guten Morgen, ich stricke den Baby glam Cardigan und wollte die dafür angegebenen Knöpfe Drops Nr. 628 (6 Stck.) bestellen. Leider sind sie nicht erhältlich. Können Sie mir bitte eine Alternative anbieten oder mir mitteilen welchen Durchmesser die Knöpfe haben? Vielen Dank . Mit freundlichen Grüßen Cornelia Keller
30.08.2024 - 07:03DROPS Design answered:
Liebe Frau Keller, hier lesen Sie mehr über diese Knöpfe, fragen Sie mal Ihr DROPS Händler, vielleicht bekommen Sie diese Knöpfe bald wieder. Viel Spaß beim Stricken!
30.08.2024 - 14:46
![]() Simone wrote:
Simone wrote:
Moin! Ich stricke die Jacke in Größe 68/74. Jetzt bin ich bei der Passe und habe 302 Maschen mit der Strickschrift A3 und A5 auf der Nadel in der Hinreihe. Jetzt soll ich A3 und A4/A5 zu Ende stricken und dann im Rippenmuster 5 re. / 4 li. Maschen weiter stricken. Und da komme ich mit den Strickanleitungen nicht konform. Ich habe da 5 re. ,aber nur 3 li. Maschen???!!! Wo ist mein Denkfehler??? Liebe Grüße Simone 😎
16.07.2024 - 00:42DROPS Design answered:
Liebe Simone, Sie müssten nach der 1. Reihe von A.3/A.5 202 Maschen auf der Nadel haben, nicht 302. Dann nehmen Sie so ab, dass nur noch 191 Maschen vorhanden sind. A.4 stricken Sie in der von Ihnen gewählten Größe gar nicht, nur A.3 und A.5. Und dabei kommen Sie auf 5 Maschen rechts und 4 Maschen links. A.4 gilt nur für die kleinste Größe. Gutes Gelingen!
22.07.2024 - 09:17
![]() Debouck wrote:
Debouck wrote:
Bonjour quand vous écrivez par A3/A5 combien de mailles avons nous avant de faire les côtes 5 mailles endroits / 4mailles envers merci
12.07.2024 - 14:36DROPS Design answered:
Bonjour Mme Debouck, au 1er rang, vous avez 3 m dans chaque A.3 et 3 m dans chaque A.5; au 1er rang des diagrammes, vous augmentez 2 m dans chaque A.3 (= 5 m dans chaque A.3) et 1 m dans chaque A.5 (= 4 m dans chaque A.5). Bon tricot!
29.07.2024 - 09:36
![]() Ingrid Janson wrote:
Ingrid Janson wrote:
Hej!! Förstår inte hur jag skall göra på varvet som är det första på oket, efter två räta varv. Ska öka från 94 till 137 maskor. Jag tolkar det som att jag ska göra ett omslag mellan varje maska* A1, A 2*, men det blir för många . Kan ni förtydliga? Mvh Ingrid J
04.07.2024 - 23:03DROPS Design answered:
Hej Ingrid. Du stickar först 4 framkantsmaskor i rätstickning. Sedan stickar du A.1 (=rm, omslag, rm) och A.2 (= rm, omslag, rm). När du har stickat 4 maskor har du alltså ökat 2 maskor. Detta upprepas tills det återstår 6 maskor på varvet, sticka A.1 och 4 framkantsmaskor i rätstickning. Mvh DROPS Design
05.07.2024 - 11:23
![]() Birgitt Wilhelmus wrote:
Birgitt Wilhelmus wrote:
Das Jäckchen stricke ich für meine Enkelkn in Gr. 80/86. PASSE: Ich habe nun 98 M. auf der Nadel und fange mit dem Muster *A.1,A.2* an. Dann heißt es: Nach der 1.Reihe soll ich 143 M. auf der Nadel haben. Wo bitte sollten denn die 45 M. zugenommen werden? Gerne erwarte ich Ihre Antwort. Mit freundlichen Grüßen Birgitt Wilhelmus
11.06.2024 - 08:36DROPS Design answered:
Liebe Frau Wilhelmus, so stricken Sie die 98 M: 4 Blenden-M, (A.1 = 2 M, A.2 = 2 M) x 22, dann A.1 = 2 M und 4 Blende-Maschen, bei der 1. Reihe wird man 1 Masche in jedemA1. und A.2 zunehmen, so sind es 3 M in jedem A.1 und A.2 dh:: 4 + (3+3)x22 + 3 + 4 = 143. Viel Spaß beim Stricken!
12.06.2024 - 07:51
![]() Tarja wrote:
Tarja wrote:
Tämä on tosi kiva ohje, olen tehnyt jo neljälle lapselle tällaiset neuletakit. Kiitos suunnittelijalle!
28.04.2024 - 10:41
![]() Pat Cozier wrote:
Pat Cozier wrote:
How do I print patterns in US format instructions ?
07.04.2024 - 14:54DROPS Design answered:
Dear Pat, please select the pattern on the US site, then see the print icon just above the title that says "instructions". If you click on that, you will get a printable PDF. Happy Crafting!
07.04.2024 - 18:21
|
||||||||||
Sweet Gleam Cardigan#sweetgleamcardigan |
||||||||||
 |
 |
|||||||||
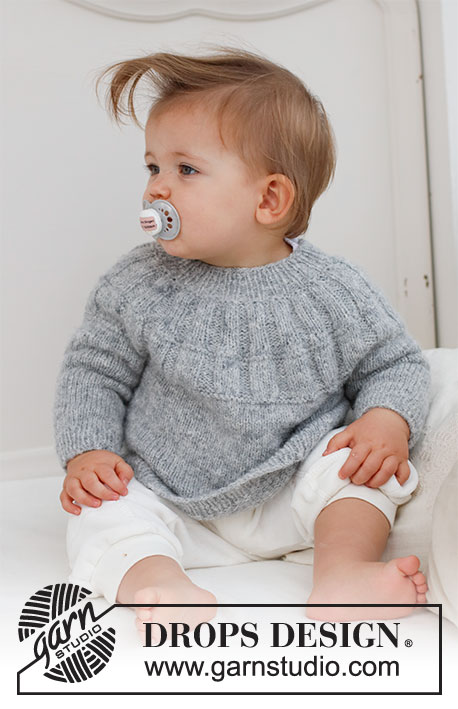
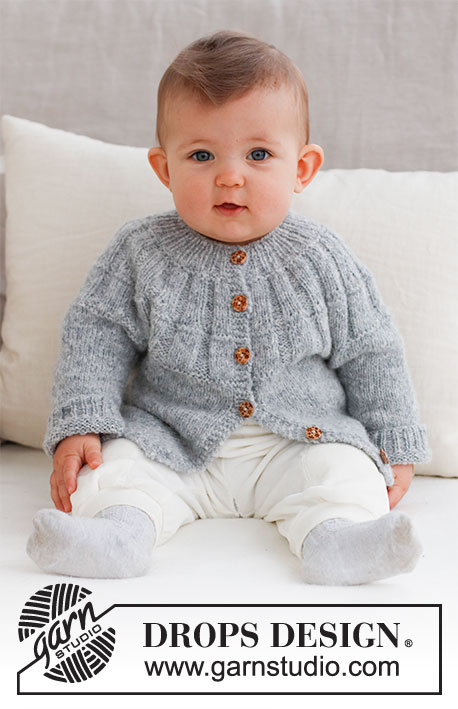
Knitted jacket for baby in DROPS Sky. The piece is worked top down, with round yoke and ribbing on the yoke. Sizes: Premature to 2 years.
DROPS Baby 43-6 |
||||||||||
|
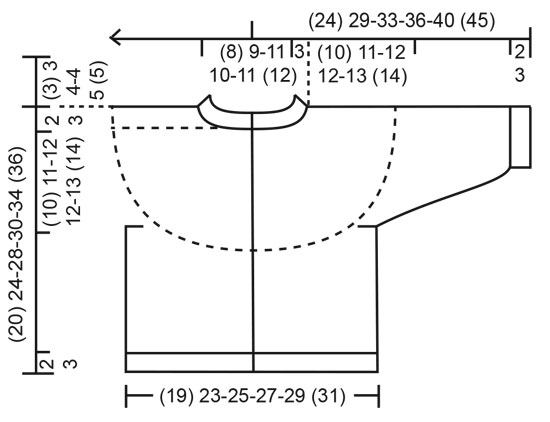
------------------------------------------------------- EXPLANATIONS FOR THE PATTERN: ------------------------------------------------------- RIDGE/GARTER STITCH (worked back and forth): Knit all rows. 1 ridge = knit 2 rows. PATTERN: See diagrams A.1 to A.5. The diagrams show all rows in the pattern from the right side. DECREASE TIP (for sleeves): Start 3 stitches left before the marker, knit 2 together, knit 2 (marker sits between these 2 stitches), slip 1 stitch as if to knit, knit 1 and pass the slipped stitch over the knitted stitch. BUTTONHOLES: Work the buttonholes on the right band (when the garment is worn). Work from the right side when there are 3 stitches left: Make 1 yarn over, knit 2 together and knit 1. On the next row (wrong side) knit the yarn over to leave a hole. The first buttonhole is worked when the neck measures 1½-2 cm = ½"-¾", the other (3) 4-5-5-5 (5) buttonholes are worked with (5) 5-5-5-5½ (6) cm = (2") 2"-2"-2"-2⅛" (2⅜") between each one. ------------------------------------------------------- START THE PIECE HERE: ------------------------------------------------------- JACKET – SHORT OVERVIEW OF THE PIECE. The neck and yoke are worked back and forth with circular needle, from mid front and top down. The yoke is divided for body and sleeves and the body continued back and forth. The sleeves are worked in the round with double pointed needles. NECK: Cast on (59) 63-71-75-79 (83) stitches with circular needle size 3 MM = US 2.5 and DROPS Sky. Purl 1 row from the wrong side, then work the next row as follows: 4 band stitches in GARTER STITCH – read description above, * knit 1, purl 1 *, work from *-* until there are 5 stitches left, knit 1 and 4 band stitches in garter stitch. Work this rib for (2) 2-3-3-4 (4) cm = (3/4") ¾"-1⅛"-1⅛"-1½" (1½") – remember the BUTTONHOLES on the right band – read description above. On the next row from the right side increase every other purl-1 to purl-2 by making 1 yarn over – start to increase in the 2nd purled stitch after the band (knit the yarn overs twisted on the next row to avoid holes) = (12) 13-15-16-17 (18) increased stitches and (71) 76-86-91-96 (101) stitches. Continue the new rib until the neck measures (3) 3-4-4-5 (5) cm = (1⅛") 1⅛"-1½"-1½"-2" (2"). Insert 1 marker after the band; the yoke is measured from this marker! YOKE: Change to circular needle size 4 MM = US 6 and work 1 ridge over all stitches – AT THE SAME TIME on the first row increase (3) 2-0-3-2 (1) stitches evenly spaced = (74) 78-86-94-98 (102) stitches. After the ridge work as follows from the right side: 4 band stitches in garter stitch, * A.1, A.2 *, work from *-* until there are 6 stitches left, A.1 and 4 band stitches in garter stitch. After the first row there are (107) 113-125-137-143 (149) stitches. Complete A.1 and A.2, then continue with knit 3 /purl 3 until the yoke measures (4) 5-5-5-6 (6) cm = (1½") 2"-2"-2"-2⅜" (2⅜") from the marker on the neck. Work the next row from the right side as follows: SIZE (<0): 4 band stitches in garter stitch, * A.3, A.4 *, work from *-* until there are 7 stitches left, A.3 and 4 band stitches in garter stitch. SIZES 0/1 – 1/3 – 6/9 – 12/18 months (2 years): 4 band stitches in garter stitch, * A.3, A.5 *, work from *-* until there are 7 stitches left, A.3 and 4 band stitches in garter stitch. After the first row there are (141) 166-184-202-211 (220) stitches. Complete A.3 and A.4/A.5, then continue with knit 5 / purl 3 in size (<0) and knit 5 / purl 4 in the other sizes until the yoke measures (8) 10-10-10-12 (12) cm = (3⅛") 4"-4"-4"-4¾" (4¾") from the marker. Knit 1 row from the right side where you adjust the number of stitches to (139) 163-175-191-195 (207) stitches. Knit 1 row from the wrong side. Continue with stockinette stitch and 4 band stitches in garter stitch on each side until the yoke measures (10) 11-12-12-13 (14) cm = (4") 4⅜"-4¾"-4¾"-5⅛" (5½") from the marker. On the next row divide for the body and sleeves as follows: Work the first (22) 26-28-30-31 (33) stitches as before, place the next (30) 34-36-40-40 (42) stitches on a thread for the sleeve, cast on (4) 4-6-6-8 (8) stitches (in side under sleeve), work (35) 43-47-51-53 (57) stitches, place the next (30) 34-36-40-40 (42) stitches on a thread for the sleeve, cast on (4) 4-6-6-8 (8) stitches (in side under sleeve), work the last (22) 26-28-30-31 (33) stitches. The body and sleeves are finished separately. The piece is now measured from here! BODY: = (87) 103-115-123-131 (139) stitches. Continue with stockinette stitch and 4 band stitches in garter stitch on each side for a further (6) 9-12-12-15 (16) cm = (2⅜") 3½"-4¾"-4¾"-6" (6¼"). Knit 1 row from the right side where you increase (12) 14-16-18-18 (20) stitches evenly spaced = (99) 117-131-141-149 (159) stitches. Change to circular needle size 3 MM = US 2.5 and work as follows from the wrong side: 4 band stitches in garter stitch, * purl 1, knit 1 *, work from *-* until there are 5 stitches left, purl 1 and 4 band stitches in garter stitch. Continue this rib for (2) 2-2-3-3 (3) cm = (3/4") ¾"-¾"-1⅛"-1⅛" (1⅛"). Bind off a little loosely. The jacket measures approx. (20) 24-28-30-34 (36) cm = (8") 9½"-11"-11¾"-13⅜" (14¼") from the shoulder down. SLEEVES: Place the (30) 34-36-40-40 (42) stitches from the thread on the one side of the piece on double pointed needles size 4 MM = US 6 and knit up 1 stitch in each of the (4) 4-6-6-8 (8) stitches cast on under the sleeve = (34) 38-42-46-48 (50) stitches. Insert a marker in the middle of the (4) 4-6-6-8 (8) stitches under the sleeve. Start at the marker and work stockinette stitch in the round for 1 cm = ⅜". Now decrease 2 stitches under the sleeve (does not apply to sizes <0 and 0/1 month) – read DECREASE TIP. Decrease like this every 4th round a total of (0) 0-1-1-1 (2) times = (34) 38-40-44-46 (46) stitches. Continue working until the sleeve measures (5) 8-10-13-15 (19) cm = (2") 3⅛"-4"-5⅛"-6" (7½") from the division. There is approx. (2) 2-2-3-3 (3) cm = (3/4") ¾"-¾"-1⅛"-1⅛" (1⅛") to finished length; try the jacket on and work to desired length. Knit 1 round where you decrease (0) 0-0-4-4 (2) stitches evenly spaced = (34) 38-40-40-42 (44) stitches. Change to double pointed needles size 3 MM = US 2.5 and work rib (knit 1, purl 1) for (2) 2-2-3-3 (3) cm = (3/4") ¾"-¾"-1⅛"-1⅛" (1⅛"). Bind off a little loosely The sleeve measures approx. (7) 10-12-16-18 (22) cm = (2¾") 4"-4¾"-6¼"-7" (8¾") from the division. Work the other sleeve in the same way. ASSEMBLY: Sew the buttons onto the left band. |
||||||||||
Diagram explanations |
||||||||||
|
||||||||||
 |
||||||||||
 |
||||||||||
Have you finished this pattern?Tag your pictures with #dropspattern #sweetgleamcardigan or submit them to the #dropsfan gallery. Do you need help with this pattern?You'll find 29 tutorial videos, a Comments/Questions area and more by visiting the pattern on garnstudio.com. © 1982-2026 DROPS Design A/S. We reserve all rights. This document, including all its sub-sections, has copyrights. Read more about what you can do with our patterns at the bottom of each pattern on our site. |
||||||||||


With over 40 years in knitting and crochet design, DROPS Design offers one of the most extensive collections of free patterns on the internet - translated to 17 languages. As of today we count 324 catalogs and 12290 patterns - 12280 of which are translated into English (US/in).
We work hard to bring you the best knitting and crochet have to offer, inspiration and advice as well as great quality yarns at incredible prices! Would you like to use our patterns for other than personal use? You can read what you are allowed to do in the Copyright text at the bottom of all our patterns. Happy crafting!
Post a comment to pattern DROPS Baby 43-6
We would love to hear what you have to say about this pattern!
If you want to leave a question, please make sure you select the correct category in the form below, to speed up the answering process. Required fields are marked *.