
Popular categories
Looking for a yarn?


Comments / Questions (12)
![]() Magdalena wrote:
Magdalena wrote:
Jakim rozmiarem drutów jest robiona próbka opisana w opisie? Proszę o dopisanie do wzoru
03.03.2026 - 03:03DROPS Design answered:
Hello Magdalena, the gauge described in the pattern is worked with 8 mm needles. Happy knitting!
03.03.2026 - 05:52
![]() Reidun wrote:
Reidun wrote:
Hvordan, og når øker jeg
15.04.2025 - 19:42DROPS Design answered:
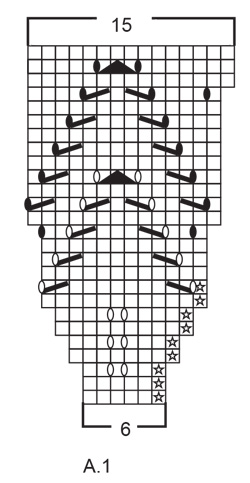
Hei Reidun. Øke: Les ØKETIPS øverst i oppskriften. Når du følger diagram A.1 og det kommer et hvit oval ikon eller sort oval ikon, står det i diagramikon teksten hvordan kastet skal strikkes (se rad 3-5-7 (hvit oval ikon) -13-23 (sort oval ikon). mvh DROPS Design
28.04.2025 - 11:12
![]() Elisabeth Lein wrote:
Elisabeth Lein wrote:
Oppskrift
09.06.2024 - 19:00
![]() Angie wrote:
Angie wrote:
Dear Drops Team, Thank you very much for this lovely pattern! I have tryed about 8 Times to knit this pattern in several sizes. But I can't knit it, the Charts are complicated. Maybe you could make a video of this leaf knitting-parts? It would be very helpful and Kind of you. Many thanks!
23.04.2024 - 21:26DROPS Design answered:
Dear Angie, we are sorry, but we do not have this diagram in a written out version. Not only because these patterns are available in many languages, but also we believe, that with diagrams, you can see the "bigger picture" (in other words, not only the very next stitch, but also how rows and stitches relate to each other. HERE we have a tutorial on how to read knitting diagrams, and you can always ask for help (either over the phone or in person) in the store where you bought your DROPS yarn from. Happy Crafting!
23.04.2024 - 21:51
![]() Triinu wrote:
Triinu wrote:
Koo mustrit järgmiselt (1. rida töö paremal pool): tee 5 nööbiliistusilmust ripskoes, koo skeemi A.1 kokku 9-9-10-10-11-11 korda real, koo skeemi A.1 esimene silmus (et küljed oleks sarnased) nii segane selgitus, et tuli kapsunist tehtud foto järgi kududa. Pole kindel, et selle kapsuni juhendi järgi valmis saan. Pettunud
07.12.2022 - 13:35
![]() Els Van Der Voet wrote:
Els Van Der Voet wrote:
Goede dag ik heb dit patroon met gaten gekocht. Maar wordt deze met 1 of 2 draden gebreid?
10.11.2022 - 14:22
![]() Lene Vestergård wrote:
Lene Vestergård wrote:
Hej Jeg undre mig over at der skal tages masker ud før rib kanten strikkes på kroppen. Er det korrekt? Ved ærmerne skal der tages ind før ribben strikkes. Venlig hilsen Lene
17.10.2022 - 10:47DROPS Design answered:
Hei Lene. Ja, det stemmer. For å få en penere overgang mellom bol og vrangbord, økes det masker før vrangbord, men på ermene felles det masker. Dette kan forandres fra oppskrift til oppskrift, fra hvilken kvalitet det strikkes med og hvordan plagget skal være. Så ingen fasit for alle strikkeplagg. mvh DROPS Design
17.10.2022 - 13:35
![]() Fay Anabelle wrote:
Fay Anabelle wrote:
Love this design! I definitely will try it. five nights at freddy's
09.05.2022 - 11:31
![]() Annick Hénault wrote:
Annick Hénault wrote:
Bonjour, puis je faire ce modèle avec des aiguilles droites ? Cordialement
23.02.2022 - 18:12DROPS Design answered:
Bonjour Mme Hénault, vous pourrez tricoter l'empiècement et le dos/le devant sur aiguilles droites, pour les manches, une aiguille circulaire sera probablement plus simple, même pour tricoter en rangs en raison de sa forme. Vous trouverez ici plus d'infos à ce sujet. Bon tricot!
24.02.2022 - 10:11
![]() Linda wrote:
Linda wrote:
Coffee at Neighbours'
18.01.2022 - 14:44
|
||||||||||||||||||||||
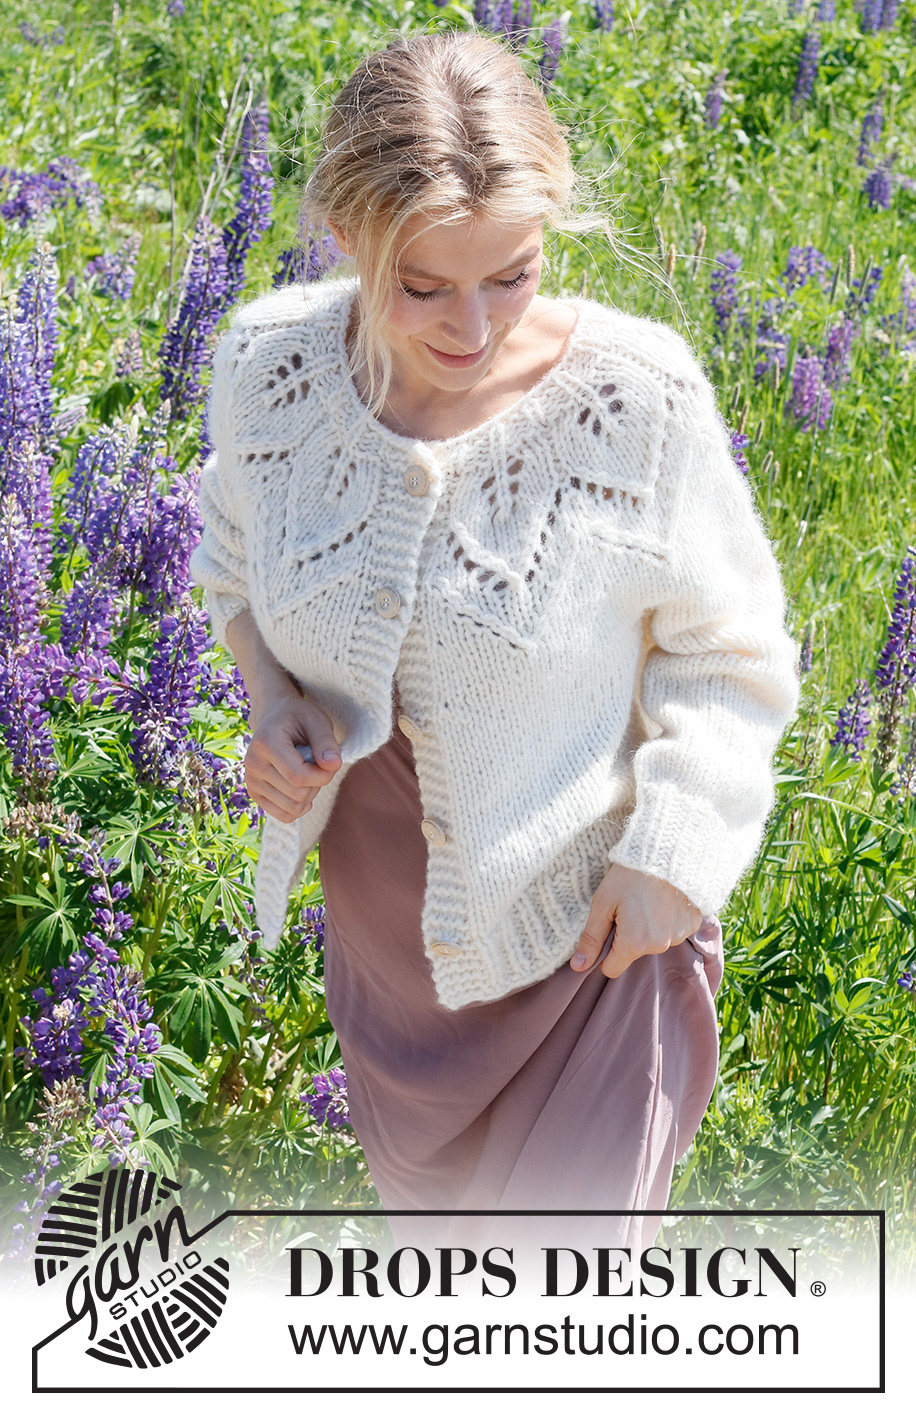
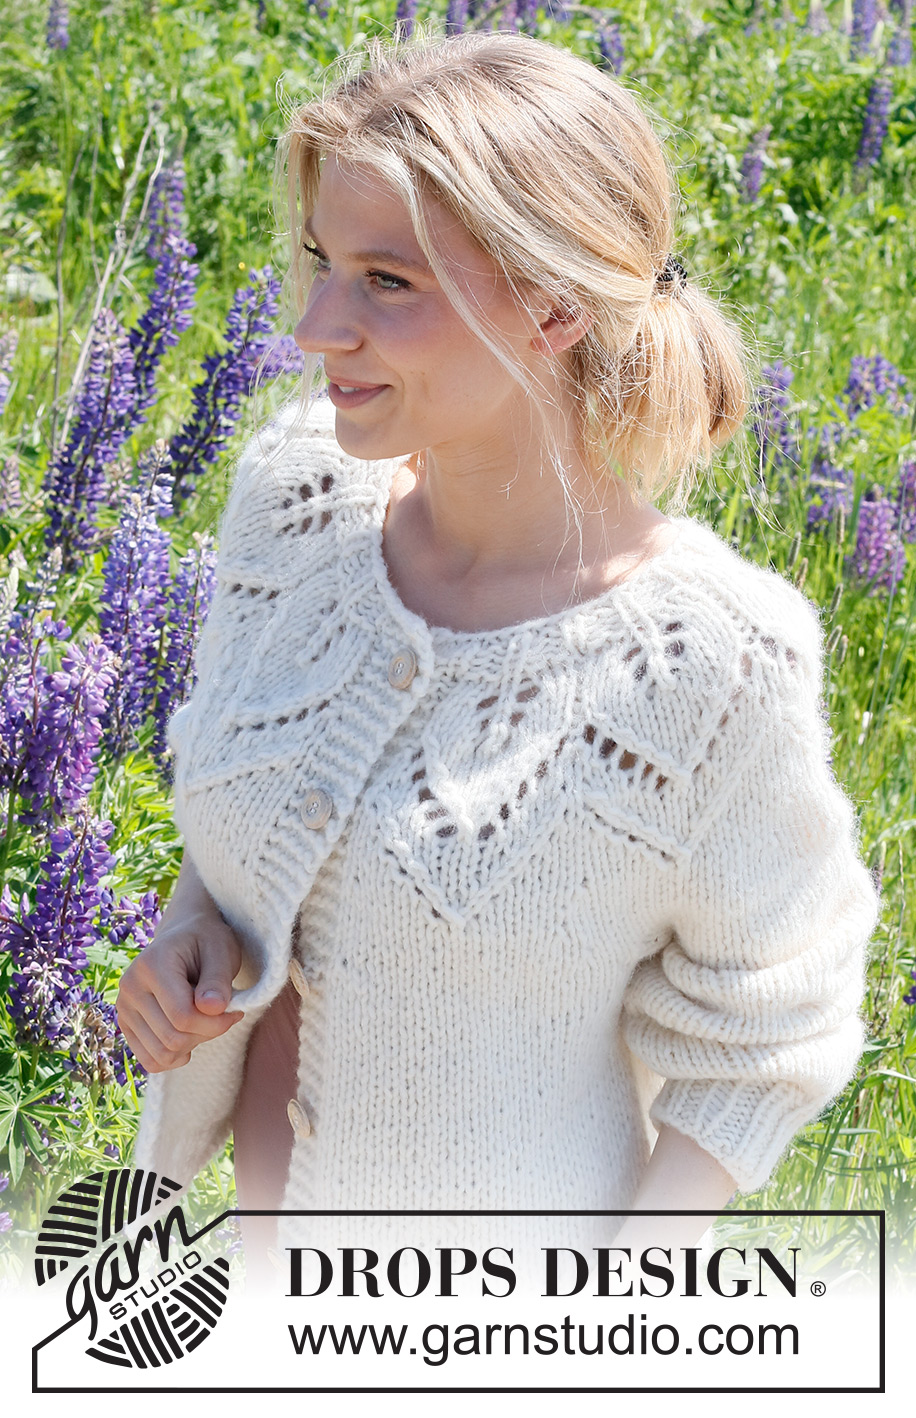
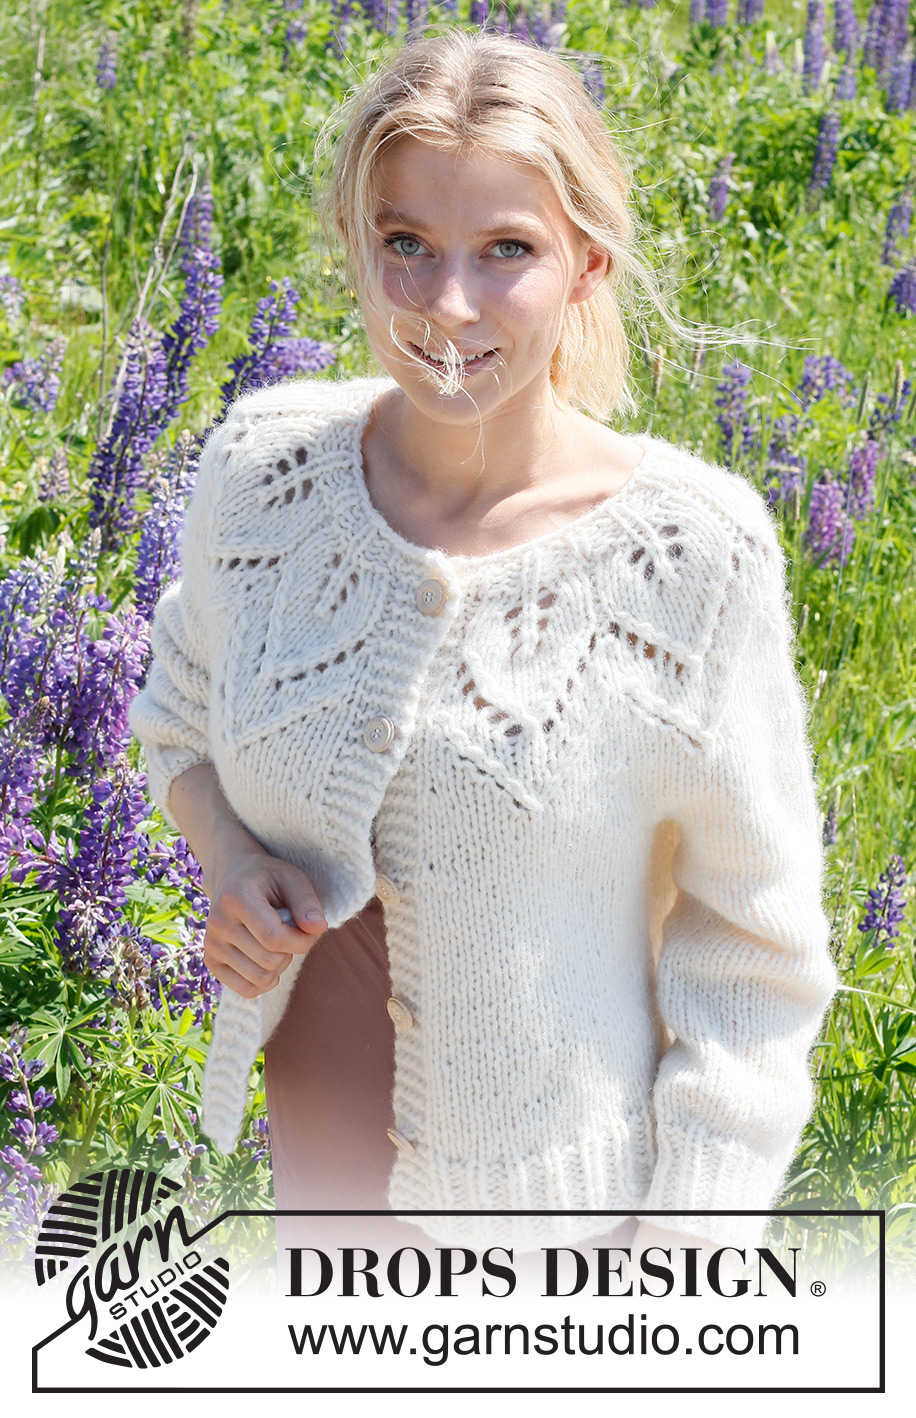
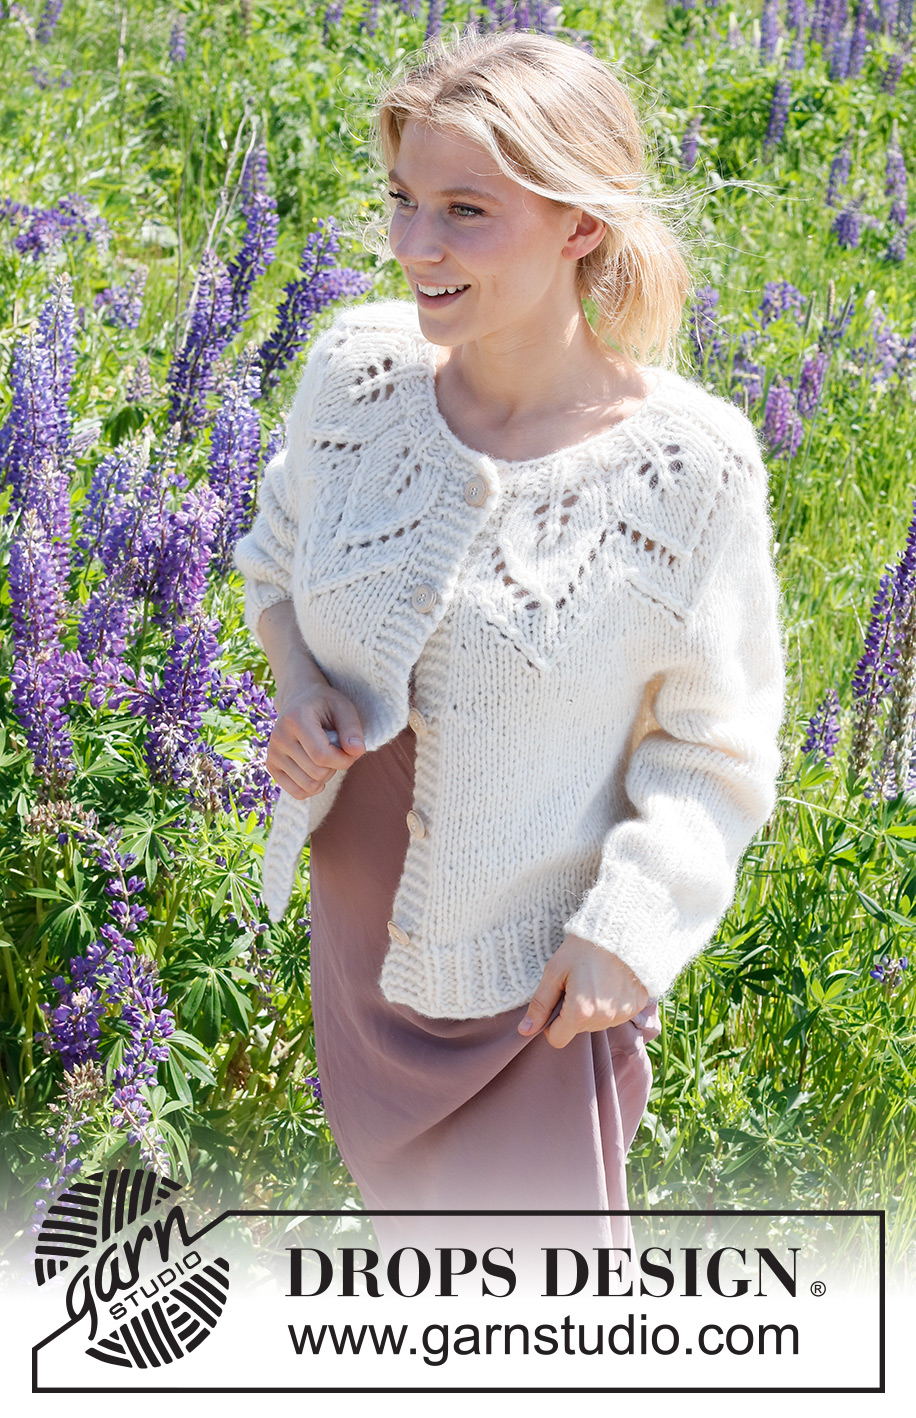
Leaf Ring Cardigan#leafringcardigan |
||||||||||||||||||||||
 |
 |
|||||||||||||||||||||
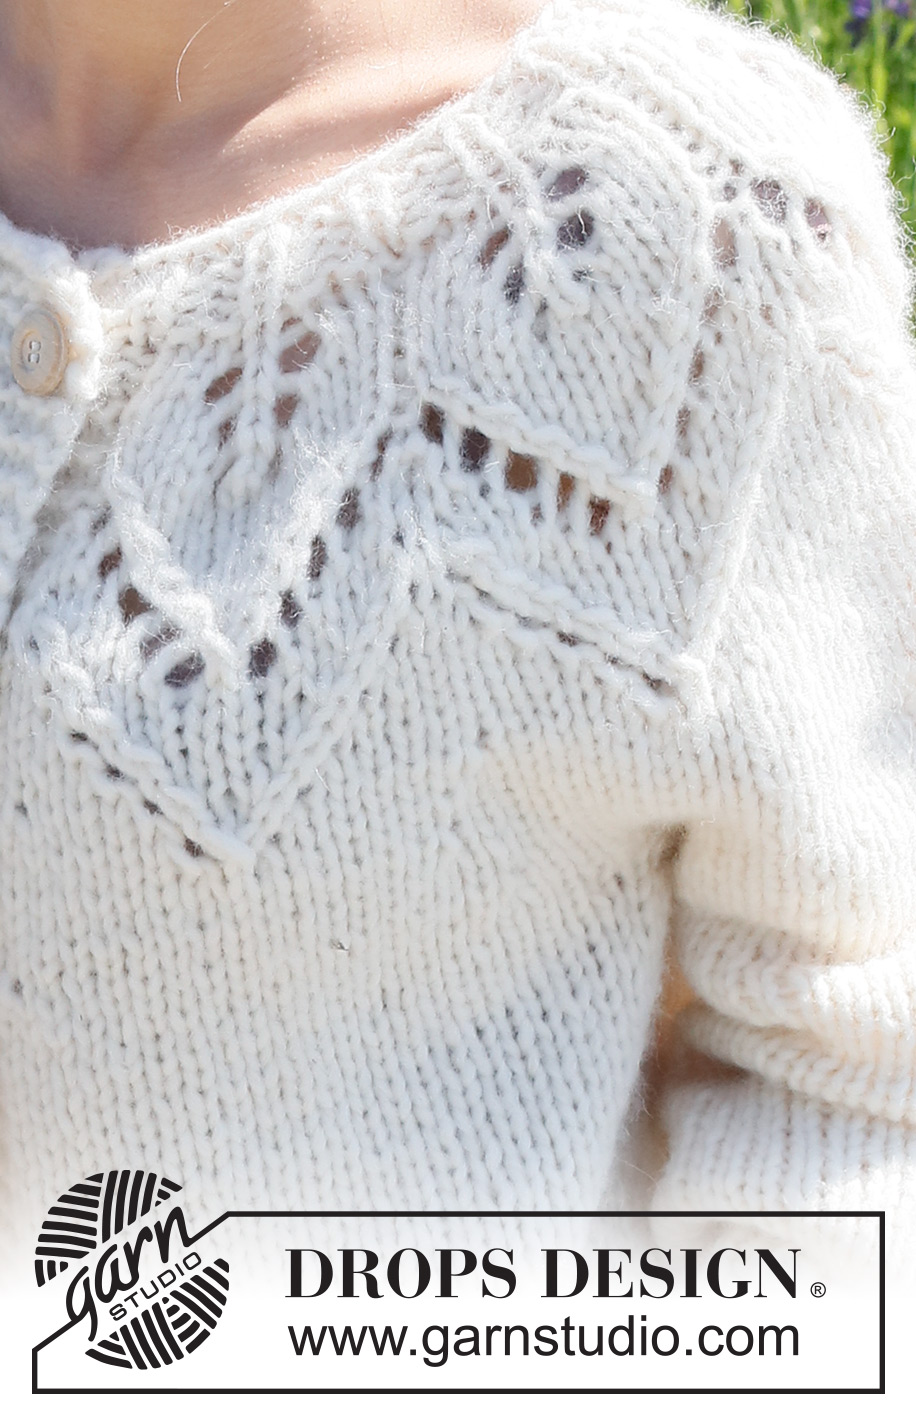
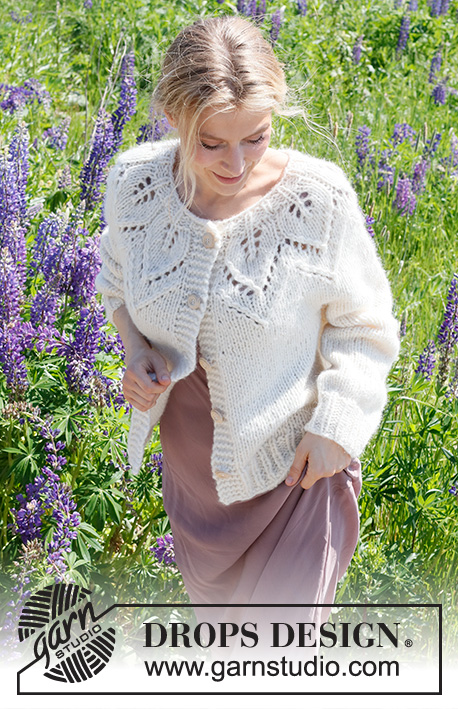
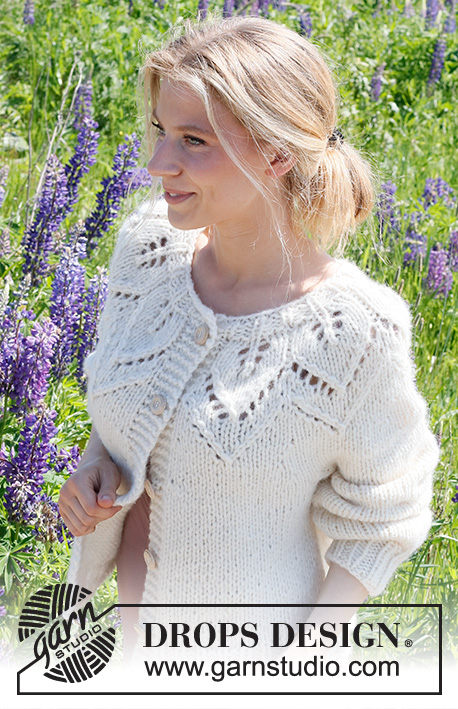
Knitted jacket in DROPS Wish. Piece is knitted top down with round yoke and leaf pattern / lace pattern. Size: S - XXXL
DROPS 232-7 |
||||||||||||||||||||||
|
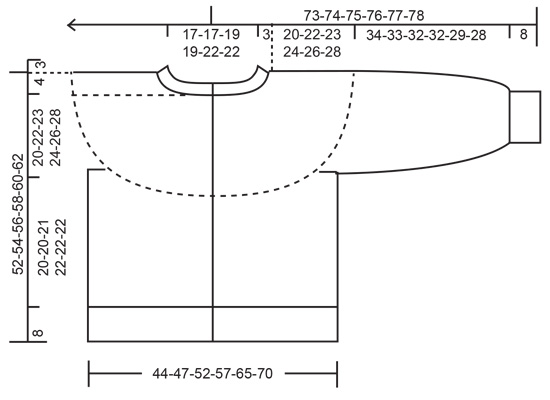
---------------------------------------------------------- EXPLANATION FOR THE PATTERN: ---------------------------------------------------------- GARTER STITCH (back and forth): Knit all rows. 1 ridge vertically = knit 2 rows. BUTTONHOLES: Decrease for buttonholes on right band (when garment is worn). Decrease from right side when 3 stitches remain on row as follows: Make 1 yarn over, knit the next 2 stitches together, knit last stitch. On next row knit yarn over to make holes. Decrease first buttonhole when yoke measures approx. 3 cm = 1⅛". Then decrease the next 4-4-5-5-5-5, approx. 10½-10½-9½-10-10-10½ cm = 4⅛"-4⅛"-3⅝"-4"-4"-4⅛" apart. PATTERN: See diagram A.1. Diagrams show all rows in pattern seen from the right side. INCREASE TIP: All increases are done from the right side. Increase 1 stitch at every marker, increase alternately before and after stitch with marker: Increase by making a yarn over before or after the stitch with marker, on next row purl yarn over twisted to avoid holes. ---------------------------------------------------------- START THE PIECE HERE: ---------------------------------------------------------- JACKET - SHORT OVERVIEW OF THE PIECE: Work neck edge and yoke back and forth on circular needle from mid front, work top down. Now divide yoke for body and sleeves. Work body back and forth on circular needle. Work sleeves in the round on double pointed needles/a short circular needle. NECK EDGE: Cast on 65-65-71-71-77-77 stitches on circular needle size 7 MM = US 10.75 with DROPS Wish. Purl 1 row from wrong side. Work next row as follows from right side: Work 5 band stitches in GARTER STITCH - read explanation above - * knit 1, purl 2 *, work from *-* until 6 stitches remain, knit 1 and finish with 5 band stitches in garter stitch. Continue rib like this for 3 cm = 1⅛". YOKE: Switch to circular needle size 8 MM = US 11. Insert 1 marker after band at beginning of row mid front, measure yoke from this marker! Now work pattern as follows (1st row = from right side): 5 band stitches in garter stitch, work A.1 9-9-10-10-11-11 times, work first stitch in A.1 (so that pattern begins and ends the same), 5 band stitches in garter stitch. Decrease for BUTTONHOLES on right band - read explanation above. REMEMBER THE KNITTING GAUGE! Continue pattern back and forth. When A.1 has been worked vertically, there are 146-146-161-161-176-176 stitches on needle. Insert 1 marker in 1st stitch in every repetition = 9-9-10-10-11-11 markers. Continue with stockinette stitch and in garter stitch as before, at the same time on first row from right side increase 1 stitch at every marker - read INCREASE TIP. Increase every 2-3-4-3-2½-2½ cm = ¾"-1⅛"-1½"-1⅛"-1"-1" 1-2-2-3-4-5 times in total = 155-164-181-191-220-231 stitches. Work until piece measures 20-22-23-24-26-28 cm = 8"-8¾"-9"-9½"-10¼"-11" from marker after neck edge. Now divide piece for body and sleeves as follows: Work the first 26-28-31-32-37-39 stitches (front piece), slip the next 30-31-34-36-41-43 stitches on a stitch holder for sleeve, and cast on 6-6-6-8-8-10 new stitches on needle (in the side under sleeve), work the next 43-46-51-55-64-67 stitches (back piece), slip the next 30-31-34-36-41-43 stitches on a thread for sleeve, and cast on 6-6-6-8-8-10 new stitches on needle (in the side under sleeve), work the last 26-28-31-32-37-39 stitches (front piece). Then finish body and sleeves separately. NOW MEASURE PIECE FROM HERE! BODY: = 107-114-125-135-154-165 stitches. Continue with stockinette stitch and 5 band stitches in garter stitch in each side. When piece measures 20-20-21-22-22-22 cm = 8"-8"-8¼"-8¾"-8¾"-8¾" from division, increase 12-11-12-14-16-17 stitches evenly = 119-125-137-149-170-182 stitches. Switch to circular needle size 7 MM = US 10.75. Work next row as follows from right side: Work 5 band stitches in garter stitch, * knit 1, purl 2 *, work from *-* until 6 stitches remain, knit 1 and finish with 5 band stitches in garter stitch. Continue rib like this for 8 cm = 3⅛". Loosely bind off. Jacket measures approx. 52-54-56-58-60-62 cm = 20½"-21¼"-22"-22¾"-23⅝"-24⅜" from shoulder and down. SLEEVES: Slip the 30-31-34-36-41-43 stitches from stitch holder in one side on a short circular needle/double pointed needles size 8 MM = US 11 and pick in addition up 1 stitch in each of the 6-6-6-8-8-10 stitches cast on in the side under sleeve = 36-37-40-44-49-53 stitches. Work in stockinette stitch in the round. When sleeve measures 34-33-32-32-29-28 cm = 13⅜"-13"-12½"-12½"-11⅜"-11" from division, decrease 9-7-7-8-10-11 stitches evenly = 27-30-33-36-39-42 stitches. Switch to double pointed needles size 7 MM = US 10.75. Work rib (knit 1/purl 2) in the round for 8 cm = 3⅛". Loosely bind off. Sleeve measures approx. 42-41-40-40-37-36 cm = 16½"-16⅛"-15¾"-15¾"-14½"-14¼" from division. Work the other sleeve the same way. ASSEMBLY: Sew the buttons on to left band. |
||||||||||||||||||||||
Diagram explanations |
||||||||||||||||||||||
|
||||||||||||||||||||||
 |
||||||||||||||||||||||
 |
||||||||||||||||||||||
Have you finished this pattern?Tag your pictures with #dropspattern #leafringcardigan or submit them to the #dropsfan gallery. Do you need help with this pattern?You'll find 29 tutorial videos, a Comments/Questions area and more by visiting the pattern on garnstudio.com. © 1982-2026 DROPS Design A/S. We reserve all rights. This document, including all its sub-sections, has copyrights. Read more about what you can do with our patterns at the bottom of each pattern on our site. |
||||||||||||||||||||||


With over 40 years in knitting and crochet design, DROPS Design offers one of the most extensive collections of free patterns on the internet - translated to 17 languages. As of today we count 324 catalogs and 12290 patterns - 12280 of which are translated into English (US/in).
We work hard to bring you the best knitting and crochet have to offer, inspiration and advice as well as great quality yarns at incredible prices! Would you like to use our patterns for other than personal use? You can read what you are allowed to do in the Copyright text at the bottom of all our patterns. Happy crafting!
Post a comment to pattern DROPS 232-7
We would love to hear what you have to say about this pattern!
If you want to leave a question, please make sure you select the correct category in the form below, to speed up the answering process. Required fields are marked *.