
Popular categories
Looking for a yarn?


Comments / Questions (35)
![]() Hoa wrote:
Hoa wrote:
Vielen herzlichen Dank
05.05.2026 - 16:52
![]() Hoa wrote:
Hoa wrote:
Können Sie mir bitte aufgrund dieses Diagrams " Doves Bay West" erklären?
05.05.2026 - 13:52
![]() Hoa wrote:
Hoa wrote:
Danke für Ihre Rückantwort. Ich frage aber nach dem Diagram von Doves Bay West. Alles nur weiße Farbe :)
05.05.2026 - 12:56DROPS Design answered:
Liebe Hoa, Verzeihung, ich hatte eigentlich ein anderes Modell geschaut... die Idée ist aber diegleiche: alle Reihen sind im Diagram gezeichnet, die Hin- sowie die Rückreihen; die 1. Reihe ist eine Hinreihe (die liest man von rechts nach links) und die 2. Reihe eine Rückreihe (die liest man von links nach rechts) so beim A.1 werden alle Maschen links bei den Rückreihen gestrickt. Viel Spaß beim Stricken!
05.05.2026 - 16:26
![]() Hoa wrote:
Hoa wrote:
Hallo, vielen Dank für die tollen kostenlosen Anleitungen. Zum Diagramm habe ich noch eine Frage: A1 bei 2. Reihe, handelt es sich hier um 2 Hin- und Rückreihen glatt rechts (ebenso bei 4. und 6. Reihe) oder diese 2. Reihe ist die Rückreihe von der 1. Reihe?
05.05.2026 - 09:00DROPS Design answered:
Liebe Hoa, das Diagram zeigt alle Reihen und die lesen Sie rechts nach links in jeder Runde, so es beginnt mit 2 Runden Kastanie/Kakaobohne, dann 1 Runde (1 M Natur, 1 M Kastanie/Kakaobohne), dann 2 Runden Kastanie/Kakaobohne, und dann wieder mit Natur stricken. Viel Spaß beim Stricken!
05.05.2026 - 10:03
![]() Véronique wrote:
Véronique wrote:
Bonjour N’y a-t-il pas une erreur dans le diagramme A2 ? Une des mailles envers serait à faire sur le rang envers ?
19.03.2026 - 17:12
![]() Blanca wrote:
Blanca wrote:
Querría saber a que se refiere y como se trabajan los 2 pliegues de las sisas. Gracias anticipadas.
08.12.2023 - 14:09DROPS Design answered:
Hola Blanca, 1 pliegue = 2 filas de derecho. 2 pliegues = 4 filas de derecho. Es decir, trabajar todos los puntos de derecho 4 filas.
10.12.2023 - 18:33
![]() Blanca wrote:
Blanca wrote:
Hola . Recién empiezo con este patrón y en las explicaciones dice 1 pliegue en vertical ,y en la sisa dice también de trabajar 2 pliegues y no se como se hacen ni como trabajarlo. Gracias anticipadas.
08.12.2023 - 14:06DROPS Design answered:
Hola Blanca, puedes ver la explicación del pliegue en PUNTO MUSGO en EXPLICACIONES PARA REALIZAR LA LABOR. 1 pliegue en vertical = 2 filas de derecho.
10.12.2023 - 18:30
![]() Blanca wrote:
Blanca wrote:
Ya compre los hilos y voy a comenzar la labor ,y donde pone delantero dicho a continuación y entre paréntesis ,pone ,con la prenda puesta ...y no se que significa . Podría decírmelo. Gracias de antemano.
01.12.2023 - 21:54DROPS Design answered:
Hola Blanca, cuando dice DELANTERO DERECHO (con la prenda puesta) significa que estás trabajando lo que va a ser el delantero derecho (la parte del delantero a mano derecha) cuando montes y te pongas la prenda al final. Es decir, ahora no importa para trabajar, es para que sepas que pieza está a cada lado cuando montes la labor.
03.12.2023 - 19:54
![]() Juanita Garcia wrote:
Juanita Garcia wrote:
Sorry to bother you again. Firstly thank you for answering my last question. I'm now at the point where I start to decrease for the v neck. Whilst decreasing I still follow the chart correct? If so how do I do that if there are less stitches for that section?
30.11.2022 - 17:29DROPS Design answered:
Dear Mrs Garcia, correct, you will continue to work the diagram at the same time as you decrease for neck; just work all stitches as before but when there is not enough stitches to work a cable or the decrease+ yarn over in the lace pattern, just work these stitches in stocking stitch. Happy knitting!
01.12.2022 - 11:01
![]() Juanita Garcia wrote:
Juanita Garcia wrote:
I'm new to chart reading. What do I do when I get to the end of chart A2... chart A1 has 10 rows but chart A2 only has 9 so the next row would be a wrong side row. Do I just start the chart at the bottom but in reverse? And if so does that mean that all the rows would be done in reverse too?
28.11.2022 - 00:28DROPS Design answered:
Dear Juanita Garcia, it looks llike one row is missing in A.2/A.3 sorry for that, work them over 10 rows so that there will be always 4 rows stocking stitch between the rows with the purled sts, and repeat these 10 rows in height - at the same time, continue working A.1 over 8 rows as before. Happy knitting!
28.11.2022 - 10:25
|
|||||||||||||||||||||||||
Doves Bay Vest#dovesbayvest |
|||||||||||||||||||||||||
 |
 |
||||||||||||||||||||||||
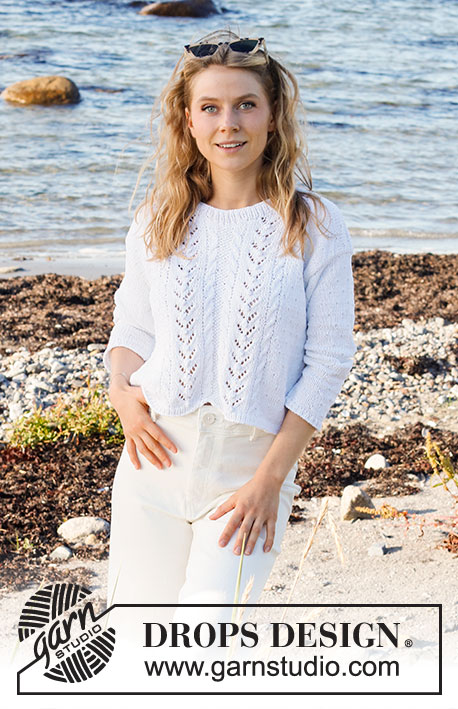
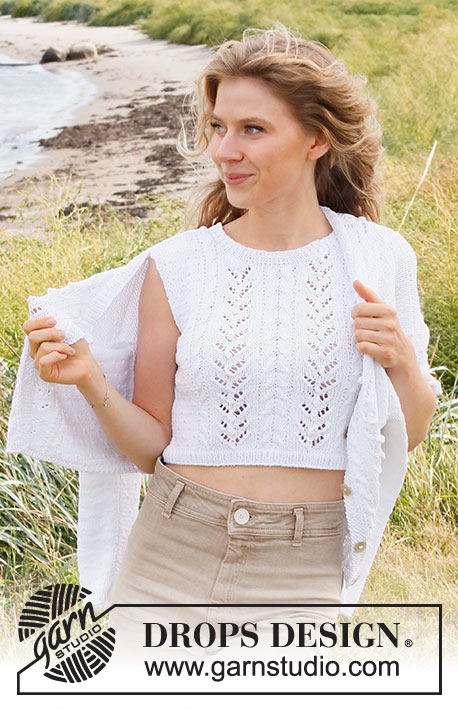
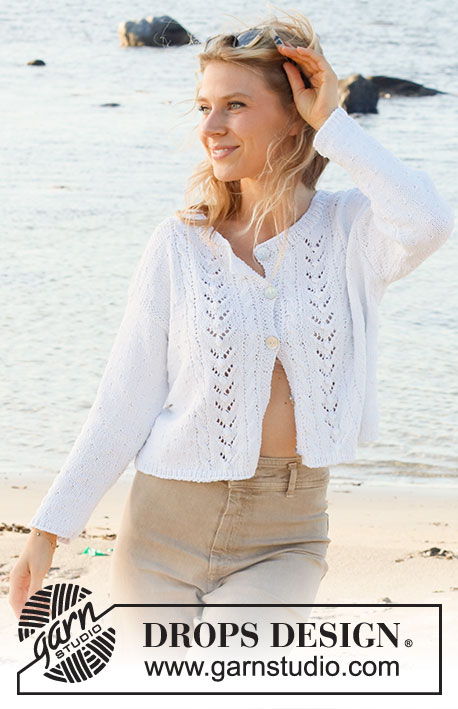
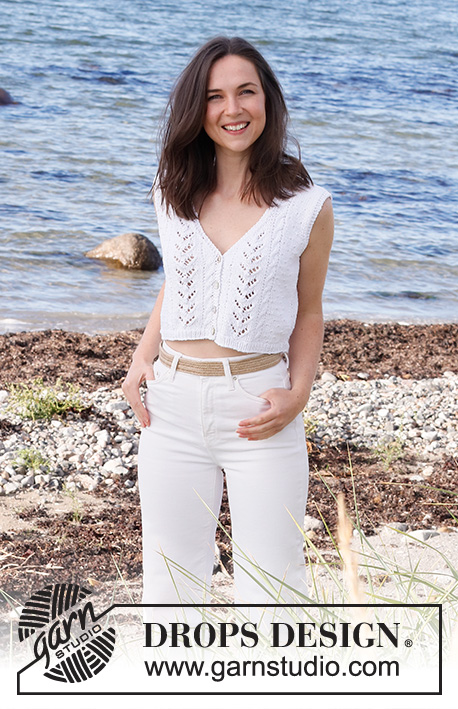
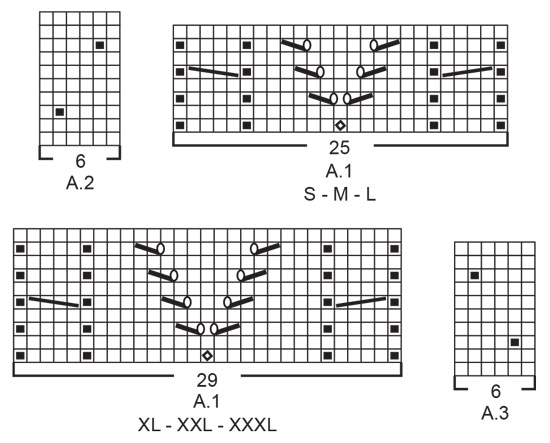
Knitted top in DROPS Cotton Light. Piece is knitted with lace pattern, cables, V-neck and closure at the front. Size: S - XXXL
DROPS 221-18 |
|||||||||||||||||||||||||
|
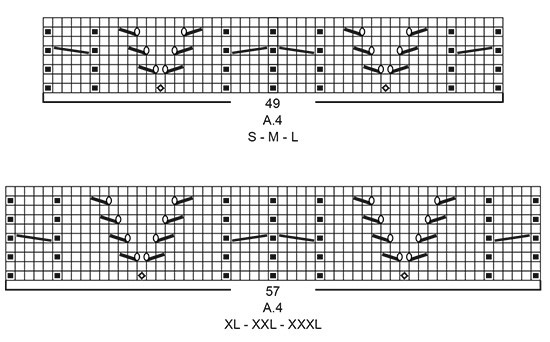
------------------------------------------------------- EXPLANATION FOR THE PATTERN: ------------------------------------------------------- GARTER STITCH (back and forth): Knit all rows. 1 ridge vertically = knit 2 rows. PATTERN: See diagrams A.1 to A.4. Choose diagram for your size (applies to A.2 and A.4). Diagrams show all rows in pattern seen from the right side. INCREASE TIP: Increase inside 1 edge stitch in garter stitch. All increases are done from the right side. Increase 1 stitch by making 1 yarn over, on next row work yarn over twisted to avoid holes. Work the new stitches in stockinette stitch. DECREASE TIP (applies to the armholes and V-neck): Decrease inside 3 edge stitches in garter stitch. All decreases are done from the right side! DECREASE AS FOLLOWS AFTER 3 EDGE STITCHES IN GARTER STITCH: Slip 1 stitch knitwise, knit 1, pass slipped stitch over stitch worked. DECREASE AS FOLLOWS BEFORE 3 EDGE STITCHES IN GARTER STITCH: Work until 2 stitches remain before the 3 edge stitches, knit these 2 together. BUTTONHOLES: Bind off for buttonholes on right front band from right side. 1 BUTTONHOLE = knit second and third stitch from edge together and make 1 yarn over. On next row (wrong side) knit the yarn over to make a hole. Decrease for buttonholes when piece measures: S: 2, 6, 10 and 14 cm = ¾", 2⅜", 4" and 5½" M: 1, 6, 11 and 16 cm = ⅜", 2⅜", 4⅜" and 6¼" L: 2, 7, 12 and 17 cm = ¾", 2¾", 4¾" and 6¾" XL: 1, 7, 13 and 19 cm = ⅜", 2¾", 5⅛" and 7½" XXL: 1, 7, 13 and 19 cm = ⅜", 2¾", 5⅛" and 7½" XXXL: 2, 8, 14 and 20 cm = ¾", 3⅛", 5½" and 8" ------------------------------------------------------- START THE PIECE HERE: ------------------------------------------------------- TOP - SHORT OVERVIEW OF THE PIECE: Work front pieces and back piece back and forth on circular needle separately. Sew piece together on the shoulders and in the sides. RIGHT FRONT PIECE (when garment is worn): Cast on 48-54-58-64-70-76 stitches (including 3 band stitches towards mid front and 1 edge stitch in the side) on circular needle size 3 MM = US 2.5 with Cotton Light. Purl 1 row (= wrong side). Work next row as follows from right side: 3 band stitches in GARTER STITCH - read explanation above - * knit 1, purl 1 *, repeat from *-* until 1 stitch remains on needle, and finish with 1 edge stitch in garter stitch. Continue rib back and forth for 2 cm = ¾" – finish after a row from wrong side. Switch to circular needle size 4 MM = US 6. Work 2 rows in stockinette stitch with 3 band stitches in garter stitch towards mid front and 1 edge stitch in garter stitch towards the side - AT THE SAME TIME on first row decrease 0-1-1-1-1-1 stitch in approx. the middle of row = 48-53-57-63-69-75 stitches. Then work as follows (1st row = right side): 3 band stitches in garter stitch, work A.1 (= 25-25-25-29-29-29 stitches), work A.2 over the next 12-18-24-24-30-36 stitches (= 2-3-4-4-5-6 repetitions of 6 stitches), work 7-6-4-6-6-6 stitches in stockinette stitch, and finish with 1 edge stitch in garter stitch towards the side. Continue pattern back and forth like this. REMEMBER THE KNITTING GAUGE and remember BUTTONHOLES on band - see explanation above. Then increase in the side, decrease for V-neck towards mid front and decrease for armholes towards the side. This happens at the same time and is explained below: INCREASE IN THE SIDE: When piece measures 4-4-4-5-5-5 cm = 1½"-1½"-1½"-2"-2"-2", increase 1 stitch in the side – read INCREASE TIP. Increase like this every 3½-4-4-4½-4½-4½ cm = 1¼"-1½"-1½"-1⅝"-1⅝"-1⅝" 4 times in total. V-NECK: When piece measures 15-17-18-20-20-21 cm = 6"-6¾"-7"-8"-8"-8¼" (approx. 1 cm = ⅜" after last buttonhole on band), decrease 1 stitch for V-neck – read DECREASE TIP. Decrease for V-neck on every other row (i.e. every row from right side) 17-17-16-18-17-16 times in total, and then every 4th row (i.e. every other row from right side) 3-3-4-4-5-6 times in total. ARMHOLE: When piece measures 17-18-19-20-21-22 cm = 6¾"-7"-7½"-8"-8¼"-8¾", work 2 ridges over the outermost 6-6-7-9-11-13 stitches towards the side (work first row from right side and the other stitches as before). After the 2 ridges bind off 3-3-4-6-8-10 stitches for armhole at beginning of the next row from the side. Continue pattern back and forth as before with 3 band stitches in garter stitch towards mid front and 3 edge stitches in garter stitch towards the armhole. AT THE SAME TIME on next row from right side decrease 1 stitch in towards the side for armhole - read DECREASE TIP. Decrease for armhole like this every other row 3-7-9-10-12-14 times in total. After all increases and decreases, there are 26-27-28-29-31-33 stitches on needle. Work until 2 rows remain before piece measures 36-38-40-42-44-46 cm = 14¼"-15"-15¾"-16½"-17¼"-18". Knit 1 row from right side while decreasing the stitches in cable towards the neck by knitting together 2 by 2 = 24-25-26-27-29-31 stitches remain. Knit 1 row from wrong side. Bind off knitting from right side. Front piece measures approx. 36-38-40-42-44-46 cm = 14¼"-15"-15¾"-16½"-17¼"-18" from shoulder and down. LEFT FRONT PIECE (when garment is worn): Cast on 48-54-58-64-70-76 stitches (including 1 edge stitch in side and 3 band stitches towards mid front) on circular needle size 3 MM = US 2.5 with Cotton Light. Purl 1 row (= wrong side). Work next row as follows from right side: 1 edge stitch in garter stitch, * purl 1, knit 1 *, repeat from *-* until 3 stitches remain on needle, and finish with 3 band stitches in garter stitch towards mid front. Continue rib back and forth for 2 cm = ¾" – finish after a row from wrong side. Switch to circular needle size 4 MM = US 6. Work 2 rows in stockinette stitch with 1 edge stitch in garter stitch towards the side and 3 band stitches in garter stitch towards mid front - AT THE SAME TIME on first row decrease 0-1-1-1-1-1 stitch in approx. the middle of row = 48-53-57-63-69-75 stitches. Then work as follows (1st row = right side): 1 edge stitch in garter stitch, work 7-6-4-6-6-6 stitches in stockinette stitch, A.3 over the next 12-18-24-24-30-36 stitches (= 2-3-4-4-5-6 repetitions of 6 stitches), work A.1 (= 25-25-25-29-29-29 stitches), and finish with 3 band stitches in garter stitch towards mid front. Continue pattern back and forth like this. Then increase in the side, decrease for V-neck towards mid front and decrease for armholes towards the side. This happens at the same time and is explained below: INCREASE IN THE SIDE: When piece measures 4-4-4-5-5-5 cm = 1½"-1½"-1½"-2"-2"-2", increase 1 stitch in the side – read INCREASE TIP. Increase like this every 3½-4-4-4½-4½-4½ cm = 1¼"-1½"-1½"-1⅝"-1⅝"-1⅝" 4 times in total. V-NECK: When piece measures 15-17-18-20-20-21 cm = 6"-6¾"-7"-8"-8"-8¼", decrease 1 stitch for V-neck – read DECREASE TIP. Decrease for V-neck every other row 17-17-16-18-17-16 times in total, and then every 4th row 3-3-4-4-5-6 times in total. ARMHOLE: When piece measures 17-18-19-20-21-22 cm = 6¾"-7"-7½"-8"-8¼"-8¾", work 2 ridges over the outermost 6-6-7-9-11-13 stitches towards the side (work first row from right side and the other stitches as before). After the 2 ridges bind off 3-3-4-6-8-10 stitches for armhole at beginning of the next row from the side. Continue pattern back and forth as before with 3 band stitches in garter stitch towards armhole and 3 band stitches in garter stitch towards mid front. AT THE SAME TIME on next row from right side decrease 1 stitch in towards the side for armhole - read DECREASE TIP. Decrease for armhole like this every other row 3-7-9-10-12-14 times in total. After all increases and decreases, there are 26-27-28-29-31-33 stitches on needle. Work until 2 rows remain before piece measures 36-38-40-42-44-46 cm = 14¼"-15"-15¾"-16½"-17¼"-18". Knit 1 row from right side while decreasing the stitches in cable towards the neck by knitting together 2 by 2 = 24-25-26-27-29-31 stitches remain. Knit 1 row from wrong side. Bind off knitting from right side. Front piece measures approx. 36-38-40-42-44-46 cm = 14¼"-15"-15¾"-16½"-17¼"-18" from shoulder and down. BACK PIECE: Cast on 89-99-107-119-131-143 stitches (including 1 edge stitch in each side) on circular needle size 3 MM = US 2.5 with Cotton Light. Purl 1 row (= wrong side). Work next row as follows from right side: 1 edge stitch in garter stitch, * knit 1, purl 1 *, repeat from *-* until 2 stitches remain on needle, knit 1, and finish with 1 edge stitch in garter stitch. Continue rib back and forth for 2 cm = ¾" – finish after a row from wrong side. Switch to circular needle size 4 MM = US 6. Work 2 rows in stockinette stitch with 1 edge stitch in garter stitch in each side. Then work as follows (1st row = right side): 1 edge stitch in garter stitch, work 7-6-4-6-6-6 stitches in stockinette stitch, work A.3 over the next 12-18-24-24-30-36 stitches (= 2-3-4-4-5-6 repetitions of 6 stitches), work A.4 (= 49-49-49-57-57-57 stitches), work A.2 over the next 12-18-24-24-30-36 stitches (= 2-3-4-4-5-6 repetitions of 6 stitches), work 7-6-4-6-6-6 stitches in stockinette stitch, and finish with 1 edge stitch in garter stitch. Continue pattern back and forth like this. When piece measures 4-4-4-5-5-5 cm = 1½"-1½"-1½"-2"-2"-2", increase 1 stitch in each side – read INCREASE TIP. Increase like this every 3½-4-4-4½-4½-4½ cm = 1¼"-1½"-1½"-1⅝"-1⅝"-1⅝" 4 times in total in each side = 97-107-115-127-139-151 stitches. When piece measures 17-18-19-20-21-22 cm = 6¾"-7"-7½"-8"-8¼"-8¾", work 2 ridges over the outermost 6-6-7-9-11-13 stitches in each side (work first row from right side and the other stitches as before). After the 2 ridges bind off 3-3-4-6-8-10 stitches for armholes at the beginning of the next 2 rows = 91-101-107-115-123-131 stitches. Continue pattern back and forth as before with 3 edge stitches in garter stitch in each side towards armholes. AT THE SAME TIME on next row from right side decrease 1 stitch in each side for armholes - read DECREASE TIP. Decrease for armholes like this on every other row from right side 3-7-9-10-12-14 times in total in each side = 85-87-89-95-99-103 stitches. When piece measures 32-34-36-38-40-42 cm = 12½"-13⅜"-14¼"-15"-15¾"-16½", decrease 4 stitches mid back by knitting the two cables mid back together 2 by 2 (= 4 stitches decreased) = 81-83-85-91-95-99 stitches. Then work 2 ridges over the middle 33-33-33-37-37-37 stitches (work the other stitches as before). After the 2 ridges bind off the middle 27-27-27-31-31-31 stitches for neck and finish each shoulder separately. Then work as before and bind off 1 stitch for neck on next row from right side – remember DECREASE TIP = 26-27-28-29-31-33 stitches remain on shoulder. Work until 2 rows remain before piece measures 36-38-40-42-44-46 cm = 14¼"-15"-15¾"-16½"-17¼"-18". Knit 1 row from right side while decreasing the stitches in cable towards the neck by knitting together 2 by 2 (= 2 stitches decreased) = 24-25-26-27-29-31 stitches. Knit 1 row from wrong side. Bind off knitting from right side. Work the other shoulder the same way. Back piece measures approx. 36-38-40-42-44-46 cm = 14¼"-15"-15¾"-16½"-17¼"-18" from shoulder and down. ASSEMBLY: Sew shoulder seams inside bind-off edge. Sew side seams inside 1 edge stitch in garter stitch. Sew the buttons on to the left band. |
|||||||||||||||||||||||||
Diagram explanations |
|||||||||||||||||||||||||
|
|||||||||||||||||||||||||
 |
|||||||||||||||||||||||||
 |
|||||||||||||||||||||||||
 |
|||||||||||||||||||||||||
Have you finished this pattern?Tag your pictures with #dropspattern #dovesbayvest or submit them to the #dropsfan gallery. Do you need help with this pattern?You'll find 24 tutorial videos, a Comments/Questions area and more by visiting the pattern on garnstudio.com. © 1982-2026 DROPS Design A/S. We reserve all rights. This document, including all its sub-sections, has copyrights. Read more about what you can do with our patterns at the bottom of each pattern on our site. |
|||||||||||||||||||||||||


With over 40 years in knitting and crochet design, DROPS Design offers one of the most extensive collections of free patterns on the internet - translated to 17 languages. As of today we count 324 catalogs and 12291 patterns - 12281 of which are translated into English (US/in).
We work hard to bring you the best knitting and crochet have to offer, inspiration and advice as well as great quality yarns at incredible prices! Would you like to use our patterns for other than personal use? You can read what you are allowed to do in the Copyright text at the bottom of all our patterns. Happy crafting!
Post a comment to pattern DROPS 221-18
We would love to hear what you have to say about this pattern!
If you want to leave a question, please make sure you select the correct category in the form below, to speed up the answering process. Required fields are marked *.