
Popular categories
Looking for a yarn?


Comments / Questions (5)
![]() Rosemarie wrote:
Rosemarie wrote:
Bonjour, Je vous remercie de mettre a disposition des tutos gratuits qui font des pulls formidables. J'en ai déjà expérimenté quelques uns. Je suis un peu bloquée sur le modele Pull Torsades Drops. J'ai fais les 4 cm en M4 et les augmentations Je suis bloquée car je ne comprend pas la répartition des différents points Merci d'avance pour votre aide précieuse Cordialement Rosemarie
29.11.2021 - 17:15DROPS Design answered:
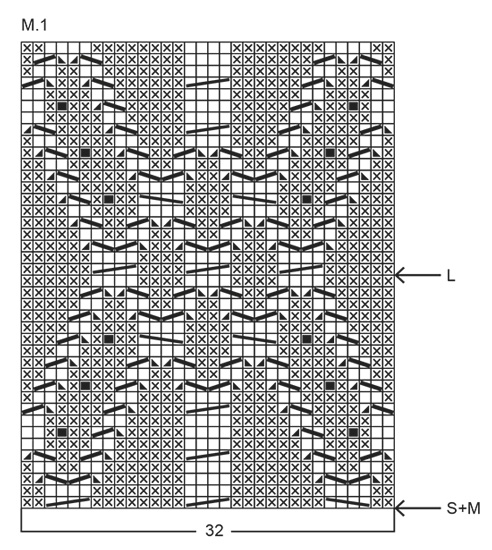
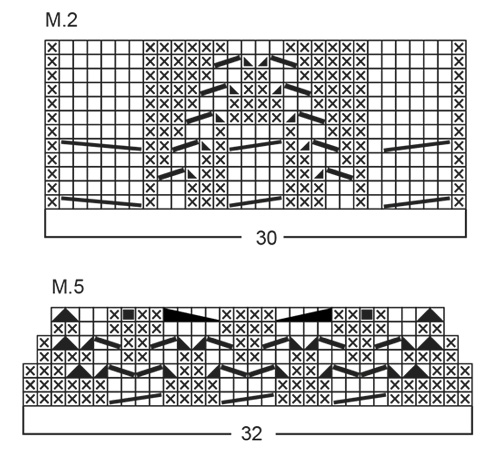
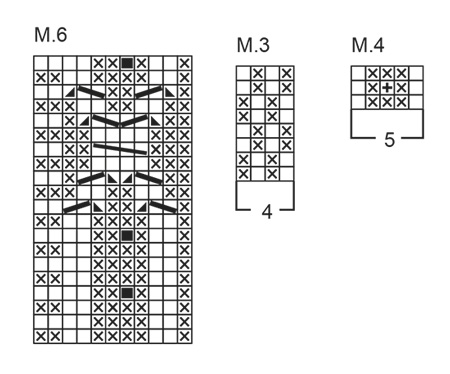
Bonjour Rosemarie et merci. Après M.4 tricotez ainsi:13-17-20 m de M3 (répétez les 4 m de M.3 et terminez par la 1ère m en S et M), M2 ( = 30 m), M1 (= 32 m - cf flèche pour savoir où commencer selon la taille), M2 (= 30 m), 26-34-40 m de M3, M2 (= 30 m), M1 (= 32 m + cf flèche), M2 (= 30 m), 13-17-20 m de M2 soit: 13-17-20 + 30 + 32 + 30 + 36-34-40 + 30 + 32 + 30 + 13-17-20=236-252-264 m. Sur les côtés, vous avez M.3 et les 2 panneaux du milieu devant et milieu dos avec M.2, M.1 et M.2. En espérant que ceci puisse vous aider, bon tricot!
30.11.2021 - 08:05
![]() Samantha Booth wrote:
Samantha Booth wrote:
Hi I really want to knit this jumper and have looked a ton all the tutorials but can’t understand how to put the patterns together I want to make a medium size jumper so know I need 122 stitches for the front but the middle bit has 32 it also says to knit pattern 5 over and to decrease every 3red stich for the arms but surely you are starting from the bottom? I’m very confused as to how to get to 122 and which patterns are for which bit. Sorry if I am being thick!
25.10.2018 - 00:04DROPS Design answered:
Dear Mrs Booth, this jumper is worked bottom up in the round to the armholes, then you will finish each piece separately back and forth on needle. Pattern 1 to 6 are the diagrams M.1 to M.6 below the written pattern. Start reading diagrams from the bottom corner on the right side towards the left on every round (when working in the round) and from RS (when working back and forth, WS rows will then be worked left to right). Happy knitting!
25.10.2018 - 08:45
![]() Diana wrote:
Diana wrote:
I'm trying to understand the last part of these directions. Specifically for the sleeves and end cap. What does that mean "knit back and forth on the needle"? Do I continue to work Pattern 3? When the sleeve measures 21-5/8", how many stiches should I have?
10.01.2014 - 19:02DROPS Design answered:
Dear Diana, you work M.3 until finished measurements. You start sleeve in the round (around, on dpn), then for sleeve cap, bind off 2 sts mid under sleeve (last st of round + 1st st of next round) and continue in rows (=back and forth), at the same time bind off 3 sts at the beg of every row (from RS + from WS) a total of 8-9-10 times, then bind off remaining sts. Happy knitting!
11.01.2014 - 09:56
![]() Birgitte wrote:
Birgitte wrote:
Please look at the description at the top of the pattern with the = sign in front. It comes in the same vertical order as in the pattern. Best wishes Birgitte Scandinavian Knitting Design
18.02.2007 - 01:22
![]() Jod wrote:
Jod wrote:
Is there any way to get a translation of the chart in pattern 55-8?
18.02.2007 - 01:05
|
||||||||||||||||||||||||||||||||||||||||
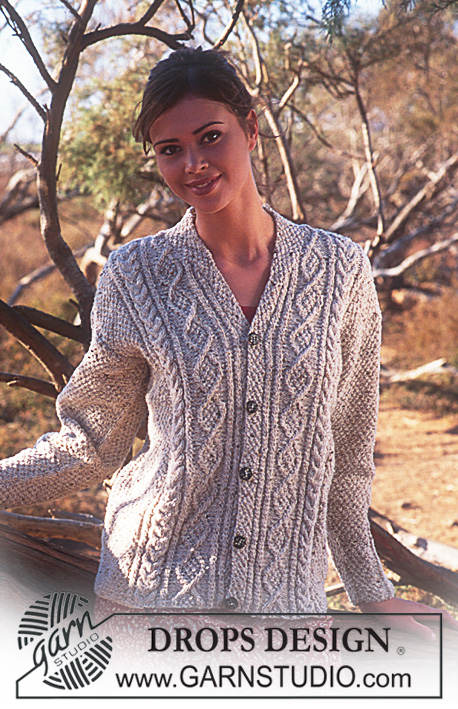
Tangled Oak |
||||||||||||||||||||||||||||||||||||||||
 |
 |
|||||||||||||||||||||||||||||||||||||||
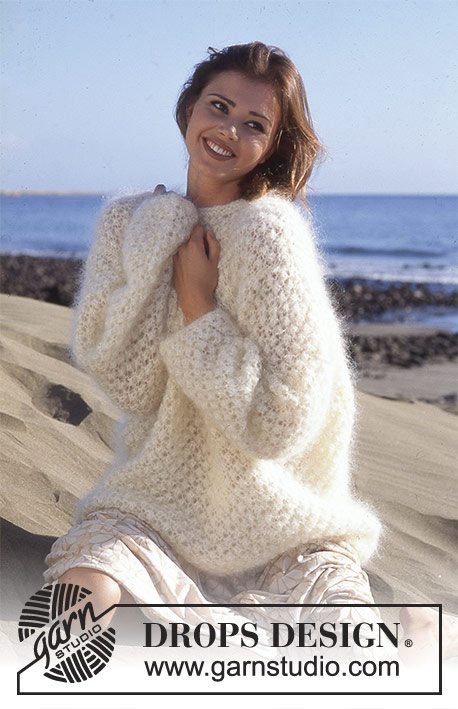
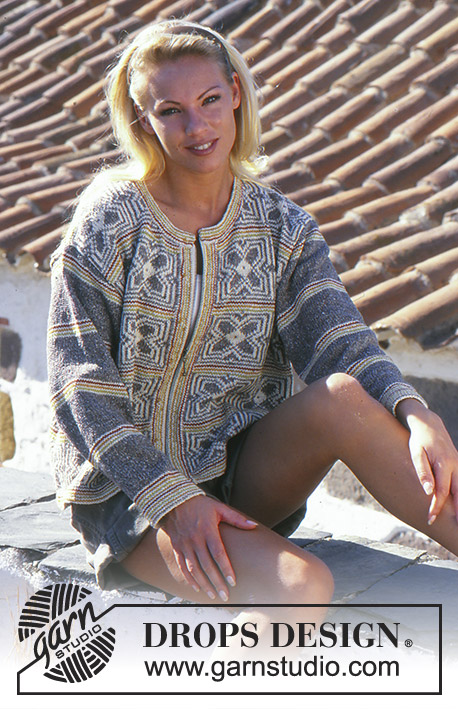
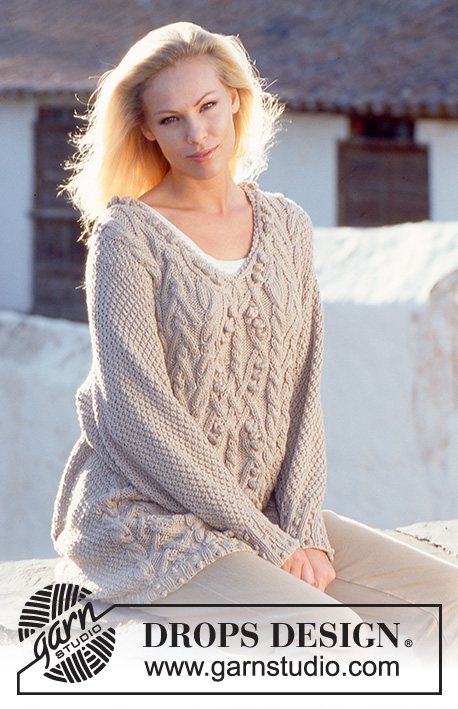
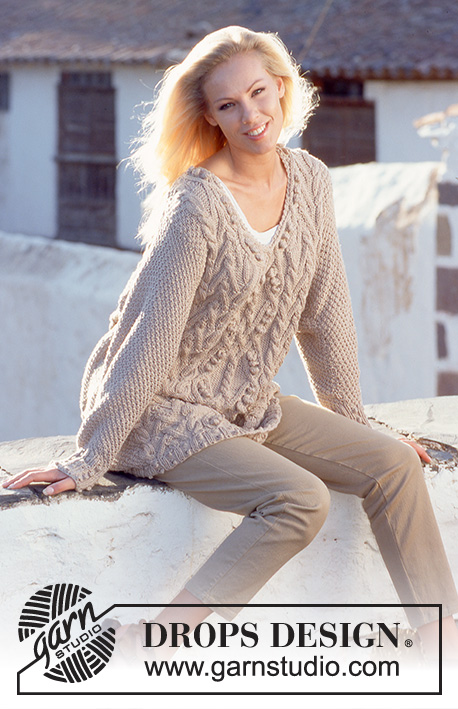
DROPS Sweater in Paris with Cables.
DROPS 55-8 |
||||||||||||||||||||||||||||||||||||||||
|
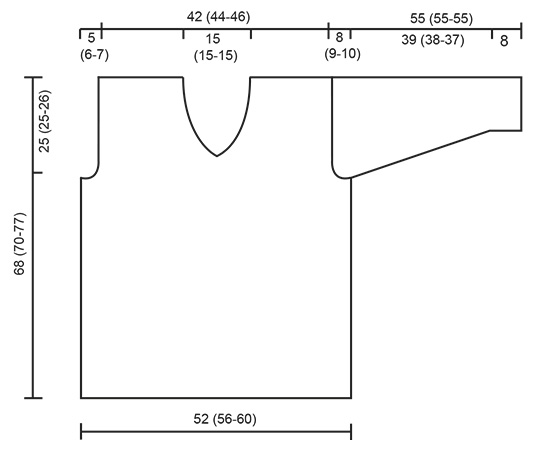
Gauge: 17 sts 22 rows on larger needles in Pattern 3 = 10 x 10 cm (4" x 4"). Pattern: See charts. The pattern is seen from the right side. Bobble 1: (in Patterns 1, 5, and 6) Inc 1 st to 5 sts by knitting alternately in the front and in the back of the st four times. Turn, purl 5. Turn, knit 5. Turn, purl 5. Turn, knit 5. Slip the 4th, 3rd, 2nd and 1st sts over the 5th st. Bobble 2: (in Pattern 4) Inc 1 st to 2 sts by knitting 1 st alternately in the front and in the back of the st. Turn, purl 2. Turn, knit 2. Turn, purl 2. Turn, knit 2. Pass the 1st st over the 2nd. Garter st, when knitting flat: Knit all sts, all rows. Garter st, when knitting in the round: *Rnd 1, knit. Rnd 2, purl.* Repeat from * - *. Short Model: If a short model is desired knit as follows: Decrease the measurements for armholes, neck and binding off by 9 cm [3.5"]. Start Pattern 1 as follows: Sizes S + M: start at the arrow for size L. Size L: Start at the arrow for size S+M. Finished dimensions = 59 (61-68) cm [23.25" (24" - 26.75")]. Reduce the yarn amount by 100 grams. Body: If a short model is desired, see instructions above. Cast 175 (190-205) sts on smaller circular needles. Join, being careful not to twist the sts. Place a marker at the join and knit Pattern 4 for 4 cm [1.5"]. Inc 61 (62-59) sts evenly distributed on the last row = 236 (252-264) sts. Change to larger circular needles and establish pattern as follows: 13 (17-20) sts of Pattern 3, Pattern 2, Pattern 1 (start at the arrow on the diagram), Pattern 2, 26 (34-40) sts of Pattern 3, Pattern 2, Pattern 1 (start at the arrow on the diagram), Pattern 2, 13 (17-20) sts of Pattern 3. When the work measures 43 (45-51) cm [16⅞" (17.75" - 20")] knit the next row as follows: bind off 2 sts for armhole, 114 (122-128) sts for the front, bind off 4 sts for armhole, 114 (122-128) sts for the back, bind off 2 sts for armhole. Knit the rest of the front and back separately. Front: 114 (122-128) sts. Bind off for armholes every other row: 3 sts 1 time, 2 sts 1 (1-2) times, 1 st 1 (3-2) times = 102 (106-110) sts. When the work measures approx. 50 (50-59) cm [19.75" (19.75" - 23.25")], and you have finished row 20 in Pattern 1, knit Pattern 5 over Pattern 1 = 92 (96-100) sts. After Pattern 5 divide the work at the center front for a V neck. Knit Pattern 6 over the remaining sts of Pattern 5 so that the 2 sts of garter st come up against the neck opening. Pattern 6 should be reversed (mirror image) on the opposite side of the neck. At the same time, dec for the neck on the inside of the 11 outer sts (Pattern 6) every other row: 2 sts 2 times, 1 st 7 times, then every 4th row: 1 st 2 times = 33 (35-37) sts on the shoulder (including Pattern 6). Dec 2 sts as follows: P 3 tog. Dec 1 st as follows: P 2 tog. On the last row before the work measures 68 (70-77) cm [26.75" (27⅝" - 30.25")], dec 7 sts evenly distributed on each shoulder = 26 (28-30) sts. Bind off on the next row -- the work measures 68 (70-77) cm [26.75" (27⅝" - 30.25")]. Back: 114 (122-128) sts. Bind off for armholes as on the front = 102 (106-110). On the row before the work measures 66 (68-75) cm [26" (26.75" - 29.5")], dec 14 sts evenly distributed over the center 36 (36-36) sts. On the next row, bind off the center 22 sts for the neck. Bind off 2 sts at each neck edge on the next row = 31 (33-35) sts on each shoulder. On the row before the work measures 68 (70-77) cm [26.75" (27⅝" - 30.25")], dec 7 sts evenly distributed on each shoulder = 24 (26-28) sts (there should be 2 sts fewer on the shoulder on the back than on the front). Bind off when the work measures 68 (70-77) cm [26.75" (27⅝" - 30.25")]. Sleeves: Cast on 40 (40-45) sts on smaller double pointed needles. Join, being careful not to twist the sts. Place a marker at the join and knit Pattern 4 for 8 cm [3⅛"]. Change to larger double pointed needles and knit Pattern 3 to finished dimensions. At the same time, after Pattern 4, inc 1 st each side of the marker 23 (23-22) times alternately every 3rd and 4th row = 86 (86-89) sts. When the work measures 47 (46-45) cm [18.5" (18⅛" - 17.75")], bind off 2 sts each side of the marker and knit the rest back and forth on the needle. Bind off each side for sleeve caps every other row: 3 sts 8 (9-10) times. Bind off. The work measures approx. 55 cm [21⅝"]. Assembly: Pick up approx. 26 sts around the back neck with smaller needles and knit 4 rows garter st back and forth on the needle. Sew shoulder seams. Sew in the sleeves. |
||||||||||||||||||||||||||||||||||||||||
Diagram explanations |
||||||||||||||||||||||||||||||||||||||||
|
||||||||||||||||||||||||||||||||||||||||
 |
||||||||||||||||||||||||||||||||||||||||
 |
||||||||||||||||||||||||||||||||||||||||
 |
||||||||||||||||||||||||||||||||||||||||
 |
||||||||||||||||||||||||||||||||||||||||
Have you finished this pattern?Tag your pictures with #dropspattern or submit them to the #dropsfan gallery. Do you need help with this pattern?You'll find 24 tutorial videos, a Comments/Questions area and more by visiting the pattern on garnstudio.com. © 1982-2026 DROPS Design A/S. We reserve all rights. This document, including all its sub-sections, has copyrights. Read more about what you can do with our patterns at the bottom of each pattern on our site. |
||||||||||||||||||||||||||||||||||||||||


With over 40 years in knitting and crochet design, DROPS Design offers one of the most extensive collections of free patterns on the internet - translated to 17 languages. As of today we count 324 catalogs and 12290 patterns - 12280 of which are translated into English (US/in).
We work hard to bring you the best knitting and crochet have to offer, inspiration and advice as well as great quality yarns at incredible prices! Would you like to use our patterns for other than personal use? You can read what you are allowed to do in the Copyright text at the bottom of all our patterns. Happy crafting!
Post a comment to pattern DROPS 55-8
We would love to hear what you have to say about this pattern!
If you want to leave a question, please make sure you select the correct category in the form below, to speed up the answering process. Required fields are marked *.