
Popular categories
Looking for a yarn?


Comments / Questions (41)
![]() Patricia Gilgan wrote:
Patricia Gilgan wrote:
Do you have a video of this garment
20.01.2024 - 23:07
![]() Sølvi wrote:
Sølvi wrote:
Ønsker å få en bedre beskrivelse av økning A3. Får bare feil antall masker på venstre side av halsen. Dvs altfor mange
10.01.2024 - 14:45DROPS Design answered:
Hei Sølvi. Når du skal strikke omgangen med A.3 bruk maskemarkører mellom hver rapport. Så har du en bedre oversikt. Hvordan det økes kan du se på hjelpevideoen som ligger under oppskriften. Se: "Hvordan strikke i masken under og hvordan øke 4 masker i 1 maske" og se mellom tidspunktet 05:00-05:28. mvh DROPS Design
15.01.2024 - 13:45
![]() Elżbieta wrote:
Elżbieta wrote:
Jak przerabiać w tym modelu ścieg fantazyjny na okrągło?
01.12.2023 - 23:10DROPS Design answered:
Witaj Elu, przerabiasz ścieg fantazyjny na okrągło zgodnie ze schematem A.1. Okr.1: powtarzasz *2 oczka lewe, 1 oczko prawe*, Okr. 2: powtarzasz *2 oczka lewe, 1 oczko prawe wkłuwając drut w oczko pod następnym oczkiem*. Następnie przerabiasz na przemian okr 1 i 2. na całej długości. Pozdrawiamy!
04.12.2023 - 08:48
![]() Pia wrote:
Pia wrote:
Nu förstår jag varför man ska lägga upp 24 m….
22.10.2023 - 15:38
![]() Pia wrote:
Pia wrote:
Varför inte lägga upp 23 m så att det går jämt upp med en kantmaska i varje sida??
19.10.2023 - 11:44
![]() Elisa wrote:
Elisa wrote:
Gentilissimi non ho capito un passaggio: quando si inizia il collo “iniziare il giro all’altezza del segnapunti al centro dietro e continuare il motivo A1 in tondo su tutte le maglie” ma il motivo A1 crea un motivo lavorando in piano sul dritto e sul rovescio del lavoro, se sono con i ferri circolari lavorando in tondo, come faccio ad eseguire il motivo non avendo un rovescio del lavoro?! In questo modo non torna una costa normale?
16.03.2023 - 23:19
![]() Pia wrote:
Pia wrote:
När man börjar sticka rundstickning måste man sticka varannat varv vanlig 1 rm 1am, annars finns det ingen maskbåge på nästa varv att fånga upp på de räta maskorna så att de blir patentmaskor. 'Det framgår inte av mönstret.
17.01.2023 - 22:30
![]() Annika Eriksson wrote:
Annika Eriksson wrote:
Hopplöst mönster! En riktigt dålig beskrivning.
06.01.2023 - 14:30
![]() Ellinor wrote:
Ellinor wrote:
Hej, fortsättning på fråga nedan: I mönstret står det: A1 Från rätsida: 1 kantmaska, följ A1, avsluta med första maskan i A1, 1 kantmaska. A1 Från avigsida: 1 kantmaska, följ A1, avsluta med första maskan i A1, 1 kantmaska. Det borde bli: A1 Från avigsida: 1 kantmaska, BÖRJA MED FÖRSTA MASKAN I A1, A1, 1 kantmaska. Annars blir allt förskjutet. Man läser ju rätsida höger-vänster och avigsida fr vä-hö i diagram.
05.12.2022 - 14:40DROPS Design answered:
Hei Ellinor. Det står i oppskriften at man skal strikke første maske i A.1 slik at mønstret starter og slutter likt og man fortsetter mønstret slik frem og tilbake. mvh DROPS Design
05.12.2022 - 14:55
![]() Sasha Aslanian wrote:
Sasha Aslanian wrote:
I have a question right out of the gate on this pattern. When it says "Cast on 24-24" Am I to cast on 24 stitches? Or 48? Thank you!
03.12.2022 - 19:13DROPS Design answered:
Dear Mrs Aslanian, to start the mid-section of this pattern, you cast on 24 stitches in both sizes, ie in the first and in the 2nd size. Then follow the first number in the first size and the 2nd number in the 2nd size. Happy knitting!
06.12.2022 - 08:55
|
|||||||||||||||||||
Wrapped in Wonder#wrappedinwonderbalaclava |
|||||||||||||||||||
 |
 |
||||||||||||||||||
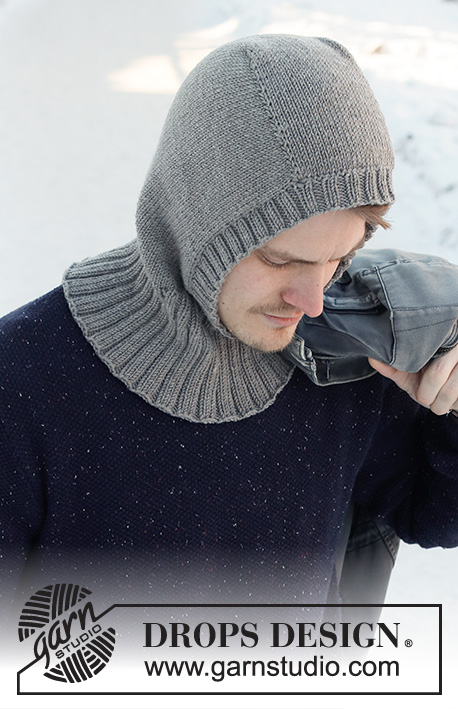
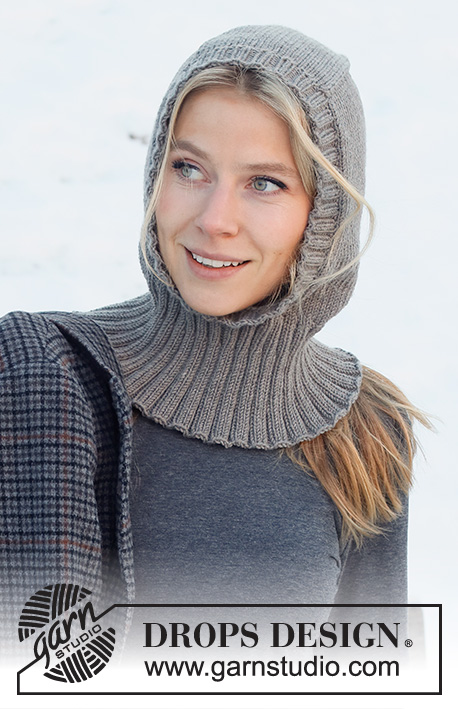
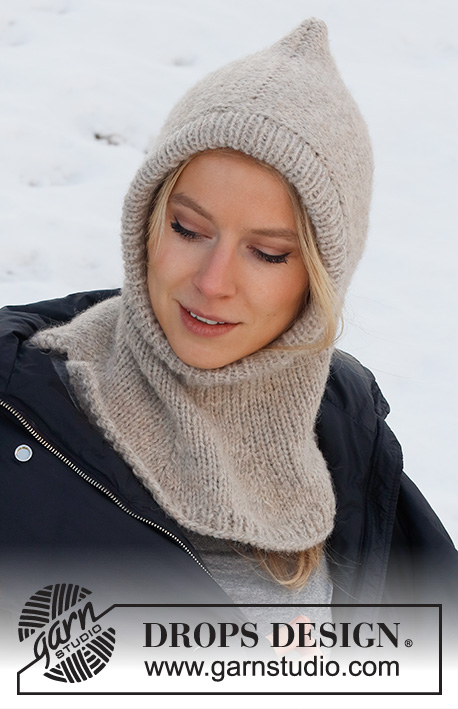
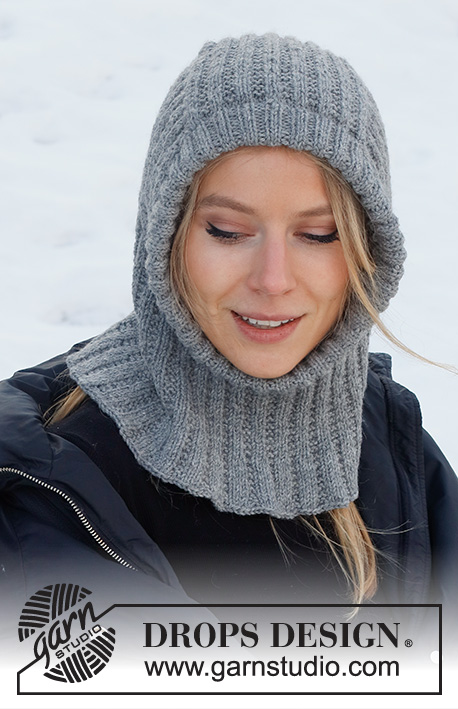
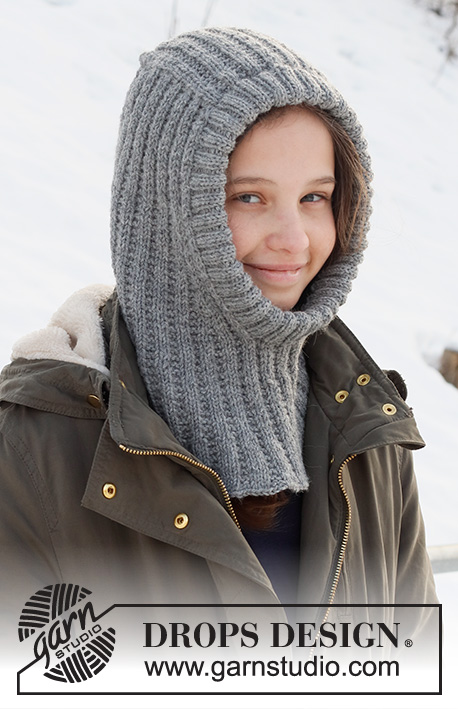
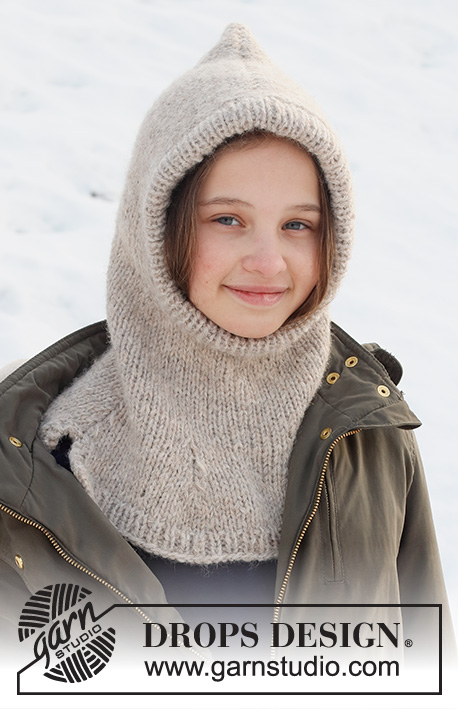
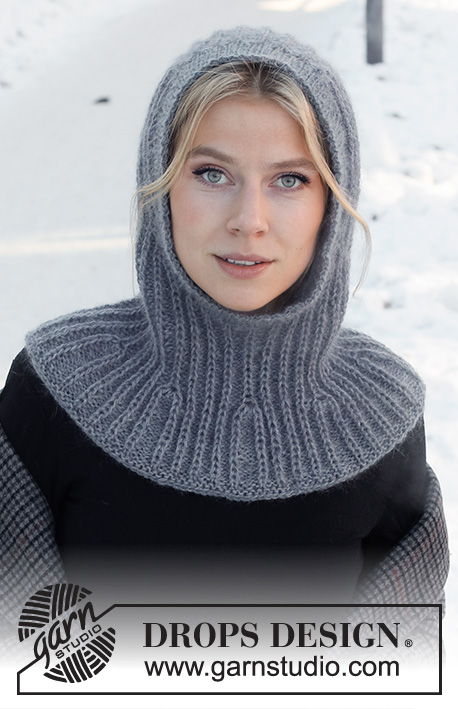
Knitted hat / balaclava in DROPS Alpaca and DROPS Kid-Silk. The piece is worked top down with Fisherman’s rib and ribbed edging.
DROPS 214-73 |
|||||||||||||||||||
|
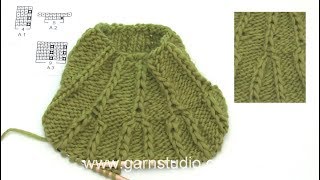
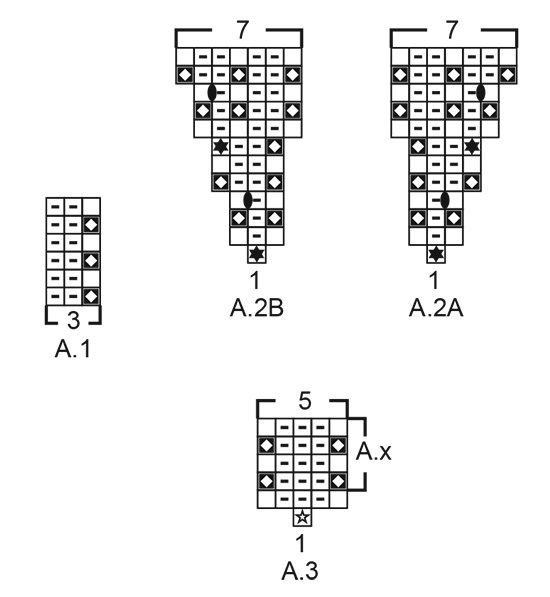
------------------------------------------------------- EXPLANATIONS FOR THE PATTERN: ------------------------------------------------------- RIDGE/GARTER STITCH (worked back and forth): Knit all rows. 1 ridge in height = Knit 2 rows. PATTERN: See diagrams A.1 to A.3. The diagrams show all rows in the pattern from the right side. BINDING-OFF TIP: To avoid the bind-off edge being tight you can bind off with a larger size needle. If the edge is still tight, make 1 yarn over after approx. each 6th stitch at the same time as binding off; the yarn overs are bind off as normal stitches. ------------------------------------------------------- START THE PIECE HERE: ------------------------------------------------------- BALACLAVA – SHORT OVERVIEW OF THE PIECE: The mid-section is worked back and forth with circular needle from mid-front and backwards. Stitches are knitted up on each side of the mid-section and the piece continued back and forth before stitches are cast on for the neck. The piece finished in the round. A ribbed edge is worked around the face-opening to finish. MID-SECTION: Cast on 24-24 stitches (including 1 edge stitch on each side) with circular needle size 4 MM = US 6 and 1 strand Alpaca and 1 strand Kid-Silk (2 strands). Purl 1 row from the wrong side. Then continue as follows from the right side: 1 edge stitch in GARTER STITCH on each side – read description above, work A.1 until there are 2 stitches left (7-7 repeats of 3 stitches), work the first stitch in A.1 (so the pattern starts and finishes in the same way) and 1 edge stitch in garter stitch. Continue this pattern back and forth. REMEMBER THE KNITTING GAUGE! When the piece measures 13-14 cm = 5⅛"-5½" and the next row is from the wrong side, bind off the edge stitches on each side = 22-22 stitches. Cut the strand, then work the hood as described below. HOOD: Knit up stitches on each side of the mid-section from the right side as follows: Knit up 25-28 stitches along the one side inside the 1 edge stitch, continue A.1 as before over the 22-22 stitches on the needle and knit up 25-28 stitches along the other side inside the 1 edge stitch = 72-78 stitches. Insert 1 marker at the beginning of the row. THE PIECE IS NOW MEASURED FROM THIS MARKER! Continue A.1 back and forth over all stitches with 1 edge stitch in garter stitch on each side towards mid-front – the pattern should match the pattern on the mid-section. When the piece measures 16-18 cm = 6¼"-7" from the marker and the next row is from the right side, increase on each side towards mid front as follows: 1 edge stitch in garter stitch, work A.1 over the first 3 stitches, A.2A (= 1 stitch), A.1 as before until there are 5 stitches left, A.2B (= 1 stitch), A.1 over the next 3 stitches and finish with 1 edge stitch in garter stitch. Continue this pattern and increase on each side as shown in the diagrams. When A.2 has been completed in height there are 84-90 stitches. Continue working until the piece measures 22-24 cm = 8¾"-9½" from the marker – the hat measures approx. 28-30 cm = 11"-11¾" from the middle of the mid-section down. Now cast on stitches for the neck (try the hat on and work to desired length before casting on). Cast on 12-18 stitches at the end of the next row from the right side = 96-108 stitches. Cut the strand and remove the marker. Insert a new marker in the piece, approx. mid-back, inserted in a Fisherman’s rib stitch. THE PIECE IS NOW MEASURED FROM THIS MARKER. Continue working the neck as described below. NECK: Start the round at the marker mid-back and continue with A.1 in the round over all stitches – make sure the pattern matches all the way round. When the piece measures 8-8 cm = 3⅛"-3⅛" from the marker mid-back, increase as follows: Work A.3 in the marker-stitch, * A.1 as before over the next 11 stitches, A.3 in the next Fisherman’s rib stitch *, work from *-* a total of 7-8 times and A.1 as before over the last 11 stitches = 128-144 stitches. Continue working until the piece measures 15-15 cm = 6"-6" from the marker. Knit 1 round and purl 1 round. Then loosely bind off with knit – read BINDING-OFF TIP! The hat measures approx. 43-45 cm = 17"-17¾" from the middle of the mid-section down. EDGE AROUND FACE-OPENING: Start from the right side at the bottom of the opening, where stitches were cast on for the neck. Knit up 140 to 160 stitches around the opening, inside the 1 edge stitch using short circular needle size 3 MM = US 2.5 and 1 strand Alpaca and 1 strand Kid-Silk (2 strands). The number of stitches should be divisible by 2. NOTE: On the mid-section and along the stitches cast on for the neck, knit up 1 stitch in each Fisherman’s rib stitch and 3 stitches between each Fisherman’s rib stitch. Work rib in the round (knit 1, purl 1) for 3-3 cm = 1⅛"-1⅛" – make sure the rib matches neatly over the mid-section and the cast-on stitches. Loosely bind off with knit over knit and purl over purl – remember BINDING-OFF TIP. |
|||||||||||||||||||
Diagram explanations |
|||||||||||||||||||
|
|||||||||||||||||||
 |
|||||||||||||||||||
Have you finished this pattern?Tag your pictures with #dropspattern #wrappedinwonderbalaclava or submit them to the #dropsfan gallery. Do you need help with this pattern?You'll find 21 tutorial videos, a Comments/Questions area and more by visiting the pattern on garnstudio.com. © 1982-2026 DROPS Design A/S. We reserve all rights. This document, including all its sub-sections, has copyrights. Read more about what you can do with our patterns at the bottom of each pattern on our site. |
|||||||||||||||||||


With over 40 years in knitting and crochet design, DROPS Design offers one of the most extensive collections of free patterns on the internet - translated to 17 languages. As of today we count 324 catalogs and 12290 patterns - 12280 of which are translated into English (US/in).
We work hard to bring you the best knitting and crochet have to offer, inspiration and advice as well as great quality yarns at incredible prices! Would you like to use our patterns for other than personal use? You can read what you are allowed to do in the Copyright text at the bottom of all our patterns. Happy crafting!
Post a comment to pattern DROPS 214-73
We would love to hear what you have to say about this pattern!
If you want to leave a question, please make sure you select the correct category in the form below, to speed up the answering process. Required fields are marked *.