DROPS Alpaca
DROPS Alpaca
100% Alpaca
from 3.40 £ /50g
DROPS Kid-Silk
DROPS Kid-Silk
75% Mohair, 25% Silk
from 4.60 £ /25g
Get the yarn to make this pattern from 16.00£.

The yarn cost is calculated from the pattern’s smallest size and the yarn’s cheapest product type. Looking for an even better price? You might find it on the DROPS Deals!

DROPS SS24

Wrapped in Wonder

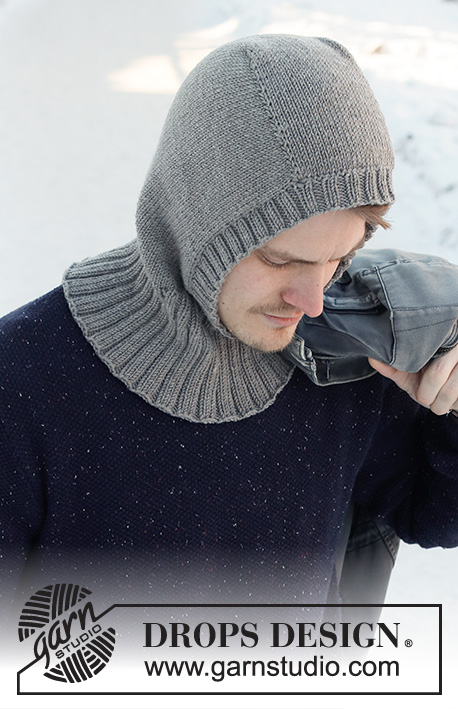
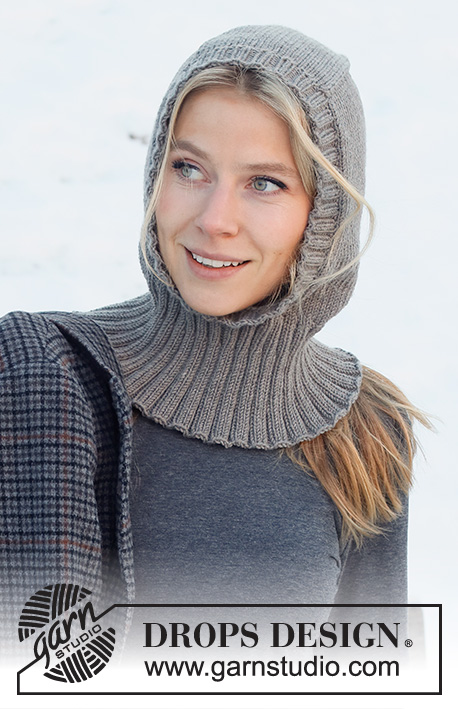
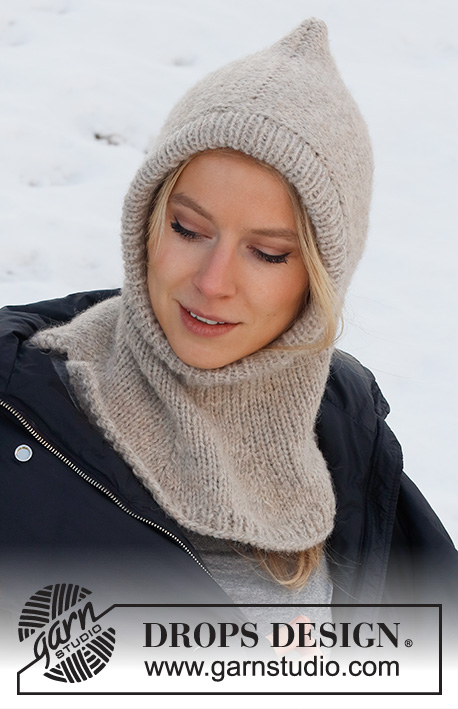
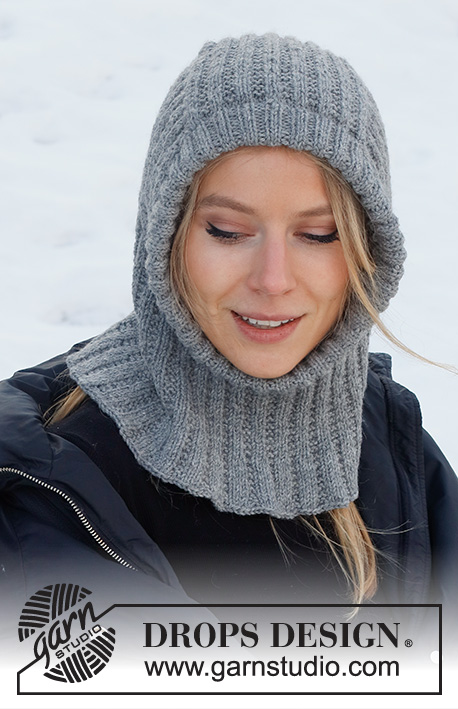
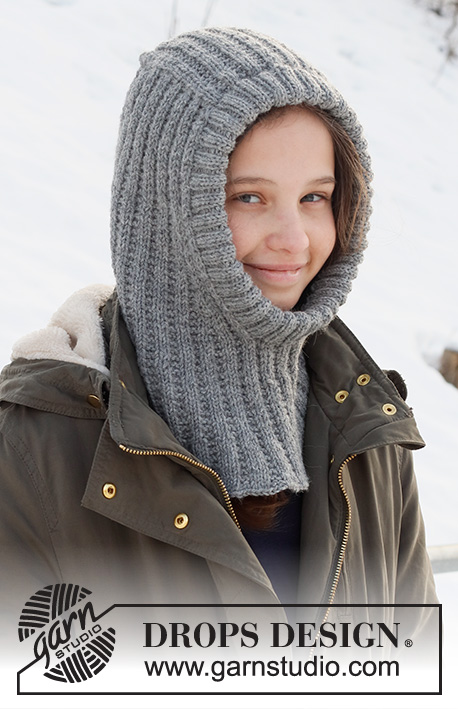
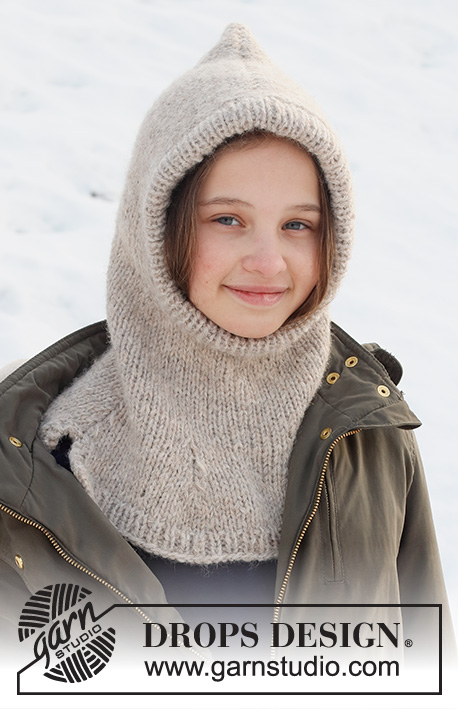
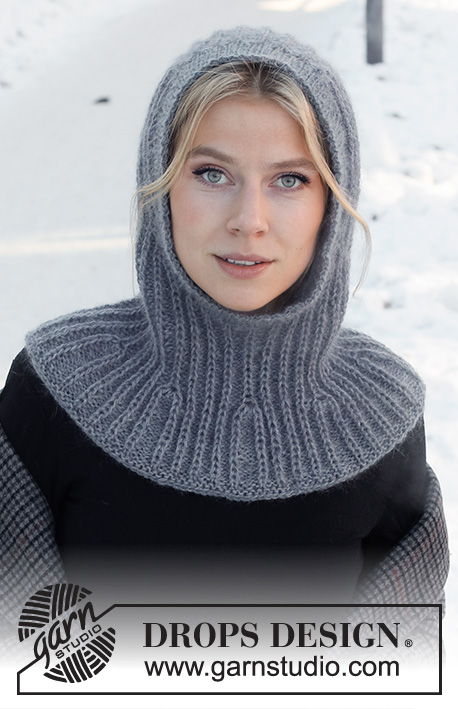
Knitted hat / balaclava in DROPS Alpaca and DROPS Kid-Silk. The piece is worked top down with Fisherman’s rib and ribbed edging.

DROPS 214-73
DROPS Design: Pattern no z-930
Yarn group A + A or C
-------------------------------------------------------

SIZES:
S/M - L
Fits head size: Approx. 54/56 - 58 cm

MATERIALS:
DROPS ALPACA from Garnstudio (belongs to yarn group A)
100-100 g colour 517, medium grey
And use:
DROPS KID-SILK from Garnstudio (belongs to yarn group A)
50-50 g colour 10, grey

KNITTING TENSION:
21 stitches in width and 25 rows in height with A.1 and 1 strand of each quality = 10 x 10 cm.

NEEDLES:
DROPS CIRCULAR NEEDLE SIZE 4 MM: Length 60 cm for pattern.
DROPS CIRCULAR NEEDLE SIZE 3 MM: Length 40 cm or 60 cm for rib.
Needle size is only a guide. If you get too many stitches on 10 cm, change to a larger needle size. If you get too few stitches on 10 cm, change to a smaller needle size.

-------------------------------------------------------

Alternative Yarn – See how to change yarns here
Yarn Groups A to F – Use the same pattern and change the yarn here
Yarn usage using an alternative yarn – Use our yarn converter here

-------------------------------------------------------

DROPS Alpaca
DROPS Alpaca
100% Alpaca
from 3.40 £ /50g
DROPS Kid-Silk
DROPS Kid-Silk
75% Mohair, 25% Silk
from 4.60 £ /25g
Get the yarn to make this pattern from 16.00£.

The yarn cost is calculated from the pattern’s smallest size and the yarn’s cheapest product type. Looking for an even better price? You might find it on the DROPS Deals!

Pattern instructions

NOTE: This pattern is written in British English. All measurements in charts are in cm. For conversion from cm to inches - click here. There are different terms for crocheting in British and American English. If this pattern includes crochet, click for "crochet terms" here. For this pattern in American English, please click here.
-------------------------------------------------------

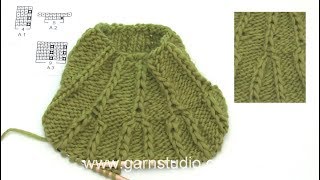
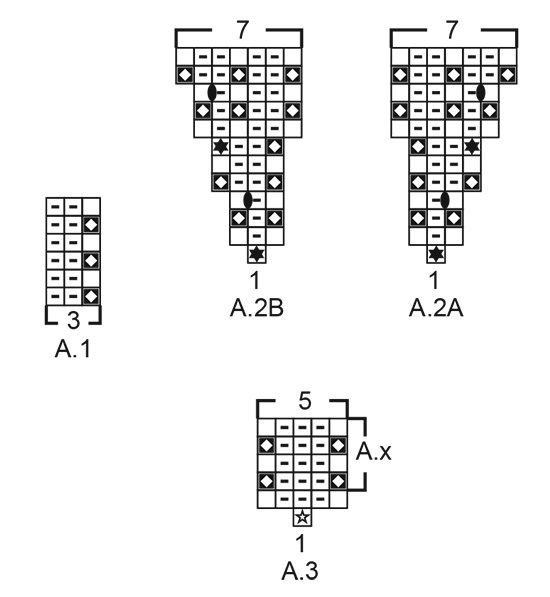
EXPLANATIONS FOR THE PATTERN:

-------------------------------------------------------

RIDGE/GARTER STITCH (worked back and forth):
Knit all rows.
1 ridge in height = Knit 2 rows.

PATTERN:
See diagrams A.1 to A.3. The diagrams show all rows in the pattern from the right side.

CASTING-OFF TIP:
To avoid the cast-off edge being tight you can cast off with a larger size needle. If the edge is still tight, make 1 yarn over after approx. each 6th stitch at the same time as casting off; the yarn overs are cast off as normal stitches.

-------------------------------------------------------

START THE PIECE HERE:

-------------------------------------------------------

BALACLAVA – SHORT OVERVIEW OF THE PIECE:
The mid-section is worked back and forth with circular needle from mid-front and backwards. Stitches are knitted up on each side of the mid-section and the piece continued back and forth before stitches are cast on for the neck. The piece finished in the round. A ribbed edge is worked around the face-opening to finish.

MID-SECTION:
Cast on 24-24 stitches (including 1 edge stitch on each side) with circular needle size 4 mm and 1 strand Alpaca and 1 strand Kid-Silk (2 strands). Purl 1 row from the wrong side. Then continue as follows from the right side: 1 edge stitch in GARTER STITCH on each side – read description above, work A.1 until there are 2 stitches left (7-7 repeats of 3 stitches), work the first stitch in A.1 (so the pattern starts and finishes in the same way) and 1 edge stitch in garter stitch. Continue this pattern back and forth. REMEMBER THE KNITTING TENSION!
When the piece measures 13-14 cm and the next row is from the wrong side, cast off the edge stitches on each side = 22-22 stitches. Cut the strand, then work the hood as described below.

HOOD:
Knit up stitches on each side of the mid-section from the right side as follows: Knit up 25-28 stitches along the one side inside the 1 edge stitch, continue A.1 as before over the 22-22 stitches on the needle and knit up 25-28 stitches along the other side inside the 1 edge stitch = 72-78 stitches. Insert 1 marker at the beginning of the row. THE PIECE IS NOW MEASURED FROM THIS MARKER!
Continue A.1 back and forth over all stitches with 1 edge stitch in garter stitch on each side towards mid-front – the pattern should match the pattern on the mid-section.
When the piece measures 16-18 cm from the marker and the next row is from the right side, increase on each side towards mid front as follows: 1 edge stitch in garter stitch, work A.1 over the first 3 stitches, A.2A (= 1 stitch), A.1 as before until there are 5 stitches left, A.2B (= 1 stitch), A.1 over the next 3 stitches and finish with 1 edge stitch in garter stitch. Continue this pattern and increase on each side as shown in the diagrams.
When A.2 has been completed in height there are 84-90 stitches.
Continue working until the piece measures 22-24 cm from the marker – the hat measures approx. 28-30 cm from the middle of the mid-section down.
Now cast on stitches for the neck (try the hat on and work to desired length before casting on).
Cast on 12-18 stitches at the end of the next row from the right side = 96-108 stitches. Cut the strand and remove the marker. Insert a new marker in the piece, approx. mid-back, inserted in a Fisherman’s rib stitch. THE PIECE IS NOW MEASURED FROM THIS MARKER. Continue working the neck as described below.

NECK:
Start the round at the marker mid-back and continue with A.1 in the round over all stitches – make sure the pattern matches all the way round.
When the piece measures 8-8 cm from the marker mid-back, increase as follows:
Work A.3 in the marker-stitch, * A.1 as before over the next 11 stitches, A.3 in the next Fisherman’s rib stitch *, work from *-* a total of 7-8 times and A.1 as before over the last 11 stitches = 128-144 stitches.
Continue working until the piece measures 15-15 cm from the marker. Knit 1 round and purl 1 round. Then loosely cast off with knit – read CASTING-OFF TIP! The hat measures approx. 43-45 cm from the middle of the mid-section down.

EDGE AROUND FACE-OPENING:
Start from the right side at the bottom of the opening, where stitches were cast on for the neck. Knit up 140 to 160 stitches around the opening, inside the 1 edge stitch using short circular needle size 3 mm and 1 strand Alpaca and 1 strand Kid-Silk (2 strands). The number of stitches should be divisible by 2. NOTE: On the mid-section and along the stitches cast on for the neck, knit up 1 stitch in each Fisherman’s rib stitch and 3 stitches between each Fisherman’s rib stitch.
Work rib in the round (knit 1, purl 1) for 3-3 cm – make sure the rib matches neatly over the mid-section and the cast-on stitches. Loosely cast off with knit over knit and purl over purl – remember CASTING-OFF TIP.

This pattern has been corrected.

Updated online: 22.02.2021
HOOD:
... When the piece measures 16-18 cm from the marker and the next row is from the right side, increase on each side towards mid front as follows:...
Updated online: 23.11.2021
HOOD: ... Cast on 12-18 stitches at the end of the next row from the right side = 96-108 stitches...

Diagram

symbols = knit from right side, purl from wrong side
symbols = purl from right side, knit from wrong side
symbols = knit 1 in the stitch below next stitch (this stitch is now called a Fisherman’s rib stitch)
symbols = increase 2 stitches in 1 Fisherman’s rib stitch by working 3 stitches in the same stitch as follows (from the right side): Knit 1 in stitch under the next stitch, but do not slip the stitch from the left needle, make 1 yarn over the right needle, knit 1 in the same stitch on the left needle, then slip the stitch from the left needle = 3 stitches (2 stitches increased).
symbols = Increase 4 stitches in 1 Fisherman’s rib stitch by working 5 stitches as follows (from the right side): Knit 1 in the stitch below the next stitch, but do not slip the stitch from the left needle, * make 1 yarn over the right needle, knit 1 in the same stitch on the left needle *, work from *-* a total of 2 times, then slip the stitch from the left needle = 5 stitches (4 stitches increased).
symbols = between 2 stitches make 1 yarn over, on the next row (right side) purl the yarn over twisted to avoid a hole
diagram

Each of our patterns has specific tutorial videos to help you.

Do you have a question? See a list of frequently asked questions (FAQ)

Knitting tension is what determines the final measurements of your work, and is usually measured per 10 x 10 cm. It is provided like so: number of stitches in width x number of rows in height - eg: 19 stitches x 26 rows = 10 x 10 cm.

The knitting tension is very individual; some people knit/crochet loosely while others work tightly. You adjust the knitting tension with the needle size, which is why the suggested needle size is only meant as a guide! You need to adjust this (up or down) to ensure that YOUR knitting tension matches the knitting tension provided in the pattern. If you work with a different knitting tension than provided you will have a different yarn consumption, and your work will have different measurements than what the pattern suggests.

The knitting tension also determines which yarns can replace each other. As long as you achieve the same knitting tension you can replace one yarn with another.

See DROPS lesson: How to measure your tension/gauge

See DROPS video: How to make a gauge tension swatch

The required amount of yarn is provided in grams, eg: 450 g. To calculate how many balls you’ll need you first need to know how many grams are in 1 ball (25g, 50g or 100g). This information is available if you click on the individual yarn quality on our pages. Divide the amount required with the amount of each ball. For example, if each ball is 50g (the most common amount), the calculation will be as follows: 450 / 50 = 9 balls.

The important thing when changing from one yarn to another is that the knitting/crochet tension remains the same. This is so that the measurements of the finished piece will be the same as on the sketch provided. It is easier to achieve the same knitting tension using yarns from the same yarn group. It is also possible to work with multiple strands of a thinner yarn to achieve the knitting tension of a thicker one. Please try our yarn converter. We recommend you to always work a test swatch.

Please NOTE: when changing yarn the garment might have a different look and feel to the garment in the photo, due to individual properties and qualities of each yarn.

See DROPS lesson: Can I use a different yarn than the one mentioned in the pattern?

All our yarns are categorised into yarn groups (from A to F) according to thickness and knitting tension – group A contains the thinnest yarns and group F the thickest. This makes it easier for you to find alternative yarns to our patterns, should you wish to switch yarn. All yarns within the same group have a similar knitting tension and can easily replace each other. However, different yarn qualities have different structures and properties which will give the finished work a unique look and feel.

Click here for an overview of the yarns in each yarn group

At the top of all our patterns you’ll find a link to our yarn calculator, which is a helpful tool should you wish to use a different yarn than suggested. By filling in the yarn quality you wish to replace, the amount (in your size) and number of strands, the calculator will present good alternative yarns with the same knitting tension. Additionally it will tell you how much you’ll require in the new qualities and whether you’ll need to work with multiple strands. Most skeins are 50g (some are 25g or 100g).

If the pattern is worked with multiple colours, every colour will have to be calculated separately. Similarly, if the pattern is worked with several strands of different yarns (for example 1 strand Alpaca and 1 strand Kid-Silk) you will have to find alternatives for each, individually.

Click here to see our yarn calculator

Since different yarns have different qualities and textures we have chosen to keep the original yarn in our patterns. However, you can easily find options among our available qualities by using our yarn calculator, or simply pick a yarn from the same yarn group.

It is possible that some retailers still have discontinued yarns in stock, or that someone has a few skeins at home that they would like to find patterns for.

The yarn calculator will provide both alternative yarn as well as required amount in the new quality.

If you think it's hard to decide what size to make, it can be a good idea to measure a garment you own already and like the size of. Then you can pick the size by comparing those measures with the ones available in the pattern's size chart.

You'll find the size chart at the bottom of the pattern.

See DROPS lesson: How to read size chart

The needle size provided in the pattern serves only as a guide, the important thing is to follow the knitting tension. And since knitting tension is very individual, you will have to adjust the needle size to ensure that YOUR tension is the same as in the pattern – maybe you’ll have to adjust 1, or even 2 needle sizes, up or down to achieve the correct tension. For this, we recommend that you work test swatches.

Should you work with a different knitting tension than the one provided, the measurements of the finished garment might deviate from the measurement sketch.

See DROPS lesson: How to measure your tension/gauge

See DROPS video: How to make a tension/gauge swatch

Working a garment top-down provides more flexibility and room for personal adjustment. For example it is easier to try the garment on while working, as well as making adjustments to length of yoke and shoulder caps.

The instructions are carefully explaining every step, in the correct order. Diagrams are adjusted to the knitting direction and are worked as usual.

The diagram depicts all rows/rounds, and every stitch seen from the right side. It is read from bottom to top, from right to left. 1 square = 1 stitch.

When working back and forth, every other row is worked from the right side and every other row is worked from the wrong side. When working from the wrong side, the diagram will have to be worked reversed: from left to right, knit stitches are purled, purl stitches are knit etc.

When working in the round every round is worked from the right side and the diagram are worked from right to left on all rounds.

See DROPS lesson: How to read knitting diagrams

The diagram depicts all rows/rounds, and every stitch seen from the right side. It is worked from bottom to top, from right to left.

When working back and forth every other row is worked from the right side: from right to left and every other row is worked from the wrong side: from left to right.

When working in the round, every row in the diagram are worked from the right side, from right to left.

When working a circular diagram you start in the middle and work your way outwards, counter clockwise, row by row.

The rows usually start with a given number of chain stitches (equivalent to the height of the following stitch), this will either be depicted in the diagram or explained in the pattern.

See DROPS lesson: How to read crochet diagrams

Instructions for working several diagrams after each other on the same row/round, will often be written like so: “work A.1, A.2, A.3 a total of 0-0-2-3-4 times". This means you work A.1 once, then A.2 is worked once, and A.3 is repeated (in width) the number of times provided for your size – in this case like so: S = 0 times, M = 0 times, L=2 times, XL= 3 times and XXL = 4 times.

The diagrams are worked as usual: begin with the first row in A.1, then work the first row in A.2 etc.

See DROPS lesson: How to read knitting diagrams

See DROPS lesson: How to read crochet diagrams

The total width of the garment (from wrist-to-wrist) will be larger in the larger sizes, despite the actual sleeves being shorter. The larger sizes have longer sleeve caps and wider shoulders, so there will be a good fit in all sizes.

The measurement sketch/schematic drawing provides information regarding the full length of the garment. If it’s a jumper or a jacket the length is measured from the highest point on the shoulder closest to the neckline, and straight down to the bottom of the garment. It is NOT measured from the tip of shoulder. Similarly, the length of yoke is measured from the highest point on the shoulder and down to where yoke is split into body and sleeves.

On a jacket measures are never taken along bands, unless specifically stated. Always measure inside band stitches when measuring the length.

See DROPS lesson: How to read a schematic drawing

Diagrams are often repeated on the round or in height. 1 repeat is the diagram the way it appears in the pattern. If it says to work 5 repeats of A.1 in the round, then you work A.1 a total of 5 times after/next to each other in the round. If it says to work 2 repeats of A.1 vertically/in height you work the entire diagram once, then begin again at the start and work the entire diagram one more time.

Chain stitches are slightly narrower than other stitches and to avoid working the cast-on edge too tight, we simply chain more stitches to begin with. The stitch count will be adjusted on the following row to fit the pattern and measurement sketch.

The rib edge is more elastic and will contract slightly compared to, for example, stocking stitch. By increasing before the rib edge, you avoid a visible difference in width between the rib edge and the rest of the body.

It’s very easy to cast off too tightly, and by making yarn overs while casting off (and simultaneously casting these off) you avoid a too tight cast off edge.

See DROPS video: How to bind off with yarn overs (yo)

To achieve an even increase (or decrease) you can increase on, for example: every 3rd and 4th row alternately, like so: work 2 rows and increase on the 3rd row, work 3 rows and increase on the 4th. Repeat this until the increase is complete.

See DROPS lesson: Increase or decrease 1 st on every 3rd and 4th row alternately

Should you prefer to work in the round instead of back and forth, you may of course adjust the pattern. You’ll need to add steeks mid-front (usually 5 stitches), and follow the instructions. When you would normally turn and work from the wrong side, simply work across the steek and continue in the round. At the end you’ll cut the piece open, pick up stitches to work bands, and cover the cut edges.

See DROPS video: How to knit steeks and cut open

Should you prefer to work back and forth instead of in the round, you may of course adjust the pattern so you work the pieces separately and then assemble them at the end. Divide the stitches for the body in 2, add 1 edge stitch in each side (for sewing) and work the front and back pieces separately.

See DROPS lesson: Can I adapt a pattern for circular needles into straight needles?

Pattern repeats can vary slightly in the different sizes, in order to get the correct proportions. If you’re not working the exact same size as the garment in the photo, yours might deviate slightly. This has been carefully developed and adjusted so that the complete impression of the garment is the same in all sizes.

Make sure to follow instructions and diagrams for your size!

If you have found a pattern you like which is available in women’s size it’s not very difficult to convert it to men’s size. The biggest difference will be the length of sleeves and body. Start working on the women size that you think would fit across the chest. The additional length will be worked right before you cast off for the armhole/sleeve cap. If the pattern is worked top-down you can add the length right after the armhole or before the first decrease on sleeve.

Regarding additional yarn amount, this will depend on how much length you add, but it is better with a skein too many than too few.

All yarns will have excess fibres (from production) that might come off as lint or shedding. Brushed yarns (ie hairier yarns) have more of these loose, excess fibres, causing more shedding.

Shedding also depends on what is worn under or over the garment, and whether this pulls at the yarn fibres. It’s therefore not possible to guarantee that there will be no shedding

Below are some tips on how to get the best result when working with hairier yarns:

1. When the garment is finished (before you wash it) shake it vigorously so the looser hairs come off. NOTE: do NOT use a lint roller, brush or any method that pulls at the yarn.

2. Place the garment in a plastic bag and put it in your freezer - the temperature will cause the fibres to become less attached to each other, and excess fibres will come off easier.

3. Leave in the freezer for a few hours before taking it out and shaking it again.

4. Wash the garment according to the instructions on the yarn label.

Pilling is a natural process that happens to even the most exclusive of fibers. It's a natural sign of wear and tear that is hard to avoid, and that is most visible in high friction areas of your garment like a sweater's arms and cuffs.

You can make your garment look as new by removing the pilling, using a fabric comb or a pill/lint remover.

Still can't find the answer you need? Then scroll down and leave your question so one of our experts can try to help you. This will be done normally within 5 to 10 working days.
In the meantime, you can read the questions and answers that others have left to this pattern or join the DROPS Workshop on Facebook to get help from fellow knitters/crocheters!

You might also like...

Post a comment to pattern DROPS 214-73

We would love to hear what you have to say about this pattern!

If you want to leave a question, please make sure you select the correct category in the form below, to speed up the answering process. Required fields are marked *.

Comments / Questions (32)

country flag Jorun wrote:

Hei! Jeg får ikke A1 til å stemme med videoene som viser hvordan strikke patentmaske. Som jeg forstår det, starter A1 på rettsida, men da strikker man patent i en rettmaske, ikke en vrangmaske, som i videoene. Ikke minst i videoen "Hvordan strikke i masken under og hvordan øke 4 masker i 1 maske" vises et diagram som alternerer med tre rette på vrangsida, ikke en rett og to vrange, som i denne oppskrifta. Kan dere forklare?

18.02.2024 - 10:29

DROPS Design answered:

Hei Jorun. I videoen strikkes det i masken under forrige omgang og den er en rettmaske (se diagram A.1 og tidspunkt: 0:36, 1:08, 1:42 og 1:56). Første diagramikon i diagram A.1 i videoen og første diagramikon i diagram A.1 i 214-73 strikkes likt selv om forrige omgang i videoen er vrang, så er det i omgangen under det skal strikkes i og den er rett, både i videoen og i 214-37. Videoen viser øketeknikken (4 økte masker) i A.2. I oppskrift 214-73 gjør du samme øketeknikk, men du må følge forklaringen hvordan maskene skal strikkes i 214-73 på neste omgang (i A.3). mvh DROPS Design

26.02.2024 - 11:08

country flag Patricia Gilgan wrote:

Do you have a video of this garment

20.01.2024 - 23:07

country flag Sølvi wrote:

Ønsker å få en bedre beskrivelse av økning A3. Får bare feil antall masker på venstre side av halsen. Dvs altfor mange

10.01.2024 - 14:45

DROPS Design answered:

Hei Sølvi. Når du skal strikke omgangen med A.3 bruk maskemarkører mellom hver rapport. Så har du en bedre oversikt. Hvordan det økes kan du se på hjelpevideoen som ligger under oppskriften. Se: "Hvordan strikke i masken under og hvordan øke 4 masker i 1 maske" og se mellom tidspunktet 05:00-05:28. mvh DROPS Design

15.01.2024 - 13:45

country flag Elżbieta wrote:

Jak przerabiać w tym modelu ścieg fantazyjny na okrągło?

01.12.2023 - 23:10

DROPS Design answered:

Witaj Elu, przerabiasz ścieg fantazyjny na okrągło zgodnie ze schematem A.1. Okr.1: powtarzasz *2 oczka lewe, 1 oczko prawe*, Okr. 2: powtarzasz *2 oczka lewe, 1 oczko prawe wkłuwając drut w oczko pod następnym oczkiem*. Następnie przerabiasz na przemian okr 1 i 2. na całej długości. Pozdrawiamy!

04.12.2023 - 08:48

country flag Pia wrote:

Nu förstår jag varför man ska lägga upp 24 m….

22.10.2023 - 15:38

country flag Pia wrote:

Varför inte lägga upp 23 m så att det går jämt upp med en kantmaska i varje sida??

19.10.2023 - 11:44

country flag Elisa wrote:

Gentilissimi non ho capito un passaggio: quando si inizia il collo “iniziare il giro all’altezza del segnapunti al centro dietro e continuare il motivo A1 in tondo su tutte le maglie” ma il motivo A1 crea un motivo lavorando in piano sul dritto e sul rovescio del lavoro, se sono con i ferri circolari lavorando in tondo, come faccio ad eseguire il motivo non avendo un rovescio del lavoro?! In questo modo non torna una costa normale?

16.03.2023 - 23:19

country flag Pia wrote:

När man börjar sticka rundstickning måste man sticka varannat varv vanlig 1 rm 1am, annars finns det ingen maskbåge på nästa varv att fånga upp på de räta maskorna så att de blir patentmaskor. 'Det framgår inte av mönstret.

17.01.2023 - 22:30

country flag Annika Eriksson wrote:

Hopplöst mönster! En riktigt dålig beskrivning.

06.01.2023 - 14:30

country flag Ellinor wrote:

Hej, fortsättning på fråga nedan: I mönstret står det: A1 Från rätsida: 1 kantmaska, följ A1, avsluta med första maskan i A1, 1 kantmaska. A1 Från avigsida: 1 kantmaska, följ A1, avsluta med första maskan i A1, 1 kantmaska. Det borde bli: A1 Från avigsida: 1 kantmaska, BÖRJA MED FÖRSTA MASKAN I A1, A1, 1 kantmaska. Annars blir allt förskjutet. Man läser ju rätsida höger-vänster och avigsida fr vä-hö i diagram.

05.12.2022 - 14:40

DROPS Design answered:

Hei Ellinor. Det står i oppskriften at man skal strikke første maske i A.1 slik at mønstret starter og slutter likt og man fortsetter mønstret slik frem og tilbake. mvh DROPS Design

05.12.2022 - 14:55