
Looking for a yarn?


Comments / Questions (89)
![]() Anita wrote:
Anita wrote:
Hallo ihr Lieben, ein wunderschönes Modell und ich habe mich getraut… Habe gerade wieder aufgetrennt, weil mir 80 M fehlten bei den Zunahmen. Oder hab ich’s doch richtig gemacht ? HM u VM sind klar - beidseitig jeweils 1 M zunehmen. Bei den Ärmeln nach der 2. u 5. Markierung bzw vor der 3. u 6. Markierung jeweils 1 M zunehmen ?? Oder doch beidseitig??? Bis jetzt habe ich Raglanabnahmen jeweils mit einer Mittelmasche beidseitig gestrickt. Ist es hier nicht so ? Danke
30.05.2021 - 14:17DROPS Design answered:
Liebe Anita, es wird je nach der Größe unterschiedlich und in einem unterschiedlichen Rythmus bei Rumpfteil und Ärmel zugenommen, bzw entweder 8 Maschen beim Vorder- und Rückenteil + bei jeder Ärmel oder nur 4 Maschen z.B. wenn man beim Vorder- Und Rückenteil in jeder Runde aber bei den Ärmeln in jeder 2. Runde zunimmt. Kann das helfen?
31.05.2021 - 08:22
![]() Mary wrote:
Mary wrote:
Buonasera, mi sto cimentando nel modello 177-6, credo di aver mal interpretatonle istruzioni. Per il raglan sono da fare gli aumenti 40 volte sul davanti/dietro e 37 volte sulle maniche il tutto dovrebbe essere lungo 23 cm. Aumentare 40 volte significa; aumentare ogni giro/2 giri per 40 volte in altezza? Perchè finora sono arrivata a circa 25 volte e ho già lavorato 40 cm. Grazie, il modello è bellissimo!!!
13.05.2021 - 21:08DROPS Design answered:
Buonasera Mary, i primi aumenti sono da lavorare su ogni giro, poi ogni 2 giri. Buon lavoro!
14.05.2021 - 18:13
![]() Irene wrote:
Irene wrote:
For pattern 177-6, are the mid front and mid back increases in the yoke always on either side of A2. (yo, A2 stitch, yo)? Or, do they fan out so that the second increase row is (yo, k1, A2 stitch, k1, yo)?
25.04.2021 - 22:07DROPS Design answered:
Dear Irene, the increases on mid back/mid front will always be worked on each side of A.2 (= always: YO, A.2 stitch, YO). Happy knitting!
26.04.2021 - 08:24
![]() Daniela wrote:
Daniela wrote:
Bonjour, je n'ai pas dû bien comprendre le comptage des augmentations : en faisant 40 augmentations de chaque côté des fils marqueurs, je me retrouve avec 80 mailles de plus, et donc 116 mailles au lieu de 76 pour chaque demi devant par exemple. Merci de me montrer où je comprends mal. Ce modèle est tellement élégant, je vous remercie pour votre partage ! Cordialement. Daniela
02.04.2021 - 09:39DROPS Design answered:
Bonjour Daniela, vous augmentez 40 fois 1 m de chaque côté de la maille avec le fil marqueur -1 et -4; vous aurez ainsi: 36 m, 40 m augmentées au total, 1 m avec le marqueur, 40 m augmentées au total, 36m = 76 m avant et après le fil marqueur. Bon tricot!
06.04.2021 - 11:50
![]() Jessica Ribera wrote:
Jessica Ribera wrote:
Bonjour, je ne ne comprend pas le raglan fait on le devant/dos et les manches en même temps où séparément ?
24.03.2021 - 17:38DROPS Design answered:
Bonjour Mme Ribera, on les fait en même temps mais à un rythme différent, ainsi, vous allez augmenter soit 8 mailles (= dos, devant et manches), soit 4 mailles seulement (quand on augmente par ex. tous les tours pour le dos et le devant mais tous les 2 tours pour les manches). Bon tricot!
25.03.2021 - 08:25
![]() Helen Booth wrote:
Helen Booth wrote:
I have bought the correct quantity of wool. Downloaded the pattern and was thoroughly looking forward to a new project. Never in my life have I come across such a terrible pattern. The instructions are completely unintelligible. I’m a good knitter but this pattern is impossible. I’ve tried to find another pattern from your website to use the wool But I can’t find one.
08.03.2021 - 14:00DROPS Design answered:
Dear Mrs Booth, we are sorry to hear that. The DROPS patterns are knitted and crocheted by thousands and thousands of people around the world. We understand however that in certain countries, with different knitting/crochet traditions than Scandinavia, our patterns might be written in a way that differs from what some are used to. But of course we want everyone to understand our patterns, so that’s why we have created an extensive library of tutorial videos as well as step by step lessons that explain how to follow the techniques we use and how to read the diagrams in our patterns. Happy knitting!
08.03.2021 - 14:04
![]() ADEL MEDJAHER wrote:
ADEL MEDJAHER wrote:
- Dites-moi ! s'il vous plait ce modèle on peut le travailler sur deux aiguilles simple ?
13.02.2021 - 21:51DROPS Design answered:
Bonjour Mme Medjaher, ce modèle se tricote en rond sur aiguille circulaire, vous trouverez ici quelques explications et suggestions pour l'adapter sur aiguilles droites. Votre magasin saura vous assister si besoin, même par mail ou téléphone. Bon tricot!
15.02.2021 - 09:54
![]() Ilaria wrote:
Ilaria wrote:
Buongiorno, negli ultimi Ferri (quando si lavora il mezzo davanti col mezzo dietro), si diminuiscono 2 maglie ad inizio ferro. Ma al centro sotto la manica si continua a diminuire le due maglie prima e dopo il segnapunti oppure no? Grazie
07.02.2021 - 17:33DROPS Design answered:
Buonasera Ilaria, no, deve proseguire nella lavorazione come indicato. Buon lavoro!
17.05.2021 - 22:15
![]() Ilaria wrote:
Ilaria wrote:
Buongiorno, negli ultimi Ferri (quando si lavora il mezzo davanti col mezzo dietro), si diminuiscono 2 maglie ad inizio ferro. Ma al centro sotto la manica si continua a diminuire le due maglie prima e dopo il segnapunti oppure no? Grazie
07.02.2021 - 17:31
![]() Petra wrote:
Petra wrote:
Das große Lochmuster kommt nicht vollständig an den Raglanschrägen aus. Ich müsste jeweils zwei einfache Maschen stricken, dann die Zunahme an den Raglanschrägen und dann mit dem Muster von vorne beginnen. Ist das richtig, dass ich, um die Zunahmen und überzähligen Maschen auszugleichen, jeweils einfach einige rechte Maschen dazwischen stricke? Oder muss das Muster immer auskommen. Vielleicht habe ich mich ja verzählt und das Muster passt deshalb nicht
05.01.2021 - 11:47
|
||||||||||||||||||||||
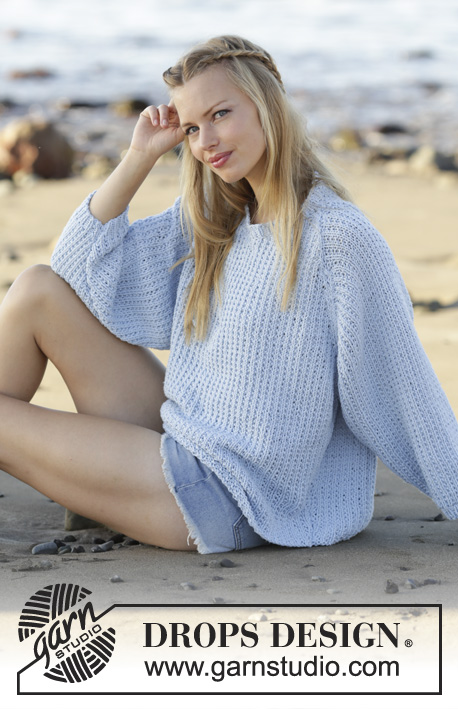
Chevron Delight#chevrondelightsweater |
||||||||||||||||||||||
|
|
||||||||||||||||||||||
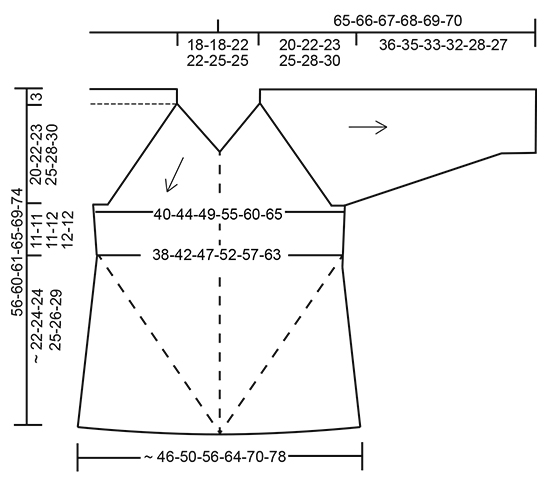
Jumper worked top down with raglan and lace pattern in DROPS BabyAlpaca Silk. Sizes S - XXXL.
DROPS 177-6 |
||||||||||||||||||||||
|
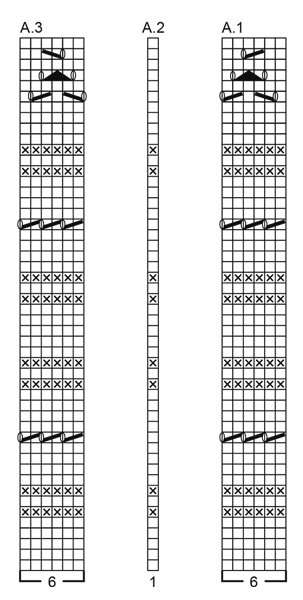
RIDGE/GARTER STITCH (worked in the round): 1 ridge = 2 rounds. Knit 1 round and purl 1 round. PATTERN: See diagrams A.1 to A.3. The diagrams show all the rows in the pattern from the right side. INCREASE TIP: To work out how to increase evenly, count the total number of stitches on the needle (e.g. 124 stitches) and divide by the number of increases to be made (e.g. 12) = 10.3. In this example, increase after approx. every 10th stitch. Increase 1 stitch by making 1 yarn over, on the next round work the yarn overs twisted knit to prevent holes. RAGLAN: Increase to raglan on each side of the stitch with the marker thread mid front/mid back and in each of side of the sleeves (i.e. on each side of the 1st and 4th marker thread, before the 3rd and 6th marker thread and after the 2nd and 5th marker thread). Increase 1 stitch by making 1 yarn over, on the next round the yarn overs are worked twisted knit to prevent holes. The increased stitches are worked into the pattern as you go. NOTE: The increases are different on the body and sleeves as explained in the text. DECREASE TIP-1 (for the sides of the body and mid underarm): Decrease 1 stitch on each side of each marker thread as follows: Work until there are 3 stitches left before the marker, knit 2 together, knit 2 (the marker sits in the middle of these 2 stitches), slip 1 stitch as if to knit, knit 1, pass the slipped stitch over the knitted stitch (= 2 stitches decreased). DECREASE TIP-2 (for the sides of the body): Decrease 2 stitches on each side of each marker as follows: Work until there are 5 stitches left before the marker, * knit 2 together *, repeat from *-* in total 2 times (= 2 stitches decreased), knit 2 (the marker sits in the middle of these 2 stitches), * slip 1 stitch as if to knit, knit 1, pass the slipped stitch over the knitted stitch *, repeat from *-* in total 2 times (= 4 stitches decreased). ---------------------------------------------------------- JUMPER: The piece is worked with circular needle and from the top down. The sleeves are worked with a short circular needle/double pointed needles. YOKE: Cast on 124-124-132-132-148-148 stitches with circular needle size 2.5 mm and BabyAlpaca Silk. Work 3 RIDGES – see description above, AT THE SAME TIME on the 4th round increase 12-12-20-20-24-24 stitches evenly along the round – READ INCREASE TIP = 136-136-152-152-172-172 stitches. Repeat the increase on the 6th round = 148-148-172-172-196-196 stitches on the needle. Change to circular needle size 3 mm and work the next round as follows from the left shoulder back: Work A.1 across the first 30-30-36-36-42-42 stitches (= 5-5-6-6-7-7 repeats of 6 stitches), insert the 1st marker thread in the next stitch and work the stitch A.2 (= mid back), work A.3 across the next 30-30-36-36-42-42 stitches (= 5-5-6-6-7-7 repeats of 6 stitches), insert the 2nd marker thread before the next stitch, work A.1 across the next 12 stitches (= 2 repeats of 6 stitches), work A.2 (= 1 stitch), insert the 3rd marker thread before the next stitch (= 13 stitches on the right sleeve between the 2nd and 3rd marker thread), work A.1 across the next 30-30-36-36-42-42 stitches, insert the 4th marker thread in the next stitch and work this stitch A.2 (= mid front), work A.3 across the next 30-30-36-36-42-42 stitches, insert the 5th marker thread before the next stitch, work A.2 (= 1 stitch), work A.3 across the next 12 stitches, insert the 6th marker thread before the next stitch (= 13 stitches on the left sleeve between the 5th and 6th marker thread). There are now 6 marker threads in the piece. Continue the pattern as follows (A.1-A.3 repeated to finished length). AT THE SAME TIME on the first round after the marker threads have been inserted begin the increases to RAGLAN – see description above. Increase as follows: BODY: Increase every round in total 6-12-10-22-18-30 times, then every 2nd round in total 28-28-30-28-34-32 times (= in total 34-40-40-50-52-62 times). SLEEVE: Increase every round in total 0-3-4-2-0-0 times, every 2nd round in total 29-32-33-37-40-41 times and then every 4th round in total 1-0-0-0-2-3 times (= in total 30-35-37-39-42-44 times). REMEMBER THE KNITTING TENSION! When the increases to raglan are finished the piece measures approx. 20-22-23-25-28-30 cm from the cast-on edge (measured mid front). There are 64-70-76-86-94-104 stitches on each side of the 1st and 4th marker thread (= 129-141-153-173-189-209 stitches on the front and back pieces including the stitches with marker threads) and 73-83-87-91-97-101 stitches on each sleeve = in total 404-448-480-528-572-620 stitches on the needle. The next round is worked as follows: Twisted knit together the first 2 stitches (= 1 stitch decreased), work as before to the 1st marker thread, make 1 yarn over, work the stitch as before (= mid back), make 1 yarn over (= 2 stitches increased), work as before until there are 2 stitches left before the 2nd marker, knit 2 together (= 1 stitch decreased), place the next 73-83-87-91-97-101 stitches (i.e. the stitches between the 2nd and 3rd marker threads) on a thread for the sleeve, cast on 6-6-12-12-12-12 new stitches under the sleeve, insert 1 marker in the middle of the new stitches, twisted knit 2 stitches together (= 1 stitch decreased), work the pattern as before to the 4th marker thread, make 1 yarn over, work the stitch as before (= mid front), make 1 yarn over (= 2 stitches increased), work the pattern as before until there are 2 stitches left before the 5th marker thread, knit 2 together (= 1 stitch decreased), place the next 73-83-87-91-97-101 stitches (i.e. the stitches between the 5th and 6th marker threads) on 1 thread for the sleeve, cast on 6-6-12-12-12-12 new stitches under the sleeve and insert 1 marker in the middle of these new stitches = 270-294-330-370-402-442 stitches on the needle. Cut the strand. THE PIECE IS NOW MEASURED FROM HERE! BODY: Displace the round so that it starts mid-under the sleeve in the right side of the piece when the garment is worn (i.e. move the next stitches across to the right needle without working them first). The markers follow as you work the piece. Continue the pattern as before – NOTE: The new stitches under the sleeve in each side are worked in to the pattern, adjust so that the pattern is symmetrical under the sleeve (i.e. on each side of the marker). AT THE SAME TIME every 2nd round increase 1 stitch on each side of the stitch with the 1st and 4th marker thread in the same way as before and decrease 1 stitch on each side of the marker under the sleeve in each side – READ DECREASE TIP-1 = 4 stitches increased and 4 stitches decreased. When you increase and decrease in this way the number of stitches remains the same. When the piece measures 3 cm from the separation under each sleeve – adjust so that the next round is an increase/decrease round and now decrease 2 stitches on each side of the marker under each sleeve (the increases front and back continue as before) – READ DECREASE TIP-2 = 4 stitches increased and 8 stitches decreased. Decrease and increase like this every 4-4-4-3-3-3 cm in total 3-3-3-4-4-4 times = 258-282-318-354-386-426 stitches. Then work as before with 4 decreases and 4 increases every 2nd round. Continue in this way until the piece measures approx. 46-50-51-55-58-63 cm measured along the middle stitch (i.e. by the 1st and 4th marker thread), but finish so that the next round is an increase/decrease round. The piece now measures approx. 56-60-61-65-69-74 cm measured from the shoulder and down at the longest part. Cut the strand. Place the first 65-71-80-89-97-107 stitches (= half the front piece including the mid-stitch) on 1 thread and the last 64-70-79-88-96-106 stitches (= half the back piece) on the same thread. Now work as follows across the remaining 129-141-159-177-193-213 stitches on the needle (i.e. from after the 4th marker thread up to and including the stitch with the 1st marker thread = left side of the jumper, from mid front to mid back): ROW 1 (= right side): Cast off the first 2 stitches, work the pattern as before until there are 3 stitches left before the marker under the sleeve, decrease 1 stitch on each side of the marker as before (= 2 stitches decreased), work the pattern as before for the rest of the row = 2 stitches decreased at the beginning of the row towards mid front and 2 stitches decreased in the side of the jumper (= in total 4 stitches decreased). ROW 2 (= wrong side): Cast off the first 2 stitches, Work the pattern to the end of the row as before = 2 stitches decreased at the start of the row towards mid back. ROW 3: Cast off the first 2 stitches, work the pattern for the rest of the row as before = 2 stitches decreased at the start of the row towards mid front. ROW 4: Work as for row 2 = 2 stitches decreased at the beginning of the row towards mid back. ROW 5: Work as for row 3 = 2 stitches decreased at the beginning of the row towards mid front. ROW 6: Work as for row 2 = 2 stitches decreased at the beginning of the row towards mid back. ROW 7: Work as for row 1 = 2 stitches decreased at the beginning of the row towards mid front and 2 stitches decreased in the side of the jumper (= in total 4 stitches decreased). ROW 8: Work as for row 2 = 2 stitches decreased at the beginning of the row towards mid back. ROW 9: Work as for row 3 = 2 stitches decreased at the beginning of the row towards mid front. ROW 10: Work as for row 2 = 2 stitches decreased at the beginning of the row towards mid back. Repeat rows 1-10 until there are 5 stitches left on the needle and cast off. Place the stitches from the thread back on the needle and work in the same way (= right side of the jumper, from mid back to mid front). SLEEVE: Place the stitches from the thread in the right side of the piece (when the garment is worn) on a short circular needle size 3 mm, in addition knit up 1 stitch in each of the 6-6-12-12-12-12 stitches cast on under the sleeve = 79-89-99-103-109-113 stitches on the needle. Insert 1 marker in the middle of these new stitches. The marker follows the piece. Continue A.1/A.2 as before, but the stitches which do not fit the pattern under the sleeve are knitted in rounds of knit and purled in rounds of purl. When the piece measures 3 cm decrease 1 stitch on each side of the marker – READ DECREASE TIP-1 (= 2 stitches decreased). Decrease in this way a total of 15-20-25-24-27-26 times in S: Every 6th round, in M: Every 5th round, in L + XL: Every 3rd round and in XXL + XXXL: Alternately every 2nd and 3rd round = 49-49-49-55-55-61 stitches. When the piece measures 34-33-31-30-26-25 cm from the separation (or try the garment on and work to desired length), change to double pointed needles size 2.5 mm. Work 4 RIDGES. Change back to double pointed needles size 3 mm and cast off. The sleeve measures approx. 36-35-33-32-28-27 cm from the separation. Work the other sleeve in the same way, but continue A.2/A.3 as before. RIDGE EDGE AT BOTTOM OF BODY: Knit up stitches for an edge inside 1 stitch along the whole of the bottom edge of the jumper. Knit up approx. 240-260-290-332-364-406 stitches evenly spaced from the right side with circular needle size 2.5 mm. Make sure the edge does not tighten the body! If it does, then knit up more stitches. Work 3 ridges. Change to circular needle size 3 mm and cast off. |
||||||||||||||||||||||
Diagram explanations |
||||||||||||||||||||||
|
||||||||||||||||||||||
 |
||||||||||||||||||||||
 |
||||||||||||||||||||||
Have you finished this pattern?Tag your pictures with #dropspattern #chevrondelightsweater or submit them to the #dropsfan gallery. Do you need help with this pattern?You'll find 26 tutorial videos, a Comments/Questions area and more by visiting the pattern on garnstudio.com. © 1982-2025 DROPS Design A/S. We reserve all rights. This document, including all its sub-sections, has copyrights. Read more about what you can do with our patterns at the bottom of each pattern on our site. |
||||||||||||||||||||||


With over 40 years in knitting and crochet design, DROPS Design offers one of the most extensive collections of free patterns on the internet - translated to 17 languages. As of today we count 320 catalogues and 12094 patterns translated into English (UK/cm). 12094
We work hard to bring you the best knitting and crochet have to offer, inspiration and advice as well as great quality yarns at incredible prices! Would you like to use our patterns for other than personal use? You can read what you are allowed to do in the Copyright text at the bottom of all our patterns. Happy crafting!
Post a comment to pattern DROPS 177-6
We would love to hear what you have to say about this pattern!
If you want to leave a question, please make sure you select the correct category in the form below, to speed up the answering process. Required fields are marked *.