
Looking for a yarn?


Comments / Questions (119)
![]() ÁNGELA wrote:
ÁNGELA wrote:
Creo que estoy entendiendo los aumentos. En la primera v de A1 se aumentan 4 puntos en cada manga por las lazadas y se aumentan 8 puntos para el raglan. En las vueltas 3 y 5 dcho del A1 se vuelven a aumentar 8 p para el raglan y en las siguientes v de A1 ya no se vuelve a aumentar para el raglan. A su vez, en las v 3 y 6 dcho del A1 se aumentan 2p en cada v para el escote. Pero esto hace un total de 106p (70+4+4+8+8+8+2+2). Dónde me estoy equivocando?
10.12.2022 - 12:39DROPS Design answered:
Hola Ángela, puedes ver la respuesta debajo.
19.12.2022 - 00:07
![]() ÁNGELA wrote:
ÁNGELA wrote:
En la talla S parto de 70 p y al acabar A1 (6 v dcho 6 v revés) tengo 104 p, es decir, 34 p de aumento. 4 corresponden al escote (2 en v 3° dcho y 2 en v 6° dcho). 30 corresponden al raglan, pero 30 no es múltiplo de 8, n° de p que se aumentan en cada v que hay aumentos de raglan. Es un error en 104 que debería ser 106?. Los primeros 8 p se aumentan en la primera v , pero y los 22 o 24 restantes cuándo se aumentan a lo largo de las 5 v de dcho que quedan de A1?
10.12.2022 - 11:36DROPS Design answered:
Hola Ángela, A.1 son solo 6 filas (3 de derecho y 3 de revés). En la 1ª fila (que se trabaja por el lado revés) se aumentan 8 + 8 pts = 16 pts (1 a cada lado del raglán y 4 en cada manga). En la 3ª fila y en la 5ª fila de A.1 aumentas 8 pts en cada una (no aumentas en cada manga). Por lo tanto, vas a tener 32 aumentos + los 2 aumentos para el escote en V en la 6ª fila de A.1 (que es la 3ª fila por el lado derecho). En total, tienes 34 aumentos y 104 pts.
19.12.2022 - 00:07
![]() Julie Starr wrote:
Julie Starr wrote:
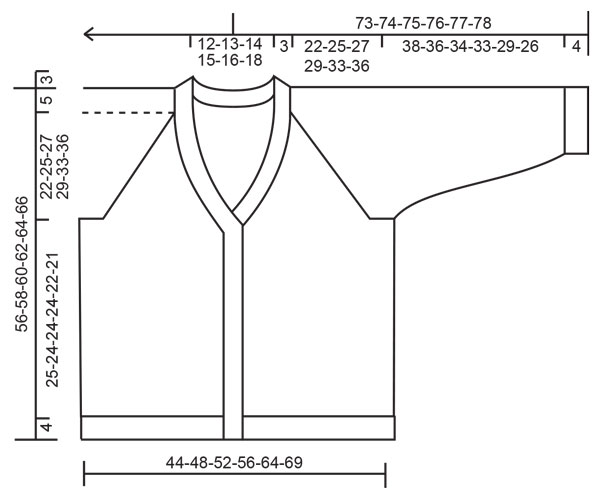
The math isn't working for DROPS 221-4 when it comes to placing markers. Size XXL requires a cast-on of 78 stitches. When placing first marker after 3rd cast-on, and follow the remaining marker-placement directions, I end up with 8 stitches at the end. Should the first marker be after 3rd cast on, or after the 4th (to allow for 1 edge stitch)? What should the spacing be for size XXL? Thank you.
08.12.2022 - 21:49DROPS Design answered:
Hi Julie, You count 3 stitches then insert the first marker in the 4th stitch, count 21 stitches and insert the marker in the 26th stitch, count 26 stitches and insert the marker in the 53rd stitch, count 21 stitches and insert the last marker in the 75th stitch, which leaves you with 3 stitches after the last marker. Happy knitting!
09.12.2022 - 06:58
![]() Vignon Nelly wrote:
Vignon Nelly wrote:
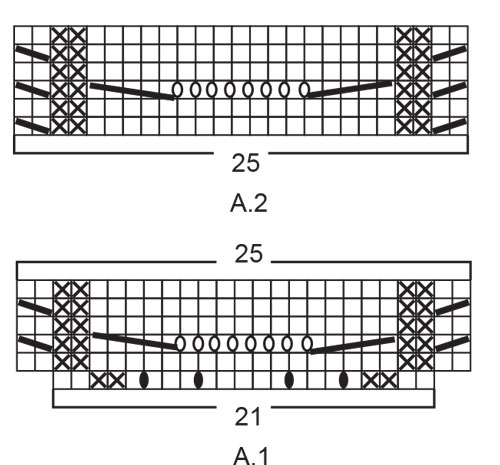
Bonjour, pour le dessin A1 ou A2, après avoir remis les 5 mailles tricotées à l’endroit sur l’aiguille gauche (tricoter 5 mailles ensemble a l’endroit ) je ne comprends pas comment on passe les mailles par dessus la dernière étant donné qu’elle se trouve à gauche puisque l’on a mis les mailles tricotées à gauche ? Merci pour votre aide
12.10.2022 - 06:44DROPS Design answered:
Bonjour Mme Vignon, cette vidéo montre comment procéder pour passer les 5 mailles une à une par-dessus la dernière (en commençant par la 2ème des mailles remises sur l'aiguille gauche). et (si besoin), cette autre vidéo montre comment tricoter 5 mailles ensemble mais cette fois torse à l'endroit. Bon tricot!
12.10.2022 - 09:18
![]() Jantine Lasonder wrote:
Jantine Lasonder wrote:
In dit stuk is een vertaalfout gemaakt!!! In het engels staat er dat je stopt met meerderen en verder breit tot een aantal cm is bereikt! In de Nederlandse vertaling staat dat je doorgaat met meerderen tot het aantal cm bereikt is! Wat een chaos...
15.09.2022 - 21:54
![]() Welada Albazzaz wrote:
Welada Albazzaz wrote:
I have counted my stitches after the 2 increases for the body (not the sleeves) i have 306 stitches.. does it mean that i have to increase only the v neck because i will increase 9 times* 2 sides which equals 18 stitches.. 306+18 = 324 sts the number of stitches that i have to finish with.. is that right? or i have mistaken somewhere ? thanks for your help
09.09.2022 - 16:51DROPS Design answered:
Dear Mrs Albazzaz, you cast on 74 sts, increase 8 sts in first row in A.1 + increase 27 times 8 sts for the raglan (216 sts) + 4 sts 2 times for the body only (= 8 sts) and increase for neck 2 sts 9 times (= 18 sts) = 74+8+216+8+18=324 sts. Hope it will help. Happy knitting!
12.09.2022 - 09:02
![]() Welada Albazzaz wrote:
Welada Albazzaz wrote:
It is still not clear.. i knitted two rows and in these rows i increased 4 stitches only for the back and front pieces.. now on the sixth row i increase 10 stitches and i will increase 10 stitches every sixth row for 6 times (size L) and after that i will increase 10 stitches every 4th row for 3 times and the rest of the rows i increase 8 stitches for back , front and sleeves
08.09.2022 - 21:05DROPS Design answered:
Dear Mrs Albalazz, you have to increase for the raglan and for the V-neck almost on the same time: on the first row from RS you have to increase 8 sts for the raglan (= 2 sts for each sleeve / back piece + 1 st on each front piece), and you will continue following diagrams (A.1 then repeat A.2 in height) and increasing for the raglan (= 8 sts on every RS row) a total of 2 7times in size L then increase only 2 times on the body (not on the sleeve), at the same time, when working the 3rd row from RS (you have increased 2 times for the raglan), you will also increase for the V-neck and repeat the increase for the V-neck on every 6th row then on every 4th row. Happy knitting!
09.09.2022 - 09:05
![]() Welada Albazzaz wrote:
Welada Albazzaz wrote:
Hi again.. i have reached the part where we increase for v neck.. at the same time which partsshould we also increase? Back and front only or sleeves too or none? Thanks
08.09.2022 - 08:35DROPS Design answered:
Dear Mrs Albazzaz, you will increase for the V-neck at the same time as you increase for the raglan, ie start on 3rd row from RS from the beg of yoke and increase for raglan as before for your size + start increasing for neck as explained (you will increase either 10 sts = raglan + V-neck or only 8 sts = only raglan). Happy knitting!
08.09.2022 - 09:26
![]() Welads Albazzaz wrote:
Welads Albazzaz wrote:
Hi.. i have finished sleeves increases.. now wehave to increase,for thr back and frond pieces only.. at thd same time on 6th rowwe increase fir vneck.. but the 6th row is a ws row .. how can we make an increase on a ws row?
07.09.2022 - 15:18DROPS Design answered:
Dear Mrs Albazzaz, all increases should be worked from RS, so that you will work 5 rows after last increase starting from WS and the next row will be a row from right side (= in other words you will increase on every 3rd row from RS). Happy knitting!
07.09.2022 - 15:54
![]() Quynh wrote:
Quynh wrote:
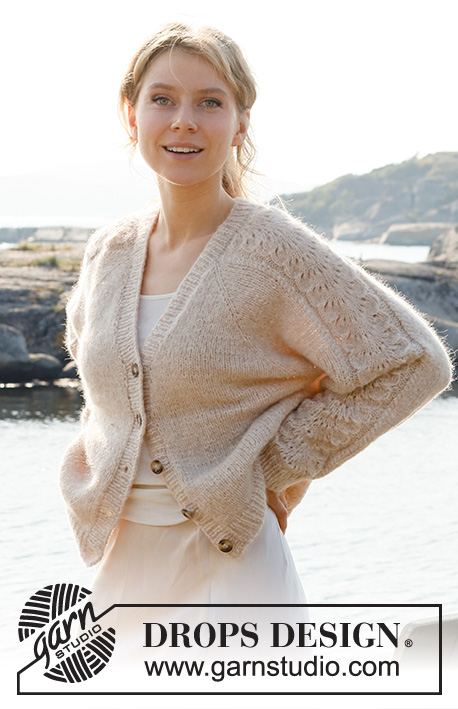
Can I ask which size the model wears in the photo? I plan to cast on a larger size with smaller needle, so I want to know how much positive ease i should opt for. Thank you
07.09.2022 - 06:42DROPS Design answered:
Hi, the model on the photo is wearing S or M size. How to choose the right size you will find in the DROPS lesson HERE. Happy knitting!
07.09.2022 - 08:15
|
|||||||||||||||||||||||||
Bronze Summer#bronzesummercardigan |
|||||||||||||||||||||||||
 |
 |
||||||||||||||||||||||||
Knitted jacket in DROPS Air. Piece is knitted top down with raglan, lace pattern and V-neck. Size: S - XXXL
DROPS 221-4 |
|||||||||||||||||||||||||
|
------------------------------------------------------- EXPLANATION FOR THE PATTERN: ------------------------------------------------------- GARTER STITCH (back and forth): Knit all rows. 1 ridge vertically = knit 2 rows. PATTERN: See diagrams A.1 and A.2. RAGLAN: Increase 1 stitch on each side of 1 stitch in stocking stitch (stitch with marker thread) in every transition between body and sleeves (= 8 stitches increased on row). Increase 1 stitch by making 1 yarn over. On next row purl yarn overs twisted to avoid holes. Then work the new stitches in stocking stitch. V-NECK: All increases are done from the right side. Make 1 yarn over inside 1 edge stitch in garter stitch (= 1 stitch increased) in each side. On next row (wrong side) purl yarn over twisted to avoid holes. Then work the new stitches in stocking stitch. Increase 2 stitches in total on every increase row (1 stitch in each side). DECREASE TIP (applies to sleeves): Decrease 1 stitch on each side of marker thread as follows: Work until 3 stitches remain before marker thread and knit 2 together, knit 2 (marker thread is between these stitches), slip 1 stitch knitwise, knit 1, pass slipped stitch over stitch worked. CAST-OFF TIP: To avoid a tight cast-off edge you may use a larger needle size. If this also is too tight, work a 1 yarn over after approx. every 4th stitch while casting off (cast off yarn overs as regular stitches). BUTTONHOLES (applies to right band when garment is worn): Decrease for 5 buttonholes on right band. 1 buttonhole = work 2 stitches together and make 1 yarn over. On next row knit yarn over to make holes. Bottom buttonhole should be approx. 2 cm from bottom edge and top buttonhole where V-neck begins. Place the remaining 3 buttonholes evenly, approx. 8-8-8-7½-7½-7½ cm between each buttonhole. ------------------------------------------------------- START THE PIECE HERE: ------------------------------------------------------- JACKET - SHORT OVERVIEW OF THE PIECE: Work yoke back and forth on circular needle from mid front, work top down. AT THE SAME TIME increase V-neck and raglan. Now divide yoke for body and sleeves. Work body back and forth on circular needle, top down. Work sleeves in the round on double pointed needles/short circular needle, top down. At the end work a neck edge/band around the opening on jacket. YOKE: Cast on 70-72-74-76-78-80 stitches (including 1 edge stitch in each side towards mid front) on circular needle size 5 mm with Air. Purl 1 row from wrong side. OVERVIEW OF THE NEXT SECTION: Now start the pattern on the sleeves, at the same time increase for raglan and V-neck – therefore read the entire next section before starting. Insert 4 marker threads in piece as follows (without working the stitches): Count 3 stitches (= front piece), insert 1 marker thread in next stitch, count 21 stitches (= sleeve), insert 1 marker thread in next stitch, count 18-20-22-24-26-28 stitches (= back piece), insert 1 marker thread in next stitch, count 21 stitches (= sleeve), insert 1 marker thread in next stitch, 3 stitches remain on row after last marker thread (= front piece). Then work in stocking stitch on stitches on front pieces and on back piece, and A.1 (= 21 stitches) over stitches on each sleeve, AT THE SAME TIME on first row from right side increase for RAGLAN in every transition between body and sleeves – read explanation above. When A.1 has been worked 1 time vertically continue with A.2 (= 25 stitches) over stitches in A.1 and continue increase for raglan every other row (i.e. on every row from right side) until increase has been done 22-25-27-29-33-36 times in total on each side of the 4 stitches with marker threads. Now continue increase on back piece and on front pieces 2 more times (do not increase on sleeves, increase has been done 24-27-29-31-35-38 times on back piece/front pieces). AT THE SAME TIME on 6th row (i.e. on 3rd row from right side) increase for V-NECK in each side towards mid front – read explanation above, as follows: Increase every 6th row 4-5-6-7-8-9 times, every 4th row 3 times in total (= 7-8-9-10-11-12 stitches in total increased in each side towards mid front). REMEMBER THE KNITTING TENSION! After last increase for raglan continue without increases until piece measures 22-25-27-29-33-36 cm, increases for V-neck should now be finished. There are now 276-304-324-344-380-408 stitches on needle. Work next row as follows: Work the first 35-39-42-45-50-54 stitches (= front piece), slip the next 69-75-79-83-91-97 stitches on a stitch holder for sleeve, cast on 6-6-6-8-10-12 new stitches on row (= in the side under sleeve), work the next 68-76-82-88-98-106 stitches (= back piece), slip the next 69-75-79-83-91-97 stitches on a stitch holder for sleeve, cast on 6-6-6-8-10-12 new stitches on needle (= in the side under sleeve), and work the remaining 35-39-42-45-50-54 stitches (= front piece). NOW MEASURE PIECE FROM HERE! BODY: = 150-166-178-194-218-238 stitches. Continue with stocking stitch and 1 edge stitch in garter stitch in each side. When piece measures 25-24-24-24-22-21 cm from division, knit 1 row from right side while increasing 1 stitch = 151-167-179-195-219-239 stitches. Switch to circular needle size 4 mm. Work next row as follows from wrong side: 1 edge stitch in garter stitch, * purl 1, knit 1 *, repeat from *-* until 2 stitches remain on needle, purl 1 and finish with 1 edge stitch in garter stitch. Continue rib like this for 4 cm. Loosely cast off with knit over knit and purl over purl, read CAST-OFF TIP. Jacket measures approx. 56-58-60-62-64-66 cm from shoulder. SLEEVE: Slip the 69-75-79-83-91-97 stitches from stitch holder in one side of piece on a short circular needle/double pointed needles size 5 mm and pick in addition up 1 stitch in each of the 6-6-6-8-10-12 stitches cast on in the side under sleeve = 75-81-85-91-101-109 stitches. Insert 1 marker thread in the middle of the 6-6-6-8-10-12 stitches under sleeve and move the marker thread upwards when working, it is used for decrease later. Begin round at the marker thread and continue with A.2 and stocking stitch in the round. When piece measures 3 cm from division, decrease 2 stitches mid under sleeve - read DECREASE TIP. Decrease like this every 3½-3-2-1½-1-1 cm 10-11-13-16-19-21 times in total = 55-59-59-59-63-67 stitches. Continue until piece measures 38-36-34-33-29-26 cm from division - or desired length (shorter measurements in the larger sizes because of longer yoke). Work 1 round while decreasing 11 stitches evenly over stitches in A.2 = 44-48-48-48-52-56 stitches. Switch to double pointed needles size 4 mm and work rib in the round = knit 1/purl 1 for 4 cm. Loosely cast off with knit over knit and purl over purl – remember CAST-OFF TIP. Work the other sleeve the same way. BAND + NECK EDGE: Insert 1 marker mid back of neck on back piece, marker should be used to calculate half the stitches on band/neck edge. Pick up band inside 1 edge stitch in garter stitch on front pieces, and in the 1st row worked around the neck. Begin at the bottom on right front piece from right side and pick up approx. 119-125-131-137-143-149 stitches along the entire front edge up to marker in the neck, on circular needle size 4 mm – leave the marker here. Continue to pick up approx. 120-126-132-138-144-150 stitches along the entire front edge on left front piece, total number of stitches should be divisible by 2 + 1 = approx. 239-251-263-275-287-299 stitches. It is important that the rib is not too loose with too many stitches but it should not be too tight either with tight front edges. Work next row as follows from wrong side: 2 stitches in garter stitch, * purl 1, knit 1 *, repeat from *-* until 3 stitches remain, purl 1 and finish with 2 stitches in garter stitch. Continue rib like this. When piece measures 1 ½ cm decrease for BUTTONHOLES on right band - read explanation above. Continue like this until rib measures 3 cm. Loosely cast off with knit over knit and purl over purl, remember cast-off tip. ASSEMBLY Sew the buttons on to the left band. |
|||||||||||||||||||||||||
Diagram explanations |
|||||||||||||||||||||||||
|
|||||||||||||||||||||||||
 |
|||||||||||||||||||||||||
 |
|||||||||||||||||||||||||
Have you finished this pattern?Tag your pictures with #dropspattern #bronzesummercardigan or submit them to the #dropsfan gallery. Do you need help with this pattern?You'll find 32 tutorial videos, a Comments/Questions area and more by visiting the pattern on garnstudio.com. © 1982-2025 DROPS Design A/S. We reserve all rights. This document, including all its sub-sections, has copyrights. Read more about what you can do with our patterns at the bottom of each pattern on our site. |
|||||||||||||||||||||||||


With over 40 years in knitting and crochet design, DROPS Design offers one of the most extensive collections of free patterns on the internet - translated to 17 languages. As of today we count 320 catalogues and 12093 patterns translated into English (UK/cm). 12093
We work hard to bring you the best knitting and crochet have to offer, inspiration and advice as well as great quality yarns at incredible prices! Would you like to use our patterns for other than personal use? You can read what you are allowed to do in the Copyright text at the bottom of all our patterns. Happy crafting!
Post a comment to pattern DROPS 221-4
We would love to hear what you have to say about this pattern!
If you want to leave a question, please make sure you select the correct category in the form below, to speed up the answering process. Required fields are marked *.