
Looking for a yarn?


Comments / Questions (36)
![]() Malene wrote:
Malene wrote:
Hej hvordan finder jeg ud af hvilken størrelse jeg skal have? Hvad for nogle mål skal man bruge? kan ikke finde måleskitsen.
02.04.2025 - 16:53DROPS Design answered:
Hei Malene. Du finner mål øverst i oppskriften. Pannebånd: One-size. Passer til hodemål: 54/56 cm – eller til ønsket lengde. Hals: Lengde: ca 32-34 cm målt fra etter vrangborden i halsen. Bredde skulder: ca 34 - 39 cm. mvh DROPS Design
07.04.2025 - 10:57
![]() Eva L wrote:
Eva L wrote:
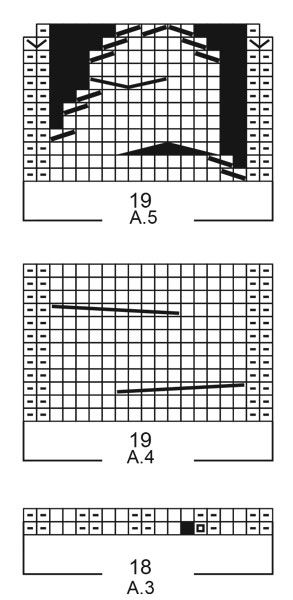
I diagrammet A1 finns fyllda rutor. Det står att detta är ingen maska. Men maskan är ju där. Ska jag lyfta den eller ska den stickad ihop med nästa? Förstår inte.
15.01.2025 - 17:43DROPS Design answered:
Hej Eva. På varvet under den symbolen så minskade du en maska så där det tidigare var 3 maskor är det nu bara 2 maskor så du går bara direkt till nästa ruta i diagrammet. Mvh DROPS Design
16.01.2025 - 14:29
![]() Bona Evs wrote:
Bona Evs wrote:
Mit jelent az hogy nincs szem? A fekete négyzet esetében? Nem értem hovà tünik az a szem ami az elözö sorbsn ott volt.\r\nKöszönöm Éva
16.12.2024 - 18:08DROPS Design answered:
Kedves Bona Evs, nincs szem, mert az előző sorban fogyasztás volt, és az adott sorban kevesebb szemünk marad. Sikeres kézimunkázást!
14.01.2025 - 16:22
![]() Paulina wrote:
Paulina wrote:
Robię rękawiczkę lewą, małą. Mam 4 oczek za dużo, gdzie popełniłam błąd? W trzecim akapicie mam 40 oczek = 23 oczek wierzchu dłoni, które redukuję o 14 oczek (bo schemat A5 z 19 oczek maleje do 5 oczek) + 17 oczek wnętrza dłoni, które redukuję o 10 oczek bo zamykam 5 razy (co drugie okrążenie) po 2 oczka. Czyli w sumie redukuję 24 oczka, więc zostaje mi 16 oczek, a powinno być (zgodnie z opisem 12 oczek). Co przegapiłam?
06.10.2024 - 11:12DROPS Design answered:
Witaj Paulino, 17 oczek wnętrza dłoni redukujesz o 14 oczek bo zamykasz 5 razy 2 oczka co 2 okrążenia i 2 razy 2 oczka w każdym okrążeniu. W ten sposób zostaje 12 oczek w okrążeniu. Pozdrawiamy!
07.10.2024 - 08:48
![]() Graham Hammill wrote:
Graham Hammill wrote:
Hello! I love these patterns; I’ve knitted quite a few. What does it mean in the mitten pattern to decrease [like this] every other round 5 and every round 2 times when working pattern A4?
08.08.2024 - 01:27DROPS Design answered:
Hi Graham, You decrease every 2nd round x 5 to begin with (10 rounds worked), then decrease every round x 2 (2 rounds worked). Hope this helps and happy knitting!
08.08.2024 - 08:37
![]() Linnea wrote:
Linnea wrote:
Hej. Jag gör halsvärmaren och förstår inte steget med kantmaskor ”Sticka slätstickning fram och tillbaka med 2 kantmaskor RÄTSTICKNING - läs förklaring ovan, i varje sida.” hur vill ni att man gör kantmaskorna här? Räta på rätsidan och aviga på avigsidan? Hur skiljer sig detta mot övriga maskor i varvet?
30.07.2024 - 13:41DROPS Design answered:
Hej Linnea,, de 2 kantmasker strikkes i rätstickning (rät både på rätsidan och avigsidan) :)
02.08.2024 - 10:51
![]() Anette Wingefors wrote:
Anette Wingefors wrote:
Hej. Jag funderar på detta mönster och vill använda befintligt garn som jag har hemma och där man ska använda stickor 6 mm. Kan jag göra och hurr mycket garn kommr det att gå åt?
15.01.2024 - 18:04DROPS Design answered:
Hej Anette, det kan vi ikke svare på. Vi bruger DROPS Alaska hvor der er 70 m / 50 gram - så kan du prøve at regne det ud med det du har...
16.01.2024 - 14:32
![]() Eva wrote:
Eva wrote:
På oppskriften på hals hadde det vært fint om "strikk 2 vrang, (2 rett / 2 vrang) over de neste 24-28 maskene" ble endret til " strikk 2 vrang, deretter (2 rett / 2 vrang) over de neste 24-28 maskene" og tilsvarende på den neste med samme tilfelle.
04.01.2024 - 20:59
![]() Susanne Persson wrote:
Susanne Persson wrote:
Stickar vanten och har stickat klart på höjden. Det står att jag ska minska på undersidan vartannat varv fem gånger och varje varv två gånger men det stämmer inte med diagrammet. Det står att minska efter markören det är innan aviga maskor… ???
12.12.2023 - 20:58DROPS Design answered:
Hej Susanne, du skal både tage ind ifølge diagrammet og indenfor mærkerne, i de glatstrikkede masker indeni hånden :)
13.12.2023 - 14:50
![]() Sharon Hunt wrote:
Sharon Hunt wrote:
Hi I see there are a few knitters having the same problem am having with the neckwarmer am making the large size. Is the pattern worked back and forth the joined an work in the round? At last sett of instruction says to: A.2 over the next 12 stitches (= shoulder stitches), insert 4th marker here, purl 2, (knit 2/purl 2) over the last 12-12 stitches. But I only have 12 sts to work sit here. How do I correct this? S
25.06.2023 - 11:16DROPS Design answered:
Dear Sharon, when starting the neck warmer, you have 84 stitches. Work rib over the first 16 stitches, insert marker between the stitches, A.2 over 12 stitches , insert marker between the stitches, purl 2 , work rib over 28 stitches, insert marker between the stitches, work A.2 over the next 12 stitches, insert marker between the stitches, purl 2, work rib over the last 12 stitches. 16+12+2+28+12+2+12 = 84 stitches. Happy knitting!
25.06.2023 - 14:29
|
||||||||||||||||||||||||||||||||||||||||
Winter Wisps Set#winterwispsset |
||||||||||||||||||||||||||||||||||||||||
 |
 |
|||||||||||||||||||||||||||||||||||||||
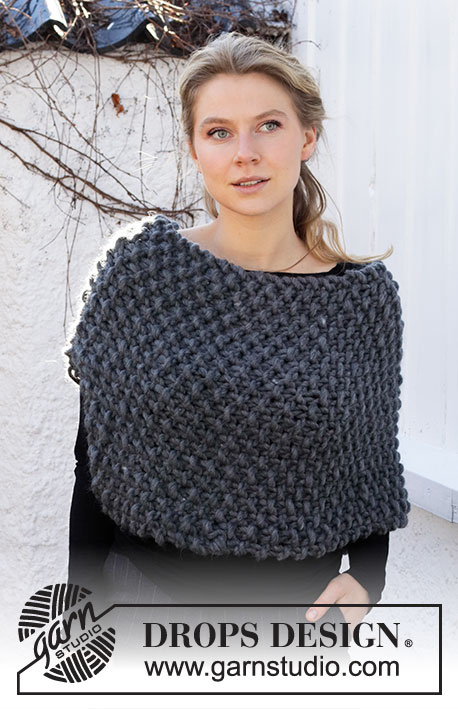
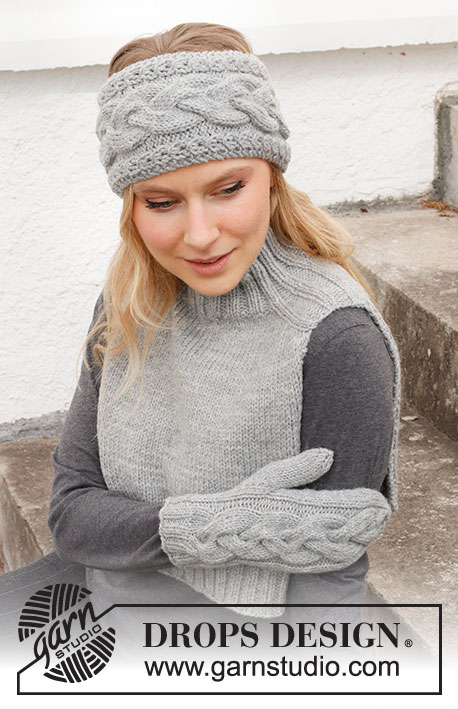
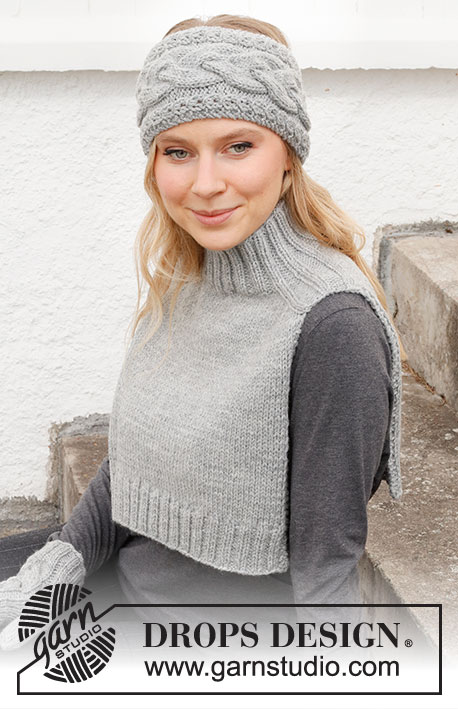
Knitted head band, neck warmer and mittens in DROPS Alaska. Piece is worked with cables and increase for saddle shoulders.
DROPS 214-49 |
||||||||||||||||||||||||||||||||||||||||
|
------------------------------------------------------- EXPLANATION FOR THE PATTERN: ------------------------------------------------------- GARTER STITCH (back and forth): Knit all rows. 1 ridge vertically = knit 2 rows. PATTERN: Head band: See diagram A.1. Neck warmer: See diagram A.2. Mittens: See diagrams A.3, A.4 and A.5. Diagrams show all rows in pattern seen from the right side. INCREASE TIP-1 (applies to neck warmer): BEFORE MARKER: The new stitch will be twisted, leaning towards the right. Use left needle to pick up strand between 2 stitches from the round below, pick up strand from behind and knit stitch in front loop. AFTER MARKER: The new stitch will be twisted, leaning towards the left. Use left needle to pick up strand between 2 stitches from the round below, pick up strand from the front and knit stitch in back loop. INCREASE TIP-2 (evenly): To calculate how to increase evenly, use the total number of stitches on row (e.g. 54 stitches), and minus stitches in garter stitch in each side (e.g. 4 stitches) and divide stitches by number of increases to be done (e.g. 12) = 4.1. In this example increase by making 1 yarn over after approx. every 4th stitch. On next row work yarn overs twisted to avoid holes. INCREASE TIP-3 (applies to mittens): Increase 1 stitch by making 1 yarn over. On next round knit yarn over twisted to avoid holes. DECREASE TIP: Decrease in stockinette stitch section on the under side of mitten as follows: Decrease as follows after marker: Slip 1 stitch knitwise, knit 1, pass slipped stitch over (= 1 stitch decreased), work until 2 stitches remain before next marker, knit 2 together (= 1 stitch decreased). ------------------------------------------------------- START THE PIECE HERE: ------------------------------------------------------- HEAD BAND - SHORT OVERVIEW OF THE PIECE: Work piece back and forth on circular needle and sew together when finished. HEAD BAND: Cast on 31 stitches on circular needle size 4.5 mm = US 7 with Alaska. Purl 1 row from wrong side. Then work pattern from right side as follows: 2 edge stitches in GARTER STITCH - see explanation above, A.1 over the next 27 stitches, 2 edge stitches in garter stitch. Continue back and forth like this. REMEMBER THE KNITTING GAUGE! Continue like this until piece measures 49 cm = 19¼", or desired length - adjust to finish after or 4th or 10th row in A.1. Bind off. Sew together head band inside cast-on and bind-off edge. ------------------------------------------------------- NECK WARMER - SHORT SUMMARY OF PIECE: Worked top down. First work in the round until increase for shoulder is done. Then finish front piece and back piece separately. NECK WARMER: Cast on 76-84 stitches on a short circular needle size 4.5 mm = US 7 with Alaska. Knit 1 round. Then work rib as follows: (Knit 2/purl 2) over the first 12-16 stitches, insert 1st marker here, work A.2 over the next 12 stitches (= shoulder stitches), insert 2nd marker here, purl 2, (knit 2/purl 2) over the next 24-28 stitches, insert 3rd marker here, work A.2 over the next 12 stitches (= shoulder stitches), insert 4th marker here, purl 2, (knit 2/purl 2) over the last 12-12 stitches. Continue in the round like this for 8 cm = 3⅛". Switch to circular needle size 5.5 mm = US 9. Insert a marker at beginning of round. Now measure piece from here. Now work pattern as follows: SADDLE SHOULDER INCREASE: Continue with A.2 over shoulder stitches in each side and work in stockinette stitch over the remaining stitches on round, at the same time on first round increase 4 stitches: Increase BEFORE 1st and 3rd marker, and AFTER 2nd and 4th marker- read INCREASE TIP-1. There are only increases on back piece and front piece and number of shoulder stitches remains the same. Increase like this on every round 14-16 times in total = 132-148 stitches. REMEMBER THE KNITTING GAUGE! Work next round as follows: Knit until shoulder stitches, bind off with knit over knit and purl over purl over the 12 shoulder stitches, knit over the next 54-62 stitches before slipping them on a stitch holder for front piece, bind off the next 12 shoulder stitches, knit over all the 54-62 stitches on back piece. BACK PIECE: Work in stockinette stitch back and forth with 2 edge stitches in GARTER STITCH - read explanation above, in each side. When neck warmer measures 27-29 cm = 10⅝"-11⅜" from marker inserted after the neck, increase 12-16 stitches evenly - read INCREASE TIP-2 = 66-78 stitches. Switch to circular needle size 4.5 mm = US 7. Now work rib from right side as follows: 2 stitches in garter stitch, (knit 2/purl 2) until 4 stitches remain, knit 2, 2 stitches in garter stitch. Continue rib like this for 5 cm = 2". Bind off with knit over knit and purl over purl (bind off stitches in garter stitch by knitting). Neck warmer measures approx. 32-34 cm = 12½"-13⅜" from marker. FRONT PIECE: Slip stitches from stitch holder back on circular needle 5.5 = US 9 and work as back piece. ------------------------------------------------------- MITTENS - SHORT OVERVIEW OF THE PIECE: Worked in the round on double pointed needles. LEFT MITTEN: Cast on 40-44 stitches on double pointed needles size 3.5 mm = US 4 with Alaska. Knit 1 round. Work rib (knit 2/purl 2) in the round for 4 cm = 1½". Work next round as follows: Knit 0-3 stitches. Insert a marker here. This is beginning of round. Work next round as follows: Knit 2-3, work A.3 over the next 18 stitches (= 1 stitch increased), knit 2-3, knit 2 together (= 1 stitch decreased), knit the last 16-18 stitches = 40-44 stitches. Work 1 round with knit over knit and A.3 over A.3. Work 1 more round the same way. Switch to double pointed needles size 4 mm = US 6. Then work pattern as follows: Knit 2-3, A.4 over A.3, knit the next 19-22 stitches on round. REMEMBER THE KNITTING GAUGE! When piece measures 8-8 cm = 3⅛"-3⅛", increase 1 stitch on each side of last stitch on round for thumb (= 2 stitches increased) - read INCREASE TIP-3. Increase like this on outside of the increased stitches every other round 5-6 times in total = 50-56 stitches. Now slip the 11-13 thumb stitches on 1 stitch holder. Work pattern in the round as before in the round on mitten and cast on 1 new stitch behind thumb on next round = 40-44 stitches. Continue like this until A.4 has been worked 4 times vertically. Mitten now measures approx. 23 cm = 9" from cast-on edge. Insert 1 marker at beginning of round and 1 marker after 23-25 stitches (= 23-25 stitches on top of mitten and 17-19 stitches on the under side of mitten). Now work A.5 over A.4, AT THE SAME TIME on next round decrease on the under side of mitten - read DECREASE TIP. Decrease like this every other round 5 and every round 2 times. When diagram has been worked vertically, there are 12-16 stitches on round. Work 1 round where all stitches are knitted together 2 by 2 = 6-8 stitches. Cut the yarn and pull it through the remaining stitches, tighten together and fasten. THUMB: Slip the 11-13 thumb stitches back on double pointed needles size 4 mm = US 6. Pick in addition up 4 stitches behind thumb = 15-17 stitches. Work in stockinette stitch until the thumb itself measures approx. 5-5½ cm = 2"-2⅛" (try on the mitten, approx. ½ cm = ⅛" remains until finished measurements). Knit 2 rounds AT THE SAME TIME knit all stitches together 2 by 2 on both rounds. Cut the yarn and pull it through the remaining stitches, tighten together and fasten. RIGHT MITTEN: Cast on and work as left mitten but increase for thumb on each side of the 24th-26th stitch (= 3rd-4th stitch with stockinette stitch after A.4). |
||||||||||||||||||||||||||||||||||||||||
Diagram explanations |
||||||||||||||||||||||||||||||||||||||||
|
||||||||||||||||||||||||||||||||||||||||

|
||||||||||||||||||||||||||||||||||||||||
|
||||||||||||||||||||||||||||||||||||||||
Have you finished this pattern?Tag your pictures with #dropspattern #winterwispsset or submit them to the #dropsfan gallery. Do you need help with this pattern?You'll find 33 tutorial videos, a Comments/Questions area and more by visiting the pattern on garnstudio.com. © 1982-2025 DROPS Design A/S. We reserve all rights. This document, including all its sub-sections, has copyrights. Read more about what you can do with our patterns at the bottom of each pattern on our site. |
||||||||||||||||||||||||||||||||||||||||


With over 40 years in knitting and crochet design, DROPS Design offers one of the most extensive collections of free patterns on the internet - translated to 17 languages. As of today we count 314 catalogs and 11822 patterns - 11812 of which are translated into English (US/in).
We work hard to bring you the best knitting and crochet have to offer, inspiration and advice as well as great quality yarns at incredible prices! Would you like to use our patterns for other than personal use? You can read what you are allowed to do in the Copyright text at the bottom of all our patterns. Happy crafting!
Post a comment to pattern DROPS 214-49
We would love to hear what you have to say about this pattern!
If you want to leave a question, please make sure you select the correct category in the form below, to speed up the answering process. Required fields are marked *.