
Looking for a yarn?


Comments / Questions (74)
![]() Anja wrote:
Anja wrote:
Anders gefragt: Man soll die Zunahmen abwechselnd als rechte und als kraus rechte Maschen stricken. Aber ein Umschlag ist ja weder rechts noch links. Was stricke ich also in der Reihe nach der Zunahme: Alle alten Maschen stricke ich rechts und die Umschläge die 1. rechts, die 2. links u.sw.? Und dann habe ich in der nächsten Reihe mal 2 linke bzw. 2 rechte M nebeneinander? Ein Diagramm nur für die ersten 3 Marker wäre hilfreich.
04.05.2025 - 12:21DROPS Design answered:
Liebe Anja, die Maschenanzah vor 1. Mark. + zwischen 2./3. + 4./5. + 6./7. + nach 8. Mark. soll nicht ändern/ zunehmen; so stricken Sie die neuen Maschen je nach der nächsten/vorigen Masche nach den 1. / 3. / 5. / 7. Mark und vor den 2. / 4. / 6. und 8. Mark. Die 1. Zunahme wird eine krausrechte Masche sein (da die 1. und letzte Masche zwischen diese Markierungen eine glatt rechte Masche ist), und die 2. Zunahme ist dann eine glatt rechte Masche. So wird sich das Muster zwischen diesen Markierungen erweitern. Viel Spaß beim Stricken!
05.05.2025 - 07:59
![]() Anja wrote:
Anja wrote:
Immer noch Probleme mit dem Muster in der Passe. Ich beginne mit 1 M re, 1 li, Zunahmen mittels Umschlag wie beschrieben. Dann stricke ich eine Runde rechts, also alle Umschläge rechts,damit es abwechselnd eine krausrechte und rechte Masche gibt. Dann die zweite Zunahmerunde: wieder 1Mre 1M li. Bleibt der Marker immer in derselben Masche, also der 1. Marker, wo in der ersten Reihe die 9. Masche war, 2. Markierer, dort wo in der 1. Reihe die 15.M war? Oder werden die Marker neu verteilt?
03.05.2025 - 16:50
![]() Isabelle DUFRAISSE wrote:
Isabelle DUFRAISSE wrote:
Bonjour Après avoir fait les 19 augmentations , j'ai 270 m pour la raille L , ce qui trop.. Q uelle est mon erreur ?
29.04.2025 - 15:43DROPS Design answered:
Bonjour Mme Dufraisse, on doit augmenter 8 mailles à chaque fois: 19 fois tous les 2 tours + 1 fois tous les 4 tours + 1 fois tous les 6 tours soit 88 +(19x8)+8+8=256 mailles. Vous avez probablement augmenté plus de 8 mailles à chacune de ces 19 fois. Bon tricot!
29.04.2025 - 16:41
![]() Anja wrote:
Anja wrote:
Noch eine Frage zu der Passe: Wie strickt man das Muster weiter nach den Zunahmen, also beim Abstricken der Umschläge in der Reihe danach? Auch einfach weiter 1 rechts, 1 links, obwohl sich dann das Muster im Vergleich zur letzten Reihe vor der Zunahme verschiebt?
24.04.2025 - 17:28DROPS Design answered:
Liebe Anja, das Muster soll sich nicht verschieben wo die Maschenanzahl zunimmt, die neuen Maschen werden im Muster gestrickt, so sollte die Masche vor / nach der Zunahme eine Glattrechts Masche sein, dann wird die Zunahme krausrechts gestrickt und verkehrt, sollte die Masche vor / nach der Zunahme eine krausrechts Masche sein, dann wird die Zunahmen glatt rechts gestrickt. Viel Spaß beim Stricken!
25.04.2025 - 07:28
![]() Anja wrote:
Anja wrote:
Auch ich kämpfe mit dem Strukturmuster. Bei einer Antwort heisst es dazu: die Streifen werden im Rippenmuster (= 1 Masche rechts, 1 Masche Krausrechts) gestrickt, dh die Masche rechts wird immer rechts gestrickt und die Masche krausrechts wird abwechlunsweise rechts und links gestrickt. Das bedeutet dann in der Praxis beim Rundstricken, dass man eine Reihe rechte und linke Maschen abwechselnd strickt und dann in der Rückreihe alles rechts, oder nicht?
24.04.2025 - 17:26
![]() Christine Weir wrote:
Christine Weir wrote:
Hi .......Im not sure how the textured part is to be knitted as there are increases \r\nit says k1 work one in garter st....so its in rib ?
14.04.2025 - 21:55DROPS Design answered:
Dear Christine, it's a type of rib: in the first round you will work 2 knit stitches, while in the next round knit 1 over the previous knit 1 and purl 1 in the garter stitch stitch. So it will look like a rib but it's actually a small ridge, not a real rib pattern. Happy knitting!
19.04.2025 - 18:37
![]() Karin Wigert wrote:
Karin Wigert wrote:
Jag tycker det här är helt obegripligt. När jag har lagt upp o stickat de två första varven - vad gör jag då?? Jag förstår verkligen inte det här mönstret!
05.07.2024 - 22:30DROPS Design answered:
Hei Karin. Ta en titt på hjelpevideoen til denne genseren. Klikk på VIDEOR til høyre eller under bildet og velg videoen: Hur man stickar början på en tröja . mvh DROPS Design
08.07.2024 - 14:05
![]() Carina Rijnhart wrote:
Carina Rijnhart wrote:
Brei 14cm in ecru. En dan? Strepen breien? Want er moet ook voor maat L 19 keer gemeerderd worden. En dan nog iets met 4 en 6. Ik heb nu 14 keer gemeerderd. Heb 200 steken en het werk meet 14 cm. Wat is nu de bedoeling? Ga ik door tot 19 keer ? Nog 10 toeren. Ik vind het zo verwarrend. Wat doe ik fout??
19.06.2024 - 17:32DROPS Design answered:
Dag Carina,
In de beschrijving van de pas staat op een gegeven moment 'brei STREPEN'. Hier brei je wat bovenaan bij de paragraaf STREPEN staat onder 'Instructies voor het patroon'.
02.07.2024 - 22:15
![]() Jan wrote:
Jan wrote:
I do not understand the textured pattern instructions. Does "textured pattern as follows: * Knit 1, work 1 stitch in GARTER STITCH – read description above *, work from *-* to end of round." This seems to mean "*K1, P1* across the round, but "knit one round, purl one round (not 'stitch'" makes more sense and achieves a garter ridge. Or ? And do the CC rounds alternate, i.e. *P1,K1*
07.04.2024 - 00:25DROPS Design answered:
Dear Jan, for the textured patternn every odd rows (1st, 3d, 5th, etc), you knit every stitch. For even numbered rows (2nd, 4th, etc), you - knit one, purl 1. * I hope this helps. Happy Knitting.
07.04.2024 - 01:36
![]() Amelia wrote:
Amelia wrote:
Muchas gracias por el patrón! A qué distancia del escote empiezo a tejer las rayas?
25.03.2023 - 20:51DROPS Design answered:
Hola Amelia, nosotros no indicamos los cm inicialmente, ya que estos pueden variar según la tensión a la que trabajes y por el punto elástico. Trabajas 4 vueltas del escote, seguido de 13 o 14 cm (según la talla) en blanco hueso (como se ve en el apartado RAYA 1) en el canesú. A partir de aquí, comienzas con la primera raya en lima.
26.03.2023 - 22:16
|
|
Breaking Sunlight#breakingsunlightsweater |
|
 |
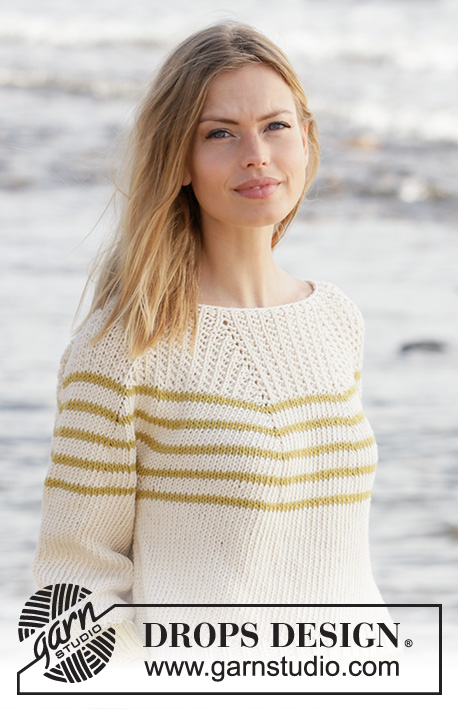 |
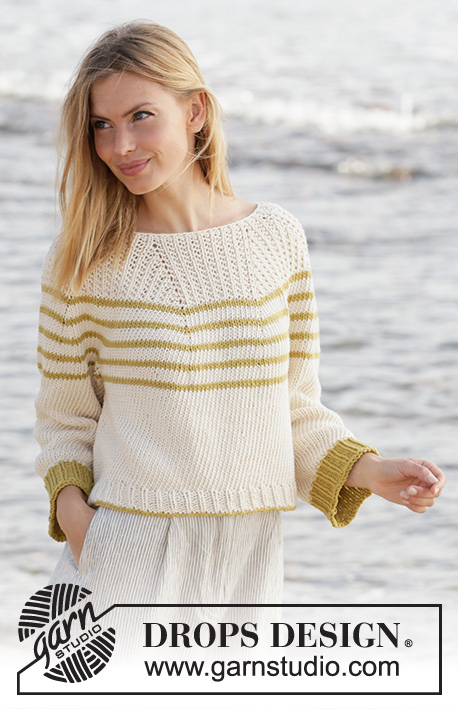
Knitted sweater with round yoke in DROPS Paris. The piece is worked top down with stripes and textured pattern. Sizes S - XXXL.
DROPS 213-36 |
|
|
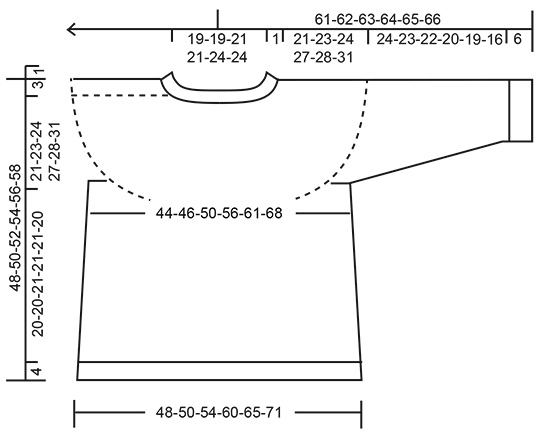
------------------------------------------------------- EXPLANATIONS FOR THE PATTERN: ------------------------------------------------------- RIDGE/GARTER STITCH (worked in the round): 1 ridge in height = 2 rounds; Knit 1 round and purl 1 round. INCREASE TIP-1 (for yoke): Increase with 1 yarn over after markers 1, 3, 5 and 7. Increase with 1 yarn over before markers 2, 4, 6 and 8. The yarn overs are worked twisted on the next round to avoid holes. The increase stitches are worked into the textured pattern as you go, i.e. increase-1 is worked in garter stitch, increase-2 is worked in stockinette stitch etc. When the textured pattern is finished, work the increased stitches in stockinette stitch. INCREASE TIP-2 (for sides of body): Work until there are 2 stitches left before the marker thread, make 1 yarn over, knit 4 (marker thread sits between these 4 stitches) make 1 yarn over (= 2 stitches increased at each marker thread; 4 stitches increased on round). On the next round work the yarn overs twisted to avoid holes. Then work the new stitches in stockinette stitch. STRIPES: STRIPE 1: Work 13-13-14-14-14-14 cm = 5⅛"-5⅛"-5½"-5½"-5½"-5½" with off-white and work textured pattern as follows: * Knit 1, work 1 stitch in GARTER STITCH – read description above *, work from *-* to end of round. STRIPE 2: Work stockinette stitch and stripes as follows: Work * 2 rounds with lime, 4 rounds with off white *, work from *-* for 15-15-15-16-16-16 cm = 6"-6"-6"-6¼"-6¼"-6¼", adjust so you finish after a complete stripe (applies to the stripe with lime). STRIPE 3: Finish the piece with off-white and stockinette stitch. DECREASE TIP (for sleeves): Decrease 1 stitch on each side of the marker thread as follows: Work until there are 3 stitches left before the marker thread, knit 2 together, knit 2 (marker thread sits between these 2 stitches), slip 1 stitch as if to knit, knit 1 and pass the slipped stitch over the knitted stitch. BINDING-OFF TIP: To avoid the bind-off edge being tight you can bind off with a larger size needle. If the edge is still tight, make 1 yarn over after approx. each 4th stitch at the same time as binding off and the yarn overs are bind off as normal stitches. ------------------------------------------------------- START THE PIECE HERE: ------------------------------------------------------- SWEATER – SHORT OVERVIEW OF THE PIECE: The neck and yoke are worked in the round with circular needle, from mid back and top down. The yoke is divided for body and sleeves and the body is continued in the round with circular needle. The sleeves are worked with double pointed needles, top down. NECK: Cast on 80-80-88-88-96-96 stitches with circular needle size 4.5 mm = US 7 and off-white. Knit 1 round. The next round is worked as follows: * Knit 1, purl 1 *, work from *-* to end of round. Work 2 rounds like this and then change to circular needle size 5.5 mm = US 9. Insert 1 marker at the beginning of the round (= approx. mid back); the yoke will be measured from this marker! YOKE: The piece is worked in STRIPES – read description above. On the next round insert 8 markers (all markers are inserted into knitted stitches) as follows: Insert marker 1 in the 7th-7th-9th-9th-9th-9th stitch. Insert marker 2 in the 13th-13th-15th-15th-15th-15th stitch. Insert marker 3 in the 27th-27th-31st-31st-33rd-33rd stitch. Insert marker 4 in the 33rd-33rd-37th-37th-39th-39th stitch. Insert marker 5 in the 47th-47th-53rd-53rd-57th-57th stitch. Insert marker 6 in the 53rd-53rd-59th-59th-63rd-63rd stitch. Insert marker 7 in the 67th-67th-75th-75th-81st-81st stitch. Insert marker 8 in the 73rd-73rd-81st-81st-87th-87th stitch. On the next round increase 1 stich by each marker – read INCREASE TIP-1 (= 8 stitches increased). The number of stitches before marker 1, between markers 2 and 3, markers 4 and 5, markers 6 and 7 and after marker 8 remain the same. The increased stitches are between markers 1 and 2, markers 3 and 4, markers 5 and 6 and between markers 7 and 8. REMEMBER THE KNITTING GAUGE! Increase like this every 2nd round a total of 15-17-19-23-24-27 times, every 4th round 1 time and every 6th round 1 time = 216-232-256-288-304-328 stitches. The piece measures approx. 19-21-23-27-28-31 cm = 7½"-8¼"-9"-10⅝"-11"-12¼" from the marker. Continue working until the piece measures 21-23-24-27-28-31 cm = 8¼"-9"-9½"-10⅝"-11"-12¼". Now divide the piece for body and sleeves as follows: Work the first 31-33-36-41-44-49 stitches as before, place the next 46-50-56-62-64-66 stitches on a thread for sleeve and cast on 8-8-8-8-10-10 stitches under the sleeve, work 62-66-72-82-88-98 stitches as before, place the next 46-50-56-62-64-66 stitches on a thread for sleeve and cast on 8-8-8-8-10-10 stitches under the sleeve, and work 31-33-36-41-44-49 stitches as before. BODY: = 140-148-160-180-196-216 stitches. Insert 1 marker thread in the middle of the 8-8-8-8-10-10 stitches under each sleeve (= in sides of body). There are 70-74-80-90-98-108 stitches between the marker threads. Allow the threads to follow your work onwards; they will be used when increasing in the sides. When the piece measures 4 cm = 1½" from the division, increase 1 stitch on each side of both marker threads – read INCREASE TIP-2 (= 4 stitches increased). Increase like this every 4 cm = 1½" a total of 3 times = 152-160-172-192-208-228 stitches. When the body measures 20-20-21-21-21-20 cm = 8"-8"-8¼"-8¼"-8¼"-8" from the division increase 10-11-11-12-11-12 stitches evenly on the next round = 162-171-183-204-219-240 stitches. Change to circular needle size 4.5 mm = US 7 and work rib (= knit 1 / purl 2) for 4 cm = 1½". Bind off with knit using lime– read BINDING-OFF TIP! SLEEVES: Place the 46-50-56-62-64-66 stitches from the thread on the one side of the piece on double pointed needles size 5.5.mm = US 9 and knit up 1 stitch in each of the 8-8-8-8-10-10 stitches cast on under the sleeve = 54-58-64-70-74-76 stitches. Insert a marker thread in the middle of the 8-8-8-8-10-10 stitches under the sleeve. Allow the thread to follow your work onwards; it will be used when decreasing under the sleeve. Continue with stockinette stitch and stripes in the round. When the sleeve measures 3 cm = 1⅛" from the division, decrease 1 stitch on each side of the marker thread – read DECREASE TIP (= 2 stitches decreased). Decrease like this every 3-2½-2-1½-1-1 cm = 1⅛"-⅞"-¾"-½"-⅜"-⅜" a total of 6-7-9-11-12-12 times = 42-44-46-48-50-52 stitches. When the sleeve measures 24-23-22-20-19-16 cm = 9½"-9"-8¾"-7½"-6¼" from the division increase 0-1-2-0-1-2 stitches = 42-45-48-48-51-54 stitches. Change to double pointed needles size 4.5 mm = US 7 and work rib (= knit 1 / purl 2) in the round using lime and for 6 cm = 2⅜". Bind off with knit using lime. Work the other sleeve in the same way. |
|
|
|
Have you finished this pattern?Tag your pictures with #dropspattern #breakingsunlightsweater or submit them to the #dropsfan gallery. Do you need help with this pattern?You'll find 25 tutorial videos, a Comments/Questions area and more by visiting the pattern on garnstudio.com. © 1982-2025 DROPS Design A/S. We reserve all rights. This document, including all its sub-sections, has copyrights. Read more about what you can do with our patterns at the bottom of each pattern on our site. |
|


With over 40 years in knitting and crochet design, DROPS Design offers one of the most extensive collections of free patterns on the internet - translated to 17 languages. As of today we count 314 catalogs and 11822 patterns - 11812 of which are translated into English (US/in).
We work hard to bring you the best knitting and crochet have to offer, inspiration and advice as well as great quality yarns at incredible prices! Would you like to use our patterns for other than personal use? You can read what you are allowed to do in the Copyright text at the bottom of all our patterns. Happy crafting!
Post a comment to pattern DROPS 213-36
We would love to hear what you have to say about this pattern!
If you want to leave a question, please make sure you select the correct category in the form below, to speed up the answering process. Required fields are marked *.