
Looking for a yarn?


Comments / Questions (88)
![]() Peuvergne wrote:
Peuvergne wrote:
Bonjour aurait il pas une erreur pour les augmentations car vous commencez par7 mailles première manche et 8 deuxième manche merci pour votre réponse. Evelyne15
15.05.2025 - 20:58DROPS Design answered:
Bonjour Mme Peuvergne, tout à fait, mais, lorsque vous allez augmenter pour le raglan, vous augmentez après le marqueur-1 et 1 maille avant le marqueur -2 = soit de part et d'autre des 6 mailles de la manche (6 m entre les marqueurs + 1 maille avant le marqueur); de même pour l'autre manche, vous augmentez 1 m après le marqueur et 1 m avant le marqueur suivant, ainsi vous avez bien 6 m aussi entre les augmentations (au 1er rang, par la suite, vous avez plus de mailles bien sûr, mais le même nombre pour les 2 manches). Bon tricot_
16.05.2025 - 08:21
![]() Renna Barbara wrote:
Renna Barbara wrote:
Buon giorno vorrei sapere se gli aumenti nello sprone vanno fatti ad ogni giro sempre sul dritto. Grazie e buona sera
06.05.2025 - 19:17DROPS Design answered:
Buonasera Barbara, gli aumenti sono lavorati sul diritto del lavoro. Buon lavoro!
27.05.2025 - 21:38
![]() Lilianne wrote:
Lilianne wrote:
Hello,i don’t understand the first increases,are they not increased before and after the markers? It only says evenly, am Making the 2nd smallest Size so the 1st marker then inc. by 4sts evenly in the 7 sts ?
02.05.2025 - 20:14DROPS Design answered:
Dear Lilianne, the first increases are not for the raglan, only to adjust the number of stitches for working in stocking stitch with a larger needle and getting the correct measurements. You increase stitches evenly in the knit sections (for example, increase 4 sts evenly in the 7 knit stitches or knit 23 stitches and increase 2 stitches evenly). After adjusting the number of stitches for the raglan you will then start with raglan increases, where you will increase on the sides of the markers as explained in the INCREASE TIP! Happy knitting!
03.05.2025 - 20:25
![]() Andrea wrote:
Andrea wrote:
Autant pour moi j'étais sur l'envers... Désolée.!
20.02.2025 - 22:59
![]() Andrea wrote:
Andrea wrote:
Bonjour, j'ai un petit problème de compréhension pour le dos & devant taille 12/18 mois. Au moment de commencer le diagramme c'est écrit : 1m lisière, 72m en jersey (dos ?), A1, 11m, 1m lisière mais en faisant ainsi le dessin se retrouve sur le dos puisque l'ouverture de l'encolure raglan se trouve au niveau des premières mailles ? Merci de votre aide
20.02.2025 - 22:48DROPS Design answered:
Bonjour Andrea, ce pull se tricote de haut en bas, donc lorsque l'on divise l'empiècement, on commence par le côté gauche du pull, on tricote le dos et on termine par le devant. Les 72 mailles jersey sont non seulement les mailles du dos mais aussi celles du côté pour que le diagramme soit centré au milieu du devant. Bon tricot!
21.02.2025 - 08:41
![]() Therese Gallati wrote:
Therese Gallati wrote:
Beim Rumpfteil ist der Satz verwirrlich. Der Satz lautet Nun A.1 am Vorderteil wie folgt stricken 1 Rand masche ,(glatt re über 62 68 72 76 82 84 89 maschen ) , A1 und so weiter. Der Satz in der Klammer sollte gelöscht werden.
05.02.2025 - 23:06DROPS Design answered:
Liebe Frau Galati, so stimmt es aber, A.1 wird hier nur beim Vorderteil gestrickt und nicht beim Rückenteil. Viel Spaß beim Stricken!
06.02.2025 - 09:32
![]() Birgit wrote:
Birgit wrote:
Wenn ich die Arbeit von oben nach unten stricke, muss ich doch erst A2 und A3 stricken und danach A1? Das steht in der Anleitung umgekehrt.
22.11.2024 - 06:21DROPS Design answered:
Liebe Birgit, der Pullover wird von oben nach unten gestrickt - A.2 und A.3 werden nicht eingestrickt sondern aufgestrickt. So kommt A.2 über das schwarze Sternchen und A.3 über das weisse Sternchen. Viel Spaß beim Stricken!
22.11.2024 - 10:05
![]() Ira wrote:
Ira wrote:
Hallo, verstehe ich das richtig, dass es nur eine Seitennaht gibt? Vielen Dank im Voraus
09.11.2024 - 14:41DROPS Design answered:
Liebe Ira, ja richtig. Viel Spaß beim Stricken!
11.11.2024 - 08:34
![]() Marjan wrote:
Marjan wrote:
Brei je als je de steken voor de mouwen op een hulpnaald heb gezet voor en achterkant in 1x met de rondbreinaald. Dus zonder naden.
09.11.2024 - 09:41DROPS Design answered:
Dag Marjan,
Nee, het voorpand en achterpand wordt wel in een stuk gebreid, maar heen en weer, waarbij de ene zijnaad steeds het begin en einde is. (De andere zijnaad zit dus halverwege de naald).
10.11.2024 - 13:21
![]() Monica Alvarez wrote:
Monica Alvarez wrote:
No entiendo lo de los aumentos dice que después del marcador tejer dos puntos y luego lazada
22.06.2024 - 03:42DROPS Design answered:
Hola Monica, trabaja como sigue: trabajar normal hasta el marcapuntos 1, hacer 1 lazada después del marcapuntos 1, *trabajar hasta que quede 1 punto antes del marcapuntos, 1 lazada, 1 punto, (marcapuntos), 1 punto, 1 lazada,* repetir esto para los marcapuntos 3 y 4, hacer 1 lazada justo antes del marcapuntos 5.
23.06.2024 - 18:48
|
|||||||||||||
Little Fox#littlefoxsweater |
|||||||||||||
 |
 |
||||||||||||
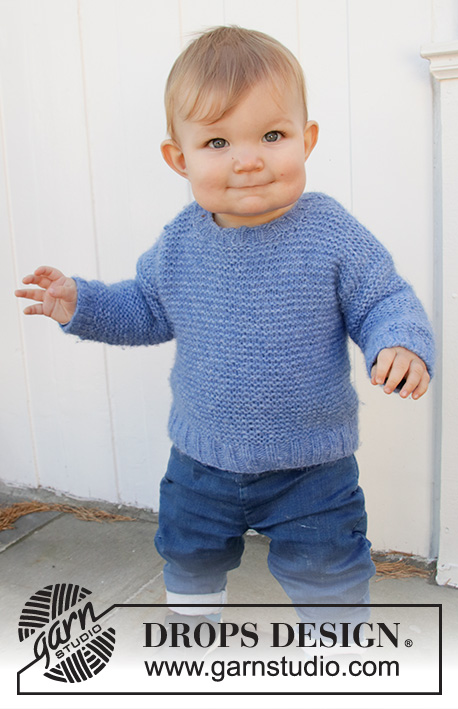
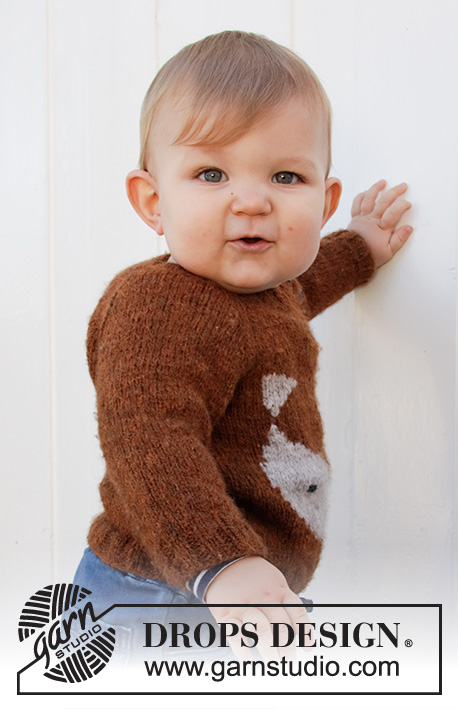
Knitted sweater with raglan for babies and kids in DROPS Sky. The piece is worked top down with fox-pattern. Sizes 1 month – 8 years.
DROPS Baby 36-14 |
|||||||||||||
|
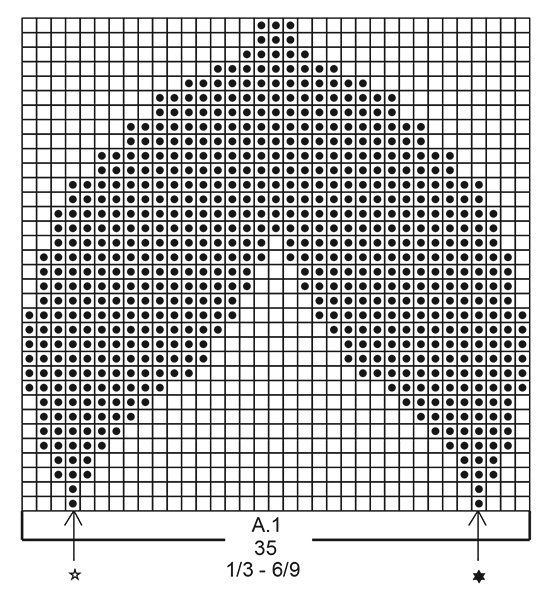
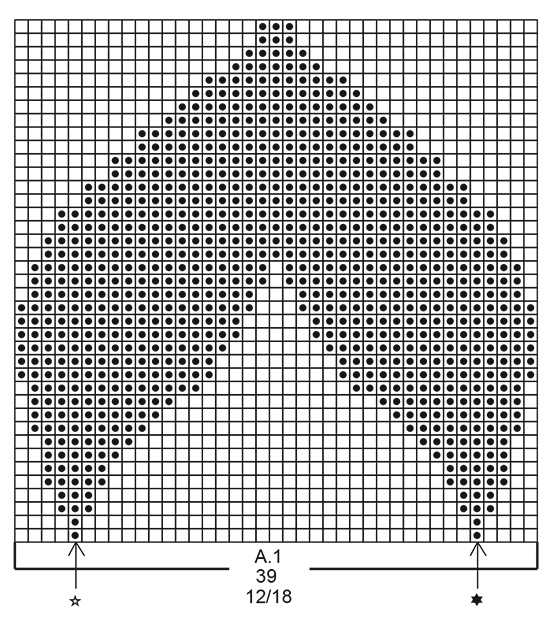
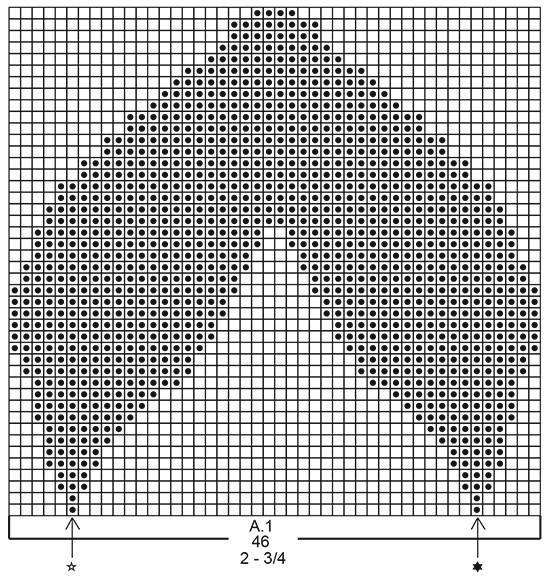
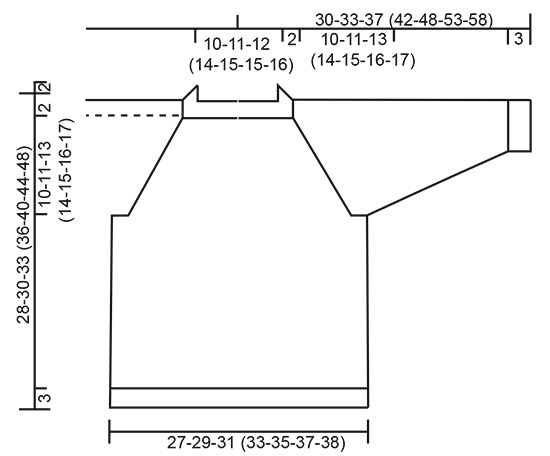
------------------------------------------------------- EXPLANATIONS FOR THE PATTERN: ------------------------------------------------------- RIDGE/GARTER STITCH (worked back and forth): Knit all rows. 1 ridge in height = Knit 2 rows. PATTERN: Diagrams A.1 to A.3 – choose diagram for your size. The whole of diagram A.1 is worked in stockinette stitch. The diagrams show all rows in the pattern from the right side. When working with 2 colors, work with more than 1 strand of each color to avoid long strands on the wrong side. You can use the strand from both the inside and outside of the ball. I.e. the first part of A.1 is knitted with 5 threads (1 thread hazelnut, 1 thread light beige, 1 thread hazelnut, 1 thread light beige, 1 thread hazelnut), the rest of A.1 is knitted with 3 threads ( 1 thread hazelnut, 1 thread light beige, 1 thread hazelnut) NOTE: To avoid holes when changing color, twist the 2 strands together. Diagrams A.2 and A.3 show how the ears are sewn with duplicate stitches. INCREASE TIP: All increases are worked from the right side! Increase 1 stitch after marker 1, work until there is 1 stitch left before markers 2, 3 and 4, 1 yarn over, work 2 stitches (markers sit between these 2 stitches), 1 yarn over and increase 1 stitch before marker 5 (= 8 stitches increased). Increase by making 1 yarn over, which is worked twisted on the next row to avoid holes. DECREASE TIP (for sleeves): Decrease 1 stitch on each side of the marker as follows: Work until there are 3 stitches left before the marker, knit 2 together, knit 2 (marker sits between these 2 stitches), slip 1 stitch as if to knit, knit 1 and pass the slipped stitch over the knitted stitch (= 2 stitches decreased). BINDING-OFF TIP: To avoid the bind-off edge being tight you can bind off with a larger size needle. If the edge is still tight, make 1 yarn over after approx. each 4th stitch at the same time as binding off and the yarn overs are bind off as normal stitches. ------------------------------------------------------- START THE PIECE HERE: ------------------------------------------------------- SWEATER – SHORT OVERVIEW OF THE PIECE: The piece is worked top down. The yoke is worked back and forth with circular needle, before it is divided for sleeves and body. The body is continued back and forth with circular needle. The sleeves are worked in the round with double pointed needles. YOKE: Cast on 56-60-60 (68-72-72-76) stitches (including 1 edge stitch on each side) with circular needle size 3.5 mm = US 4 and hazelnut. Purl 1 row from the wrong side. Then work rib as follows: Work 1 edge stitch in GARTER STITCH – read description above, * knit 2, purl 2 *, work from *-* until there are 3 stitches left, knit 2 and 1 edge stitch in garter stitch. When the rib measures 1½ to 2 cm = ½" to ¾", change to circular needle size 4.5 mm = US 7. Insert 5 markers in the piece and increase evenly from the right side as follows: Work 1 edge stitch in garter stitch, knit 1, insert marker 1, knit 7 and increase 2-4-2 (2-2-2-2) stitches evenly, insert marker 2 (= left sleeve), knit 21-23-23 (27-29-29-31) and increase 2-2-2 (1-1-2-1) stitches evenly, insert marker 3 (= back piece), knit 8 and increase 2-4-2 (2-2-2-2) stitches evenly, insert marker 4 (= right sleeve), knit 16-18-18 (22-24-24-26) and increase 2-2-2 (1-1-2-1) stitches evenly, insert marker 5, knit 1 and finish with 1 edge stitch in garter stitch = 64-72-68 (74-78-80-82) stitches. Continue with stockinette stitch and 1 edge stitch in garter stitch on each side and increase to raglan on each row from the right side as follows: Increase at each marker – read INCREASE TIP, a total of 13-14-15 (16-17-18-19) times = 168-184-188 (202-214-224-234) stitches. REMEMBER THE KNITTING GAUGE! Work until the piece measures 12-13-15 (16-17-18-19) cm = 4¾"-5⅛"-6" (6¼"-6¾"-7"-7½") from the cast-on edge. Now divide the piece for body and sleeves on the next row from the right side as follows: Work 1 stitch in garter stitch, place the next 36-40-40 (42-44-46-48) stitches on 1 thread for the sleeve and cast on 4-4-6 (6-6-6-6) stitches under the sleeve, knit 49-53-55 (60-64-67-70) stitches (= back piece), place the next 36-40-40 (42-44-46-48) stitches on 1 thread for the sleeve and cast on 4-4-6 (6-6-6-6) stitches under the sleeve, knit 45-49-51 (56-60-63-66) stitches, 1 stitch in garter stitch and cast on 4-4-4 (4-4-4-5) stitches at the end of the row = 108-116-124 (134-142-148-155) stitches. BODY: Continue back and forth with stockinette stitch and 1 edge stitch in garter stitch on each side until the piece measures 0-0-0 (0-1-2-3) cm = 0"-0"-0" (0"-⅜"-¾"-1⅛") from the division. Now work A.1 on the front piece as follows: Work 1 edge stitch in garter stitch, stockinette stitch over 62-68-72 (76-82-84-89) stitches, A.1 (= 35-35-39 (46-46-51-51) stitches), stockinette stitch over 9-11-11 (10-12-11-13) stitches and 1 edge stitch in garter stitch. Continue this pattern. When A.1 has been worked 1 time in height, finish the piece with hazelnut. Work stockinette stitch with 1 edge stitch in garter stitch on each side until the piece measures 12-13-14 (17-20-22-25) cm = 4¾"-5⅛"-5½" (6¾"-8"-8¾"-9¾") from the division. On the next row from the right side increase 2-2-2 (0-0-2-3) stitches evenly spaced = 110-118-126 (134-142-150-158) stitches. Change to circular needle size 3.5 mm = US 4. On the next row from the right side work rib as follows: 1 edge stitch in garter stitch, * knit 2, purl 2 *, work from *-* until there is 1 stitch left and finish with 1 edge stitch in garter stitch. Bind off with knit from the right side when the rib measures 3 cm = 1⅛" – read BINDING-OFF TIP. The sweater measures approx. 28-30-33 (36-40-44-48) cm = 11"-11¾"-13" (14¼"-15¾"-17¼"-19") from the shoulder down. SLEEVE: Place the 36-40-40 (42-44-46-48) stitches from the thread on the one side of the piece on double pointed needles size 4.5 mm = US 7 and knit up 1 stitch in each of the 4-4-6 (6-6-6-6) stitches cast on under the sleeve = 40-44-46 (48-50-52-54) stitches. Insert 1 marker in the middle of the 4-4-6 (6-6-6-6) stitches under the sleeve. Allow the marker to follow your work onwards; it will be used when decreasing under the sleeve. Work stockinette stitch in the round. When the sleeve measures 2 cm = ¾" from the division decrease 1 stitch on each side of the marker – read DECREASE TIP! Decrease like this every 2-2-1½ (2½-3½-4-5) cm = ¾"-¾"-½" (7/8"-1¼"-1½"-2") a total of 3-4-5 (5-5-5-5) times = 34-36-36 (38-40-42-44) stitches. When the sleeve measures 10-12-13 (16-21-25-28) cm = 4"-4¾"-5 1/8 (6¼"-8¼"-9¾"-11") from the division decrease 2-0-0 (2-0-2-0) stitches evenly spaced = 32-36-36 (36-40-40-44) stitches. Change to double pointed needles size 3.5 mm = US 4 and work rib (= knit 2, purl 2). Bind off with knit when the rib measures 3 cm = 1⅛". Work the other sleeve in the same way. RAGLAN-BAND: Knit up from the right side approx. 28 to 36 stitches (divisible by 4) inside the 1 edge stitch along the sleeve’s raglan-opening with circular needle size 3.5 mm = US 4 and hazelnut. Work rib (= knit 2, purl 2) with 1 edge stitch in garter stitch and 2 knitted stitches on each side (seen from the right side). When the band measures 2 cm = ¾", bind off with knit over knit and purl over purl. Repeat along the raglan-opening on the front piece but when the band measures 1 cm = ⅜" work 4 buttonholes evenly spaced. 1 buttonhole = purl 2 together in the purled section, (seen from the right side) and make 1 yarn over. ASSEMBLY: Sew the side seam inside the 1 edge stitch. Embroider the fox’s eyes and nose on the front piece using black. The ears are sewn using duplicate stitches and light beige, according to diagrams A.2 and A.3. The stitches are sewn top down. The stitch with the arrow and a star in diagrams A.2 and A.3, is sewn approx. 2 rows above the stitch with the arrow and a star in A.1. Sew the bands at the bottom of the raglan-openings (this is where the body starts) – the band on the front piece should lie over the band on the sleeve. Sew buttons onto the band on the sleeve. |
|||||||||||||
Diagram explanations |
|||||||||||||
|
|||||||||||||
|
|||||||||||||
|
|||||||||||||
|
|||||||||||||

|
|||||||||||||

|
|||||||||||||
|
|||||||||||||
Have you finished this pattern?Tag your pictures with #dropspattern #littlefoxsweater or submit them to the #dropsfan gallery. Do you need help with this pattern?You'll find 29 tutorial videos, a Comments/Questions area and more by visiting the pattern on garnstudio.com. © 1982-2025 DROPS Design A/S. We reserve all rights. This document, including all its sub-sections, has copyrights. Read more about what you can do with our patterns at the bottom of each pattern on our site. |
|||||||||||||


With over 40 years in knitting and crochet design, DROPS Design offers one of the most extensive collections of free patterns on the internet - translated to 17 languages. As of today we count 314 catalogs and 11822 patterns - 11812 of which are translated into English (US/in).
We work hard to bring you the best knitting and crochet have to offer, inspiration and advice as well as great quality yarns at incredible prices! Would you like to use our patterns for other than personal use? You can read what you are allowed to do in the Copyright text at the bottom of all our patterns. Happy crafting!
Post a comment to pattern DROPS Baby 36-14
We would love to hear what you have to say about this pattern!
If you want to leave a question, please make sure you select the correct category in the form below, to speed up the answering process. Required fields are marked *.