DROPS Sky
DROPS Sky
74% Alpaca, 18% Polyamide, 8% Wool
from 7.20 $ /50g
Get the yarn to make this pattern from 21.60$.

The yarn cost is calculated from the pattern’s smallest size and the yarn’s cheapest product type. Looking for an even better price? You might find it on the DROPS Deals!

DROPS SS24

Little Fox

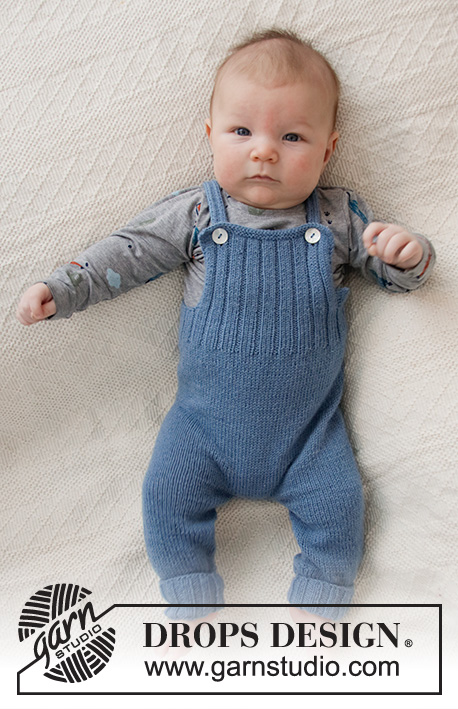
Knitted sweater with raglan for babies and kids in DROPS Sky. The piece is worked top down with fox-pattern. Sizes 1 month – 8 years.

DROPS Baby 36-14
DROPS Design: Pattern no sk-001-by
Yarn group B
-----------------------------------------------------------

SIZES:
1/3 - 6/9 - 12/18 months (2 - 3/4 - 5/6 - 7/8) years
Size equivalent to child’s height in cm:
56/62 - 68/74 - 80/86 (92 - 98/104 - 110/116 - 122/128)
Size equivalent to child’s height in feet:
1ft 10/2ft – 2ft3/2ft5 – 2ft7/2ft9 (3ft – 3ft3/3ft5 – 3ft7/3ft9)

Finished measurements:
Chest measurements: 54-58-62 (66-70-74-76) cm = 21¼"-22¾"-24⅜" (26"-27½"-29⅛"-30")
Full length: 28-30-33 (36-40-44-48) cm = 11"-11¾"-13" (14¼"-15¾"-17¼"-19")

All measurements in charts are in cm.

MATERIALS:
DROPS SKY from Garnstudio (belongs to yarn group B)
100-100-100 (150-150-150-150) g color 11, hazelnut
50-50-50 (50-50-50-50) g color 03, light beige
A left-over of color 05, black for the eyes

KNITTING GAUGE:
20 stitches in width and 26 rows in height with stockinette stitch = 10 x 10 cm = 4" x 4".

NEEDLES:
DROPS DOUBLE POINTED NEEDLES SIZE 4.5 MM = US 7.
DROPS CIRCULAR NEEDLE SIZE 4.5 MM = US 7: Length 40 cm = 16", 60 cm = 24" or 80 cm = 32" for stockinette stitch.
DROPS DOUBLE POINTED NEEDLES SIZE 3.5 MM = US 4.
DROPS CIRCULAR NEEDLE SIZE 3.5 MM = US 4: Length 40 cm = 16", 60 cm = 24" or 80 cm = 32" for rib.
Needle size is only a guide. If you get too many stitches on 10 cm = 4", change to a larger needle size. If you get too few stitches on 10 cm = 4", change to a smaller needle size.

DROPS BUTTONS, Cedar NO 513: 4 items in all sizes.

-------------------------------------------------------

Alternative Yarn – See how to change yarns here
Yarn Groups A to F – Use the same pattern and change the yarn here
Yarn usage using an alternative yarn – Use our yarn converter here

-------------------------------------------------------

DROPS Sky
DROPS Sky
74% Alpaca, 18% Polyamide, 8% Wool
from 7.20 $ /50g
Get the yarn to make this pattern from 21.60$.

The yarn cost is calculated from the pattern’s smallest size and the yarn’s cheapest product type. Looking for an even better price? You might find it on the DROPS Deals!

Pattern instructions

NOTE: This pattern is written in American English. All measurements in charts are in cm. For conversion from inches to cm - click here. There are different terms for crocheting in American and British English. If this pattern includes crochet, click for "crochet terms" here. For this pattern in British English, please click here.
-------------------------------------------------------

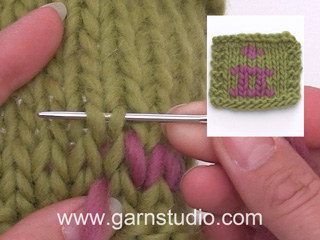
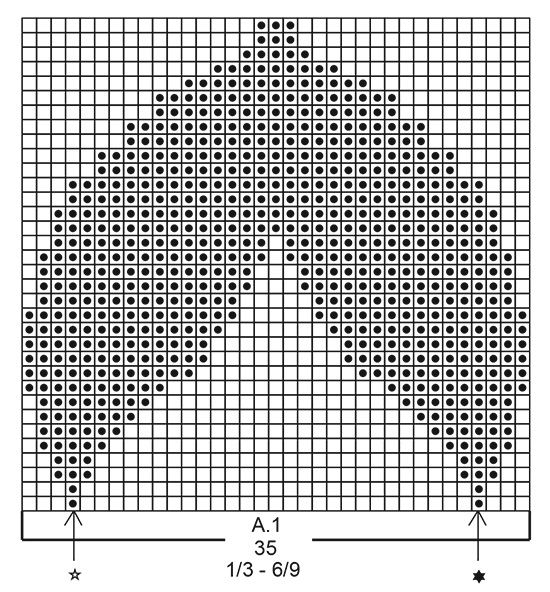
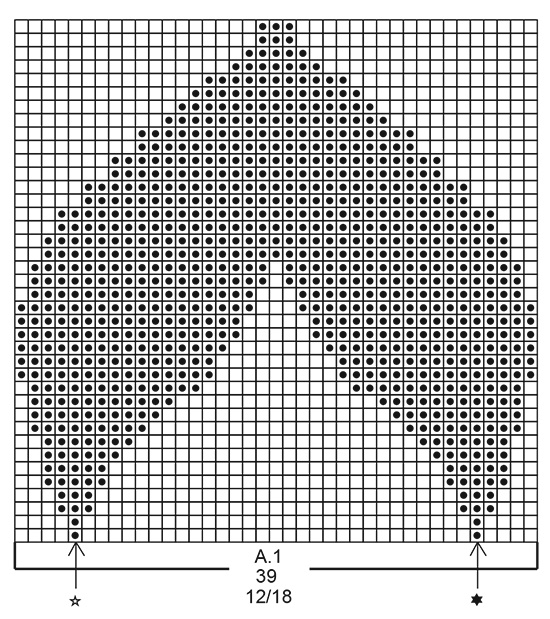
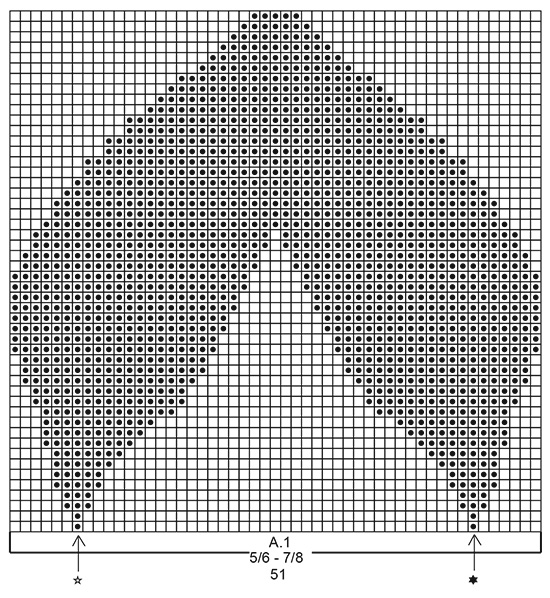
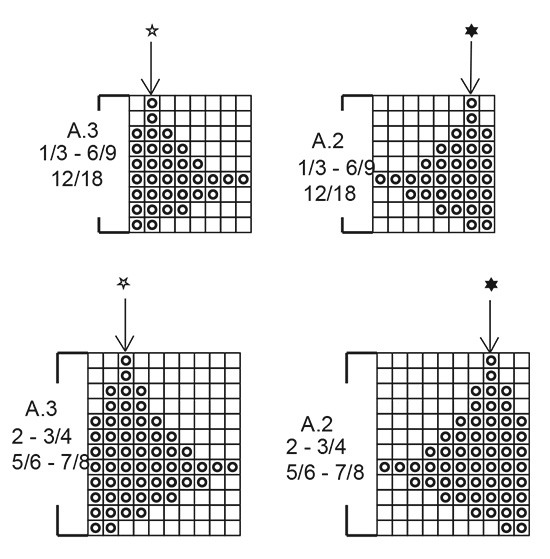
EXPLANATIONS FOR THE PATTERN:

-------------------------------------------------------

RIDGE/GARTER STITCH (worked back and forth):
Knit all rows.
1 ridge in height = Knit 2 rows.

PATTERN:
Diagrams A.1 to A.3 – choose diagram for your size.
The whole of diagram A.1 is worked in stockinette stitch. The diagrams show all rows in the pattern from the right side.
When working with 2 colors, work with more than 1 strand of each color to avoid long strands on the wrong side. You can use the strand from both the inside and outside of the ball. I.e. the first part of A.1 is knitted with 5 threads (1 thread hazelnut, 1 thread light beige, 1 thread hazelnut, 1 thread light beige, 1 thread hazelnut), the rest of A.1 is knitted with 3 threads ( 1 thread hazelnut, 1 thread light beige, 1 thread hazelnut)
NOTE: To avoid holes when changing color, twist the 2 strands together.
Diagrams A.2 and A.3 show how the ears are sewn with duplicate stitches.

INCREASE TIP:
All increases are worked from the right side!
Increase 1 stitch after marker 1, work until there is 1 stitch left before markers 2, 3 and 4, 1 yarn over, work 2 stitches (markers sit between these 2 stitches), 1 yarn over and increase 1 stitch before marker 5 (= 8 stitches increased).
Increase by making 1 yarn over, which is worked twisted on the next row to avoid holes.

DECREASE TIP (for sleeves):
Decrease 1 stitch on each side of the marker as follows: Work until there are 3 stitches left before the marker, knit 2 together, knit 2 (marker sits between these 2 stitches), slip 1 stitch as if to knit, knit 1 and pass the slipped stitch over the knitted stitch (= 2 stitches decreased).

BINDING-OFF TIP:
To avoid the bind-off edge being tight you can bind off with a larger size needle. If the edge is still tight, make 1 yarn over after approx. each 4th stitch at the same time as binding off and the yarn overs are bind off as normal stitches.

-------------------------------------------------------

START THE PIECE HERE:

-------------------------------------------------------

SWEATER – SHORT OVERVIEW OF THE PIECE:
The piece is worked top down. The yoke is worked back and forth with circular needle, before it is divided for sleeves and body. The body is continued back and forth with circular needle. The sleeves are worked in the round with double pointed needles.

YOKE:
Cast on 56-60-60 (68-72-72-76) stitches (including 1 edge stitch on each side) with circular needle size 3.5 mm = US 4 and hazelnut. Purl 1 row from the wrong side. Then work rib as follows: Work 1 edge stitch in GARTER STITCH – read description above, * knit 2, purl 2 *, work from *-* until there are 3 stitches left, knit 2 and 1 edge stitch in garter stitch. When the rib measures 1½ to 2 cm = ½" to ¾", change to circular needle size 4.5 mm = US 7.
Insert 5 markers in the piece and increase evenly from the right side as follows:
Work 1 edge stitch in garter stitch, knit 1, insert marker 1, knit 7 and increase 2-4-2 (2-2-2-2) stitches evenly, insert marker 2 (= left sleeve), knit 21-23-23 (27-29-29-31) and increase 2-2-2 (1-1-2-1) stitches evenly, insert marker 3 (= back piece), knit 8 and increase 2-4-2 (2-2-2-2) stitches evenly, insert marker 4 (= right sleeve), knit 16-18-18 (22-24-24-26) and increase 2-2-2 (1-1-2-1) stitches evenly, insert marker 5, knit 1 and finish with 1 edge stitch in garter stitch = 64-72-68 (74-78-80-82) stitches.
Continue with stockinette stitch and 1 edge stitch in garter stitch on each side and increase to raglan on each row from the right side as follows:
Increase at each marker – read INCREASE TIP, a total of 13-14-15 (16-17-18-19) times = 168-184-188 (202-214-224-234) stitches. REMEMBER THE KNITTING GAUGE!
Work until the piece measures 12-13-15 (16-17-18-19) cm = 4¾"-5⅛"-6" (6¼"-6¾"-7"-7½") from the cast-on edge. Now divide the piece for body and sleeves on the next row from the right side as follows:
Work 1 stitch in garter stitch, place the next 36-40-40 (42-44-46-48) stitches on 1 thread for the sleeve and cast on 4-4-6 (6-6-6-6) stitches under the sleeve, knit 49-53-55 (60-64-67-70) stitches (= back piece), place the next 36-40-40 (42-44-46-48) stitches on 1 thread for the sleeve and cast on 4-4-6 (6-6-6-6) stitches under the sleeve, knit 45-49-51 (56-60-63-66) stitches, 1 stitch in garter stitch and cast on 4-4-4 (4-4-4-5) stitches at the end of the row = 108-116-124 (134-142-148-155) stitches.

BODY:
Continue back and forth with stockinette stitch and 1 edge stitch in garter stitch on each side until the piece measures 0-0-0 (0-1-2-3) cm = 0"-0"-0" (0"-⅜"-¾"-1⅛") from the division. Now work A.1 on the front piece as follows:
Work 1 edge stitch in garter stitch, stockinette stitch over 62-68-72 (76-82-84-89) stitches, A.1 (= 35-35-39 (46-46-51-51) stitches), stockinette stitch over 9-11-11 (10-12-11-13) stitches and 1 edge stitch in garter stitch.
Continue this pattern. When A.1 has been worked 1 time in height, finish the piece with hazelnut. Work stockinette stitch with 1 edge stitch in garter stitch on each side until the piece measures 12-13-14 (17-20-22-25) cm = 4¾"-5⅛"-5½" (6¾"-8"-8¾"-9¾") from the division.
On the next row from the right side increase 2-2-2 (0-0-2-3) stitches evenly spaced = 110-118-126 (134-142-150-158) stitches.
Change to circular needle size 3.5 mm = US 4. On the next row from the right side work rib as follows: 1 edge stitch in garter stitch, * knit 2, purl 2 *, work from *-* until there is 1 stitch left and finish with 1 edge stitch in garter stitch. Bind off with knit from the right side when the rib measures 3 cm = 1⅛" – read BINDING-OFF TIP. The sweater measures approx. 28-30-33 (36-40-44-48) cm = 11"-11¾"-13" (14¼"-15¾"-17¼"-19") from the shoulder down.

SLEEVE:
Place the 36-40-40 (42-44-46-48) stitches from the thread on the one side of the piece on double pointed needles size 4.5 mm = US 7 and knit up 1 stitch in each of the 4-4-6 (6-6-6-6) stitches cast on under the sleeve = 40-44-46 (48-50-52-54) stitches. Insert 1 marker in the middle of the 4-4-6 (6-6-6-6) stitches under the sleeve. Allow the marker to follow your work onwards; it will be used when decreasing under the sleeve. Work stockinette stitch in the round.
When the sleeve measures 2 cm = ¾" from the division decrease 1 stitch on each side of the marker – read DECREASE TIP! Decrease like this every 2-2-1½ (2½-3½-4-5) cm = ¾"-¾"-½" (7/8"-1¼"-1½"-2") a total of 3-4-5 (5-5-5-5) times = 34-36-36 (38-40-42-44) stitches. When the sleeve measures 10-12-13 (16-21-25-28) cm = 4"-4¾"-5 1/8 (6¼"-8¼"-9¾"-11") from the division decrease 2-0-0 (2-0-2-0) stitches evenly spaced = 32-36-36 (36-40-40-44) stitches. Change to double pointed needles size 3.5 mm = US 4 and work rib (= knit 2, purl 2). Bind off with knit when the rib measures 3 cm = 1⅛". Work the other sleeve in the same way.

RAGLAN-BAND:
Knit up from the right side approx. 28 to 36 stitches (divisible by 4) inside the 1 edge stitch along the sleeve’s raglan-opening with circular needle size 3.5 mm = US 4 and hazelnut.
Work rib (= knit 2, purl 2) with 1 edge stitch in garter stitch and 2 knitted stitches on each side (seen from the right side).
When the band measures 2 cm = ¾", bind off with knit over knit and purl over purl.
Repeat along the raglan-opening on the front piece but when the band measures 1 cm = ⅜" work 4 buttonholes evenly spaced. 1 buttonhole = purl 2 together in the purled section, (seen from the right side) and make 1 yarn over.

ASSEMBLY:
Sew the side seam inside the 1 edge stitch.
Embroider the fox’s eyes and nose on the front piece using black.
The ears are sewn using duplicate stitches and light beige, according to diagrams A.2 and A.3.
The stitches are sewn top down. The stitch with the arrow and a star in diagrams A.2 and A.3, is sewn approx. 2 rows above the stitch with the arrow and a star in A.1.
Sew the bands at the bottom of the raglan-openings (this is where the body starts) – the band on the front piece should lie over the band on the sleeve. Sew buttons onto the band on the sleeve.

Diagram

All measurements in charts are in cm.

symbols = knit from right side, purl from wrong side with light beige
symbols = knit from right side, purl from wrong side with hazelnut
symbols = this stitch is sewn with duplicate stitches for the ear using light beige
symbols = the arrows mark where the ears sit in relation to the pattern
diagram
diagram
diagram
diagram
diagram
diagram

Each of our patterns has specific tutorial videos to help you.

Do you have a question? See a list of frequently asked questions (FAQ)

Knitting tension is what determines the final measurements of your work, and is usually measured per 10 x 10 cm. It is provided like so: number of stitches in width x number of rows in height - eg: 19 stitches x 26 rows = 10 x 10 cm.

The knitting tension is very individual; some people knit/crochet loosely while others work tightly. You adjust the knitting tension with the needle size, which is why the suggested needle size only serve as a guide! You need to adjust this (up or down) to ensure that YOUR knitting tension matches the knitting tension provided in the pattern. If you work with a different knitting tension than provided you will have a different yarn consumption, and your work will have different measurements than what the pattern suggests.

The knitting tension also determines which yarns can replace each other. As long as you achieve the same knitting tension you can replace one yarn with another.

See DROPS lesson: How to measure your tension/gauge

See DROPS video: How to make a gauge tension swatch

The required amount of yarn is provided in grams, eg: 450 g. To calculate how many balls you’ll need you first need to know how many grams are in 1 ball (25g, 50g or 100g). This information is available if you click on the individual yarn quality on our pages. Divide the amount required with the amount of each ball. For example, if each ball is 50g (the most common amount), the calculation will be as follows: 450 / 50 = 9 balls.

The important thing when changing from one yarn to another is that the knitting/crochet tension remains the same. This is so that the measurements of the finished piece will be the same as on the sketch provided. It is easier to achieve the same knitting tension using yarns from the same yarn group. It is also possible to work with multiple strands of a thinner yarn to achieve the knitting tension of a thicker one. Please try our yarn converter. We recommend you to always work a test swatch.

Please NOTE: when changing yarn the garment might have a different look and feel to the garment in the photo, due to individual properties and qualities of each yarn.

See DROPS lesson: Can I use a different yarn than the one mentioned in the pattern?

All our yarns are categorised into yarn groups (from A to F) according to thickness and knitting tension – group A contains the thinnest yarns and group F the thickest. This makes it easier for you to find alternative yarns to our patterns, should you wish to switch yarn. All yarns within the same group have a similar knitting tension and can easily replace each other. However, different yarn qualities have different structures and properties which will give the finished work a unique look and feel.

Click here for an overview of the yarns in each yarn group

At the top of all our patterns you’ll find a link to our yarn converter, which is a helpful tool should you wish to use a different yarn than suggested. By filling in the yarn quality you wish to replace, the amount (in your size) and number of strands, the converter will present good alternative yarns with the same knitting tension. Additionally it will tell you how much you’ll require in the new qualities and whether you’ll need to work with multiple strands. Most skeins are 50g (some are 25g or 100g).

If the pattern is worked with multiple colours, every colour will have to be converted separately. Similarly, if the pattern is worked with several strands of different yarns (for example 1 strand Alpaca and 1 strand Kid-Silk) you will have to find alternatives for each, individually.

Click here to see our yarn converter

Since different yarns have different qualities and textures we have chosen to keep the original yarn in our patterns. However, you can easily find options among our available qualities by using our yarn converter, or simply pick a yarn from the same yarn group.

It is possible that some retailers still have discontinued yarns in stock, or that someone has a few skeins at home that they would like to find patterns for.

The yarn converter will provide both alternative yarn as well as required amount in the new quality.

If you think it's hard to decide what size to make, it can be a good idea to measure a garment you own already and like the size of. Then you can pick the size by comparing those measures with the ones available in the pattern's size chart.

You'll find the size chart at the bottom of the pattern.

See DROPS lesson: How to read size chart

The needle size provided in the pattern serves only as a guide, the important thing is to follow the knitting tension. And since knitting tension is very individual, you will have to adjust the needle size to ensure that YOUR tension is the same as in the pattern – maybe you’ll have to adjust 1, or even 2 needle sizes, up or down to achieve the correct tension. For this, we recommend that you work test swatches.

Should you work with a different knitting tension than the one provided, the measurements of the finished garment might deviate from the measurement sketch.

See DROPS lesson: How to measure your tension/gauge

See DROPS video: How to make a gauge tension swatch

Working a garment top-down provides more flexibility and room for personal adjustment. For example it is easier to try the garment on while working, as well as making adjustments to length of yoke and shoulder caps.

The instructions are carefully explaining every step, in the correct order. Diagrams are adjusted to the knitting direction and are worked as usual.

The diagram depicts all rows/rounds, and every stitch seen from the right side. It is read from bottom to top, from right to left. 1 square = 1 stitch.

When working back and forth, every other row is worked from the right side and every other row is worked from the wrong side. When working from the wrong side, the diagram will have to be worked reversed: from left to right, knit stitches are purled, purl stitches are knit etc.

When working in the round every round is worked from the right side and the diagram are worked from right to left on all rounds.

See DROPS lesson: How to read knitting diagrams

The diagram depicts all rows/rounds, and every stitch seen from the right side. It is worked from bottom to top, from right to left.

When working back and forth every other row is worked from the right side: from right to left and every other row is worked from the wrong side: from left to right.

When working in the round, every row in the diagram are worked from the right side, from right to left.

When working a circular diagram you start in the middle and work your way outwards, counter clockwise, row by row.

The rows usually start with a given number of chain stitches (equivalent to the height of the following stitch), this will either be depicted in the diagram or explained in the pattern.

See DROPS lesson: How to read crochet diagrams

Instructions for working several diagrams after each other on the same row/round, will often be written like so: “work A.1, A.2, A.3 a total of 0-0-2-3-4 times". This means you work A.1 once, then A.2 is worked once, and A.3 is repeated (in width) the number of times provided for your size – in this case like so: S = 0 times, M = 0 times, L=2 times, XL= 3 times and XXL = 4 times.

The diagrams are worked as usual: begin with the first row in A.1, then work the first row in A.2 etc.

See DROPS lesson: How to read knitting diagrams

See DROPS lesson: How to read crochet diagrams

The total width of the garment (from wrist-to-wrist) will be larger in the larger sizes, despite the actual sleeves being shorter. The larger sizes have longer sleeve caps and wider shoulders, so there will be a good fit in all sizes.

The measurement sketch/schematic drawing provides information regarding the full length of the garment. If it’s a jumper or a jacket the length is measured from the highest point on the shoulder (usually closest to the neckline), and straight down to the bottom of the garment. It is NOT measured from the tip of shoulder. Similarly, the length of yoke is measured from the highest point on the shoulder and down to where yoke is split into body and sleeves.

See DROPS lesson: How to read a schematic drawing

Diagrams are often repeated on the round or in height. 1 repeat is the diagram the way it appears in the pattern. If it says to work 5 repeats of A.1 in the round, then you work A.1 a total of 5 times after/next to each other in the round. If it says to work 2 repeats of A.1 vertically/in height you work the entire diagram once, then begin again at the start and work the entire diagram one more time.

Chain stitches are slightly narrower than other stitches and to avoid working the cast-on edge too tight, we simply chain more stitches to begin with. The stitch count will be adjusted on the following row to fit the pattern and measurement sketch.

The rib edge is more elastic and will contract slightly compared to, for example, stocking stitch. By increasing before the rib edge, you avoid a visible difference in width between the rib edge and the rest of the body.

It’s very easy to cast off too tightly, and by making yarn overs while casting off (and simultaneously casting these off) you avoid a too tight cast off edge.

See DROPS video: How to bind off with yarn overs (yo)

To achieve an even increase (or decrease) you can increase on, for example: every 3rd and 4th row alternately, like so: work 2 rows and increase on the 3rd row, work 3 rows and increase on the 4th. Repeat this until the increase is complete.

See DROPS lesson: Increase or decrease 1 st on every 3rd and 4th row alternately

Should you prefer to work in the round instead of back and forth, you may of course adjust the pattern. You’ll need to add steeks mid-front (usually 5 stitches), and follow the instructions. When you would normally turn and work from the wrong side, simply work across the steek and continue in the round. At the end you’ll cut the piece open, pick up stitches to work bands, and cover the cut edges.

See DROPS video: How to knit steeks and cut open

Should you prefer to work back and forth instead of in the round, you may of course adjust the pattern so you work the pieces separately and then assemble them at the end. Divide the stitches for the body in 2, add 1 edge stitch in each side (for sewing) and work the front and back pieces separately.

See DROPS lesson: Can I adapt a pattern for circular needles into straight needles?

Pattern repeats can vary slightly in the different sizes, in order to get the correct proportions. If you’re not working the exact same size as the garment in the photo, yours might deviate slightly. This has been carefully developed and adjusted so that the complete impression of the garment is the same in all sizes.

Make sure to follow instructions and diagrams for your size!

If you have found a pattern you like which is available in women’s size it’s not very difficult to convert it to men’s size. The biggest difference will be the length of sleeves and body. Start working on the women size that you think would fit across the chest. The additional length will be worked right before you cast off for the armhole/sleeve cap. If the pattern is worked top-down you can add the length right after the armhole or before the first decrease on sleeve.

Regarding additional yarn amount, this will depend on how much length you add, but it is better with a skein too many than too few.

All yarns will have excess fibres (from production) that might come off as lint or shedding. Brushed yarns (ie hairier yarns) have more of these loose, excess fibres, causing more shedding.

Shedding also depends on what is worn under or over the garment, and whether this pulls at the yarn fibres. It’s therefore not possible to guarantee that there will be no shedding

Below are some tips on how to get the best result when working with hairier yarns:

1. When the garment is finished (before you wash it) shake it vigorously so the looser hairs come off. NOTE: do NOT use a lint roller, brush or any method that pulls at the yarn.

2. Place the garment in a plastic bag and put it in your freezer - the temperature will cause the fibres to become less attached to each other, and excess fibres will come off easier.

3. Leave in the freezer for a few hours before taking it out and shaking it again.

4. Wash the garment according to the instructions on the yarn label.

Pilling is a natural process that happens to even the most exclusive of fibers. It's a natural sign of wear and tear that is hard to avoid, and that is most visible in high friction areas of your garment like a sweater's arms and cuffs.

You can make your garment look as new by removing the pilling, using a fabric comb or a pill/lint remover.

Still can't find the answer you need? Then scroll down and leave your question so one of our experts can try to help you. This will be done normally within 5 to 10 working days.
In the meantime, you can read the questions and answers that others have left to this pattern or join the DROPS Workshop on Facebook to get help from fellow knitters/crocheters!

You might also like...

Little Fox

Anna Kowal, Poland

Little Fox

Kaardewol, Belgium

Little Fox

theruth, Canada

Little Fox

Tanja, United Kingdom

Little Fox

Milja, Finland

Little Fox Sweater

Jing Zhang, United States

Little Fox

MSBlueberry, Germany

b36-14 Little Fox

Andrea, Germany

Post a comment to pattern DROPS Baby 36-14

We would love to hear what you have to say about this pattern!

If you want to leave a question, please make sure you select the correct category in the form below, to speed up the answering process. Required fields are marked *.

Comments / Questions (78)

country flag ANNE MARIE wrote:

Bonjour j'aimerais savoir si on peut avoir une explication pour 2aiguilles et non aiguille circulaire. ? Merci

12.12.2021 - 19:04

DROPS Design answered:

Bonjour Anne-Marie, nous ne pouvons malheureusement pas ajuster chacun de nos modèles à chaque demande, toutefois, cette leçon pourra vous aider. Bon tricot!

13.12.2021 - 10:01

country flag ANNE MARIE wrote:

Bonjour j\'aimerais savoir si on peut avoir l\'explication pour tricoter avec 2 aiguilles et non en aiguilles circulaires?? Merci

12.12.2021 - 19:03

country flag Martina wrote:

Salve, io non ho capito come si fa a far venire il disegbo ben piatto lavorando in tondo. Sto usando 5 fili x la prima parte della volpe come avete scritto nei suggerimenti. Ma il disegno mi viene in rilievo. C'è un video specifico x la lavorazione in tondo? Perchè quello dei colori si riferisce alla lavorazione su ferri dritti

08.12.2021 - 10:56

DROPS Design answered:

Buonasera Martina, ci può spiegare meglio cosa intende per lavorazione in rilievo? Con la lavorazione a più colori in tondo deve portarsi dietro il filo non in uso sul retro del lavoro avvolgendolo regolarmente al filo di lavoro sul retro. Buon lavoro!

08.12.2021 - 18:13

country flag Regine Conzelmann wrote:

Hallo miteinader, gibt es zu diesem zuckersüßen Pullover eigentlich auch eine deutsche Anleitung? Bis jetzt habe ich keine gefunden. Gruß Regine Conzelmann

02.11.2021 - 10:25

DROPS Design answered:

Liebe Frau Conzelmann, ja sicher, alle unsere Anleitungen sind auch auf deutsch erhältlich - klicken Sie bei der Dropdown Menu unter dem Foto um die Sprache zu ändern und die deutsche Anleitung zu finden. Viel Spaß beim stricken!

03.11.2021 - 07:59

country flag Cheryl wrote:

I’m working on the sleeve it says after decrease: when sleeve measures 16cm -61/4” after division ( does after division mean after last decrease or where you pick up the stitches under arm? ) thank you

21.10.2021 - 17:24

DROPS Design answered:

Dear Cheryl, yes, "divison" is where you divided the stitches for body and the sleeves. Happy Stitching!

21.10.2021 - 23:29

country flag Piera wrote:

Buongiorno! Sto facendo il maglioncino nella taglia 12/18 mesi. Alla fine del raglan (15 aumenti), partendo dalle 68 maglie alla fine delle coste, come faccio ad avere 188 maglie? Devo aumentare 120 maglie???? Ho capito male o c'è un errore? Grazie per la risposta

13.10.2021 - 12:53

DROPS Design answered:

Buonasera Piera, non ci sono errori: quando lavora gli aumenti deve seguire il SUGGERIMENTO PER GLI AUMENTI all'inizio delle spiegazioni e si aumentano 8 maglie per ogni giro di aumenti, quindi 8x15 = 120 maglie aumentate. Buon lavoro!

13.10.2021 - 18:26

country flag Renate Steiner wrote:

Sorry hab nochmal nachgelesen, es steht einschließlich 2 Randmaschen. Danke

07.10.2021 - 09:03

country flag Renate Steiner wrote:

Ich habe doch 60 M + 2 Randmaschen angeschlagen, also bleiben dann 2 Maschen übrig?

07.10.2021 - 08:59

country flag Renate Steiner wrote:

Liebe Wanda, ich habe begonnen die zweite Größe zu stricken. 60 M Anschlag + 2 RdM=62 M Dann: 1RdM, 1 M r/1. Markierer, 7 M/2. Markierer, 23 M/3. Mark., 8 M/4. Mark., 18 M/5. Mark., 1 M r, 1 RdM=60 M, bleiben 2 M übrig?

06.10.2021 - 08:21

DROPS Design answered:

Liebe Frau Steiner, so sehen die 60 M aus: 1 RandM, 1 M, (1. Mark), 7 M (+4 = 11 M), (2. Mark), 23 M (+2= 25 M), (3. Mark), 8 M (+4 = 12 M), (4. Mark), 18 M (+ 2M), (5. Mark),1 M, 1 RandM = 1+1+7+23+8+18+1+1=60 und nach Zunahmen = 1+1+11+25+12+20+1+1=72 M. Viel Spaß beim stricken!

06.10.2021 - 16:11

country flag Françoise wrote:

Bonjour, je ne comprends pas pourquoi si on tricote de haut en bas, on commence par le diagramme A1 avant de faire les oreilles? Merci pour votre aide

03.10.2021 - 16:00

DROPS Design answered:

Bonjour Françoise, les oreilles ne sont pas tricotées en jacquard, mais rebrodées ensuite au point de mailles (cf ASSEMBLAGE). Bon tricot!

04.10.2021 - 08:29