
Looking for a yarn?


Comments / Questions (36)
![]() Annette wrote:
Annette wrote:
Ist das richtig dass ich die Maschen sozusagen aus 4 Wollknäuel aufnehme? Also 4 Fäden zusammen?
02.04.2025 - 16:19DROPS Design answered:
Liebe Annette, ja richtig, hier strickt man mit 4 Fäden DROPS Air zusammen. Viel Spaß beim Stricken!
03.04.2025 - 08:15
![]() Hoffmann Anke wrote:
Hoffmann Anke wrote:
Ich weiß nicht, wieviel Wolle ich benötige und wieviel Maschen ich anschlagen muss. Trage die Konfektionsgröße 38.
29.01.2025 - 22:44DROPS Design answered:
Liebe Hoffmann, die benötigte gesamte Garnmenge finden Sie oben der Seite unter Tab "Anleitung", so z.B. in S und M brauchen Sie 400 g DROPS Air / 50 g das Knäuel = 8 Knäuel DROPS Air. Viel Spaß beim Stricken!
30.01.2025 - 10:12
![]() Victoria wrote:
Victoria wrote:
Hej! Hur räknar jag ut hur mycket garn jag behöver om jag ska byta ut fyra trådar Drops Air mot en tråd Drops Polaris?
09.12.2024 - 20:31DROPS Design answered:
Hei Victoria. Det kommer an på hvilken str du skal strikke, men du trenger mellom 9 (str S) og 13 (str. XXXL) nøster. mvh DROPS Design
10.12.2024 - 15:06
![]() Hanne Bork wrote:
Hanne Bork wrote:
Jeg vil gerne udskifte garnet til Nepal, så det ikke fnuldrer. Kan jeg det ? Og hvor mange nøgler skal jeg så bruge ? Jeg har prøvet garnomregneren men fik ikke et svar.
05.04.2024 - 19:13DROPS Design answered:
Hej Hanne, ja det kan du, brug vores omregner. Vælg DROPS Air, vælg antal gram i din størrelse og 1 tråd, så får du garnforbruget op i DROPS Nepal. (Nepal er tungere end Air, så hele arbejdet vil blive mere tungt) :)
09.04.2024 - 10:24
![]() Angela wrote:
Angela wrote:
The instructions say to increase in the moss stitch section, but Increase Tip 1 says the yo should be worked in stockinette. Where exactly is the yo supposed to go?
23.01.2024 - 00:25DROPS Design answered:
Hi Angela! The YO should be inside/next to the stitches in moss st, i.e. before or after the 6 stitches in moss st. YO = new stitch is then worked in stockinette (i.e. piece is widened but the edge is still 6 stitches in moss st pattern). Happy knitting!
23.01.2024 - 05:28
![]() Conny wrote:
Conny wrote:
Hallo, ich habe den Bolero gemäß der Maßskizze gestrickt. Aber ich weiß nicht was ich mit was zusammen nähen soll? Unten mit oben ? Oder rechts mit links?
11.12.2023 - 22:04DROPS Design answered:
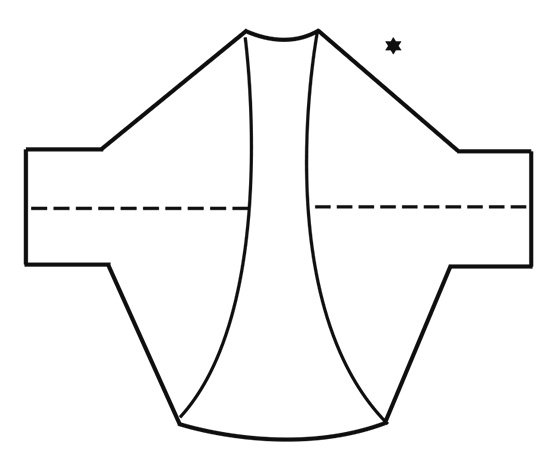
Liebe Conny, legen Sie den Bolero flach, wie in der Maßskizze, dann nähen Sie die Seiten zusammen: die gestrichten Linien unten an den gestricthen Linien oben: die ersten 20 cm zu den letzten 20 cm und die angeschlagenen Maschen zu den abgekettenen Maschen. Viel Spaß beim stricken!
12.12.2023 - 09:01
![]() Sybill wrote:
Sybill wrote:
Guten Tag Frau, die Maße an der Skizze stimmen nicht überein mit der schriftlichen Anleitung. Sind an der Skizze Zentimeter angegeben? Vielen Dank
06.09.2023 - 02:54
![]() Sybill wrote:
Sybill wrote:
Hallo guten Tag, die Maße an der Skizze stimmen nicht überein mit der schriftlichen Anleitung. Sind an der Skizze Zentimeter angegeben? Vielen Dank
06.09.2023 - 02:52DROPS Design answered:
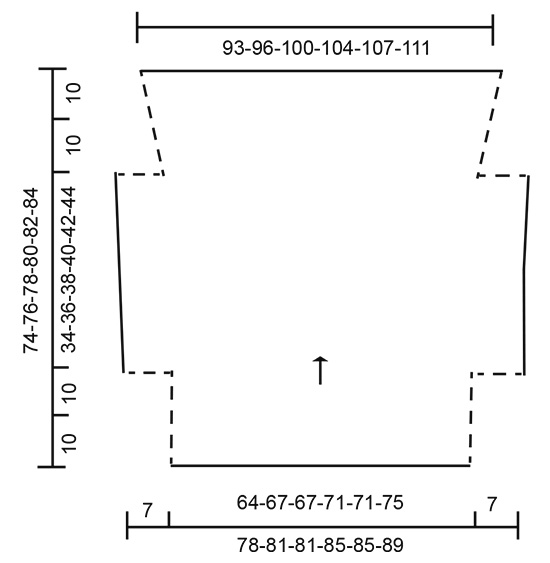
Liebe Sybill, die Maßen in der Skizze sind in cm angegeben: in 1. Größe z.B. werden 35 Maschen angeschlagen = ca 64 cm - dann werden 4 Maschen (= ca 7 cm) beidseitig angeschlagen so sind es 7+64+7= 78 cm in der Breite. Kann das Ihnen helfen?
06.09.2023 - 09:21
![]() Karen Christensen wrote:
Karen Christensen wrote:
Kan man bruge opskriften med samme garn og pind 8 ??
08.09.2022 - 20:14DROPS Design answered:
Hej Karen, Da skal du finde en opskrift med en strikkefasthed på 10-11 masker på 10 cm og bruge 2 tråde DROPS Air (i stedet for 4 tråde) : Skulderstykke - 9-11 m
09.09.2022 - 11:52
![]() Lilly Vitsák wrote:
Lilly Vitsák wrote:
Finnes det en oppskrift på dette plagget i et tynnere garn enn 4-tråder air? Har lyst å lage en slik men syns det blir for tykt å strikke med nevnte garnalternativ.
21.08.2022 - 19:07DROPS Design answered:
Hei Lilly, Hvis du bruker søkeboksen med stikkord du trenger, får du opp alle oppskrifter som passer dine stikkord. God fornøyelse!
22.08.2022 - 10:35
|
|||||||
Perfect Day#perfectdayshrug |
|||||||
 |
 |
||||||
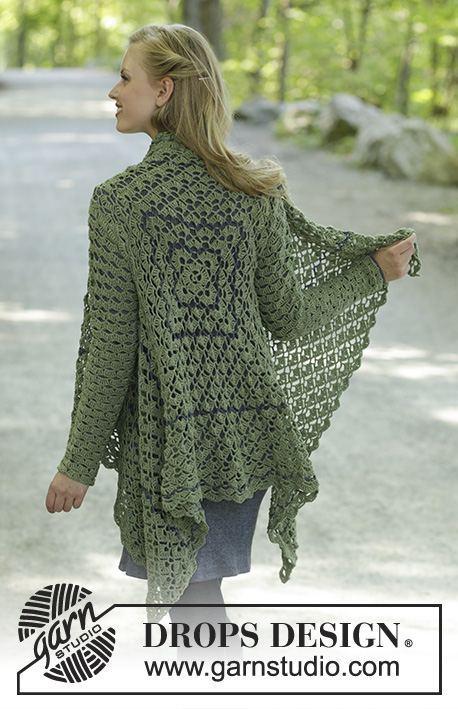
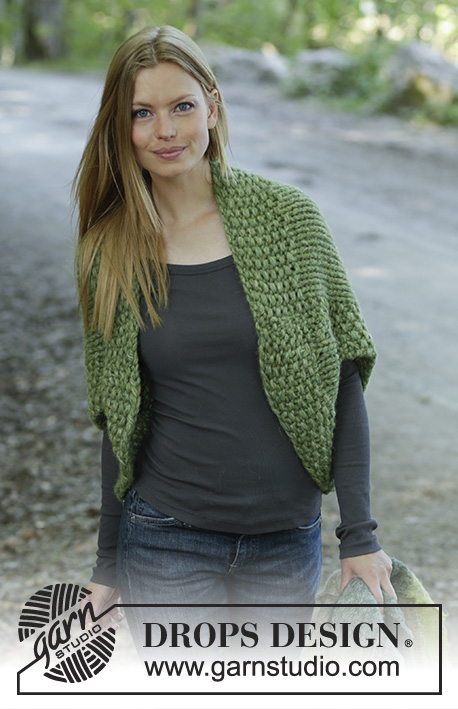
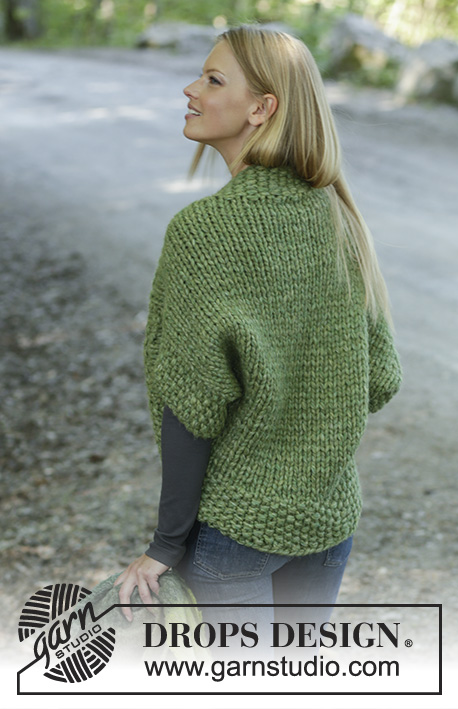
Knitted shoulder piece in 4 strands DROPS Air. The piece is worked top down with stockinette stitch and moss stitch. Sizes S - XXXL.
DROPS 196-16 |
|||||||
|
------------------------------------------------------- EXPLANATIONS FOR THE PIECE: ------------------------------------------------------- MOSS STITCH: ROW 1: * Knit 1, purl 1 *, work from *-*. ROW 2: Purl over knit and knit over purl. Repeat row 2. INCREASE TIP-1: All increases made from the right side! Increase 1 stitch by making 1 yarn over. On the next row purl the yarn over twisted to avoid a hole. Then work new stitch in stockinette stitch. INCREASE TIP-2 (evenly spaced): To work out how to increase evenly, count the total number of stitches on the needle (e.g. 82 stitches) minus the 2 stitches in moss stitch in each side (= 4 stitches) and divide the remaining stitches by the number of increases to be made (e.g. 10) = 7.8. In this example, increase by making 1 yarn over alternately after each 7th and 8th stitch (approx.). On the next row work the yarn overs twisted to avoid holes. ------------------------------------------------------- START THE PIECE HERE: ------------------------------------------------------- SHOULDER PIECE - SHORT OVERVIEW OF THE PIECE: The piece is worked back and forth with circular needle, top down and sewn together in sides under the sleeves. SHOULDER PIECE: Cast on 35-37-37-39-39-41 stitches with circular needle size 20 mm = US 36 and 4 strands Air. Work MOSS STITCH - read description above, for 10 cm = 4" – adjust so that the next row is worked from the right side. Now work pattern as follows: 2 stitches in moss stitch, stockinette stitch until there are 2 stitches left, 2 stitches in moss stitch. REMEMBER THE KNITTING GAUGE! When the piece measures 20 cm = 8" cast on 4 new stitches at the end of the next 2 rows for sleeves = 43-45-45-47-47-49 stitches. Continue with pattern as follows: 6 stitches in moss stitch, stockinette stitch until there are 6 stitches left, 6 stitches in moss stitch. When the piece measures 37-38-39-40-41-42 cm = 14½"-15"-15¼"-15¾"-16⅛"-16½" increase 1 stitch inside the 6 stitches in moss stitch in each side - read INCREASE TIP-1. Increase like this every 6 cm = 2⅜" a total of 3 times (= 6 stitches increased) = 49-51-51-53-53-55 stitches. When the piece measures 34-36-38-40-42-44 cm = 13⅜"-14¼"-15"-15¾"-16½"-17¼" from where you cast on stitches for sleeves, bind off 4 stitches at the beginning of the next 2 rows for sleeves = 41-43-43-45-45-47 stitches. Continue with stockinette stitch and 2 stitches in moss stitch in each side until the piece measures 10 cm = 4" from where you bind off stitches for sleeves. Knit 1 row where you increase 10-10-12-12-14-14 stitches evenly over the stitches in stockinette stitch - read INCREASE TIP-2 = 51-53-55-57-59-61 stitches. Now work moss stitch over all stitches for 10 cm = 4". Bind off with purl over knit and knit over purl. If the bind-off edge is tight you can make 1 yarn over after each 4th stitch (yarn overs bind off as normal stitches). ASSEMBLY: Sew sleeve and side seams in one go – see broken line in sketch. Sew in outermost loop of outermost stitch so the seam is flat. |
|||||||
Diagram explanations |
|||||||
|
|||||||
|
|||||||
|
|||||||
Have you finished this pattern?Tag your pictures with #dropspattern #perfectdayshrug or submit them to the #dropsfan gallery. Do you need help with this pattern?You'll find 19 tutorial videos, a Comments/Questions area and more by visiting the pattern on garnstudio.com. © 1982-2025 DROPS Design A/S. We reserve all rights. This document, including all its sub-sections, has copyrights. Read more about what you can do with our patterns at the bottom of each pattern on our site. |
|||||||


With over 40 years in knitting and crochet design, DROPS Design offers one of the most extensive collections of free patterns on the internet - translated to 17 languages. As of today we count 314 catalogs and 11822 patterns - 11812 of which are translated into English (US/in).
We work hard to bring you the best knitting and crochet have to offer, inspiration and advice as well as great quality yarns at incredible prices! Would you like to use our patterns for other than personal use? You can read what you are allowed to do in the Copyright text at the bottom of all our patterns. Happy crafting!
Post a comment to pattern DROPS 196-16
We would love to hear what you have to say about this pattern!
If you want to leave a question, please make sure you select the correct category in the form below, to speed up the answering process. Required fields are marked *.