
Looking for a yarn?


Comments / Questions (34)
![]() Elvira wrote:
Elvira wrote:
Hej jag har kommit fram dit där det står att jag ska sticka A1 halva bakstycket och ska nu sticka A2 jag förstår inte hur jag ska göra ökningen här för raglan och ärmen. Behöver en tydligare beskrivning. Känns inte som att det stämmer med bilden på modellen. A2 är också 3st rätmaskor. Är det att jag ska öka 2 ggr innan A2 sen sticka 3st rätor och sen göra 2 ökningar till efter A2 är stickad? När ska ökningen för ärmen göras? Tack på förhand.
28.12.2024 - 18:40
![]() Mette Paulsen wrote:
Mette Paulsen wrote:
Hva betyr bokstavene A? Hva er overvidden? hvorfor lage oppskriftene så vanskelig å skjønne
09.09.2024 - 10:24DROPS Design answered:
Hei Mette. Mener du bokstaven A som står øverst i oppskriften, slik som A+A? Det betyr hvilken garngruppe / hvilken garntykkelse denne genseren er strikket i. I oppskriften står det: Garngruppe C eller A + A. Her har Garngruppe en strek under seg. Klikk på ordet med en strek under seg og du vil få en forklaring. Gjennom hele oppskriften er det mange ord med strek under seg, klikk på ordet og få få en forklaring. Om du ser på målskissen av genseren, vi du se at overviddemålet er lik målet nederst på oppskriften. Usikker på hvordan man leser en oppskrift, gå til: Tips & Hjelp - DROPS leksjoner - Les en oppskrift og velg de ulike temaene. mvh DROPS Design
09.09.2024 - 13:25
![]() Cerys Lyn Short wrote:
Cerys Lyn Short wrote:
What is the yarn amount correction, have done several patterns and some have come up very short on yarn and I could notcomplete the item and was left with wool I was unable to use.
13.06.2023 - 14:55DROPS Design answered:
Dear Mrs Short, if you printed the pattern after the correction day, then you get the correct amount of yarn - but remember to check and keep your gauge - read more here. Happy knitting!
13.06.2023 - 16:04
![]() Christiane Josy wrote:
Christiane Josy wrote:
Wenn ich dieses Modell mit Drops Paris stricke, brauche ich dann die gleiche Wollmenge, wie mit Brushed Alpaka Silk, obwohl die Paris eine ganz andere Lauflänge hat? Oder muss ich das umrechnen?
24.04.2021 - 15:00DROPS Design answered:
Liebe Frau Josy, benutzen Sie unseren Garnumechner, so lassen Sie sich die neue Garnmenge kalkulieren - hier lesen Sie mehr über Garnalternativen. Viel Spaß beim stricken!
26.04.2021 - 09:21
![]() Aneta wrote:
Aneta wrote:
Ale jeszcze chce sie dopytac o 3 etap dodawania oczek.8 razy na tył i przód,a na rekaw co 4 okrążenie -ale ile razy?4tylko?to mi sie nie zgadza ilosc koncowa oczek
04.02.2021 - 12:24DROPS Design answered:
Witaj Aneto, łącznie będziesz dodawać do 68 okrążenia. Na rękawach ostatni etap to zamykanie 8 x 4 o. co 4 okrążenia, na tyle i przodzie ostatni etap to 25 x 4 o. co 2 okrążenia. A teraz obliczenia: RĘKAWY: (18 x 4 o.)+(8 x 4 o.)= dodane 104 o. TYŁ&PRZÓD: (9 x 8 o.)+(25 x 4 o.)= dodane 172 o. Łącznie mamy dodanych na reglan 276 o. I zgadza się wszystko: 120 początkowe + 276 dodanych o. = 396 o. dla rozmiaru M (po dodaniu oczek na reglan). Powodzenia!
04.02.2021 - 17:26
![]() Aneta wrote:
Aneta wrote:
Dziekuje Agnieszce za pomoc.jak sie zrozumie opis to robi sie bardzo fajnie.ja robie cały biały z alpaki i kid silku.fason świetny i nowoczesny.powodzenia
04.02.2021 - 12:10
![]() DROPS Design wrote:
DROPS Design wrote:
Trudność jest taka że dodajesz oczka na rękawy i na tył/przód 1) w innej częstotliwości 2) inna jest liczba dodawanych oczek (1 oczko, gdy po prostu wykonujesz 1 narzut obok tych 3 o.p., albo 2 o. -dotyczy tylko fragmentu tyłu/przodu- gdzie obok tych 3 o.p. wykonujesz 1 narzut, 1 o.p. i 1 narzut). Musisz to sobie rozpisać, aby się nie pomylić.
29.01.2021 - 17:33
![]() DROPS Design wrote:
DROPS Design wrote:
Na rękawy: dodawać za schematem A.2 na początku każdego rękawa i przed schematem A.2 na końcu każdego rękawa: 18 razy co 2 okrążenia i 8 razy co 4 okrążenia; na tyle/przodzie: dodawać 9 razy 2 oczka za schematem A.2 na początku tyłu i przodu, i przed schematem A.2 na końcu tyłu i przodu co 2 okrążenia, dalej dodawać 1 oczko 25 razy za schematem A.2 na początku tyłu i przodu i przed schematem A.2 na końcu tyłu i przodu co 2 okrążenia. Powodzenia
29.01.2021 - 17:28
![]() Aneta wrote:
Aneta wrote:
Nic nie rozumiem z tego opisu,nic.o co tu chodzi?zrobiłam z tej strony 3 swetry i mimo ze nie jestem doswiadczona to poszło mi dobrze,ale ten opis jest nie do pojecia dla mnie.chodzi o reglan i te dwa wzory A1 i A2.nawet trudno mi zadac konkretne pytanie bo nie wiem o co chodzi.błagam o pomoc bo bardzo zalezy mina tym swetrze.dzieki
29.01.2021 - 13:15DROPS Design answered:
Witaj Aneto, cały sweter jest przerabiany wg schematu A.1, schemat A.2 stanowią 3 oczka każdego skosu raglanu (4 miejsca) i one są przerabiane cały czas na prawo. Z każdej strony tych 3 oczek prawych są dodawane oczka na reglany. Dodane oczka na reglany będą przerabiane wg schematu A.1 w miarę postępu robótki. W rozmiarze M dodajesz oczka na reglan inaczej na tyle/przodzie, a inaczej na rękawach (ale dzieje się to jednocześnie). cd nastąpi
29.01.2021 - 17:25
![]() BAULON wrote:
BAULON wrote:
Bonjour Je ne trouve pas la correction du nombre de pelotes pour le tricot de ce modèle. Pouvez-vous me l’indiquer par réponse ? Merci Cordialement
22.01.2021 - 20:28DROPS Design answered:
Bonjour Mme Baulon, le modèle actuel est déjà corrigé, autrement dit, cette correction ne s'applique que si vous aviez imprimé le modèle avant le 18 mai 2018, date de la correction. Bon tricot!
25.01.2021 - 13:04
|
||||||||||
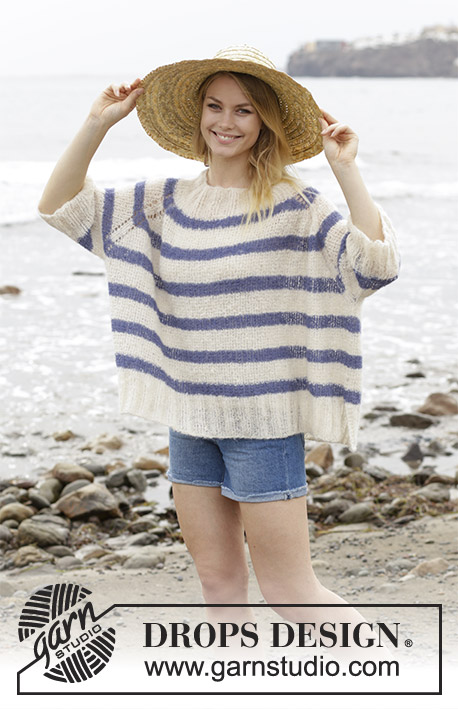
Riviera Stripes#rivierastripessweater |
||||||||||
 |
 |
|||||||||
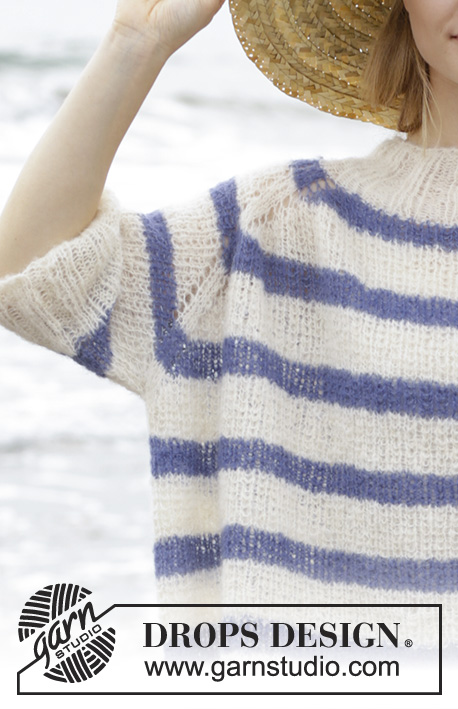
Knitted sweater with textured pattern, stripes and raglan, worked top down. Sizes S - XXXL. The piece is worked in DROPS Brushed Alpaca Silk.
DROPS 191-30 |
||||||||||
|
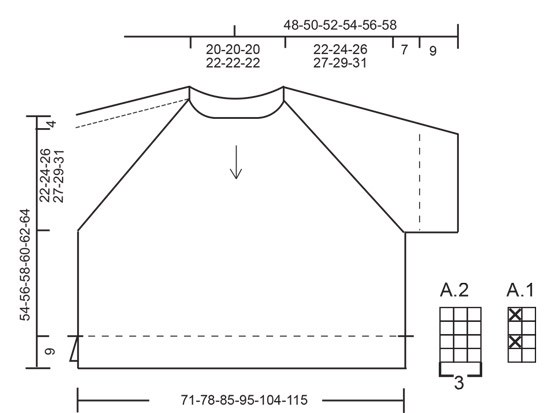
INFORMATION FOR THE PATTERN: RIDGE/GARTER STITCH (worked back and forth): 1 ridge = Knit 2 rows. INCREASE/DECREASE TIP (evenly spaced): To work out how to increase/decrease evenly, count the total number of stitches on the needle (e.g. 96 stitches), and divide by the number of increases/decreases to be made (e.g. 24) = 4. In this example make 1 yarn over after every 4th stitch, when increasing; on the next round work the yarn overs twisted to avoid holes. When decreasing knit every 3rd and 4th stitch together (in this example). STRIPES: * Work 2½-3-3-3-3½-3½ cm with denim blue, work 5-5-5-5½-5½-5½ cm with off white *, repeat from *-* onwards. PATTERN: See diagrams A.1 and A.2. The diagrams show all the rows in the pattern seen from the right side. RAGLAN SLEEVE: The yarn overs are worked twisted on the next round to avoid holes. Increase 1 stitch (= 2 new stitches on each sleeve) as follows: After A.2: Make 1 yarn over. Before A.2: Make 1 yarn over. Work the new stitches into the pattern. RAGLAN FRONT/BACK PIECE: The yarn overs are worked twisted on the next round to avoid holes. Increase 2 stitches (= 4 new stitches on front piece/4 new stitches on back piece) as follows: After A.2: Make 1 yarn over, work 1 stitch, make 1 yarn over. Before A.2: Work until there is 1 stitch left before A.2, make 1 yarn over, work 1 stitch, make 1 yarn over. Increase 1 stitch (= 2 new stitches on front piece/2 new stitches on back piece) as follows: After A.2: Make 1 yarn over. Before A.2: Make 1 yarn over. Work the new stitches into the pattern. ---------------------------------------------------------- SWEATER: The piece is worked in the round with circular needle from mid back, top down. The body is divided for the split and the front and back pieces are finished separately, back and forth on the needle. The sleeves are worked in the round with short circular needle/double pointed needles. YOKE: Cast on 96-96-96-102-102-102 stitches with circular needle size 5 mm / US 8 and off white. Knit 1 round. Then work rib (= knit 3 / purl 3) for 8 cm / 3⅛". Knit 1 round and increase 24-24-28-30-34-50 evenly on this round - read INCREASE/DECREASE TIP = 120-120-124-132-136-152 stitches. Now start the STRIPES - see description above. The next round is worked as follows: The round starts approx. mid back. Work A.1 over the first 22-22-22-24-24-28 stitches (= half back piece), work A.2 (= 3 stitches), work A.1 over the next 12-12-12-14-14-14 stitches (= sleeve), A.2, work A.1 over the next 42-42-44-46-48-56 stitches (= front piece), A.2, work A.1 over the next 12-12-12-14-14-14 stitches, A.2, work A.1 over the last 20-20-22-22-24-28 stitches (= half back piece). REMEMBER THE GAUGE! Continue the pattern like this and increase to RAGLAN - see description above. The increases are different on front/back pieces and on the sleeves as follows: SLEEVE: Increase every 2nd round a total of 17-18-18-22-23-24 times, then every 4th round a total of 7-8-9-8-9-10 times. FRONT/BACK PIECE: Increase 2 stitches on each side of A.2 every 2nd round a total of 6-9-12-18-21-24 times, then increase 1 stitch on each side of A.2 every 2nd round a total of 25-25-24-20-20-20 times. After all the increases to raglan there are 364-396-424-476-512-560 stitches on the needle. Continue in the round without increasing until the piece measures 22-24-26-27-29-31 cm / 8⅝"-9⅜"-10 ¼"-10⅝"-11⅜"-12⅛" from after the neck. The next round is worked as follows: Work A.1 over the first 61-67-72-82-88-98 stitches (= half back piece), place the next 62-66-68-76-80-84 stitches on 1 thread for sleeve, work A.1 over the next 120-132-144-162-176-196 stitches (= front piece), place the next 62-66-68-76-80-84 stitches on 1 thread for sleeve, work A.1 over the last 59-65-72-80-88-98 stitches (= half back piece). BODY: = 240-264-288-324-352-392 stitches. Insert 1 marker thread in each side. Continue with stripes and A.1 as before over all stitches. When the piece measures approx. 19-19-19-20-20-20 cm / 7⅜"-7⅜"-7⅜"-7⅞"-7⅞"-7⅞" from the division – adjust so that you finish after a stripe with denim blue, continue working with off white to finished length. Work 1 round stockinette stitch where you increase 6-6-6-6-2-4 stitches evenly on round = 246-270-294-330-354-396 stitches. Now divide the piece and the front and back pieces are finished separately. FRONT PIECE: = 123-135-147-165-177-198 stitches. Continue by working rib as follows - from the right side: 3 stitches in garter stitch, * knit 3, purl 3 *, work from *-* until there are 6 stitches left, knit 3 and 3 stitches in garter stitch. Continue like this until the rib measures 9 cm / 3½", loosely bind off with knit over knit and purl over purl. BACK PIECE: = 123-135-147-165-177-198 stitches. Work as for front piece. SLEEVE: The piece is worked in the round with short circular needle/double pointed needles. Place the 62-66-68-76-80-84 stitches from the thread on the one side of the piece on short circular needle size 5 mm / US 8. Continue with stripes as before and pattern A.1 over all stitches. When you have worked 1 stripe with denim blue on the sleeve continue with off white to finished length. When the piece measures approx. 7 cm / 2¾" from the division knit 1 round where you decrease 2-0-2-4-2-0 stitches evenly on round = 60-66-66-72-78-84 stitches. Work rib (= knit 3 / purl 3) for 9 cm / 3½". Loosely bind off with knit over knit and purl over purl. Work the other sleeve in the same way. |
||||||||||
Diagram explanations |
||||||||||
|
||||||||||
|
||||||||||
Have you finished this pattern?Tag your pictures with #dropspattern #rivierastripessweater or submit them to the #dropsfan gallery. Do you need help with this pattern?You'll find 26 tutorial videos, a Comments/Questions area and more by visiting the pattern on garnstudio.com. © 1982-2025 DROPS Design A/S. We reserve all rights. This document, including all its sub-sections, has copyrights. Read more about what you can do with our patterns at the bottom of each pattern on our site. |
||||||||||


With over 40 years in knitting and crochet design, DROPS Design offers one of the most extensive collections of free patterns on the internet - translated to 17 languages. As of today we count 314 catalogs and 11822 patterns - 11812 of which are translated into English (US/in).
We work hard to bring you the best knitting and crochet have to offer, inspiration and advice as well as great quality yarns at incredible prices! Would you like to use our patterns for other than personal use? You can read what you are allowed to do in the Copyright text at the bottom of all our patterns. Happy crafting!
Post a comment to pattern DROPS 191-30
We would love to hear what you have to say about this pattern!
If you want to leave a question, please make sure you select the correct category in the form below, to speed up the answering process. Required fields are marked *.