DROPS Brushed Alpaca Silk uni colour 77% Alpaca, 23% Silk |
3.95 $ /25g |
Order |
Clicking the ORDER button will redirect you to Wool Warehouse Direct Ltd website
The yarn cost is calculated from the pattern’s smallest size and the yarn’s cheapest product type. Looking for an even better price? You might find it on the DROPS Deals!
-------------------------------------------------------
Alternative Yarn – See how to change yarns here
Yarn Groups A to F – Use the same pattern and change the yarn here
Yarn usage using an alternative yarn – Use our yarn converter here
-------------------------------------------------------
DROPS Brushed Alpaca Silk uni colour 77% Alpaca, 23% Silk 3.95 $ /25g Order |
Clicking the ORDER button will redirect you to Wool Warehouse Direct Ltd website
The yarn cost is calculated from the pattern’s smallest size and the yarn’s cheapest product type. Looking for an even better price? You might find it on the DROPS Deals!
This pattern has been corrected. Click here to see the correction/s.
All measurements in charts are in cm.
= knit from right side, purl from wrong side | |
= purl from right side, knit from wrong side | |
= knitting direction |
Each of our patterns has specific tutorial videos to help you.
These step-by-step tutorials might also help you:
Why is the knitting/crochet tension so important?
Knitting tension is what determines the final measurements of your work, and is usually measured per 10 x 10 cm. It is provided like so: number of stitches in width x number of rows in height - eg: 19 stitches x 26 rows = 10 x 10 cm.
The knitting tension is very individual; some people knit/crochet loosely while others work tightly. You adjust the knitting tension with the needle size, which is why the suggested needle size only serve as a guide! You need to adjust this (up or down) to ensure that YOUR knitting tension matches the knitting tension provided in the pattern. If you work with a different knitting tension than provided you will have a different yarn consumption, and your work will have different measurements than what the pattern suggests.
The knitting tension also determines which yarns can replace each other. As long as you achieve the same knitting tension you can replace one yarn with another.
See DROPS lesson: How to measure your tension/gauge
See DROPS video: How to make a gauge tension swatch
How do I know how many balls of yarn I need?
The required amount of yarn is provided in grams, eg: 450 g. To calculate how many balls you’ll need you first need to know how many grams are in 1 ball (25g, 50g or 100g). This information is available if you click on the individual yarn quality on our pages. Divide the amount required with the amount of each ball. For example, if each ball is 50g (the most common amount), the calculation will be as follows: 450 / 50 = 9 balls.
Can I use a different yarn than what the pattern suggests?
The important thing when changing from one yarn to another is that the knitting/crochet tension remains the same. This is so that the measurements of the finished piece will be the same as on the sketch provided. It is easier to achieve the same knitting tension using yarns from the same yarn group. It is also possible to work with multiple strands of a thinner yarn to achieve the knitting tension of a thicker one. Please try our yarn converter. We recommend you to always work a test swatch.
Please NOTE: when changing yarn the garment might have a different look and feel to the garment in the photo, due to individual properties and qualities of each yarn.
See DROPS lesson: Can I use a different yarn than the one mentioned in the pattern?
What are the yarn groups?
All our yarns are categorised into yarn groups (from A to F) according to thickness and knitting tension – group A contains the thinnest yarns and group F the thickest. This makes it easier for you to find alternative yarns to our patterns, should you wish to switch yarn. All yarns within the same group have a similar knitting tension and can easily replace each other. However, different yarn qualities have different structures and properties which will give the finished work a unique look and feel.
How do I use the yarn converter?
At the top of all our patterns you’ll find a link to our yarn converter, which is a helpful tool should you wish to use a different yarn than suggested. By filling in the yarn quality you wish to replace, the amount (in your size) and number of strands, the converter will present good alternative yarns with the same knitting tension. Additionally it will tell you how much you’ll require in the new qualities and whether you’ll need to work with multiple strands. Most skeins are 50g (some are 25g or 100g).
If the pattern is worked with multiple colours, every colour will have to be converted separately. Similarly, if the pattern is worked with several strands of different yarns (for example 1 strand Alpaca and 1 strand Kid-Silk) you will have to find alternatives for each, individually.
Why do you show discontinued yarns in the patterns?
Since different yarns have different qualities and textures we have chosen to keep the original yarn in our patterns. However, you can easily find options among our available qualities by using our yarn converter, or simply pick a yarn from the same yarn group.
It is possible that some retailers still have discontinued yarns in stock, or that someone has a few skeins at home that they would like to find patterns for.
The yarn converter will provide both alternative yarn as well as required amount in the new quality.
What size should I knit?
If you think it's hard to decide what size to make, it can be a good idea to measure a garment you own already and like the size of. Then you can pick the size by comparing those measures with the ones available in the pattern's size chart.
You'll find the size chart at the bottom of the pattern.
See DROPS lesson: How to read size chart
Why do I get the wrong knitting tension with the suggested needle size?
The needle size provided in the pattern serves only as a guide, the important thing is to follow the knitting tension. And since knitting tension is very individual, you will have to adjust the needle size to ensure that YOUR tension is the same as in the pattern – maybe you’ll have to adjust 1, or even 2 needle sizes, up or down to achieve the correct tension. For this, we recommend that you work test swatches.
Should you work with a different knitting tension than the one provided, the measurements of the finished garment might deviate from the measurement sketch.
See DROPS lesson: How to measure your tension/gauge
See DROPS video: How to make a gauge tension swatch
Why is the pattern worked top-down?
Working a garment top-down provides more flexibility and room for personal adjustment. For example it is easier to try the garment on while working, as well as making adjustments to length of yoke and shoulder caps.
The instructions are carefully explaining every step, in the correct order. Diagrams are adjusted to the knitting direction and are worked as usual.
How do I work according to a knitting diagram?
The diagram depicts all rows/rounds, and every stitch seen from the right side. It is read from bottom to top, from right to left. 1 square = 1 stitch.
When working back and forth, every other row is worked from the right side and every other row is worked from the wrong side. When working from the wrong side, the diagram will have to be worked reversed: from left to right, knit stitches are purled, purl stitches are knit etc.
When working in the round every round is worked from the right side and the diagram are worked from right to left on all rounds.
See DROPS lesson: How to read knitting diagrams
How do I work according to a crochet diagram?
The diagram depicts all rows/rounds, and every stitch seen from the right side. It is worked from bottom to top, from right to left.
When working back and forth every other row is worked from the right side: from right to left and every other row is worked from the wrong side: from left to right.
When working in the round, every row in the diagram are worked from the right side, from right to left.
When working a circular diagram you start in the middle and work your way outwards, counter clockwise, row by row.
The rows usually start with a given number of chain stitches (equivalent to the height of the following stitch), this will either be depicted in the diagram or explained in the pattern.
See DROPS lesson: How to read crochet diagrams
How do I work several diagrams simultaneously on the same row/round?
Instructions for working several diagrams after each other on the same row/round, will often be written like so: “work A.1, A.2, A.3 a total of 0-0-2-3-4 times". This means you work A.1 once, then A.2 is worked once, and A.3 is repeated (in width) the number of times provided for your size – in this case like so: S = 0 times, M = 0 times, L=2 times, XL= 3 times and XXL = 4 times.
The diagrams are worked as usual: begin with the first row in A.1, then work the first row in A.2 etc.
See DROPS lesson: How to read knitting diagrams
See DROPS lesson: How to read crochet diagrams
Why are the sleeves shorter in larger sizes?
The total width of the garment (from wrist-to-wrist) will be larger in the larger sizes, despite the actual sleeves being shorter. The larger sizes have longer sleeve caps and wider shoulders, so there will be a good fit in all sizes.
Where on the garment is the length measured?
The measurement sketch/schematic drawing provides information regarding the full length of the garment. If it’s a jumper or a jacket the length is measured from the highest point on the shoulder (usually closest to the neckline), and straight down to the bottom of the garment. It is NOT measured from the tip of shoulder. Similarly, the length of yoke is measured from the highest point on the shoulder and down to where yoke is split into body and sleeves.
See DROPS lesson: How to read a schematic drawing
What is a repeat?
Diagrams are often repeated on the round or in height. 1 repeat is the diagram the way it appears in the pattern. If it says to work 5 repeats of A.1 in the round, then you work A.1 a total of 5 times after/next to each other in the round. If it says to work 2 repeats of A.1 vertically/in height you work the entire diagram once, then begin again at the start and work the entire diagram one more time.
Why does the piece start with more chain stitches than it’s worked with?
Chain stitches are slightly narrower than other stitches and to avoid working the cast-on edge too tight, we simply chain more stitches to begin with. The stitch count will be adjusted on the following row to fit the pattern and measurement sketch.
Why increase before the rib edge when the piece is worked top-down?
The rib edge is more elastic and will contract slightly compared to, for example, stocking stitch. By increasing before the rib edge, you avoid a visible difference in width between the rib edge and the rest of the body.
Why increase in the cast-off edge?
It’s very easy to cast off too tightly, and by making yarn overs while casting off (and simultaneously casting these off) you avoid a too tight cast off edge.
See DROPS video: How to bind off with yarn overs (yo)
How do I increase/decrease on every 3rd and 4th row/round alternately?
To achieve an even increase (or decrease) you can increase on, for example: every 3rd and 4th row alternately, like so: work 2 rows and increase on the 3rd row, work 3 rows and increase on the 4th. Repeat this until the increase is complete.
See DROPS lesson: Increase or decrease 1 st on every 3rd and 4th row alternately
How can I work a jacket in the round instead of back and forth?
Should you prefer to work in the round instead of back and forth, you may of course adjust the pattern. You’ll need to add steeks mid-front (usually 5 stitches), and follow the instructions. When you would normally turn and work from the wrong side, simply work across the steek and continue in the round. At the end you’ll cut the piece open, pick up stitches to work bands, and cover the cut edges.
See DROPS video: How to knit steeks and cut open
Can I work a jumper back and forth instead of in the round?
Should you prefer to work back and forth instead of in the round, you may of course adjust the pattern so you work the pieces separately and then assemble them at the end. Divide the stitches for the body in 2, add 1 edge stitch in each side (for sewing) and work the front and back pieces separately.
See DROPS lesson: Can I adapt a pattern for circular needles into straight needles?
Why is the pattern slightly different than what I see in the photo?
Pattern repeats can vary slightly in the different sizes, in order to get the correct proportions. If you’re not working the exact same size as the garment in the photo, yours might deviate slightly. This has been carefully developed and adjusted so that the complete impression of the garment is the same in all sizes.
Make sure to follow instructions and diagrams for your size!
How do I make a women’s size garment into a men’s size one?
If you have found a pattern you like which is available in women’s size it’s not very difficult to convert it to men’s size. The biggest difference will be the length of sleeves and body. Start working on the women size that you think would fit across the chest. The additional length will be worked right before you cast off for the armhole/sleeve cap. If the pattern is worked top-down you can add the length right after the armhole or before the first decrease on sleeve.
Regarding additional yarn amount, this will depend on how much length you add, but it is better with a skein too many than too few.
How do I prevent a hairy garment from shedding?
All yarns will have excess fibres (from production) that might come off as lint or shedding. Brushed yarns (ie hairier yarns) have more of these loose, excess fibres, causing more shedding.
Shedding also depends on what is worn under or over the garment, and whether this pulls at the yarn fibres. It’s therefore not possible to guarantee that there will be no shedding
Below are some tips on how to get the best result when working with hairier yarns:
1. When the garment is finished (before you wash it) shake it vigorously so the looser hairs come off. NOTE: do NOT use a lint roller, brush or any method that pulls at the yarn.
2. Place the garment in a plastic bag and put it in your freezer - the temperature will cause the fibres to become less attached to each other, and excess fibres will come off easier.
3. Leave in the freezer for a few hours before taking it out and shaking it again.
4. Wash the garment according to the instructions on the yarn label.
Why does my garment pill?
Pilling is a natural process that happens to even the most exclusive of fibers. It's a natural sign of wear and tear that is hard to avoid, and that is most visible in high friction areas of your garment like a sweater's arms and cuffs.
You can make your garment look as new by removing the pilling, using a fabric comb or a pill/lint remover.
Riviera Stripes |
||||||||||
|
|
|||||||||
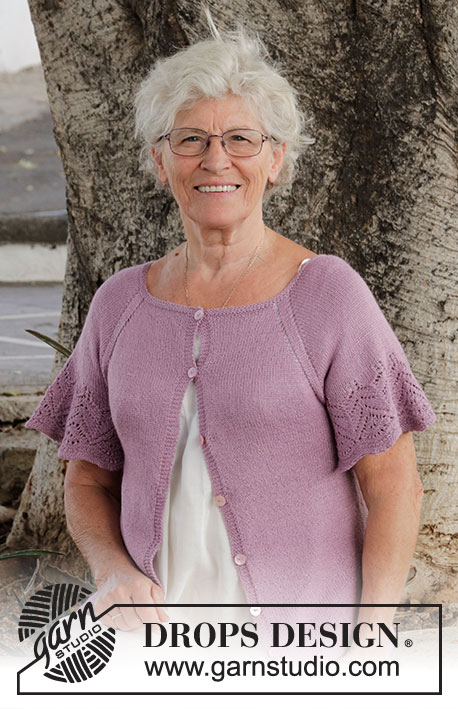
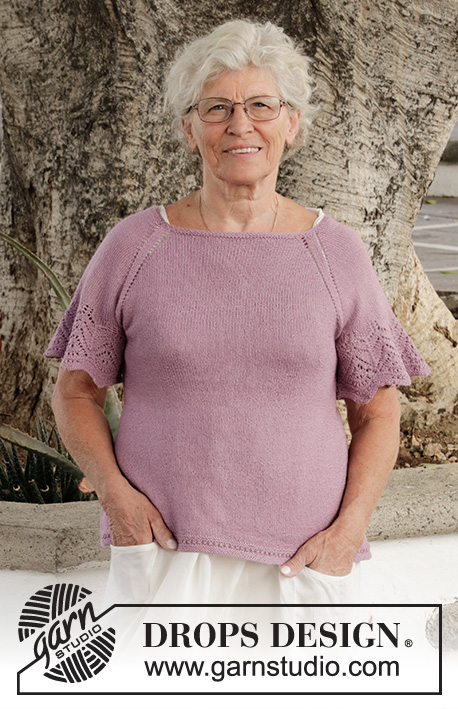
Knitted sweater with textured pattern, stripes and raglan, worked top down. Sizes S - XXXL. The piece is worked in DROPS Brushed Alpaca Silk.
DROPS 191-30 |
||||||||||
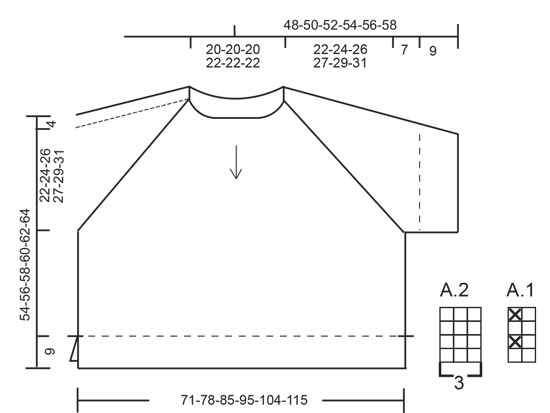
INFORMATION FOR THE PATTERN: RIDGE/GARTER STITCH (worked back and forth): 1 ridge = Knit 2 rows. INCREASE/DECREASE TIP (evenly spaced): To work out how to increase/decrease evenly, count the total number of stitches on the needle (e.g. 96 stitches), and divide by the number of increases/decreases to be made (e.g. 24) = 4. In this example make 1 yarn over after every 4th stitch, when increasing; on the next round work the yarn overs twisted to avoid holes. When decreasing knit every 3rd and 4th stitch together (in this example). STRIPES: * Work 2½-3-3-3-3½-3½ cm with denim blue, work 5-5-5-5½-5½-5½ cm with off white *, repeat from *-* onwards. PATTERN: See diagrams A.1 and A.2. The diagrams show all the rows in the pattern seen from the right side. RAGLAN SLEEVE: The yarn overs are worked twisted on the next round to avoid holes. Increase 1 stitch (= 2 new stitches on each sleeve) as follows: After A.2: Make 1 yarn over. Before A.2: Make 1 yarn over. Work the new stitches into the pattern. RAGLAN FRONT/BACK PIECE: The yarn overs are worked twisted on the next round to avoid holes. Increase 2 stitches (= 4 new stitches on front piece/4 new stitches on back piece) as follows: After A.2: Make 1 yarn over, work 1 stitch, make 1 yarn over. Before A.2: Work until there is 1 stitch left before A.2, make 1 yarn over, work 1 stitch, make 1 yarn over. Increase 1 stitch (= 2 new stitches on front piece/2 new stitches on back piece) as follows: After A.2: Make 1 yarn over. Before A.2: Make 1 yarn over. Work the new stitches into the pattern. ---------------------------------------------------------- SWEATER: The piece is worked in the round with circular needle from mid back, top down. The body is divided for the split and the front and back pieces are finished separately, back and forth on the needle. The sleeves are worked in the round with short circular needle/double pointed needles. YOKE: Cast on 96-96-96-102-102-102 stitches with circular needle size 5 mm / US 8 and off white. Knit 1 round. Then work rib (= knit 3 / purl 3) for 8 cm / 3⅛". Knit 1 round and increase 24-24-28-30-34-50 evenly on this round - read INCREASE/DECREASE TIP = 120-120-124-132-136-152 stitches. Now start the STRIPES - see description above. The next round is worked as follows: The round starts approx. mid back. Work A.1 over the first 22-22-22-24-24-28 stitches (= half back piece), work A.2 (= 3 stitches), work A.1 over the next 12-12-12-14-14-14 stitches (= sleeve), A.2, work A.1 over the next 42-42-44-46-48-56 stitches (= front piece), A.2, work A.1 over the next 12-12-12-14-14-14 stitches, A.2, work A.1 over the last 20-20-22-22-24-28 stitches (= half back piece). REMEMBER THE GAUGE! Continue the pattern like this and increase to RAGLAN - see description above. The increases are different on front/back pieces and on the sleeves as follows: SLEEVE: Increase every 2nd round a total of 17-18-18-22-23-24 times, then every 4th round a total of 7-8-9-8-9-10 times. FRONT/BACK PIECE: Increase 2 stitches on each side of A.2 every 2nd round a total of 6-9-12-18-21-24 times, then increase 1 stitch on each side of A.2 every 2nd round a total of 25-25-24-20-20-20 times. After all the increases to raglan there are 364-396-424-476-512-560 stitches on the needle. Continue in the round without increasing until the piece measures 22-24-26-27-29-31 cm / 8⅝"-9⅜"-10 ¼"-10⅝"-11⅜"-12⅛" from after the neck. The next round is worked as follows: Work A.1 over the first 61-67-72-82-88-98 stitches (= half back piece), place the next 62-66-68-76-80-84 stitches on 1 thread for sleeve, work A.1 over the next 120-132-144-162-176-196 stitches (= front piece), place the next 62-66-68-76-80-84 stitches on 1 thread for sleeve, work A.1 over the last 59-65-72-80-88-98 stitches (= half back piece). BODY: = 240-264-288-324-352-392 stitches. Insert 1 marker thread in each side. Continue with stripes and A.1 as before over all stitches. When the piece measures approx. 19-19-19-20-20-20 cm / 7⅜"-7⅜"-7⅜"-7⅞"-7⅞"-7⅞" from the division – adjust so that you finish after a stripe with denim blue, continue working with off white to finished length. Work 1 round stockinette stitch where you increase 6-6-6-6-2-4 stitches evenly on round = 246-270-294-330-354-396 stitches. Now divide the piece and the front and back pieces are finished separately. FRONT PIECE: = 123-135-147-165-177-198 stitches. Continue by working rib as follows - from the right side: 3 stitches in garter stitch, * knit 3, purl 3 *, work from *-* until there are 6 stitches left, knit 3 and 3 stitches in garter stitch. Continue like this until the rib measures 9 cm / 3½", loosely bind off with knit over knit and purl over purl. BACK PIECE: = 123-135-147-165-177-198 stitches. Work as for front piece. SLEEVE: The piece is worked in the round with short circular needle/double pointed needles. Place the 62-66-68-76-80-84 stitches from the thread on the one side of the piece on short circular needle size 5 mm / US 8. Continue with stripes as before and pattern A.1 over all stitches. When you have worked 1 stripe with denim blue on the sleeve continue with off white to finished length. When the piece measures approx. 7 cm / 2¾" from the division knit 1 round where you decrease 2-0-2-4-2-0 stitches evenly on round = 60-66-66-72-78-84 stitches. Work rib (= knit 3 / purl 3) for 9 cm / 3½". Loosely bind off with knit over knit and purl over purl. Work the other sleeve in the same way. |
||||||||||
Diagram explanations |
||||||||||
|
||||||||||
Have you made this or any other of our designs? Tag your pictures in social media with #dropsdesign so we can see them! Do you need help with this pattern?You'll find tutorial videos, a Comments/Questions area and more by visiting the pattern on garnstudio.com. © 1982-2024 DROPS Design A/S. We reserve all rights. This document, including all its sub-sections, has copyrights. Read more about what you can do with our patterns at the bottom of each pattern on our site. |
With over 40 years in knitting and crochet design, DROPS Design offers one of the most extensive collections of free patterns on the internet - translated to 17 languages. As of today we count 304 catalogs and 11422 patterns - 11417 of which are translated into English (US/in).
We work hard to bring you the best knitting and crochet have to offer, inspiration and advice as well as great quality yarns at incredible prices! Would you like to use our patterns for other than personal use? You can read what you are allowed to do in the Copyright text at the bottom of all our patterns. Happy crafting!
Comments / Questions (32)
Lena wrote:
Hej! Kan man välja att inte sticka mönster A1 och istället bara sticka slätstickning? När jag tittar på bilderna så ser det ut som om det är enbart slätstickning.
26.12.2020 - 13:37DROPS Design answered:
Hej Lena. Det är lite svårt att se på bilderna men det är strukturmönster. Vill du sticka den i slätstickning så kan du göra det men det är viktigt att du då får samma stickfasthet som uppges i mönstret även i slätstickning för att måtten ska stämma. Mvh DROPS Design
05.01.2021 - 12:16Daniela Cocco wrote:
Buonasera, ho realizzato questo modello già in 2 colori e mi è venuto benissimo!! Vorrei realizzarlo con il filato “fabel “ magari con 2 fili e “ big Delight “ e “ alpaca boucle’”, vorrei sapere Se il numero delle maglie rimane lo stesso oppure cambia.. Grazie mille 😊
03.06.2020 - 17:08DROPS Design answered:
Buongiorno Daniela, Fabel appartiene al gruppo filati A per cui usando due fili può lavorare seguendo le istruzioni riportate. Per quanto riguarda Big delight e Alpaca Bouclè, sono filati che appartengono al gruppo filati C, quindi può lavorare ad un filo solo. Si ricordi di controllare che il suo campione corrisponda a quello indicato. Buon lavoro!
04.06.2020 - 10:20Christiane Baby wrote:
Bonjour Pour ce modèle 191 30 après avoir monter les 8 cm de côtes je ne comprends pas la suite que veut dire commencer au milieu dos A1 au-dessus des 22 premières mailles (lesquelles)A2 au dessus des 12 mailles suivantes (lesquelles) Merci d avance mais ça va être compliqué.
28.12.2019 - 17:17DROPS Design answered:
Bonjour Mme Baby, après les 8 cm de côtes tricotez ainsi: les 22 premières mailles en suivant A.1, les 3 m suivantes en suivant A.3, les 12 m suivante en suivant A.1 et ainsi de suite. Bon tricot!
02.01.2020 - 12:34Hej wrote:
Hej Passer mængden af garn virkelig?? Hilsen Helle
19.05.2019 - 01:57Maria Ka wrote:
Dzień dobry, przerobiłam już pierwszą linijkę wzorów A1 i A2. Dobrze zrozumiałam, że teraz powinnam już zacząć dodawać oczka na reglan - w tej drugiej linijce? Czyli (w rozmiarze S) przerabiam teraz 21 oczek schematem A1, narzut, oczko lewe, narzut, 3 oczka schematem A2 itd? CZy w kolejnym okrążeniu przerabiać oczka przekręcone w miejscu narzutu?
09.01.2019 - 14:14DROPS Design answered:
Witaj Mario! Tak dokładnie, teraz zaczynasz dodawać oczka na reglan - uważaj tylko bo inaczej (inna częstotliwość, inna liczba dodanych oczek tj. 1 lub 2 i sposób dodawania oczek) są dodawane oczka na tyle i przodzie, a inaczej na rękawach (zobacz opis w 2 miejscach: pod materiałami, a dalej w środku części KARCZEK). Nie przekręcać dodawanych oczek, powstaną dziurki jak na zdjęciu. Powodzenia!
09.01.2019 - 16:50Silke wrote:
Hallo, ich verstehe das Diagramm nicht A1 und A2 wenn ich in Runden stricke, gibt es doch keine Rückreihe. Auf dem Foto sieht es aus wie Halbpatent, oder wurde glatt rechts gestrickt? Liebe Grüße Silke
07.01.2019 - 16:03DROPS Design answered:
Liebe Silke, die Diagramme stricken Sie wie Sie erscheinen, dh 1 Kästchen = 1 Masche x 1 Runde, bei A.1 Reihe 1 stricken Sie 2 Ma re, Reihe 2, 1 M re, 1 M li - diese beide Reihen wiederholen. Bei A.2 stricken Sie die 3 Maschen rechts in jede Runde. Viel Spaß beim stricken!
08.01.2019 - 08:13Bozon Laurence wrote:
Bonjour pouvez vous m'indiquer le nombre de pelotes de chaque couleur qu'il faut pour réaliser ce pull en taille M ? Merci
22.09.2018 - 10:19DROPS Design answered:
Bonjour Mme Bozon, vous trouverez les quantités nécessaires, au poids, pour chaque taille, dans l'en-tête du modèle, soit en taille M 125 g DROPS Brushed Alpaca Silk en naturel et 50 g en bleu. 1 pelote DROPS Brushed Alpaca Silk = 25 g, il vous faudra ainsi 5 pelotes en naturel et 2 en bleu. Bon tricot!
24.09.2018 - 08:13Elisabetta wrote:
Hi, I am currently knitting this sweater and I am really enjoying it. The problem is that after I finished all the increases for the yoke I ended up with 360 stitches instead of 396 (as recommended for the M size). After checking the increases on the pattern it looks like the sum is 360, but then the pattern goes on with 396. Am I understanding wrong or is there a mistake on the pattern? Thanks for your help!
07.07.2018 - 12:38DROPS Design answered:
Dear Elisabetta, when all increases for raglan are done you should have 396 sts in size M - make sure you increase 2 sts at the beg of back/front piece + 2 sts at the end of back/front piece a total of 9 times before increasing only 1 st 25 times. Happy kniting!
09.07.2018 - 08:03Melanie W wrote:
Hallo, ich bin gerade am Abteilen für die Ärmel. Wenn ich die Ärmel mit je 12 Maschen abteile hab ich 10 Maschen zuviel. (Statt 110 die auf Vorderteil und Rückenteil verteilt werden sind es 120 wie angegeben) Was mache ich mit den restlichen?
23.05.2018 - 14:30DROPS Design answered:
Liebe Melanie, So werden die 120 M in beiden ersten Größen gestrickt: A.1 über die ersten 22 Maschen, A.2 (= 3 Maschen), A.1 über die nächsten 12 Maschen, A.2 (= 3 Maschen), A.1 über die nächsten 42 Maschen, A.2 (= 3 Maschen), A.1 über die nächsten 12 Maschen, A.2 (= 3 Maschen), A.1 über die letzten 20 Maschen (= halbes Rückenteil) = 22 (halbes Rückenteil) + 3 + 12 (= Ärmel) + 3 + 42 (Vorderteil) + 3 + 12 (Ärmel) + 3 + 20 (halbes Rückenteil) = 22+3+12+3+42+3+12+3+20=120 M. Viel Spaß beim stricken!
23.05.2018 - 14:46MARCEAU wrote:
C\\\\\\\' est dommage que vous ne mettiez pas à jour le nombre de pelotes de chaque couleur.Comment les personnes qui ont fait ce pull ont procédé?Puis-je commander ce que vous préconisez, et vous renverrez le complément à vos frais????????
18.05.2018 - 10:50DROPS Design answered:
Bonjour Mme Marceau, la correction a été faite, vous avez désormais les bonnes quantités indiquées pour chaque couleur. Bon tricot!
18.05.2018 - 13:35