
Looking for a yarn?


Comments / Questions (48)
![]() Silje wrote:
Silje wrote:
Hvordan syre man sammen på slutten? Finner ingen gode videoer..
28.04.2025 - 21:52DROPS Design answered:
Hej Silje, her ser du hvordan man kan sy tøfler sammen: sy tøfler sammen
30.04.2025 - 09:58
![]() Renette wrote:
Renette wrote:
Guten Tag, Ich möchte die Schuhe gerne mit einer sehr „festen“ Wolle stricken. Soll die Sohle über 13 Maschen auch im Rippenmuster gestrickt werden oder kann man sie auch glatt oder kraus rechts stricken? Mit der Wolle, die ich verwenden möchte, würde man sonst die Rippen an der Sohle beim Auftreten zu stark spüren und ich möchte zusätzlich noch eine Ledersohle drunter nähen.
09.01.2025 - 11:34DROPS Design answered:
Liebe Renette, das könnte wahrscheinlich passen., am besten versuchen Sie es so, so wissen Sie, ob es Ihnen gefällt oder nicht. Viel Spaß beim Stricken!
09.01.2025 - 18:01
![]() Marja Krappe wrote:
Marja Krappe wrote:
Hei! Olisi hyvä tietää eri kokojen lopullinen tossun korkeus. Kiitos!
12.10.2024 - 19:29DROPS Design answered:
Hei, koon 1/3 kk tohvelin korkeus on 9½ cm, koon 6/9 kk tohvelin korkeus on 11 cm, koon 12/18 kk tohvelin korkeus on 12½ cm, koon 2 vuotta tohvelin korkeus on 14 cm ja koon 3/4 vuotta tohvelin korkeus on 15½ cm.
14.10.2024 - 18:00
![]() Angela Michaelis wrote:
Angela Michaelis wrote:
Laut Anleitung beträgt mit 48Maschen der Umfang des Sockens 20cm. Das ist für ein Baby mit einem Monat viel zu viel???
29.09.2024 - 19:41DROPS Design answered:
Liebe frau Michaelis, 24 M = 10 cm ist nur für glattrechts, hier wird man Bündchen dann Zöpfe stricken, so sollte Ihre Maschenprobe richtig sein, dann sollten die Socken schön passen. Viel Spaß beim Stricken!
30.09.2024 - 09:45
![]() Patricia wrote:
Patricia wrote:
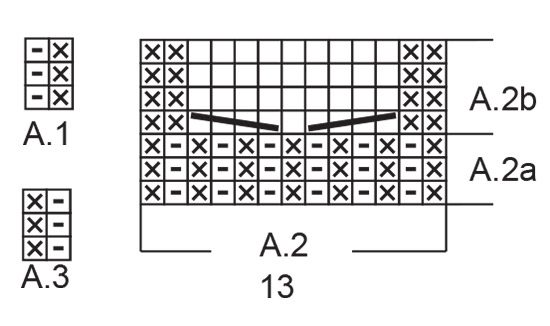
Hello! I am stuck at "When piece measures 5-6-6 (6-7) cm, work as before until 1 stitch remains on round, knit the last stitch and the first 2 stitches 3 together (= 2 stitches decreased), work 4 rounds" I knit the last stitch with the first 2 stitches as instructed. I am now confused on how to continue the new round; do I knit A.1 for 18 stitches still, or do I only do it for 16 stitches? Also, does the decrease count as the first A.1 stitch, or do I do another twisted knit to start?
27.11.2022 - 03:11DROPS Design answered:
Dear Patricia, continue working A.1 over A.1, A.2 over A.2 and A.3 over A.3, but the number of stitches in A.1 and A.3 will vary due to the decreases. The decreased stitch is the first stitch of A.1. Happy knitting!
27.11.2022 - 16:42
![]() Katarzyna wrote:
Katarzyna wrote:
Dzień dobry, mam problem ze zrozumieniem początku instrukcji, tj.: "Przerabiać schemat A.1 ponad 18-22 pierwszymi oczkami, schemat A.2a i zakończyć przerabiając schemat A.3 ponad 17-21 ostatnimi oczkami". Nigdy wcześniej nie spotkałam określenia "przerabiać ponad oczkami". Czy słowo "ponad" ma takie samo znaczenie w zdaniu: "przerabiać schemat A.2b ponad schematem A.2a"? Będę bardzo wdzięczna za pomoc.
21.09.2022 - 21:42DROPS Design answered:
Witaj Kasiu, ponad oczkami oznacza 'przez X oczek'. Serdecznie pozdrawiamy!
22.09.2022 - 11:34
![]() Britney W wrote:
Britney W wrote:
Hi! I will also be stuck at: "When piece measures approx. 8-9-10 (11-12) cm, adjust so that next round in A.2b is 1st or 3rd round, " I don't understand any of that. Sorry for the questions, I usually knit to long hand patterns. This is my first diagram! Thanks for your help!
20.03.2022 - 13:23DROPS Design answered:
Dear Britney, this means that, when measuring the piece, you need to make sure that the last round you have worked is the 2nd or 4th round in A.2b, so that the pattern is not discontinued. Happy knitting!
20.03.2022 - 18:26
![]() Britney W wrote:
Britney W wrote:
I'm stuck at: "When piece measures 5-6-6 (6-7) cm, work as before until 1 stitch remains on round, knit the last stitch and the first 2 stitches 3 together (= 2 stitches decreased)" If I work the round until 1 stitch remain and knit 3 together, I will be working into the front of the sock A.2b and knitting together the 2 purls right before the first cable. Then the cable pattern will look weird. I am so confused!
20.03.2022 - 13:10DROPS Design answered:
Dear Britney, the last stitch in the round is the last stitch from A.3 (= mid back of sock) which is worked together with the first 2 stitches of A.1 (= also at the mid back of the sock). These stitches are worked in rib so they won't modify the cable pattern. Happy knitting!
20.03.2022 - 18:23
![]() Janie wrote:
Janie wrote:
If you are working in a round how is there a wrong side
28.02.2022 - 23:51DROPS Design answered:
Hi Janie, The wrong side is when you are working the heel back and forth. Happy knitting!
01.03.2022 - 09:06
![]() Lorella Ronca wrote:
Lorella Ronca wrote:
Buongiorno, non riesco a capire da dove parte questo progetto. Dall'alto? Quando descrive di rimanere solo con una maglia di che punto della stivalino si parla? Esiste un disegno dello stivale aperto? Prima di essere cucito? Grazie
30.12.2021 - 11:51DROPS Design answered:
Buonasera Lorella, le calze sono lavorate in tondo. Buon lavoro!
30.12.2021 - 22:10
|
||||||||||||||||
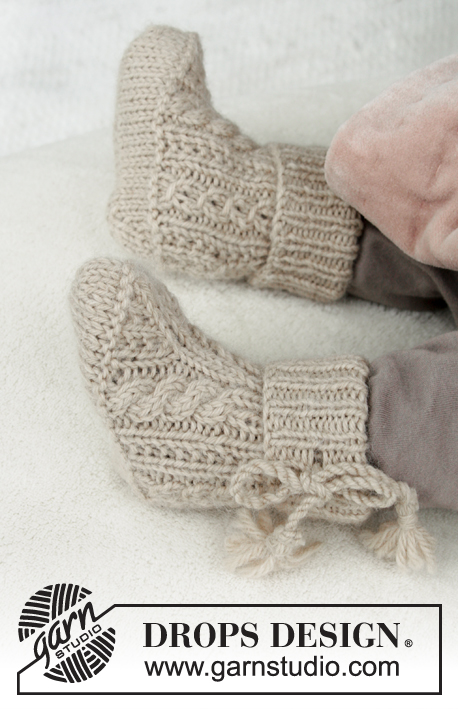
Mini Snow Boots#minisnowboots |
||||||||||||||||
|
|
||||||||||||||||
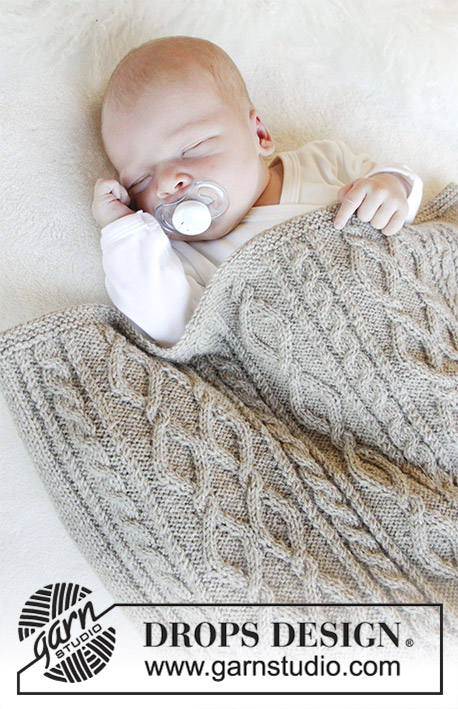
Knitted socks with cables and rib for baby. Size 1 month - 4 years Piece is knitted in DROPS Puna.
DROPS Baby 31-25 |
||||||||||||||||
|
INFORMATION FOR PATTERN: PATTERN: See diagrams A.1 to A.3. Diagrams show all rows in pattern seen from the right side. ---------------------------------------------------------- SOCK: Worked in the round on double pointed needles. Cast on 48-52-52 (56-56) stitches on double pointed needles size 2.5 mm / US 1.5 with Puna. Work A.1 (= 2 stitches) over the first 18-20-20 (22-22) stitches, A.2a (= 13 stitches) and finish with A.3 (= 2 stitches) over the remaining 17-19-19 (21-21) stitches. When A.2a has been worked 1 time vertically, work A.2b over A.2a. Continue pattern like this. REMEMBER THE GAUGE! When piece measures 5-6-6 (6-7) cm, work as before until 1 stitch remains on round, knit the last stitch and the first 2 stitches 3 together (= 2 stitches decreased), work 4 rounds, then purl 3 stitches (= purl 1, knit 1 twisted, 1 purl) together mid back (= 2 stitches decreased) = 44-48-48 (52-52) stitches. When piece measures approx. 8-9-10 (11-12) cm, adjust so that next round in A.2b is 1st or 3rd round, work the first 16-18-18 (20-20) stitches, then slip them on 1 stitch holder, work the next 13 stitches and keep this on the needle (A.2b = upper foot) and work the remaining 15-17-17 (19-19) stitches and then slip them on 1 stitch holder. Cut the yarn and continue back and forth with A.2b over the 13 stitches on needle. When upper foot measures 3½-4-5 (6½-7½) cm/1¼"-1½"-2" (2½"-2⅞"), pick up 10-12-14 (20-22) stitches on each side of upper foot and slip stitches from stitch holders back on needles = 64-72-76 (92-96) stitches. Work rib (= purl 1, knit 1 twisted) in the round, over all stitches for 1½-2-2½ (3-3½) cm / ½"-¾"-⅞" (1⅛"-1¼"), then bind off the first 26-30-32 (40-42) stitches, work rib as before over the next 13 stitches and bind off the last 25-29-31 (39-41) stitches. Work rib back and forth for 9-10-11 (13-15) cm over the remaining 13 stitches for sole. Stitch knitted twisted from right side, is purled from wrong side. bind off and sew sole to sock - sew edge to edge to avoid a chunky seam. Knit another sock the same way. |
||||||||||||||||
Diagram explanations |
||||||||||||||||
|
||||||||||||||||
|
||||||||||||||||
Have you finished this pattern?Tag your pictures with #dropspattern #minisnowboots or submit them to the #dropsfan gallery. Do you need help with this pattern?You'll find 18 tutorial videos, a Comments/Questions area and more by visiting the pattern on garnstudio.com. © 1982-2025 DROPS Design A/S. We reserve all rights. This document, including all its sub-sections, has copyrights. Read more about what you can do with our patterns at the bottom of each pattern on our site. |
||||||||||||||||


With over 40 years in knitting and crochet design, DROPS Design offers one of the most extensive collections of free patterns on the internet - translated to 17 languages. As of today we count 314 catalogs and 11822 patterns - 11812 of which are translated into English (US/in).
We work hard to bring you the best knitting and crochet have to offer, inspiration and advice as well as great quality yarns at incredible prices! Would you like to use our patterns for other than personal use? You can read what you are allowed to do in the Copyright text at the bottom of all our patterns. Happy crafting!
Post a comment to pattern DROPS Baby 31-25
We would love to hear what you have to say about this pattern!
If you want to leave a question, please make sure you select the correct category in the form below, to speed up the answering process. Required fields are marked *.