
Looking for a yarn?


Comments / Questions (193)
![]() Karen Richardt wrote:
Karen Richardt wrote:
Opskriften er total forkert. Garnmængden passer slet ikke og størelse bliver meget større. Der mangler mindst 2 nøgler til størrelse 12/18 mdr.
11.07.2025 - 13:53
![]() Jeanette wrote:
Jeanette wrote:
I lovd this knitting pattern, have been knitting for 60 years and have never seen sleeves done this way. I learned to crochet 7 years ago but patterns confuse me. I have done the first round but do not understand 2nd. I don't see how to do a trebel in a chain. I have tried but failed. Please help me. Thank you.
08.07.2025 - 20:24DROPS Design answered:
Dear Jeanette, if you mean row 2 of the crochet edge, it's worked the same way for the neck and sleeve cuff. You work the treble crochet as you would over any other stitch but inserting the hook in one loop of the 4th chain stitch from the hook. Happy crochetting!
14.07.2025 - 01:27
![]() Godard wrote:
Godard wrote:
Je ne comprends pas combien faut il monter de mailles pour la manche car avec 4m, je ne vois pas comment un bb puisse passer son poignet dedans une fois les coutures faites soit 2m
06.07.2025 - 17:07DROPS Design answered:
Bonjour Mme Godard, monter les mailles de la manche à la fin de chaque rang sur l'endroit (= sur le côté) ainsi: (4) 4-4-5-6 (7-8) fois (3) 4-6-6-6 (6-6) mailles et 1 fois (16) 19-19-18-19 (23-26) mailles. Dans la deuxieme taille vous augmentez 4 x 4 mailles et 1 x 19 mailles = 14+19=36 mailles pour chaque manche. Bon tricot!
14.07.2025 - 13:03
![]() Jeanette wrote:
Jeanette wrote:
I have been knitting 63 years but I am sitting here reading the instructions over and over. I have the bottom portion completed and ready to move on. You say cast on sleeves, are they knitted into the rest? If so wouldn't we pick up stitches? Please help, this is for my great granddaughter.
30.06.2025 - 22:20DROPS Design answered:
Dear Jeanette, after you have worked the bottom part of body you divide piece at the markers = on the sides and finish now each piece separately. Starting with right front piece you will cast on new stitches at the end of every row from the RS, these sts will be worked in garter stitch. Work to the shoulder and cast off all sts. On left front piece, cast on the same number of stitches but at the end of a row from WS. On back piece, cast on the same number of stitches on each side, ie both from RS and from WS for both sleeves. Stitches cast off for shoulders will be then sewn together on top of shoulders and cast on edges will be sewn together mid under sleeves. Happy knitting!
01.07.2025 - 08:26
![]() Rosy wrote:
Rosy wrote:
Bonjour, je me lance dans le modèle à point ajouré, 0/1 mois, je suis perdue en lisant la grille A1 - A2 en 48/52. Si je lis bien, pour la première ligne de points ajourés de la grille A1, il faut : - débuter par une maille endroit, - tricoter les points ajourés avec les mailles glissées et les mailles ensembles, - après le dernier jeté, tricoter la maille endroit de A2. Est-ce juste ? Merci de votre aide
06.05.2025 - 16:18DROPS Design answered:
Bonjour Rosy, tout à fait, la maille de A.2 permet au motif d'être symétrique. Sur l'envers, tricotez d'abord A.2 puis répétez A.1 en le lisant de gauche à droite. Bon tricot!
07.05.2025 - 08:46
![]() Cheri Cuttance wrote:
Cheri Cuttance wrote:
Hi and thank you for the beautiful pattern. My question is as follows... Tells me to finish pattern and continue in garter stitch till 16cm. Then I start decreasing on band edge. Tell me every 2nd row 22 times. which means 44 rows?? once i have reached 19cm I should start sleeves. my query is 44 rows is way more than 3 cm. (taking it from 16-19cm)or is it an error and I should decrease on both edges 22 times?? it tell me to start sleeves at 19cm Has me a little confused.
24.03.2025 - 04:08DROPS Design answered:
Hi Cheri, After you finish A.1 the body should measure approx. 16 cm in your size. You then continue and finish the piece in garter stitch. The correct knitting tension for garter stitch is 48 rows = 10 cm in height. You begin decreasing for the neckline straight after A.1 the correct number of times. At the same time (before the decreases are finished), when the piece measures 19 cm, you divide for the front and back pieces, which are finished separately. You then increase for the sleeves by casting on stitches at the end of the row on one side on each front piece, on both sides on the back piece. Hope this helps and happy knitting!
24.03.2025 - 06:49
![]() Karin Benz wrote:
Karin Benz wrote:
Hallo, benötige ihre Hilfe beim anschlagen der Ärmelmaschen und gleichzeitigem abnehmen an den Blendmaschen. Ich habe für die Gr.1/3 Monate 44Maschen auf der Nadel nehme über die Ärmelmaschen insgesamt 52 Maschen zu ,und gleichzeitig die Abnahme bei den Blendmaschen insgesamt 48 Maschen ab. Ich habe dann aber nur 49 Maschen für den Ärmel (anstatt63 Maschen) Habe wahrscheinlich irgendwo einen Denkfehler
11.02.2025 - 15:46DROPS Design answered:
Liebe Frau Benz, es sind 44 M für das Vorderteil, man wird bei dem Blendemaschen 24 Maschen abnehmen (22 Mal 1 Masche in jeder 2. Reihe + 2 Mal 1 Masche in 4. Reihe), und für den Ärmel wird man insgesamt 43 Maschen anschlagen (6 Maschen 4 Mal + 19 Maschen 1 Mal) = 44-24+43=63 Maschen. Viel Spaß beim Stricken!
11.02.2025 - 16:17
![]() Andrea wrote:
Andrea wrote:
Hallo, wo finde ich bitte die Anleitung der Mütze ?
05.02.2025 - 02:26DROPS Design answered:
Liebe Andrea, hier finden Sie die Anleitung für die Mütze. Viel Spaß beim Stricken!
05.02.2025 - 08:20
![]() Anke wrote:
Anke wrote:
Ich habe noch eine Frage. Wofür braucht man die bindebänder oben am Hals?
31.01.2025 - 13:37DROPS Design answered:
Liebe Anke, das Band am rechten Vorderteil wird zusammen mit einem Band zugebunden, das an der linke Seite später gehäkelt wird und das Band am Linken Vorderteil wird zusammen mit einem Band zugebunden,d as an ler rechten Seite später gehäkelt wird - siehe letzter Absatz: 2 separate Bindebänder häkeln, wie folgt: .... Viel Spaß beim Stricken!
31.01.2025 - 16:01
![]() Anke wrote:
Anke wrote:
Hallo, leider verstehe ich den häkelrand nicht. Die zweite Reihe verstehe ich überhaupt nicht, wie ich die machen soll. Könnt ihr mir helfen?
31.01.2025 - 13:32DROPS Design answered:
Liebe Anke, in diesem Video zeigen wir, wie man so einen ähnlichen Häkelrand häkelt; genauso der selbe ist es nicht, man wird im Video 3 Lm, 1 Stb in die 1. Lm häkeln, hier soll man anstatt 4 Lm und 1 Stb in die 1. Lm häkeln; zwischen jedem Pikot häkelt man 1 feste Masche und man wird 1 feste Masche + 1 Luftmasche der 1. Reihe dazwischen überspringen. Viel Spaß beim Häkeln!
31.01.2025 - 15:57
|
|||||||||||||||||||
Odeta#odetajacket |
|||||||||||||||||||
 |
 |
||||||||||||||||||
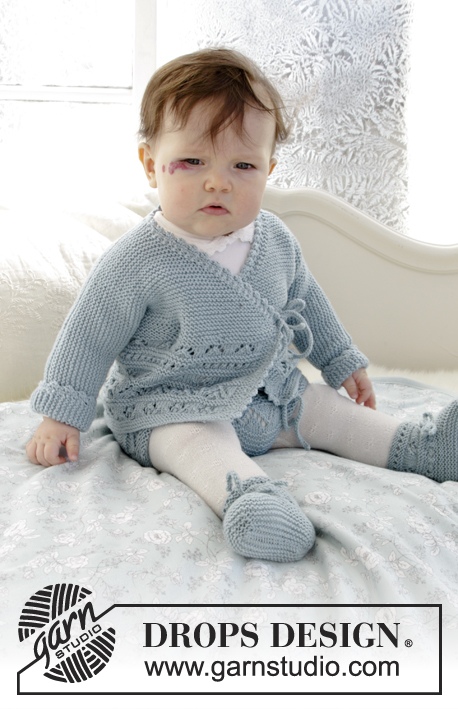
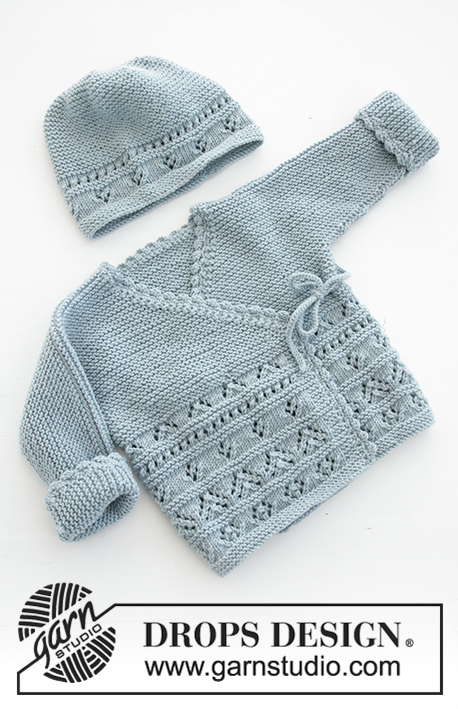
The set consists of: Knitted baby jacket and slippers with lace pattern and garter stitch. Sizes premature - 4 years. The set is worked in DROPS BabyMerino.
DROPS Baby 31-3 |
|||||||||||||||||||
|
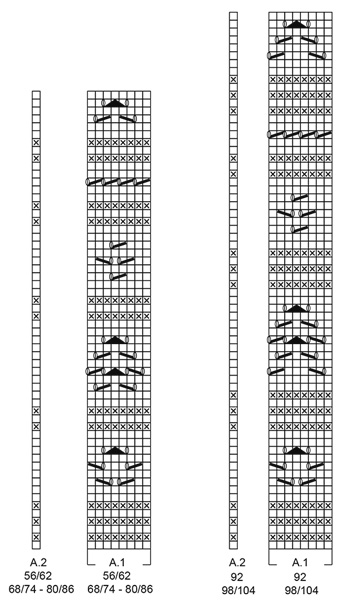
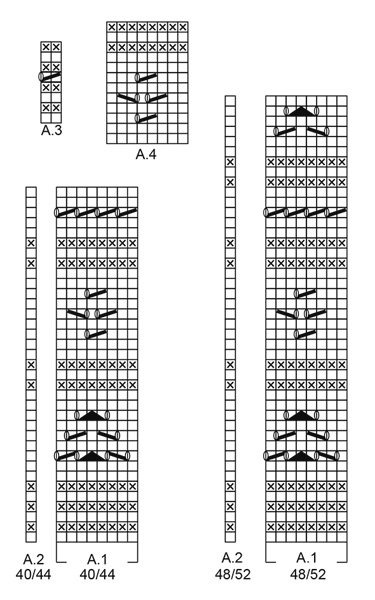
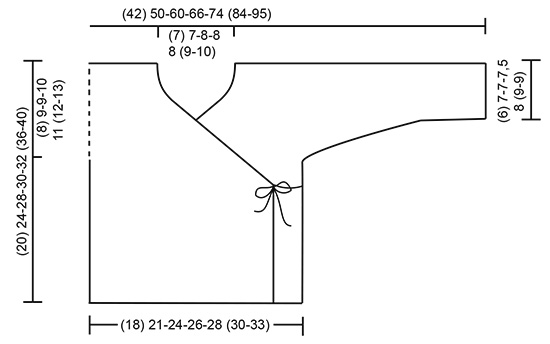
INFORMATION FOR THE PATTERN: RIDGE/GARTER STITCH (worked back and forth): 1 ridge = Knit 2 rows. PATTERN: Jacket: See diagrams A.1 and A.2. Choose diagram for your size. Slippers: See diagrams A.3 and A.4. The diagrams show all the rows in the pattern seen from the right side. DECREASE TIP (for jacket): Decrease inside the 1 band stitch in garter stitch. All decreases are made from the right side! Decrease as follows after the 1 band stitch: Slip 1 stitch as if to knit, knit 1, pass the slipped stitch over. Decrease as follows before the 1 band stitch: Knit 2 together. ---------------------------------------------------------- JACKET: The piece is worked back and forth with circular needle. The body is worked first, then stitches are cast on for sleeves and the front and back pieces are finished separately. BODY: Cast on (111) 125-145-157-173 (181-205) stitches with circular needle size 3 mm and BabyMerino. Work as follows from the right side: Work (3) 2-4-2-2 (2-2) stitches GARTER STITCH – see description above – (= band), work A.1 (= 8 stitches) over the next (104) 120-136-152-168 (176-200) stitches (= (13) 15-17-19-21 (22-25) times in width), work A.2 (= 1 stitch) and finish with (3) 2-4-2-2 (2-2) stitches garter stitch. REMEMBER THE KNITTING TENSION! On the last row in A.1 adjust the number of stitches to (112) 124-146-158-172 (182-204) stitches. When A.1 has been worked 1 time in height, continue in garter stitch to finished length. The piece measures approx. (10) 12-16-16-16 (19-19) cm or (4") 4 ¾"-6 ¼"-6 ¼"-6 ¼" (7 ½"-7 ½"). Insert 1 marker (34) 37-44-48-52 (55-62) stitches in from each side. Allow the markers to follow your work onwards, they mark the front and back pieces = (44) 50-58-62-68 (72-80) stitches on back piece. READ THE WHOLE OF THE NEXT SECTION BEFORE CONTINUING! DECREASE FOR NECK INSIDE 1 BAND STITCH IN EACH SIDE OF THE PIECE AT THE SAME TIME AS THE PIECE IS DIVIDED AND STITCHES ARE CAST ON FOR SLEEVES. DECREASE MID FRONT AS FOLLOWS: When the piece measures (10) 12-16-16-17 (20-23) cm or (4") 4 ¾"-6 ¼"-6 ¼"-6 ¾" (8"-9") – adjust so that the next row is worked from the right side, decrease 1 stitch for the neck inside the 1 band stitch in each side of the piece (= 2 stitches decreased) – read DECREASE TIP. Decrease like this every 2nd row a total of (18) 18-22-24-26 (28-32) times, then every 4th row a total of 2 times. THE PIECE IS NOW DIVIDED AND STITCHES ARE CAST ON FOR THE SLEEVES AS FOLLOWS: RIGHT FRONT PIECE: When the piece measures (12) 15-19-20-21 (24-27) cm or (4 ¾") 6"-7 ½"-8"-8 ¼" (9 ½"-10 ⅝"), divide the piece at the 2 markers and the front and back pieces are finished separately. Adjust so that the next row is from the right side. Now work over all the stitches as far as the first marker (= right front piece). Place the remaining stitches on a thread. Cast on new stitches at the end of each row from the right side (= towards the side) for the sleeve as follows: Cast on (3) 4-6-6-6 (6-6) stitches a total of (4) 4-4-5-6 (7-8) times and then (16) 19-19-18-19 (23-26) stitches 1 time. When all the stitches are cast on for the sleeve and the decreases to neck are finished, there are (42) 52-63-70-79 (90-102) stitches on the needle for shoulder/sleeve. Work garter stitch until the piece measures (20) 24-28-30-32 (36-40) cm or (8") 9 ½"-11"-11 ¾"-10 ½" (14 ¼"-15 ¾"). Cast off. LEFT FRONT PIECE: Work over the last stitches which were placed on the thread, as far as the marker in the side. Work as for the right front piece, but in reverse. In other words, cast on stitches for the shoulder/sleeve at the end of each row from the wrong side. Continue to decrease inside the 1 band stitch at the end of each row from the right side as before (towards neck). BACK PIECE: = (44) 50-58-62-68 (72-80) stitches. Cast on new stitches at the end of each row in each side of the piece for the sleeves as follows: Cast on (3) 4-6-6-6 (6-6) stitches a total of (4) 4-4-5-6 (7-8) times and then (16) 19-19-18-19 (23-26) stitches 1 time = (100) 120-144-158-178 (202-228) stitches. When the piece measures (19) 23-27-29-31 (35-39) cm or (7 ½") 9"-10 ⅝"-11 ⅜"-12 ¼" (13 ¾"-15 ¼") cast off the middle (16) 16-18-18-20 (22-24) stitches for neck and each shoulder/sleeve is finished separately = (42) 52-63-70-79 (90-102) stitches left on each shoulder/sleeve. Work until the piece measures (20) 24-28-30-32 (36-40) cm or (8") 9 ½"-11"-11 ¾"-10 ½" (14 ¼"-15 ¾"), adjust to match the front pieces. Cast off. Work the other shoulder/sleeve in the same way. ASSEMBLY: Sew the seams on top of sleeve with grafting stitches from the right side. Sew the seams under the sleeves edge to edge in the outermost loop of the outermost stitch. CROCHET EDGE: Crochet with hook size 2.5 mm/ US c/2 and BabyMerino around the whole jacket opening (i.e. work from the right front piece, up along the jacket opening, around the neck and down the opening to the cast on edge on the left front piece) as follows: ROW 1: Work 1 slip stitch in the cast on edge on the right front piece, * 1 chain stitch, skip approx. 2 stitches/rows, 1 single crochet in the next stitch/row *, work from *-* to the corner where the decreases for neck started. Work the cord as follows: 1 single crochet in the tip, then work chain stitches for approx. 20-25 cm (8"-9¾"), turn and work back with 1 slip stitch in each chain stitch, then work 1 single crochet in the tip of the front piece again, continue the crochet edge around the jacket and neck to the tip on the left front piece, work cord as on the right front piece, continue working down the left front piece and finish with 1 slip stitch in the cast on edge. ROW 2: Work 1 chain stitch, 1 single crochet around the first chain stitch on the previous row, * 4 chain stitches, 1 double crochet in the 4th chain stitch from the hook, skip 1 single crochet + 1 chain stitch + 1 single crochet, work 1 single crochet around the next chain stitch *, work from *-* (make sure you work over the cords so the cords lie underneath), finish with 1 slip stitch in the last stitch. Work rows 1 and 2 in the same way around the bottom of both sleeves (the rounds start with 1 chain stitch and finish with 1 slip stitch in the first chain stitch). Work 2 loose cords: Work chain stitches for approx. 20-25 cm or (8"-9 ¾"), turn and work back with 1 slip stitch in each chain stitch. Cut the strand and work 1 more cord in the same way. Sew 1 cord to the inside of the right side in the side and 1 cord on the outside of the left side in the side. Make sure the two cords are at the same height on each side. ---------------------------------------------------------- SLIPPER: The slipper is worked back and forth with circular needle from mid back, top down; i.e. you first work the leg then the foot. Cast on (36) 38-40-44-48 (52-56) stitches with circular needle size 2.5 mm and BabyMerino. Work 1 stitch in GARTER STITCH – see above, A.3 (= 2 stitches) until 1 stitch remains, work 1 stitch in garter stitch. When A.3 has been worked 1 time in height, work the next row from the right side as follows: Work (2) 3-0-2-0 (2-0) stitches stocking stitch, A.4 (= 8 stitches) a total of (4) 4-5-5-6 (6-7) times in width and finish with (2) 3-0-2-0 (2-0) stitches stocking stitch. REMEMBER THE KNITTING TENSION! When A.4 has been completed 1 time in height continue with A.3 as follows: work 1 stitch in garter stitch, A.3 until 1 stitch remains, and work 1 stitch in garter stitch (the cord is later thread through this row of holes). When A.3 has been completed in height, work 2 RIDGES – see description above and decrease (6) 8-6-6-6- (10-14) stitches evenly on the last row from the right side = (30) 30-34-38-38 (42-42) stitches. Cut the strand. Now place the first (11) 11-12-13-13 (15-15) stitches and the last (11) 11-12-13-13 (15-15) stitches on two separate threads. The piece is now worked in garter stitch to finished length. Work (3) 3½-4-4½-5½ (6½-8) cm or (1 ⅛")1 ¼"-1 ½"-1 ¾"-2 ⅛" (2 ¼"-3 ⅛"), over the middle (8) 8-10-12-12 (12-12) stitches (= mid top of slipper), cut the strand. The next row is worked as follows from the right side: Work the stitches from the one thread in the one side back onto the double pointed needles, knit up (7) 9-10-11-13 (16-21) stitches in the outermost loop of the outermost stitch along the side of the middle piece, work the (8) 8-10-12-12 (12-12) stitches on the needle (= front), knit up (7) 9-10-11-13 (16-21) stitches in the outermost loop of the outermost stitch along the other side of the middle piece and work the stitches from the other thread back onto the double pointed needles = (44) 48-54-60-64 (74-84) stitches on the needles. THE PIECE IS NOW MEASURED FROM HERE! Work a total of (2½) 3-3-4-5 (5-5) cm or (1") 1 ⅛"-1 ⅛"- 1 ½"-2" (2"-2") garter stitch over all stitches AT THE SAME TIME when you have worked approx. (1) 1½-1½-2-3 (3-3) cm or (⅜") ½"-½"-¾"-1 ⅛" (1 ⅛"-1 ⅛"), insert 1 marker (22) 24-27-30-32 (37-42) stitches in (= middle of slipper). Now decrease every 2nd row to finished length as follows: Knit 1 stitch, knit the next 2 stitches together (= 1 stitch decreased), knit until there are 2 stitches left before the marker, knit together the next 4 stitches, 2 and 2 (= 2 stitches decreased), knit until there are 3 stitches left, knit the next 2 stitches together (= 1 stitch decreased), knit 1 stitch (= 4 stitches decreased every 2nd row) = approx. (32) 36-42-48-52 (62-72) stitches. Cast off and sew the seam under the foot and up mid back in the outermost loop of the outermost stitch so the seam is flat. Work 1 more slipper in the same way. CORD: Work a cord as follows: Work chain stitches with hook size 2.5 mm and BabyMerino for approx. 30-40 cm (11 ¾"-15 ¾"), turn and work back with 1 slip stitch in each chain stitch. Cut and fasten the strand. Thread the cord in and out of the row of holes on the slipper (start and finish mid front of slipper). ---------------------------------------------------------- For shorts see DROPS number 31-4. ---------------------------------------------------------- |
|||||||||||||||||||
Diagram explanations |
|||||||||||||||||||
|
|||||||||||||||||||
|
|||||||||||||||||||
|
|||||||||||||||||||
|
|||||||||||||||||||
Have you finished this pattern?Tag your pictures with #dropspattern #odetajacket or submit them to the #dropsfan gallery. Do you need help with this pattern?You'll find 27 tutorial videos, a Comments/Questions area and more by visiting the pattern on garnstudio.com. © 1982-2025 DROPS Design A/S. We reserve all rights. This document, including all its sub-sections, has copyrights. Read more about what you can do with our patterns at the bottom of each pattern on our site. |
|||||||||||||||||||


With over 40 years in knitting and crochet design, DROPS Design offers one of the most extensive collections of free patterns on the internet - translated to 17 languages. As of today we count 314 catalogs and 11821 patterns - 11811 of which are translated into English (US/in).
We work hard to bring you the best knitting and crochet have to offer, inspiration and advice as well as great quality yarns at incredible prices! Would you like to use our patterns for other than personal use? You can read what you are allowed to do in the Copyright text at the bottom of all our patterns. Happy crafting!
Post a comment to pattern DROPS Baby 31-3
We would love to hear what you have to say about this pattern!
If you want to leave a question, please make sure you select the correct category in the form below, to speed up the answering process. Required fields are marked *.