
Looking for a yarn?


Comments / Questions (45)
![]() Ana Ramire wrote:
Ana Ramire wrote:
Jeg lurer på om det skal være 31 cm lengden av ermet før man begynner med A6. Det gjelder størrelsen 12 år
25.04.2025 - 10:30DROPS Design answered:
Hei Ana, Ja, ermet skal være 31 cm før man begynner A.6 i din størrelse. Hilsen Drops Team.
29.04.2025 - 07:35
![]() Ana Ramirez wrote:
Ana Ramirez wrote:
Takk for fine oppskrifter. Jeg strikker erm nå og lurer på om lengden av 31 er kort. Jeg feller hver 6 cm og dere skal jeg gjøre 6 ganger det gir meg 30 cm også har jeg strikket 2 cm før jeg begynte å felle. Jeg strikker størrelse til 12 år
24.04.2025 - 12:52DROPS Design answered:
Hej Ana, du feller når ærmet måler 2- 8- 14 -20- 26- 32 cm ærmet skal måle 39 cm :)
30.04.2025 - 13:49
![]() Myriam wrote:
Myriam wrote:
Bonjour, j’aimerais savoir combien de balles de laine 3/4 ans de chaque couleur dois je commander pour le tricot du bonnet, il n’a rien indiquer à cette effet.
25.02.2025 - 15:21DROPS Design answered:
Bonjour Myriam, retrouvez toutes les quantités nécessaires pour chaque taille dans l'onglet "Explications" en haut de page, pour le bonnet, c'et juste sous le pull, soit 50 g Merino Extra Fine dans toutes les tailles, de chaque couleur, soit 1 pelote de chaque couleur en taille 3/4 ans. Boin tricot!
26.02.2025 - 09:35
![]() Regina wrote:
Regina wrote:
Leider stimmen die angegebenen Garne nicht mehr, wenn man zur Bestellung bei Allgawo weiter geleitet wird. Könnt ihr diese bitte aktualisieren, damit ich bestellen und den Pullover stricken kann? Vielen lieben Dank und Grüße, Regina
09.12.2024 - 15:27DROPS Design answered:
Liebe Regina, die 4 Farben sind immer noch in der Farbkarte, fragen Sie mal Ihr DROPS Händler, im Falle er diese Farbe momentan nicht mehr hat. Viel Spaß beim Stricken!
11.12.2024 - 08:09
![]() Wenche F Stensland wrote:
Wenche F Stensland wrote:
Et veldig fint sett❤️👍
18.11.2024 - 10:03
![]() Sandy Steele wrote:
Sandy Steele wrote:
Merci de votre réponse au sujet des manches mais quand je commence le pull en 3/4 ans au niveau du col, quelle est la longueur de câble à utiliser ? 80cm me parait trop long pour seulement 88 mailles. Est-ce que c'est 60cm donc ?
15.07.2024 - 15:37DROPS Design answered:
Bonjour, meme pour 88 mailles vous pouvez utiliser les aiguilles circulaires longues (80, 100 cm) et tricoter avec magic loop (la video vous a ete envoye precedemment). Ainsi vous n'etes pas oblige d'acheter beaucoup d'aiguilles. Si vous n'aimez pas magic loop, les aiguilles de 40 cm seront bonnes pour 88 mailles au debut de votre ouvrage. Bonne tricot!
15.07.2024 - 16:45
![]() Sandy Steele wrote:
Sandy Steele wrote:
Pour un pull en taille 3/4 ans, quelle est la longueur de câble correcte pour tricoter? Et doit-on absolument utiliser des aiguilles doubles pointes pour les manches ou est-ce que l'on peut faire cela avec es aiguilles circulaires (et quelle longueur de câble)? Merci! :)
09.07.2024 - 21:44DROPS Design answered:
Bonjour Sandy, vous pouvez tricoter les manches sur les aiguilles circulaires courtes (40 cm) ou bien 80 cm ou plus longues si vous travaillez en utilisant la technique magic loop. Regardez la video ICI. Bon tricot!
15.07.2024 - 12:35
![]() Eelke Keessen-Storm wrote:
Eelke Keessen-Storm wrote:
Ik brei maat 9/10 jaar. In A2 heb ik bij pijl 3 de gevraagde 240 steken. Dan moet ik verder breien in het telpatroon en 12 steken meerderen. Nu klopt het telpatroon niet meer! Ik wil de punt precies boven de ster houden en dan heb ik 12 x een tussenruimte van 8 st ipv de gevraagde 7 st.
07.12.2023 - 22:14DROPS Design answered:
Dag Eelke,
Door het meerderen krijg je inderdaad de punt niet precies boven de ster. Het is niet zo dat het patroon dan niet klopt, maar dit hoort gewoon zo. Je zou dan een ander telpatroon moeten maken als je de punt boven de ster wilt hebben.
10.12.2023 - 16:32
![]() Marie wrote:
Marie wrote:
Ich habe eine Frage zum Ärmel - wenn ich erst 2cm stricke und dann alle 7 cm noch 5mal abnehme, komme ich auf 37cm ab der Teilung... Wenn ich insgesamt nur 5mal annehme komme ich auf 30 cm , aber nie auf 28cm ab der Teilung?! Stimmt da etwas in der Anleitung nicht oder was verstehe ich hier falsch?
29.10.2023 - 16:22DROPS Design answered:
Liebe Marie, Sie sind ja richtig, die letzte Abnahmen stricken Sie nach 30 cm, aber wenn die Ärmel 28 cm misst stricken Sie A.6 dh die letzte Abnahme strickt man in A.6, nach A.6 stricken Sie dann 4 cm Bündchen, so misst die Ärmel 36 cm. Viel Spaß beim stricken!
30.10.2023 - 16:40
![]() Gudrun Winkler wrote:
Gudrun Winkler wrote:
Was bedeutet "Läusemuster"? Oder "nach einer Laus"?
10.02.2023 - 17:34DROPS Design answered:
Liebe Frau Winkler, dies betrifft das Muster mit 1 Masche hellbeige und die anderen Maschen waldgrünn wie im A.5 oder bei den oberen Reihen in A.7 (1 Masche waldgrünn und die anderen 7 Maschen hellbeige). Viel Spaß beim stricken!
13.02.2023 - 08:48
|
|||||||||||||||||||
Seiland Jumper#seilandjumper |
|||||||||||||||||||
 |
 |
||||||||||||||||||
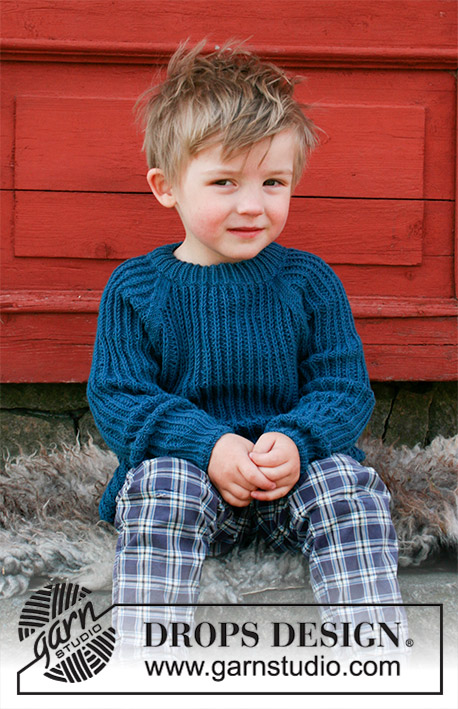
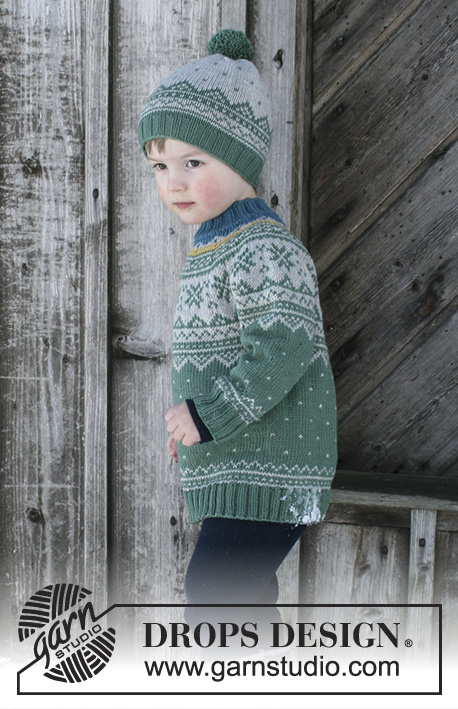
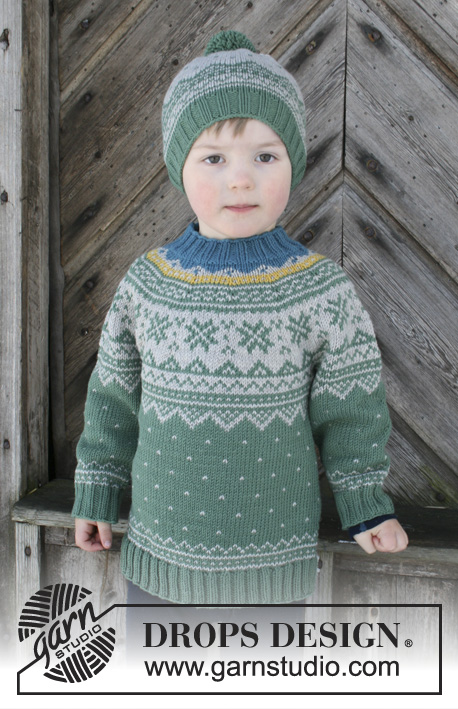
Set consists of: Sweater for kids with round yoke and multi-colored Nordic pattern, worked top down. Hat with multi-colored Nordic pattern and pompom. Size 2 - 12 years Set is knitted in DROPS Merino Extra Fine.
DROPS Children 30-5 |
|||||||||||||||||||
|
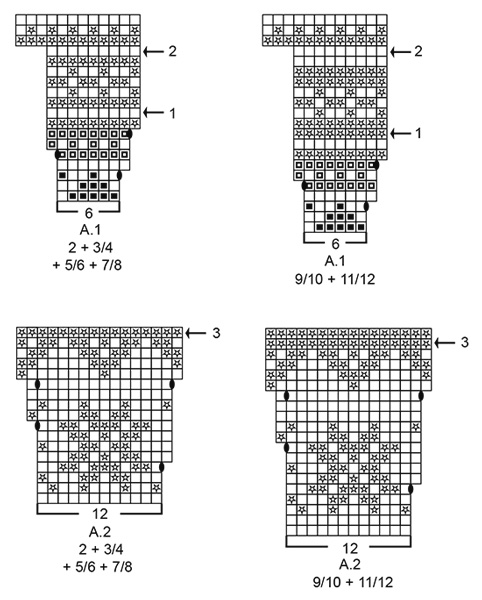
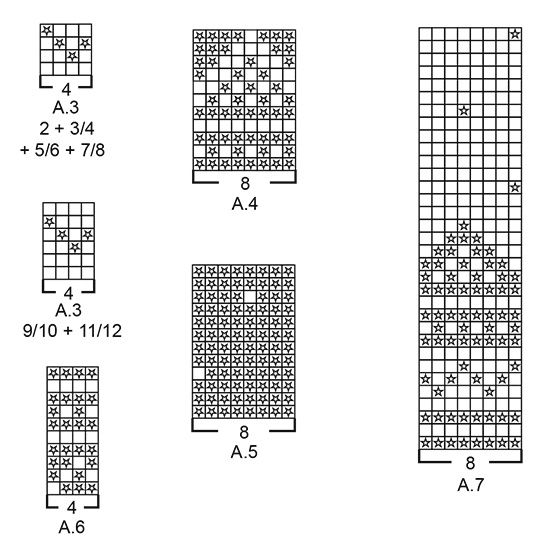
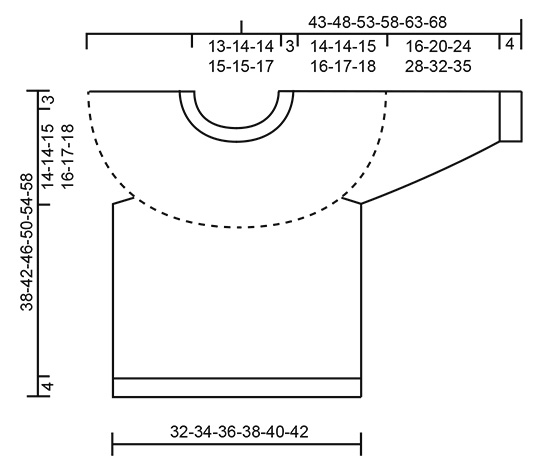
INFORMATION FOR PATTERN: PATTERN: Sweater: See diagrams A.1 to A.6. Choose diagram for your size. Hat: See diagram A.7. Work the entire pattern in stockinette stitch. DECREASE/INCREASE TIP: To calculate how to decrease or increase evenly, use the total number of stitches on round (e.g. 84 stitches) and divide stitches by number of decreased/increases to be done (e.g. 6) = 14. I.e. in this example knit approx. every 13th and 14th stitch together when decreasing. When increasing make 1 yarn over after every 14th stitch. On next round knit yarn over twisted to avoid holes. ELEVATION: Insert 1 marker at beginning of round = mid back. Begin from right side with north sea and knit as before until 7-7-8-8-9-9 stitches have been worked past marker, turn, tighten yarn and purl 14-14-16-16-18-18. Turn, tighten yarn and knit 21-21-24-24-27-27, turn, tighten yarn and purl 28-28-32-32-36-36. Turn, tighten yarn and knit 35-35-40-40-45-45, turn, tighten yarn and purl 42-42-48-48-54-54. Turn piece, tighten yarn and knit until mid back. KNITTING TIP-1: To avoid the knitting gauge to tighten when working pattern, it is important not to tighten the strands on back side of piece. Switch to a higher needle number when working pattern if the pattern is somewhat tight. KNITTING TIP-2 (applies to yoke on sweater): If knitting gauge is incorrect in height and there are more rows vertically on 10 cm / 4" than stated in pattern the round yoke will be too short and the armholes too small. To avoid this work 1 extra round in stockinette stitch evenly in the unicolored sections on yoke. DECREASE TIP-1 (applies to mid under sleeve): Begin 2 stitches before marker thread and knit 2 together, marker thread, slip 1 stitch knitwise, knit 1, pass slipped stitch over stitch worked (= 2 stitches decreased). DECREASE TIP-2 (applies to hat): Decrease as follows after marker: Slip 1 stitch knitwise, knit 1, pass slipped stitch over stitch worked (= 1 stitch decreased). ---------------------------------------------------------- SWEATER: Worked in the round on circular needle, top down. Work sleeves in the round on double pointed needles. Rounds begin mid back. NECK EDGE: Cast on 84-88-88-96-96-100 stitches on a short circular needle size 3.5 mm / US 4 with north sea. Knit 1 round. Then work rib in the round (= knit 2/purl 2) for 3 cm / 1". Knit 1 round while decreasing 6-4-4-6-6-4 stitches evenly - read DECREASE/INCREASE TIP = 78-84-84-90-90-96 stitches. Then work yoke as explained below. YOKE: Switch to circular needle size 4 mm / US 6 and work ELEVATION at the back of neck - see explanation above. When elevation has been worked, finish by knitting 0-0-2-3-0-2 rounds with north sea. Read KNITTING TIP-1 AND KNITTING TIP-2! Then work A.1 in the round (= 13-14-14-15-15-16 repetitions of 6 stitches). Continue pattern and increase as shown in diagram. REMEMBER THE GAUGE! On round marked with arrow-1 in A.1 there are 117-126-126-135-135-144 stitches on needle. Work round as shown in diagram and increase AT THE SAME TIME 18 stitches evenly in all sizes - remember DECREASE/INCREASE TIP = 135-144-144-153-153-162 stitches. Work A.1 (there is now room for 15-16-16-17-17-18 repetitions of 9 stitches). On round marked with arrow-2 in A.1 increase 21-24-24-27-27-30 stitches evenly = 156-168-168-180-180-192 stitches. When A.1 has been worked, work A.2 in the round (= 13-14-14-15-15-16 repetitions of 12 stitches). Continue A.2 and increase as shown in diagram. On round marked with arrow-3 in A.2 there are 208-224-224-240-240-256 stitches. Work round as shown in diagram and increase at the same time 4-0-12-0-12-8 stitches evenly on this round = 212-224-236-240-252-264 stitches. When A.2 has been worked, work A.3 in the round (= 53-56-59-60-63-66 repetitions of 4 stitches). After A.3 piece measures approx. 17-17-18-19-20-21 cm / 6¾"-6¾"-7"-7½"-8"-8¼" from cast-on edge mid front. Work next round as follows with light beige: work 31-33-35-36-38-40 stitches in stockinette stitch (= ½ back piece), slip the next 45-47-49-49-51-53 stitches on 1 stitch holder for sleeve, cast on 6-6-6-8-8-8 new stitches on needle (= in the side under sleeve), work 61-65-69-71-75-79 stitches in stockinette stitch (= front piece), slip the next 45-47-49-49-51-53 stitches on 1 stitch holder for sleeve, cast on 6-6-6-8-8-8 new stitches on needle (= in the side under sleeve) and work the remaining 30-32-34-35-37-39 stitches in stockinette stitch (= ½ back piece). Cut the strand. Finish body and sleeves separately. NOW MEASURE PIECE FROM HERE! BODY: = 134-142-150-158-166-174 stitches. Begin in one side of piece, in the middle of the 6-6-6-8-8-8 stitches cast on under sleeve. Work A.4 in the round and increase at the same time 2 stitches evenly on first round = 136-144-152-160-168-176 stitches on needle and 17-18-19-20-21-22 repetitions of 8 stitches. When A.4 has been worked, work A.5 in the round (= 17-18-19-20-21-22 repetitions of 8 stitches). Repeat A.5 until piece measures approx. 13-17-20-23-26-29 cm / 5"-6¾"-8"-9"-10¼"-11½" from division – adjust so that 2-4 rounds have been worked after a round with dots. Work A.6 in the round (= 34-36-38-40-42-44 repetitions of 4 stitches). When A.6 has been worked, piece measures approx. 17-21-24-27-30-33 cm / 6¾"-8¼"-9½"-10½"-11¾"-13" from division. Knit 1 round while increasing 24-28-28-32-32-32 stitches evenly = 160-172-180-192-200-208 stitches. Switch to circular needle size 3.5 mm / US 4. Work rib in the round = knit 2/purl 2 for 4 cm / 1½". Bind off with knit over knit and purl over purl but to avoid at tight bind-off edge make 1 yarn over after every 4th stitch AT THE SAME TIME bind off (bind off yarn overs as stitches). Sweater measures approx. 38-42-46-50-54-58 cm / 15"-16½"-18"-19¾"-21¼"-22¾" from shoulder and down. SLEEVE: Slip the 45-47-49-49-51-53 stitches from stitch holder in one side of piece on double pointed needles size 4 mm / US 6 and pick in addition up 1 new stitch in each of the 6-6-6-8-8-8 stitches cast on under sleeve = 51-53-55-57-59-61 stitches on needle. Insert a marker thread in the middle of the 6-6-6-8-8-8 stitches under sleeve and 1 marker thread in the middle stitch on round (= mid on top of sleeve. Read the rest of sleeve before continuing! Begin at marker thread mid under sleeve and work A.4 in the round but note that the pattern will not fit an entire repetition mid under sleeve. Begin with 3rd-2nd-1st-8th-7th-6th stitch in A.4 and repeat A.4 in the round as long as you can. Pattern will be symmetrical mid under sleeve and stitch with marker thread mid on top of sleeve should now fit 4th stitch in A.4. When A.4 has been worked, work A.5 in the round but adjust so that A.5 fits nicely over A.4 (stitch with marker thread should fit placement of a dot). Repeat A.5 onwards. AT THE SAME TIME when piece measures 2 cm / ¾", decrease 2 stitches mid under sleeve - read DECREASE TIP-1. Decrease like this every 3-3-5-5-7-6 cm / 1"-1"-2"-2"-2¾"-2¼" 5-6-5-6-5-6 times in total = 41-41-45-45-49-49 stitches. When piece measures approx. 12-16-20-24-28-31 cm / 4¾"-6¼"-8"-9½"-11"-12¼" from division – adjust so that 2-4 round with forest green have been worked after a round with dots, work A.6 in the round – begin round so that pattern fits nicely over dots in A.5. When A.6 has been worked, switch to double pointed needles size 3.5 mm / US 4. Knit 1 round with forest green while decreasing 1 stitch evenly in all sizes = 40-40-44-44-48-48 stitches. Work rib in the round = knit 2/purl 2 for 4 cm / 1½". Bind off with knit over knit and purl over purl but to avoid at tight bind-off edge make 1 yarn over after every 4th stitch AT THE SAME TIME bind off. Sleeve measures approx. 20-24-28-32-36-39 cm / 8"-9½"-11"-12½"-14¼"-15¼" from division under sleeve. Work the other sleeve the same way. ---------------------------------------------------------- HAT: Worked in the round on circular needle, switch to double pointed needles when needed. Cast on 104-112-112-120 stitches on circular needle size 2.5 mm / US 1.5 with forest green. Knit 1 round. Then work rib (= knit 2/purl 2) for 3 cm / 1". Switch to circular needle size 3 mm / US 2.5. Knit 1 round while decreasing 8 stitches evenly in all sizes - read DECREASE/INCREASE TIP = 96-104-104-112 stitches. Work A.7 in the round (= 12-13-13-14 repetitions of 8 stitches). REMEMBER THE GAUGE! When A.7 has been worked, work in stockinette stitch with light beige until finished measurements. When piece measures 15-16-17-17 cm / 6"-6¼"-6¾"-6¾", insert 8 markers in the piece, 12-13-13-14 stitches between each marker. On next round decrease after every marker - read DECREASE TIP-2 (= 8 stitches decreased). Decrease like this on every other round a total of 6-7-7-8 times = 48 stitches remain on needles in all sizes. * Knit 1 round, on next round knit together all stitches 2 by 2* = 24 stitches. Repeat from *-* 1 more time = 12 stitches remain on needles. Cut the yarn and pull it through the remaining stitches, tighten together and fasten. Hat measures approx. 20-21-22-23 cm / 8"-8¼"-8¾"-9" from top and down. POMPOM: Make a pompom with forest green with an approx. of diameter 4-5 cm / 1½"-2" and fasten it at the tip of the hat. |
|||||||||||||||||||
Diagram explanations |
|||||||||||||||||||
|
|||||||||||||||||||
|
|||||||||||||||||||
|
|||||||||||||||||||
|
|||||||||||||||||||
Have you finished this pattern?Tag your pictures with #dropspattern #seilandjumper or submit them to the #dropsfan gallery. Do you need help with this pattern?You'll find 29 tutorial videos, a Comments/Questions area and more by visiting the pattern on garnstudio.com. © 1982-2025 DROPS Design A/S. We reserve all rights. This document, including all its sub-sections, has copyrights. Read more about what you can do with our patterns at the bottom of each pattern on our site. |
|||||||||||||||||||


With over 40 years in knitting and crochet design, DROPS Design offers one of the most extensive collections of free patterns on the internet - translated to 17 languages. As of today we count 314 catalogs and 11821 patterns - 11811 of which are translated into English (US/in).
We work hard to bring you the best knitting and crochet have to offer, inspiration and advice as well as great quality yarns at incredible prices! Would you like to use our patterns for other than personal use? You can read what you are allowed to do in the Copyright text at the bottom of all our patterns. Happy crafting!
Post a comment to pattern DROPS Children 30-5
We would love to hear what you have to say about this pattern!
If you want to leave a question, please make sure you select the correct category in the form below, to speed up the answering process. Required fields are marked *.