
Popular categories
Looking for a yarn?


|
||||||||||||||||
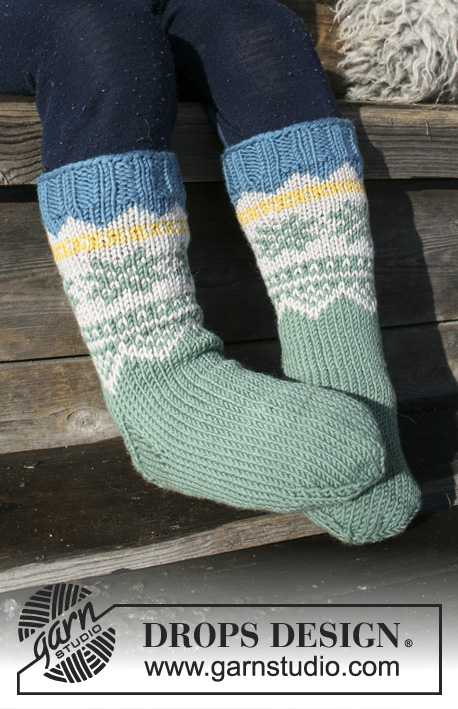
Seiland Socks |
||||||||||||||||
 |
 |
|||||||||||||||
Knitted socks with multi-colored Nordic pattern for kids. The piece is worked in DROPS Merino Extra Fine.
DROPS Children 30-6 |
||||||||||||||||
|
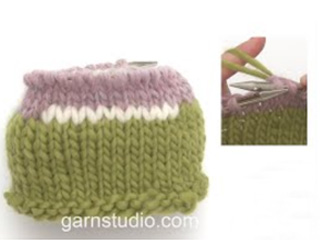
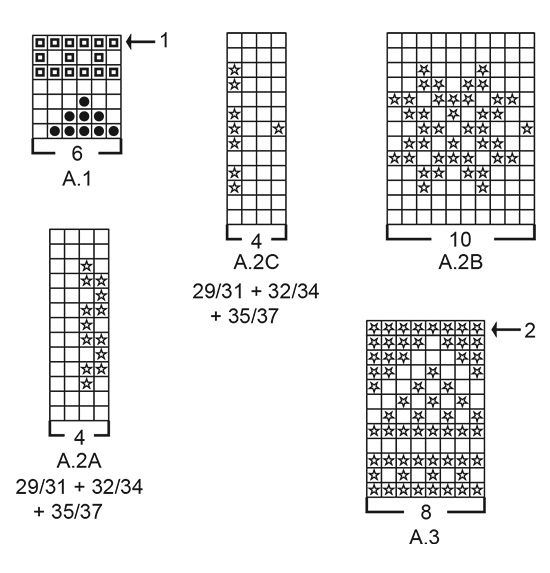
INFORMATION FOR THE PATTERN: PATTERN: See diagrams A.1 to A.3. Choose diagram for your size. The whole pattern is worked in stockinette stitch. DECREASE TIP-1: To work out how to decrease evenly, count the total number of stitches on the needle (e.g. 52 stitches) and divide by the number of decreases to be made (e.g. 4) = 13. In this example, knit every 12th and 13th stitch together. DECREASE TIP-2: Decrease as follows before the marker: Start 2 stitches before the marker and knit 2 together. Decrease as follows after the marker: Slip 1 stitch as if to knit, knit 1, pass the slipped stitch over the knitted stitch. KNITTING TIP (for heel): To strengthen the heel you can use 2 strands when working heel and heel decreases as follows: Use the strand from the inside and outside of the ball and work 1 stitch alternately with the one then the other strand. In this way, you get a slightly thicker heel without using a double strand. HEEL DECREASE: ROW 1(= RIGHT SIDE): Work until there are 5-6-7-8-8 stitches left, slip the next stitch as if to knit, knit 1, pass the slipped stitch over the knitted stitch, turn the piece. ROW 2 (= wrong side): Work until there are 5-6-7-8-8 stitches left, slip the next stitch as if to purl, purl 1, pass the slipped stitch over the purled stitch, turn the piece. ROW 3 (= right side): Work until there are 4-5-6-7-7 stitches left, slip the next stitch as if to knit, knit 1, pass the slipped stitch over the knitted stitch, turn the piece. ROW 4 (= wrong side): Work until there are 4-5-6-7-7 stitches left, slip the next stitch as if to purl, purl 1, pass the slipped stitch over the purled stitch, turn the piece. Continue to decrease in the same way, by working until there is 1 less stitch before slipping 1 stitch and until there are 10-10-10-10-10 stitches left on the needle. -------------------------------------------------------- SOCK: The piece is worked in the round with double pointed needles, top down. Cast on 44-44-48-52-52 stitches with double pointed needles size 3.5 mm / US 4 and north sea. Knit 1 round, then work rib in the round (= knit 2 / purl 2). When the rib measures 3 cm / 1" knit 1 round where you decrease 2-2-0-4-4 stitches evenly on round – read DECREASE TIP-1 = 42-42-48-48-48 stitches. Continue by working A.1 in the round (= 7-7-8-8-8 repeats of 6 stitches). REMEMBER THE GAUGE! On the round marked with arrow-1 in A.1 decrease 2-2-0-0-0 stitches evenly on round = 40-40-48-48-48 stitches. When A.1 has been completed, work the next round as follows: 2 SMALLEST SIZES: Work A.2B in the round (= 4 repeats of 10 stitches). 3 LARGEST SIZES: Work A.2A (= 4 stitches), work A.2B over the next 40 stitches (= 4 repeats of 10 stitches) and finish with A.2C (= 4 stitches). Continue the pattern in this way. When A.2 has been completed, work A.3 in the round (= 5-5-6-6-6 repeats of 8 stitches). On the round marked with arrow-2 in A.3 decrease 4-0-4-0-0 stitches evenly on round = 36-40-44-48-48 stitches. When A.3 has been completed continue with stockinette stitch and forest green. When the piece measures 14-15-16-17-18 cm / 5½"-6"-6¼"-6 3/4-7" keep the first 9-10-11-12-12 stitches on the needle for heel, place the next 18-20-22-24-24 stitches on 1 thread (= mid top of foot) and keep the last 9-10-11-12-12 stitches on the needle for heel. Read KNITTING TIP and work stockinette stitch back and forth with forest green over the 18-20-22-24-24 heel stitches for 4½-4½-5½-5½-5½ cm / 1¾"-1¾"-2¼"-2¼"-2¼". Insert 1 marker in the middle of the row – THE PIECE IS NOW MEASURED FROM HERE! Continue by working HEEL DECREASE – see description above! After heel decrease, knit up 10-10-12-12-12 stitches on each side of the heel and the 18-20-22-24-24 stitches from the thread are replaced on the needles = 48-50-56-58-58 stitches on the needles. Continue in the round with stockinette stitch and forest green. AT THE SAME TIME decrease in each side as follows: Knit together the first 2 stitches after the 18-20-22-24-24 stitches on top of the foot and knit twisted together the last 2 stitches before the 18-20-22-24-24 stitches on top of the foot. Decrease in this way every 2nd round a total of 6-6-8-8-8 times = 36-38-40-42-42 stitches. Continue working until the piece measures 11-13-14-16-18 cm / 4½"-5"-5½"-6¼"-7" from the marker on the heel. Insert 1 new marker in each side so that there are 18-19-20-21-21 stitches both on top of and underneath the foot. Continue in the round with stockinette stitch - AT THE SAME TIME decrease 1 stitch on each side of both markers for toe - read DECREASE TIP-2. Decrease in this way every 2nd round a total of 6-6-5-5-5 times and then every round a total of 0-0-2-2-2 times = 12-14-12-14-14 stitches left on the needles. On the next round knit all stitches together 2 and 2 = 6-7-6-7-7 stitches left. Cut the strand, pull it through the remaining stitches, pull tight and fasten well. Work another sock in the same way. |
||||||||||||||||
Diagram explanations |
||||||||||||||||
|
||||||||||||||||
|
||||||||||||||||
|
Have you made this or any other of our designs? Tag your pictures in social media with #dropsdesign so we can see them! Do you need help with this pattern?You'll find tutorial videos, a Comments/Questions area and more by visiting the pattern on garnstudio.com. © 1982-2024 DROPS Design A/S. We reserve all rights. This document, including all its sub-sections, has copyrights. Read more about what you can do with our patterns at the bottom of each pattern on our site. |
||||||||||||||||


With over 40 years in knitting and crochet design, DROPS Design offers one of the most extensive collections of free patterns on the internet - translated to 17 languages. As of today we count 304 catalogs and 11422 patterns - 11417 of which are translated into English (US/in).
We work hard to bring you the best knitting and crochet have to offer, inspiration and advice as well as great quality yarns at incredible prices! Would you like to use our patterns for other than personal use? You can read what you are allowed to do in the Copyright text at the bottom of all our patterns. Happy crafting!
Comments / Questions (6)
Hvilken størrelse i sko/ alder tilsvare 24/25 og 26/27?
17.05.2020 - 16:59DROPS Design answered:
Hei Åse. Det tilsvarer det samme i skostørrelse. Alder er inviduelt. mvh DROPS design
18.05.2020 - 12:03Når jeg er ferdig med mønstret A2a, A2B, A2c og A3; så måler hele arbeidet mitt 22 cm og ikke 18 cm. Kan det være riktig??
31.03.2020 - 17:53Hej. Hvordan undgår man, at indtagningerne til tå efterlader små huller? Strikker jeg for løst? Tak for svar og gode opskrifter.
11.09.2019 - 08:49DROPS Design answered:
Hej Kirsten, du kan evt bruge 1 mindre pind. God fornøjelse!
12.09.2019 - 10:07"Strikk videre til arbeidet måler 11-13-14-16-18 cm fra merket på hælen. Sett 1 nytt merke i hver side slik at det blir 18-19-20-21-21 masker både oppå og under foten. Fortsett rundt med glattstrikk - SAMTIDIG felles det 1 maske på hver side av begge merkene til tå". Betyr dette at felling til tå skal skje samtidig som man strikker disse 11-13-14-16-18 cm fra merket på hælen?
07.09.2019 - 17:26DROPS Design answered:
Hei Annette, Du setter nye merkene etter du er ferdig med å strikke 11-13-14-16-18 cm fra merket på hælen. Da begynner du også å felle masker etter at du har strikket disse 11-13-14-16-18 cm . God fornøyelse
09.09.2019 - 07:27Sur le diagramme A-1 au troisième rang le point noir à gauche complètement, indiquant la couleur mer du nord....est-ce une erreur? Ne serait-ce pas plutôt un carré blanc qui devrait être là? Merci de votre réponse à l’avance.
12.06.2019 - 16:15DROPS Design answered:
Bonjour Mme Boissonneault, on devrait effectivement avoir un carré blanc ici, le diagramme va être corrigé, merci. Bon tricot!
13.06.2019 - 09:57Hej! Går dessa att sticka med magic loop?
26.04.2018 - 12:29