
Looking for a yarn?


Comments / Questions (11)
![]() Undine wrote:
Undine wrote:
Die Maschen Anschlagszahl von z.B. 52M in Größe 26/28 in Garngruppe B und Nadel 3.5 kann unmöglich richtig sein für ein 4 jähriges Kind! Ich schlage für Größe 39 in Garngruppe A mit Nadel 2.5 sonst immer 60 Maschen an ! Wie ist das gedacht?
23.01.2023 - 19:58
![]() Veronika wrote:
Veronika wrote:
Bei der ersten Bilderschrift ist in der dritten Zeile ein Fehler, eine Masche in Rose, die da laut Foto nicht hingehört. Oder täusche ich mich? Lg Veronika
08.10.2022 - 18:24DROPS Design answered:
Liebe Veronika, Sie haben recht, eine Korrektur wird erfolgen, danke für den Hinweis. Viel Spaß beim stricken!
10.10.2022 - 08:59
![]() Heidi wrote:
Heidi wrote:
Mønsteret matcher ikke i ste 26/28. Må gi opp. Har forsøkt å lese nøye men maskene går ikke opp mht mønster.
25.10.2020 - 20:23
![]() åse Westlye wrote:
åse Westlye wrote:
Nei, nå har jeg klart å strikke feil, og må rekke opp igjen! Jeg syns det var veldig rotet og uforståelig med A2A, A2 b og a2c. at alt dette skulle være på ett og samme mønster forsto jeg ikke, og har strikket helt feil. Det burde forklares og illustreres tydeligere!
18.05.2020 - 17:59
![]() åse Westlye wrote:
åse Westlye wrote:
Er det feil i A2A mønsteret? Jeg ser ikke systemet i dette at det i rad 6 og 7 kommer to røde oppå hverandre, når det ellers er annenhver. Det ble veldig rotet. Jeg leter etter et bilde av sokken så jeg selv kan sjekke, men siden jeg strikker 29-31 str viser dere ikke bilde av hele mønsteret. Det skulle jeg ønsker dere ville gjøre.
18.05.2020 - 13:43DROPS Design answered:
Hei Åse. Ser at du har funnet ut av det med kommentaren din over, så bra. Det er veldig viktig å lese oppskriften nøye, men dine kommentarer er oversendt til design avd slik at de kan evnt forbedre sine forklaringer. mvh DROPS design
25.05.2020 - 11:13
![]() Annika Fredriksson wrote:
Annika Fredriksson wrote:
I storlek 26/28 bilderna 3 A2A och A2C slutarbetet passar inte ihop med resten av mönstret. Är de fel ritADE
28.10.2018 - 03:37
![]() Anny wrote:
Anny wrote:
Hei, diagrammene er merket feil med farger, noe om jo er veldig irriterende når man som meg bare har fulgt diagrammene og innser etter A3 at fargene er omvendt av det man ønsker og man må rekke opp. Fint om man kan få rettet opp i dette
20.10.2018 - 00:31
![]() Bjørg Aasheim wrote:
Bjørg Aasheim wrote:
Hei. Jeg synes dere burde lese igjennom teksten i oppskriften og sammenligne mot hvilke diagram det er henvist til i teksten. Viser også til kommentar jeg har ovenfor.
28.12.2017 - 12:26
![]() Bjørg Aasheim wrote:
Bjørg Aasheim wrote:
Hei. Hvorfor er diagrammet tatt vekk på de to største str. I mønsteret til Drops Children 30-12 . Gjelder sokken Vispy sock.
25.11.2017 - 19:42DROPS Design answered:
Hei Bjørg. Hvilken diagram mener du mangler? A.2B og A.2C er delt opp i 3 diagrammer (avhengig av størrelsene). mvh Drops design
27.11.2017 - 09:58
![]() Katarina Niemi wrote:
Katarina Niemi wrote:
Hej, jag tycker att det är några fel i mönstret Diagram A1, varv 3 ska vara 3 vita, 1 rosa, 2 vita Diagram A2A stl 29/32 32/34 Varv 6 bör vara 4 vita
06.11.2017 - 19:14
|
||||||||||||||||
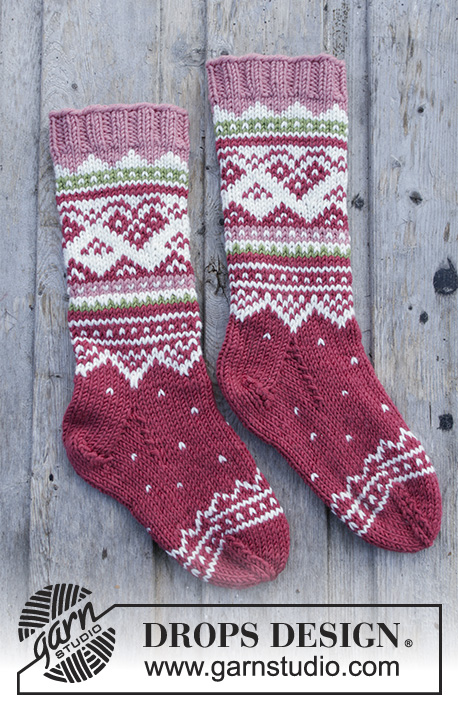
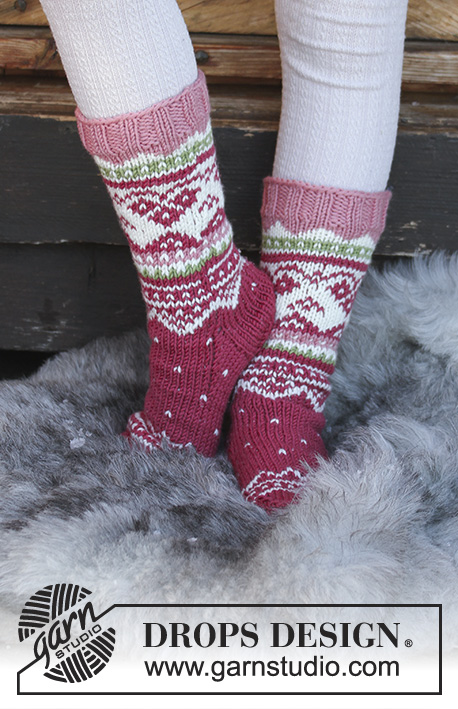
Visby Socks#visbysocks |
||||||||||||||||
 |
 |
|||||||||||||||
Knitted socks with multi-colored Nordic pattern for kids. The piece is worked in DROPS Merino Extra Fine.
DROPS Children 30-12 |
||||||||||||||||
|
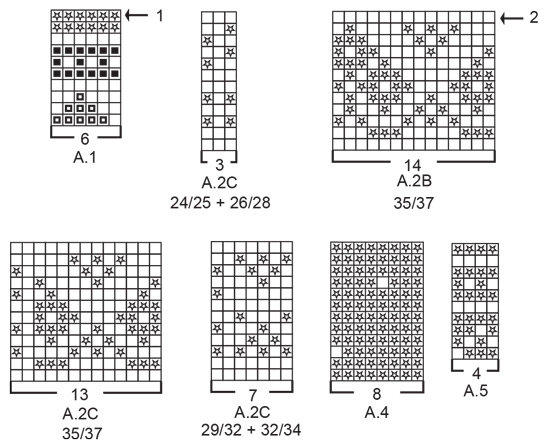
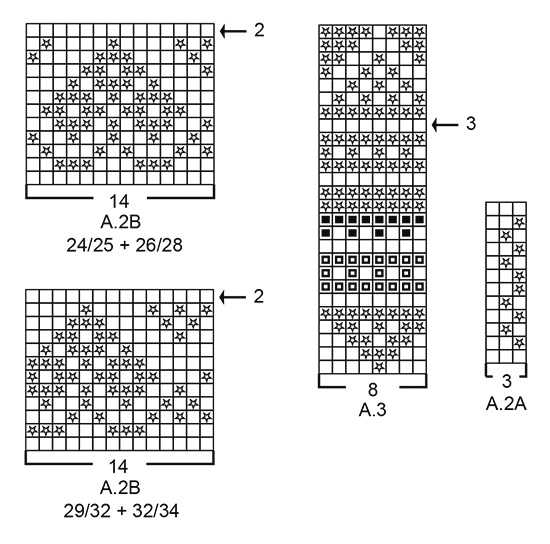
INFORMATION FOR THE PATTERN: PATTERN: See diagrams A.1 to A.5. Choose diagram for your size. The whole pattern is worked in stockinette stitch. DECREASE TIP-1: To work out how to decrease evenly, count the total number of stitches on the needle (e.g. 52 stitches) and divide by the number of decreases to be made (e.g. 4) = 13. In this example, knit every 12th and 13th stitch together. DECREASE TIP-2: Decrease as follows before the marker: Start 2 stitches before the marker and knit 2 together. Decrease as follows after the marker: Slip 1 stitch as if to knit, knit 1, pass the slipped stitch over the knitted stitch. KNITTING TIP (for heel): To strengthen the heel you can use 2 strands when working heel and heel decreases as follows: Use the strand from the inside and outside of the ball and work 1 stitch alternately with the one then the other strand. In this way, you get a slightly thicker heel without using a double strand. HEEL DECREASE: ROW 1 (= right side): Work until there are 6-6-6-8-8 stitches left, slip the next stitch as if to knit, knit 1, pass the slipped stitch over the knitted stitch, turn the piece. ROW 2 (= wrong side): Work until there are 6-6-6-8-8 stitches left, slip the next stitch as if to purl, purl 1, pass the slipped stitch over the purled stitch, turn the piece. ROW 3 (= right side): Work until there are 5-5-5-7-7 stitches left, slip the next stitch as if to knit, knit 1, pass the slipped stitch over the knitted stitch, turn the piece. ROW 4 (= wrong side): Work until there are 5-5-5-7-7 stitches, slip the next stitch as if to purl, purl 1, pass the slipped stitch over the purled stitch, turn the piece. Continue to decrease in the same way, by working until there is 1 less stitch before slipping 1 stitch and until there are 10-10-10-10-10 stitches left on the needle. -------------------------------------------------------- SOCK: The piece is worked in the round with double pointed needles, top down. Cast on 48-52-56-60-64 stitches with double pointed needles size 3.5 mm / US 4 and rose. Knit 1 round, then work rib in the round (= knit 2 /purl 2). When the rib measures 2-2-3-3-3 cm / ¾"-¾"-1"-1"-1" knit 1 round where you decrease 0-4-2-6-4 stitches evenly on round – read DECREASE TIP-1 = 48-48-54-54-60 stitches. Continue by working A.1 in the round (= 8-8-9-9-10 repeats of 6 stitches). REMEMBER THE GAUGE! On the round marked with arrow-1 in A.1 decrease 0-0-2-2-2 stitches evenly = 48-48-52-52-58 stitches. The next round is worked as follows: Work A.2A (= 3 stitches), work A.2B over the next 42 stitches (= 3 repeats of 14 stitches) and finish with A.2C (= 3-3-7-7-13 stitches). Continue the pattern in this way. On the round marked with arrow-2 in A.2B decrease 8-8-4-4-2 stitches evenly on round = 40-40-48-48-56 stitches. When A.2 has been completed, work A.3 in the round (= 5-5-6-6-7 repeats of 8 stitches). On the round marked with arrow-3 in the diagram, decrease 0-0-8-0-8 stitches evenly = 40-40-40-48-48 stitches. When A.3 has been completed, work A.4 in the round (= 5-5-5-6-6 repeats of 8 stitches). Continue A.4 until piece measures 18-19-20-20-22 cm / 7"-7½"-8"-8"-8¾". Now keep the first 10-10-10-12-12 stitches on the needle for the heel, place the next 20-20-20-24-24 stitches on a 1 thread (= mid top of foot) and keep the last 10-10-10-12-12 stitches on the needle for heel. Read KNITTING TIP and work stockinette stitch back and forth with dark rose over the 20-20-20-24-24 heel stitches for 4-4-4-5-5 cm / 1½"-1½"-1½"-2"-2". Insert 1 marker in the middle of the row – THE PIECE IS NOW MEASURED FROM HERE! Continue by working HEEL DECREASE – see description above! After the heel decrease, knit up 9-9-9-11-11 stitches on each side of the heel and the 20-20-20-24-24 stitches from the thread are placed back on the needle = 48-48-48-56-56 stitches on the needle. Continue with A.4 in the round as before until A.4 has been worked a total of 2-2-2-3-3 times in height (from where A.4 started). Then work stockinette stitch with dark rose. AT THE SAME TIME on the first round after you have knitted up stitches on each side of the heel, decrease in each side as follows: Knit together the first 2 stitches after the 20-20-20-24-24 stitches on top of foot and knit twisted together the last 2 stitches before the 20-20-20-24-24 stitches on top of foot. Decrease in this way every 2nd round a total of 4-4-4-6-6 times = 40-40-40-44-44 stitches (when decreasing there will not be enough stitches to fit a hole repeat of A.4 in each side, adapt the pattern by working more stitches with dark rose between the "dots" in each side). Continue in the round until the piece measures 8-10-11-13-15 cm / 3"-4"-4½"-5"-6" from the marker on the heel, there are now approx. 7 cm / 2¾" before finished length. Work A.5 in the round (= 10-10-10-11-11 repeats of 4 stitches). When A.5 has been completed, work stockinette stitch with dark rose to finished length. When the piece measures 11-13-14-16-18 cm / 4½"-5"-5½"-6¼"-7" from the marker on the heel, insert 1 new marker in each side so that there are 20-20-20-22-22 stitches both on top of and underneath the foot. Continue with stockinette stitch in the round - AT THE SAME TIME decrease 1 stitch on each side of both markers for toe - read DECREASE TIP-2. Decrease in this way every 2nd round a total of 5 times in all sizes and then every round a total of 2 times in all sizes = 12-12-12-16-16 stitches left on the needles. On the next round, knit all the stitches together 2 and 2 = 6-6-6-8-8 stitches left. Cut the strand, pull it through the remaining stitches, tighten and fasten well. Work one more sock in the same way. |
||||||||||||||||
Diagram explanations |
||||||||||||||||
|
||||||||||||||||
|
||||||||||||||||
|
||||||||||||||||
Have you finished this pattern?Tag your pictures with #dropspattern #visbysocks or submit them to the #dropsfan gallery. Do you need help with this pattern?You'll find 26 tutorial videos, a Comments/Questions area and more by visiting the pattern on garnstudio.com. © 1982-2025 DROPS Design A/S. We reserve all rights. This document, including all its sub-sections, has copyrights. Read more about what you can do with our patterns at the bottom of each pattern on our site. |
||||||||||||||||


With over 40 years in knitting and crochet design, DROPS Design offers one of the most extensive collections of free patterns on the internet - translated to 17 languages. As of today we count 314 catalogs and 11822 patterns - 11812 of which are translated into English (US/in).
We work hard to bring you the best knitting and crochet have to offer, inspiration and advice as well as great quality yarns at incredible prices! Would you like to use our patterns for other than personal use? You can read what you are allowed to do in the Copyright text at the bottom of all our patterns. Happy crafting!
Post a comment to pattern DROPS Children 30-12
We would love to hear what you have to say about this pattern!
If you want to leave a question, please make sure you select the correct category in the form below, to speed up the answering process. Required fields are marked *.