
Looking for a yarn?


Comments / Questions (20)
![]() Mychi wrote:
Mychi wrote:
Can you please tell me how to use two balls of yarn for the band? Where do I add the yarn and do I go back and forth alternate them ? Thanks in advance!
17.06.2025 - 14:54DROPS Design answered:
Dear Mychi, you need here the front band stitches to be worked with one colour only, so you will need to use an extra ball for the 6 sts in each side - work with a separate ball and twist yarns every row at the transition to avoid holes, just as you work with 2 colours but here it will be the same. That way, even on rows worked with off white, you will still have front band sts worked with marine blue. Happy knitting!
19.06.2025 - 11:04
![]() Carla wrote:
Carla wrote:
Hello, why do we have to increase so many stitches on the body near the end of the piece before starting on the rib? In my size, it says I have to increase 65 stitches, is that correct? Thank you!
03.12.2023 - 17:49DROPS Design answered:
Dear Carla, you increase many stitches to avoid the rib from contracting the piece. The rib is usually tighter than the rest of the pattern, so we work the rib with more stitches than the rest of the body to compensate this difference. Happy knitting!
03.12.2023 - 18:50
![]() Carla wrote:
Carla wrote:
Hi, When I am A.2a in this sweater (Lofoten sweater 181 -10) and it has an increase arrow (two times!) and it says number of stitches are 6, does that mean I start with 4 stitches and add one stitch on each row, to have a total of 6 stitches when I have finished? Or do I start with the 6 stitches and increase 2 times, to have a total of 8 stitches? Thanks!
26.10.2023 - 22:35DROPS Design answered:
Dear Carla, on the both rows with an arrow in A.2A you will increase evenly, on 1st row: 31-36-47-51-56-60 sts - then repeat the 6 sts in A.2A ending with A.2B from RS (starting with A2B from WS); on the 2nd row with an arrow increase 28-36-38-40-48-50 sts and continue repeating A.2A as before over 6 sts. Read more on increasing evenly here. Happy knitting!
27.10.2023 - 09:26
![]() Anna Karin wrote:
Anna Karin wrote:
Hej! Mina ärmar blev alldeles för korta, inte alls som på bilden. Det står att ”Ärmen mäter ca 40-40-40-40-39-37 cm från delningen. ” Det gör mina ärmar, och det är för kort. Tittar jag på diagrammet så ser det ut som om ärmen är 40 cm från där mönstret slutar. Jag skulle behöva hjälp att förstå vilket som är rätt.
26.07.2023 - 20:44DROPS Design answered:
Hei Anna Karin Forhold deg til målene i oppskrift, målskissen er kun en skisse. Men syns du ermene ble for korte, kan du fint strikke de lengre (om du har garn igjen). Prøv jakken på deg selv og mål hvor mange cm lengre du vil strikke. mvh DROPS Design
28.07.2023 - 11:18
![]() Astrid Beuth wrote:
Astrid Beuth wrote:
Nun stricke ich die Jacke mit der Original-Wolle und bin ganz begeistert vom schönen Maschenbild und der wunderbaren Anleitung. Was mich irritiert ist die Maschenzunahme am Ende vom Ärmel, bevor man das Bündchen strickt. Ich kenne es eher so, dass man vor dem Bündchen nochmal Maschen abnimmt, Was ist der Sinn dieser Zunahme?
03.06.2023 - 12:33DROPS Design answered:
Liebe Frau Beuth, das Rippenmuster ist elastischer und zieht sich z.B. im Vergleich zum Glatt-rechts-Gestrick zusammen. Wenn vor dem Rippenmuster-Rand zugenommen wird, kann man damit vermeiden, dass der Rand deutlich enger wird als der restliche Ärmel / das restliche Rumpfteil. Viel Spaß beim stricken!
05.06.2023 - 09:54
![]() Astrid Beuth wrote:
Astrid Beuth wrote:
Ich möchte die Jacke gerne stricken, lese aber bei der Wolle Drops Lima, dass sie eigentlich zum Filzen gedacht ist. Da habe ich nun arge Bedenken, dass sie auch bei Handwäsche verfilzen könnte. Das wäre schade um das Matrial und die Arbeit. Gibt es eine gute Garnalternative? Wolle soll es schon sein, aber sie soll nicht kratzen und nicht zu empfindlich auf Verfilzen sein.
30.04.2023 - 21:45DROPS Design answered:
Liebe Frau Beth, DROPS Lima is nicht zum Filzen gedacht, kann aber gerne zum filzen benutzt werden. Wenn Sie die Wolle genauso wie bei den Pflegehinweisen waschen, wird sie nicht filzen; Alternative (z.B.Superwash Garne wie Karisma oder Merino Extra Fine) finden Sie in allen Fällen dank unserem Garnumrechner. Viel Spaß beim stricken!
02.05.2023 - 09:14
![]() Zina wrote:
Zina wrote:
A.4A+B diagrams for sizes S+M have 11 rows (odd number). The same diagrams for sizes L+XL have 16 rows (even number), and for size XXL have 22 rows (even number). Then the description says that the beginning of A.5A should be the right side. If we made 11 rows for sizes S+M then the beginning of A.5A for sizes S+M falls on the wrong side. So, i'm guessing, 1 row is missing on diagrams A.4A+B for sizes S+M, and it should be 12 rows instead of 11. The question is: what exactly do we knit there?
03.08.2022 - 15:31
![]() Ktistina wrote:
Ktistina wrote:
Kan man köpa mönstret också,hos er och i så fal,hur mycket kostar det.
03.10.2020 - 22:13DROPS Design answered:
Hej. Mönstret är helt gratis och du kan skriva ut det direkt här på denna sida. Mvh DROPS Design
06.10.2020 - 07:56
![]() Amina wrote:
Amina wrote:
Can I have the pattern of Lofoten Jacket for men ,Please? :)
24.10.2018 - 19:42DROPS Design answered:
Dear Amina, we are unfortunately not able to adjust every pattern to every request, but you can take inspiration from the Lofoten Jumper for men to adjust the pattern. For any further individual assistance you are welcome to request help from your DROPS store, even per mail or telephone. Happy knitting!
25.10.2018 - 08:18
![]() Birgitte Tenstrand wrote:
Birgitte Tenstrand wrote:
Skal man strikke de 12 masker, der skal slås op i hver side af bagstykket med i bagstykket? Hvis man skal det, hvordan kan de så også blive stikket med i ærmerne?
14.10.2018 - 21:00DROPS Design answered:
Hej Birgitte, start ved halskanten og slå op ifølge den størrelse du følger. Nu er det bare at følge opskriften. De 12 masker som bliver slået op under ærmerne bliver forklaret tydeligt igen når du kommer ned til ærmerne. God fornøjelse!
29.10.2018 - 15:40
|
|||||||||||||
Lofoten Jacket#lofotenjacket |
|||||||||||||
 |
 |
||||||||||||
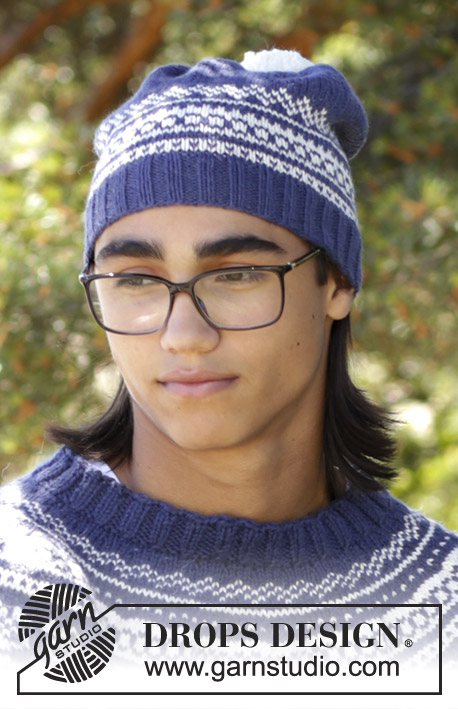
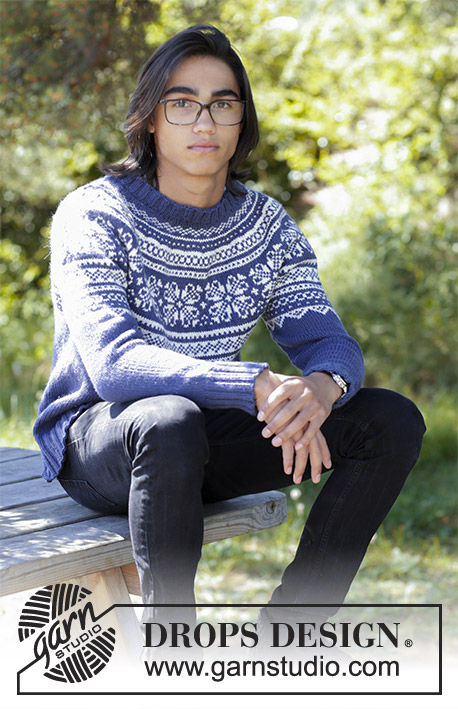
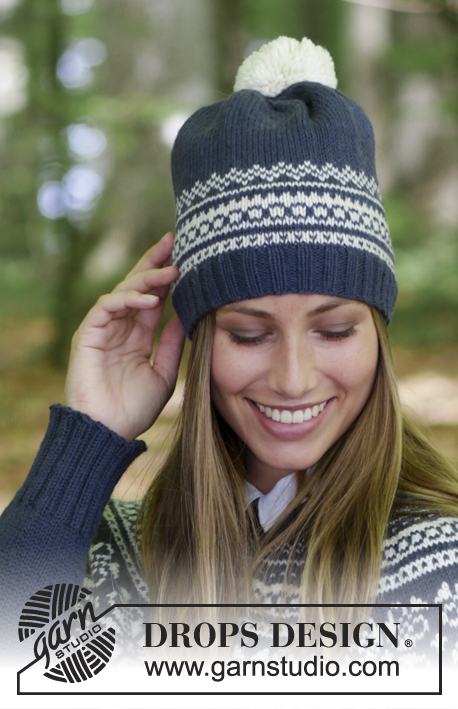
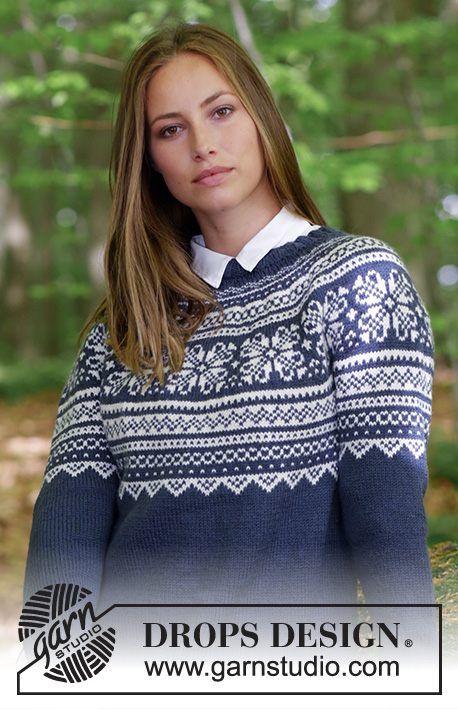
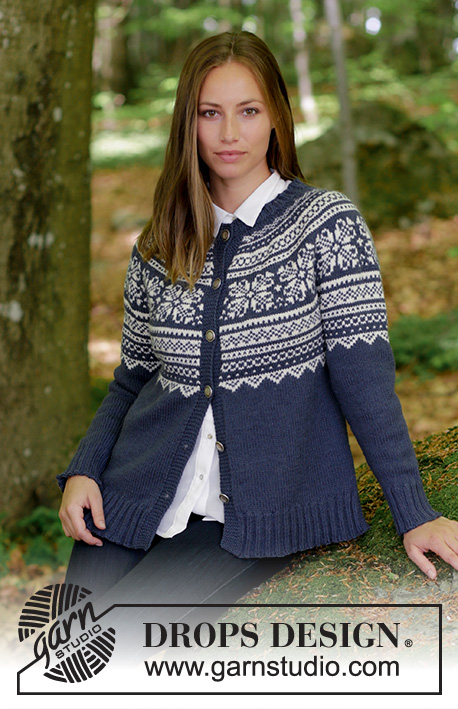
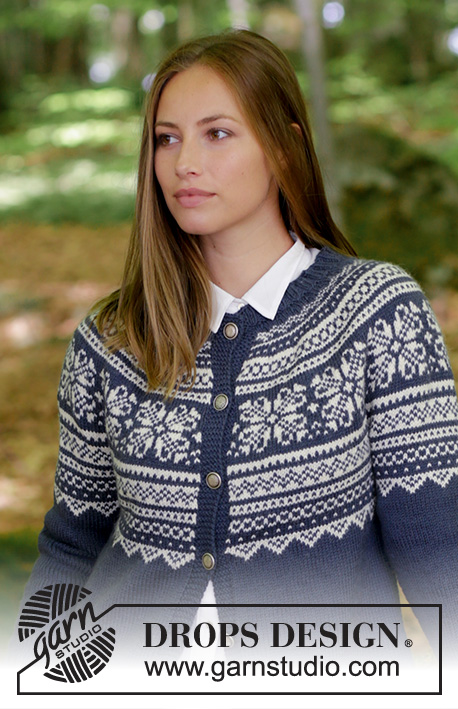
Knitted jacket with round yoke, multi-colored Norwegian pattern and A-shape, worked top down. Sizes S - XXXL. The piece is worked in DROPS Lima.
DROPS 181-10 |
|||||||||||||
|
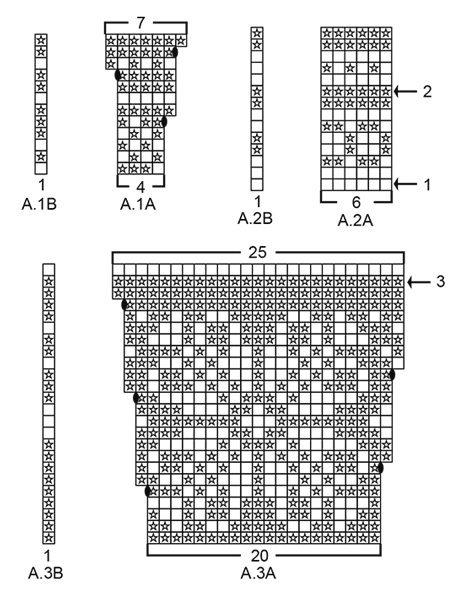
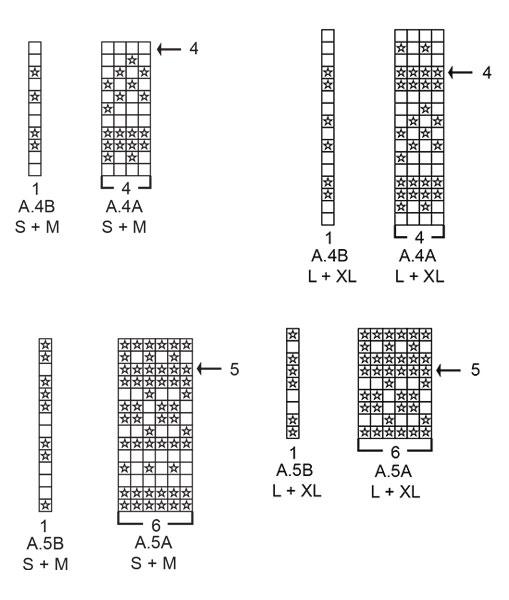
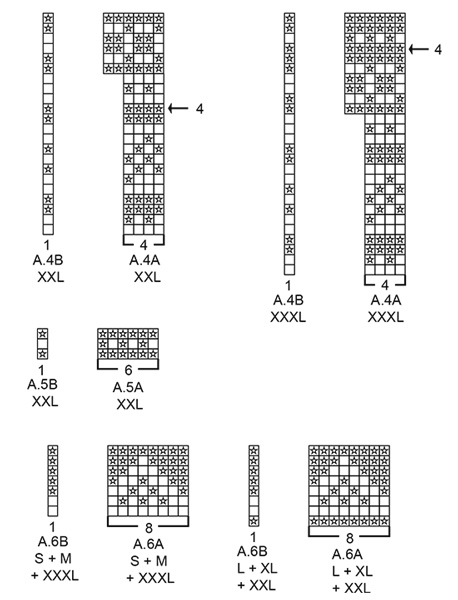
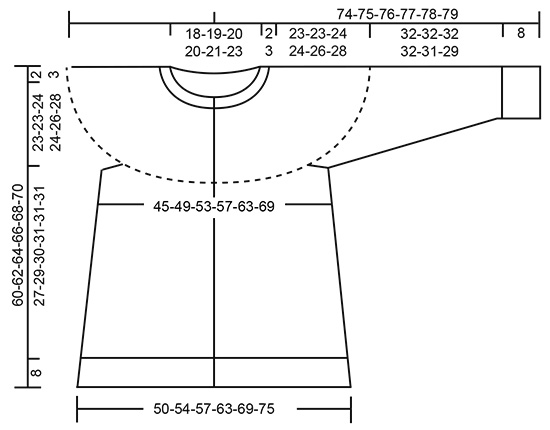
INFORMATION FOR THE PATTERN: RIDGE/GARTER STITCH (worked back and forth): 1 ridge = Knit 2 rows. DECREASE/INCREASE TIP: To work out how to decrease/increase evenly, count the total number of stitches on the needle (e.g. 118 stitches), minus the bands (e.g. 12 stitches) and divide the remaining stitches by the number of decreases/increases to be made (e.g. 13) = 8.1. In this example, knit every 7th and 8th stitch together when decreasing. Do not decrease over the bands. If you are increasing, make 1 yarn over after approx. every 8th stitch, on the next row work the yarn overs twisted to prevent holes. ELEVATION: Insert 1 marker in the middle stitch on the needle (= mid back). Start from the right side with dark blue and knit until you have worked 11-11-12-13-13-14 stitches past the marker, turn, tighten the strand and purl 22-22-24-26-26-28 stitches. Turn, tighten the strand and knit 33-33-36-39-39-42 stitches, turn, tighten the strand and purl 44-44-48-52-52-56 stitches. Turn, tighten the strand and knit 55-55-60-65-65-70 stitches, turn, tighten the strand and purl to end of row (knit the band). BAND TIP: So that the whole of the band is dark blue when working pattern in two colors, use a separate ball of dark blue for the bands (use the strands from the inside and outside of the ball for the left and right band). The bands are worked with just these strands to finished length, but to avoid there being holes in the transition between band and garment, twine the strands inside of the band each time (from right side and wrong side). KNITTING TIP-1: To prevent the knitting gauge becoming tighter when working pattern, it is important that the strands do not tighten at the back of the piece. You can increase a needle size when working pattern if this is a problem. PATTERN: See diagrams A.1 to A.6. Choose diagram for your size. The whole pattern is worked in stockinette stitch. INCREASE TIP (for the sides of the body): All increases are worked from the right side! Start 2 stitches before the marker thread, make 1 yarn over, knit 4 (the marker thread sits in the middle of these 4 stitches), make 1 yarn over (= 2 stitches increased). On the next row (wrong side) purl the yarn overs twisted to prevent holes. DECREASE TIP (for mid under the sleeve): Start 2 stitches before the marker thread, knit 2 together, marker thread, slip 1 stitch as if to knit, knit 1, pass the slipped stitch over the knitted stitch (= 2 stitches decreased). BUTTONHOLE: Work the buttonholes on the right band (when the garment is worn). Work from the right side until there are 4 stitches left on the needle, make 1 yarn over, knit 2 together and finish with knit 2. On the next row knit the yarn over so that there is a hole. The first buttonhole is worked when the neckline measures 1½-2 cm / ½"-⅞", then the next 5-5-5-6-6-6 buttonholes are worked with approx.10-10-10-9-9-9 cm / 4"-4"-4"-3½"-3½"-3½" between them. ---------------------------------------------------------- JACKET: The piece is worked back and forth with circular needle from mid front and top down. The sleeves are worked in the round with short circular needle, top down. Change to double pointed needles when necessary. NECKLINE: Cast on 118-122-130-138-142-150 stitches (including 6 band stitches in each side towards mid front) with circular needle size 3 mm / US 2.5 and dark blue. Purl 1 row (= wrong side). The next row is worked as follows from the right side: Work 6 band stitches in GARTER STITCH – see description above, * knit 2, purl 2 *, repeat from *-* until there are 8 stitches left on the needle, knit 2 and finish with 6 band stitches in garter stitch. Continue rib in this way – remember BUTTONHOLE on right band – see description above. When the rib measures 2-2-2-3-3-3 cm / ¾"-¾"-¾"-1⅛"-1⅛"-1⅛" knit 1 row from the right side where you decrease 13-13-17-17-17-17 stitches evenly on row – read DECREASE/INCREASE TIP = 105-109-113-121-125-133 stitches. Continue with yoke as described below. YOKE: Change to circular needle size 4 mm / US 6. Purl 1 row from the wrong side, but the 6 band stitches in each side are knitted. For a better fit, you can now work an ELEVATION in the back of the neck – see description above. When the elevation has been completed, work the next row as follows from the right side: 6 band stitches in garter stitch, work A.1A until there are 7 stitches left on the needle (= 23-24-25-27-28-30 repeats of 4 stitches), work A.1B (= 1 stitch) and finish with 6 band stitches in garter stitch. Continue pattern in this way and increase as shown in the diagram. Read BAND TIP, KNITTING TIP-1 and REMEMBER THE GAUGE! When A.1 has been completed, there are 174-181-188-202-209-223 stitches on the needle. The next row is worked as follows from the right side: 6 edge stitches in garter stitch, work A.2A until there are 7 stitches left on the needle and increase, at the same time, 31-36-47-51-56-60 stitches evenly over these stitches (marked with arrow-1 in A.2A), work A.2B (= 1 stitch) and finish with 6 band stitches in garter stitch = 205-217-235-253-265-283 stitches on the needle. Continue pattern in this way. On the row marked with arrow-2 in A.2A increase 28-36-38-40-48-50 stitches evenly on row = 233-253-273-293-313-333 stitches. When A.2 has been completed work the next row as follows from the right side: 6 band stitches in garter stitch, work A.3A until there are 7 stitches left on the needle (= 11-12-13-14-15-16 repeats of 20 stitches), work A.3B (= 1 stitch) and finish with 6 band stitches in garter stitch. Continue pattern in this way and increase as shown in the diagram. After the last increase in A.3A there are 288-313-338-363-388-413 stitches on the needle. On the row marked with arrow-3 in A.3A increase 1-8-11-10-9-8 stitches evenly on row = 289-321-349-373-397-421 stitches. When A.3 has been completed work the next row as follows from the right side: 6 band stitches in garter stitch, work A.4A until there are 7 stitches left on the needle (choose diagram for your size = 69-77-84-90-96-102 repeats of 4 stitches), work A.4B (= 1 stitch) and finish with 6 band stitches in garter stitch. On the row marked with arrow-4 in A.4A increase 10-8-14-8-12-16 stitches evenly on row = 299-329-363-381-409-437 stitches. When A.4 has been completed, the piece measures approx. 25-25-26-27-29-31 cm / 9¾"-9¾"-10¼"-10½"-11½"-12¼" from the cast-on edge. The next row is worked as follows from the right side with dark blue: Knit 49-53-57-61-66-71 stitches (= front piece), place the next 58-64-74-74-78-82 stitches on a thread for sleeve, cast on 8-8-10-10-12-14 new stitches on the needle (= in the side under the sleeve), knit 85-95-101-111-121-131 stitches (= back piece), place the next 58-64-74-74-78-82 stitches on a thread for sleeve, cast on 8-8-10-10-12-14 new stitches on the needle (= in the side under the sleeve) and knit the remaining 49-53-57-61-66-71 stitches (= front piece). Body and sleeves are now finished separately. THE PIECE IS NOW MEASURED FROM HERE! BODY: = 199-217-235-253-277-301 stitches. SIZES S, M, L, XL and XXL: The first row is worked as follows from the wrong side: 6 band stitches in garter stitch A.5B (= 1 stitch), work A.5A until there are 6 stitches left on the needle (= 31-34-37-40-44 repeats of 6 stitches – NOTE: the diagram is read from left to right when working from the wrong side), finish with 6 band stitches in garter stitch. Continue pattern in this way. On the row marked with arrow-5 in A.5A increase 6-4-2-0-0 stitches evenly on row = 205-221-237-253-277 stitches. When A.5 has been completed, work the next row as follows from the right side: 6 band stitches in garter stitch, work A.6A until there are 7 stitches left on the needle (= 24-26-28-30-33 repeats of 8 stitches), work A.6B (= 1 stitch) and finish with 6 band stitches in garter stitch. Continue pattern in this way until A.6 has been completed. Continue by working as described under ALL SIZES. SIZE XXXL = 301 stitches. The first row is worked as follows from the wrong side: 6 band stitches in garter stitch, work A.6B (= 1 stitch), work A.6A until there are 6 stitches left on the needle (= 36 repeats of 8 stitches – NOTE: the diagram is read from left to right when working from the wrong side) and finish with 6 band stitches in garter stitch. NOTE: in this size, you do not work A.5 because the repeat is worked in A.4. Continue the pattern until A.6 has been completed. ALL SIZES: There are 205-221-237-253-277-301 stitches on the needle and the piece measures approx. 8-8-6-6-4-3 cm / 3"-3"-2½"-2½"-1½"-1" from the separation with the sleeves. Insert 1 marker thread 54-58-62-66-72-78 stitches in from each side (= 97-105-113-121-133-145 stitches between the marker threads on the back piece). Continue by working stockinette stitch with dark blue and 6 band stitches in garter stitch in each side. AT THE SAME TIME on the first row from the right side, increase 1 stitch on each side of both marker threads – read INCREASE TIP (= 4 stitches increased). Increase in this way every 5-5-6-4-5-5 cm / 2"-2"-2½"-1½"-2"-2" a total of 4-4-4-6-6-6 times in each side = 221-237-253-277-301-325 stitches. When the piece measures 27-29-30-31-31-31 cm / 10½"-11½"-11¾"-12¼"-12¼"-12¼" from the separation, purl one row from the wrong side where you increase 49-57-65-65-73-81 stitches evenly on row (the bands are worked in garter stitch and do not increase over the bands) = 270-294-318-342-374-406 stitches. Change to circular needle size 3 mm / US 2.5 and work rib as follows from the right side: 6 band stitches in garter stitch, * knit 2, purl 2 *, repeat from *-* until there are 8 stitches left on the needle, knit 2 and finish with 6 band stitches in garter stitch. Continue rib in this way, but after 2 cm / ¾" increase all purl 2 (seen from the right side) to purl 3 by making 1 yarn over in each transition between knit 2 and purl 2 = 334-364-394-424-464-504 stitches. Continue until the rib measures 8 cm / 3⅛" (on the first row work the yarn overs twisted to prevent holes). Change to circular needle size 4 mm / US 6 and bind off with garter stitch over garter stitch, knit over knit and purl over purl. The whole jacket measures approx. 60-62-64-66-68-70 cm / 23⅝"-24⅜"-25¼"-26"-26¾"-27½" from the shoulder down. SLEEVE: Place the 58-64-74-74-78-82 stitches from the thread in the one side of the piece on short circular needle size 4 mm / US 6 and, in addition, knit up 1 stitch in each of the 8-8-10-10-12-14 stitches cast on under the sleeve = 66-72-84-84-90-96 stitches. Insert 1 marker thread in the middle of these 8-8-10-10-12-14 stitches and start the round by the marker thread (= mid under the sleeve). READ THE REST OF SLEEVE BEFORE CONTINUING! SIZES S, M, L, XL and XXL: Work A.5A in the round (= 11-12-14-14-15 repeats of 6 stitches). When A.5A has been completed, work A.6A in the round, but be aware that A.6A does not fit mid under sleeve in all sizes. When starting A.6A you have decreased 1-1-2-2-0 stitches mid under the sleeve as described below in ALL SIZES = 64-70-80-80-90 stitches on the needle. In other words, in S, L and XL start A.6A with the first stitch in the diagram and you work 8-10-10 repeats of 8 stitches. In size M, start A.6A with the 2nd stitch in the diagram and in XXL start A.6A with the 8th stitch in the diagram. SIZE XXXL: Work A.6A in the round (= 12 repeats of 8 stitches – NOTE: in this size, you do not work A.5A because this repeat has been worked in A.4A). ALL SIZES: When A.5A and A.6A have been completed, work stockinette stitch onwards with dark blue. AT THE SAME TIME when the piece measures 2-2-2-2-3-3 cm / ¾"-¾"-¾"-¾"-1⅛"-1⅛" from the separation under the sleeve, decrease 2 stitches mid under the sleeve – read DECREASE TIP. Decrease in this way every 2½-2-1½-1½-1-1 cm / ⅞"-¾"-½"-½"-⅜"-3/" a total of 11-13-18-18-19-21 times = 44-46-48-48-52-54 stitches. Continue working until the sleeve measures 32-32-32-32-31-29 cm / 12½"-12½"-12½"-12½"-12¼"-11½" from the separation (shorter measurements in the larger sizes because of longer yoke). Knit 1 round where you increase 12-10-12-12-12-14 stitches evenly on round = 56-56-60-60-64-68 stitches. Change to double pointed needles size 3 mm / US 2.5 and work rib (= knit 2 / purl 2) for 8 cm / 3⅛". Bind off with knit over knit and purl over purl, but to avoid the bind-off edge being tight, make 1 yarn over after every 8th stitch at the same time as you bind off (the yarn overs are bind off as normal stitches). The sleeve measures approx. 40-40-40-40-39-37 cm / 15¾"-15¾"-15¾"-15¾"-15¼"-14½" from the separation. Work the other sleeve in the same way. ASSEMBLY: Sew on the buttons. |
|||||||||||||
Diagram explanations |
|||||||||||||
|
|||||||||||||
|
|||||||||||||
|
|||||||||||||
|
|||||||||||||
|
|||||||||||||
Have you finished this pattern?Tag your pictures with #dropspattern #lofotenjacket or submit them to the #dropsfan gallery. Do you need help with this pattern?You'll find 32 tutorial videos, a Comments/Questions area and more by visiting the pattern on garnstudio.com. © 1982-2025 DROPS Design A/S. We reserve all rights. This document, including all its sub-sections, has copyrights. Read more about what you can do with our patterns at the bottom of each pattern on our site. |
|||||||||||||


With over 40 years in knitting and crochet design, DROPS Design offers one of the most extensive collections of free patterns on the internet - translated to 17 languages. As of today we count 314 catalogs and 11822 patterns - 11812 of which are translated into English (US/in).
We work hard to bring you the best knitting and crochet have to offer, inspiration and advice as well as great quality yarns at incredible prices! Would you like to use our patterns for other than personal use? You can read what you are allowed to do in the Copyright text at the bottom of all our patterns. Happy crafting!
Post a comment to pattern DROPS 181-10
We would love to hear what you have to say about this pattern!
If you want to leave a question, please make sure you select the correct category in the form below, to speed up the answering process. Required fields are marked *.