
Looking for a yarn?


Comments / Questions (10)
![]() Sylvia wrote:
Sylvia wrote:
Bonjour, pour l'assemblage de du corps et de la tête, je ne comprends pas dans quel sens poser la tête . Dois-je mettre la tête à l'avant ou l'arrière de base du corps? Merci beaucoup
07.03.2024 - 17:59DROPS Design answered:
Bonjour Sylvia, la tête doit se trouver au milieu du corps, au dernier rang de la tête, vous avez 8 mailles serrées avant de couper le fil. Au dernier rang de A.4, vous avez 16 mailles serrées, les tours commencent au milieu dos; vous crochetez d'abord 4 mailles serrées, puis les 8 mailles serrées suivantes en crochetant en même temps la tête et le corps (= 1 maille serrée dans chacune des mailles suivantes du corps + 1 maille serrée de la tête) et terminez ce tour par 4 mailles serrées = 16 mailles serrées. Bon crochet!
08.03.2024 - 08:16
![]() Ronnie De Gooijer wrote:
Ronnie De Gooijer wrote:
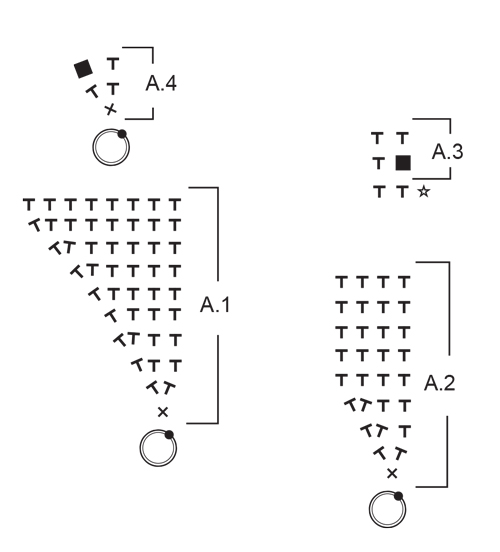
Wat betekent het als er achter een T een schuine T staat?
04.09.2022 - 14:12DROPS Design answered:
Dag Ronnie,
Deze schuine T is ook gewoon een vaste.
09.09.2022 - 12:56
![]() Maj-Lis Jonsson wrote:
Maj-Lis Jonsson wrote:
Undrar vart beskrivningen på benen tagit vägen i den svenska översättningen. Öron och huvud finns, men inte ben.
25.03.2022 - 09:54DROPS Design answered:
Hej Maj-Lis. Det finns förklaring på benen under "HOPVIRKNING AV KROPP OCH HUVUD": Nu virkas det 4 ben: Virka på samma sätt som öra, men benen virkas med ljus blålila. Mvh DROPS Design
25.03.2022 - 10:22
![]() Brigid wrote:
Brigid wrote:
There is a mistake in the US terms pattern – see below it reads „working dc in ea st = 48 dc“. This is wrong, it should be single crochet (sc) throughout because the British term pattern calls for double crochet which translates to single crochet in US terms. „Place 1 leg each side of mid front of the sheep (with 16 stitches between the legs). Work them together through both layers while working 1 double crochet in each stitch = 48 double crochets. Do not cut the strand!“
21.03.2022 - 18:28DROPS Design answered:
Dear Brigid, thanks for your feedback, pattern will be edited asap. Happy crocheting!
22.03.2022 - 10:05
![]() Mirte wrote:
Mirte wrote:
Hoi, ik vind dit een heel leuk patroon en het is misschien een stomme vraag, maar ik snap de haaktip niet. 1 losse (vervangt de eerste vaste niet) en eindigen met de halve vaste in de eerste losse. Hoe ik dit ook doe ik eindig met 49 steken(lusjes) ipv 48 en het ziet er heel raar uit. Ik heb het filmpje gekeken, maar die is (voor mij) niet heel duidelijk. Wat doe ik fout?
05.03.2021 - 22:07DROPS Design answered:
Dag Mirte,
De vaste en de losse aan het begin en eind van de toer tellen niet mee in het aantal steken.
09.03.2021 - 11:17
![]() Madde wrote:
Madde wrote:
Kan jag få en utförligare förklaring på A4?
21.01.2021 - 19:02DROPS Design answered:
Hej Madde, titta på vår video: Hur man virkar bubblorna till fåret
27.01.2021 - 14:51
![]() Anna D wrote:
Anna D wrote:
Hi. I had left an earlier comment regarding round 2 on the head and ear. While waiting for the reply i decided to try the body. But I do not get it. I just do not understand the instructions or the the diagram. Even guessing doesn¨t wotk. Help
04.05.2020 - 17:46
![]() Anna D wrote:
Anna D wrote:
I do not under stand A3. Help
03.05.2020 - 05:00DROPS Design answered:
Dear Anna D, A.3 is worked over 2 sts and 3 rows. Work on row 1: *2 trebles + 1 sc worked tog (see 4th symbol), 1 sc in next sc*, repeat from *-*. Row 2: work 1 sc in each stitch. Happy crocheting!
04.05.2020 - 13:51
![]() Dar wrote:
Dar wrote:
Do you have any free crochet patters that don't use a chart???? I never could read charts. It would take me too far long to make anything. My grandmother taught when I was five, I will be 65 in September. I love crochet over knitting as I can go faster. ThanksDar
17.04.2019 - 00:29DROPS Design answered:
Dear Dar, there are some -older- patterns that have the charts written out, but generally, our patterns are charted. It is much easier to see the stitches'places in relation to each other, as well as the shape of the piece. We also have video tutorials, and you can always ask for help in person - for example to make sense of the charts - at the store you bought your DROPS yarn from. It is well wort learning how to decipher a chart, as you will have so many more paterns to choose from. Happy Crafting!
17.04.2019 - 02:24
![]() Carina Sanna wrote:
Carina Sanna wrote:
Förstår inte hur A.4 och A.3 och A.1 och A.2 ska göras. Den film som ni lagt ut gör ju bara första varvet på kroppen. Tacksam för detaljerad beskrivning av detta. Tack på förhand Har även gjort några av dom andra djuren och det är många brister på hur man ska göra. Ni kanske skulle se över beskrivningarna.
10.03.2019 - 09:07DROPS Design answered:
Hei Carina. Det hekles etter diagram, nettopp fordi det er mer oversiktlig enn å forklare med ord. Etter at du har laget luftmaskeringen hekler du etter A.1. Første omgang av A.1 = 1 fastmaske om ringen. Du gjentar A.1 6 ganger = 6 fastmasker. På 2 omgang hekler du 2 fastmasker i hver fastmaske = 12 fastmasker. 3 omgang hekles slik: 1 fastmaske i den første fastmasken, 2 fastmasker i neste. Gjenta ut omgangen = 18 fastmasker, osv. Du kan se vår nye leksjon hvordan å lese heklediagrammer, her. Håper dette hjelper. God fornøyelse
18.03.2019 - 11:02
|
||||||||||||||||
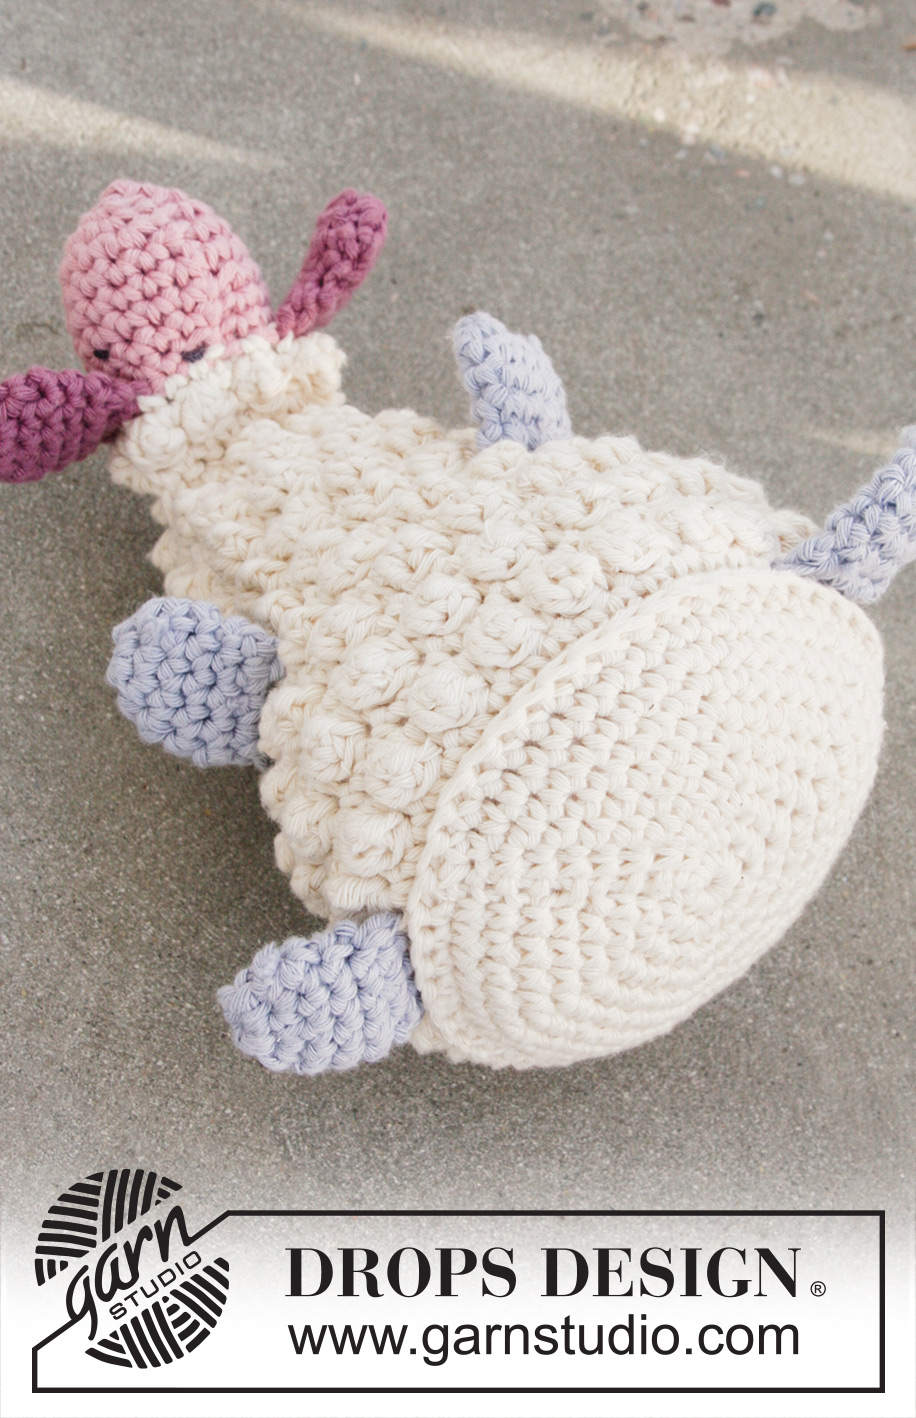
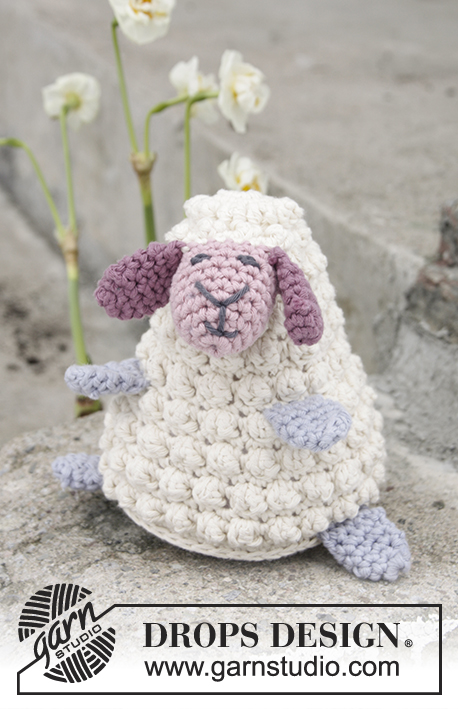
Easter Lamb#dropseasterlamb |
||||||||||||||||
 |
 |
|||||||||||||||
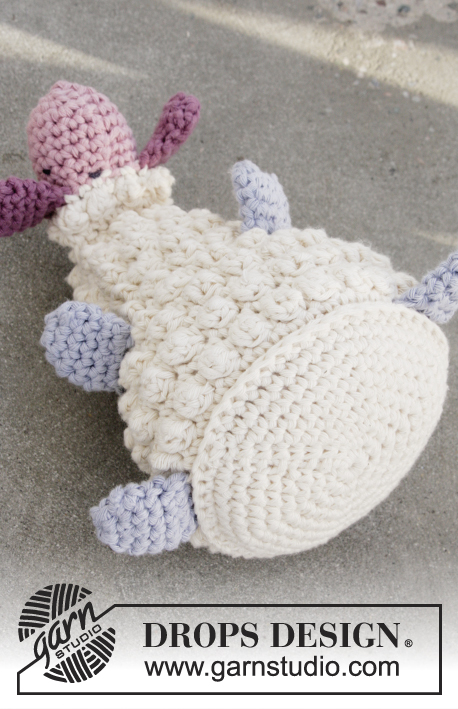
Crochet sheep for Easter in DROPS Paris.
DROPS Extra 0-1376 |
||||||||||||||||
|
PATTERN: See diagrams A.1 to A.4. CROCHET TIP: Each round starts with 1 chain stitch (does not replace the first stitch), the round finishes with 1 slip stitch in the first chain stitch at the beginning of the round. INCREASE TIP: Increase 1 single crochet by working 2 single crochets in the same stitch. ---------------------------------------------------------- SHEEP: The sheep is worked in the round and top down. It is worked in parts and these are worked together with the body as you go. First work the bottom. Then work the ears and head separately before they are worked together. The body and legs are worked at the end. BOTTOM: Work 4 chain stitches with hook size 4.5 MM = US 7 and off white and form them to a ring with 1 slip stitch in the first chain stitch. Work A.1 a total of 6 times in the round – READ CROCHET TIP and REMEMBER THE CROCHET GAUGE! When A.1 has been completed in height, there are 48 single crochets on the last round. The bottom measures approx. 11 cm = 4⅜" in diameter. Cut and fasten the strand. EAR: Work 4 chain stitches with hook size 4.5 MM = US 7 and dark old pink and form them to a ring with1 slip stitch in the first chain stitch. ROUND 1: Remember CROCHET TIP! Work 4 single crochets around the chain-stitch ring. ROUND 2: Work 2 single crochets in each single crochet = 8 single crochets. ROUNDS 3-5: Work 1 single crochet in each single crochet. Fold the ear flat so that there are 4 single crochets on each side. Work the ear together by working 1 single crochet through both layers - work 1 single crochet in each of the 4 single crochets = 4 single crochets. Cut and Fasten the strand. Work 1 more ear in the same way. HEAD: Work 4 chain stitches with hook size 4.5 MM = US 7 and light old pink and form them to a ring with 1 slip stitch in the first chain stitch. Then work A.2 a total of 4 times in the round - Remember CROCHET TIP! When A.2 has been completed in height, there are 16 single crochets on the last round. The head measures approx. 5 cm = 2" in height. Change to off white and work the head and ears together as follows: WORKING THE HEAD AND EARS TOGETHER: ROUND 1: Work 1 single crochet in each of the first 2 single crochets, lay the ear (= 4 single crochets) down along the head, matching the next 4 single crochets and work 1 single crochet in each of the next 4 single crochets through both layers, work 1 single crochet in each of the next 4 single crochets (= mid front), lay the other ear (= 4 single crochets) along the head, matching the next 4 single crochets and work 1 single crochet in each of the next 4 single crochets through both layers, finish with 1 single crochet in each of the last 2 single crochets. ROUND 2: Work the first round in A.3 a total of 8 times in the round. Cut and fasten the strand. Eyes and snout: Embroider the eyes and snout with a remnant of dark grey. Cut and fasten the strand. Fill the head with a little padding (should not be hard, but quite plump). Fold the head flat so that the ears are in the middle of each side and there are 8 single crochets on the top of the head and 8 single crochets underneath. Start on the one side and work the head together with off white by working 1 single crochet through both layers - work 1 single crochet in each of the 8 single crochets = 8 single crochets. Cut and fasten the strand. BODY: The body is worked top down. Work 4 chain stitches with hook size 4.5 MM = US 7 and off white and form them to a ring with 1 slip stitch in the first chain stitch. Then work A.4 a total of 8 times in the round - Remember CROCHET TIP! When A.4 has been completed in height, there are 16 stitches on the last round. WORKING THE BODY AND HEAD TOGETHER: ROUND 1: Work 1 single crochet in each of the first 4 stitches, lay the head (= 8 single crochets) matching the next 8 single crochets and work 1 single crochet in each of the next 8 single crochets through both layers, finish with 1 single crochet in each of the last 4 single crochets = 16 single crochets. Now work the first round in A.3 a total of 8 times on the round. Then work the 2nd round in A.3 AT THE SAME TIME as you increase 4 single crochets evenly along the round – READ INCREASE TIP! = 20 single crochets. Now work body as follows: ROUND 1: Work the first round in A.3 the whole round. ROUND 2: Work the 2nd round in A.3 and increase 4 single crochets evenly along the round = 24 stitches. Repeat rounds 1 and 2 two more times, then repeat round 1 = 32 stitches Now work 4 legs: Work in the same way as the ear, but the legs are worked in light blue purple. Place 1 leg each side of mid front of the sheep (with 8 stitches between legs). Work them together with body through both layers while working as round 2 = 36 stitches. Work rounds 1 and 2, 3 times more and then work round 1 = 48 stitches. Place 1 leg each side of mid front of the sheep (with 16 stitches between the legs). Work them together through both layers while working 1 single crochet in each stitch = 48 single crochets. Do not cut the strand! WORKING THE BODY AND BOTTOM TOGETHER: Lay the bottom (= 48 single crochets on the last round) with right side out and work it together with the body (= 48 single crochets) by working 1 single crochet in each single crochet through both layers - NOTE! Fill the sheep full of padding (should be quite firm) as you go. Cut and fasten the strand. |
||||||||||||||||
Diagram explanations |
||||||||||||||||
|
||||||||||||||||
|
||||||||||||||||
Have you finished this pattern?Tag your pictures with #dropspattern #dropseasterlamb or submit them to the #dropsfan gallery. Do you need help with this pattern?You'll find 11 tutorial videos, a Comments/Questions area and more by visiting the pattern on garnstudio.com. © 1982-2025 DROPS Design A/S. We reserve all rights. This document, including all its sub-sections, has copyrights. Read more about what you can do with our patterns at the bottom of each pattern on our site. |
||||||||||||||||


With over 40 years in knitting and crochet design, DROPS Design offers one of the most extensive collections of free patterns on the internet - translated to 17 languages. As of today we count 314 catalogs and 11822 patterns - 11812 of which are translated into English (US/in).
We work hard to bring you the best knitting and crochet have to offer, inspiration and advice as well as great quality yarns at incredible prices! Would you like to use our patterns for other than personal use? You can read what you are allowed to do in the Copyright text at the bottom of all our patterns. Happy crafting!
Post a comment to pattern DROPS Extra 0-1376
We would love to hear what you have to say about this pattern!
If you want to leave a question, please make sure you select the correct category in the form below, to speed up the answering process. Required fields are marked *.