
Looking for a yarn?


Comments / Questions (25)
![]() Lucie wrote:
Lucie wrote:
Bonjour, Est-il possible de bloquer les maniques afin de détendre un peu le tricot avec un jacquard un peu souple et avoir un rendu un peu plus grand ou bien est-ce déconseillé ? Si oui, faut-il le faire avant la couture ? Modèle très mignon au passage, merci pour les explications !
07.05.2025 - 18:24DROPS Design answered:
Bonjour Lucie, vous pouvez tout à fait les bloquer si vous en ressentez la nécessité, soit avant, soit après la couture, au choix. Bon tricot!
08.05.2025 - 09:39
![]() Carol wrote:
Carol wrote:
Hi! The colour scheme indicates "color 55, cerise" but there is no Safran 55. I bought the one that matches the name instead of the number (cherry uni colour 20) as I thought would be the correct one, but it looks too dark compared to the one used in the picture of the potholder. The same applies for the "Always Spring Potholder" pattern. What would be the correct colour? Thanks.
05.02.2025 - 15:46DROPS Design answered:
Dear Carol, the colour 55 is now discontinued, so you can replace it with another colour - you can get help from your store to find the right colour for you. Happy knitting!
05.02.2025 - 16:15
![]() Elisabeth Arnesen wrote:
Elisabeth Arnesen wrote:
Hei, er der en video tilgjengelig på hvordan sy grytekluten sammen? på forhond takk
31.01.2024 - 07:03DROPS Design answered:
Hej Elisabeth, her ser du hvordan man kan sy sammen, vælg den teknik du synes bedst om: Montering - Sy sammen
02.02.2024 - 12:13
![]() Mary Conner wrote:
Mary Conner wrote:
I would love to see this chart in a slightly bigger version for a baby blanket. Has anyone tried expanding the pattern so the images were a bit bigger?
13.06.2022 - 21:13
![]() Lea wrote:
Lea wrote:
Hej igen :) En lille uddybelse af min tidligere besked. Jeg har set videoerne, som viser hvordan man strikker med to farver, men de viser ikke, hvordan man tilføjer en ny farve, og hvordan man hæfter en farve, som man er færdig med. I denne opskrift er der jo mange forskellige farver, som skal startes op, og som ikke skal bruges hele vejen igennem. Mvh. Lea
20.01.2022 - 15:35DROPS Design answered:
Hej igen Lea, her ser du hvordan du starter med en ny farve: Farveskift Og her har du et tips når man strikker rundt med flere farver: Strik rundt med flere farver Og hvordan du hæfter trådene: Hæft tråde på bagsiden :)
20.01.2022 - 16:02
![]() Lea wrote:
Lea wrote:
Hej Jeg er ny i strikkefaget og er i tvivl om hvordan man tilføjer en ny farve og hvordan man hæfter den, når man er færdig med pågældende farve? Har I en video som viser det? :) Mvh. Lea
20.01.2022 - 14:41DROPS Design answered:
Hej Lea, ja, nederst i opskriften finder du en video som viser hvordan man strikker med 2 farver :)
20.01.2022 - 15:29
![]() Jessica Metscher wrote:
Jessica Metscher wrote:
Goedendag, ik wil deze pannenlappen voor mijn woongroep maken. Maar hoe hecht je de roze kleur af in het gras? Er zijn daar maar een paar steekjes van. Hecht je die bij het groene af, dan zie je dat aan de voorkant doorschijnen. En er zijn maar een paar steekjes van roze, waarmee je niet goed kan afhechten. Met vriendelijke groet Jessica
03.01.2022 - 13:30DROPS Design answered:
Dag Jessica,
Als je eerst een klein knoopje maakt en in de achterste draden van de verkeerde kant de draadjes wegsteekt, zou je het niet moeten zien.
06.01.2022 - 10:00
![]() Michèle wrote:
Michèle wrote:
Bonjour, je voudrais tricoter cette manique avec des aiguilles droites. Pouvez-vous me renseigner le nombre de mailles à monter ?
04.03.2021 - 21:38DROPS Design answered:
Bonjour Michèle, cette leçon explique comment adapter un modèle sur aiguilles droites et pourra vous aider ainsi à réaliser ces maniques. Bon tricot!
05.03.2021 - 07:38
![]() Ann Brorsdotter wrote:
Ann Brorsdotter wrote:
Hej, jag vill sticka en babyfilt i det här mönstret, gärna i samma färger. Fungerar garnet till babyfilt? Hur många nystan av vardera färg? Jag tänker att nedre halvan får vara grön, övre halvan blå. Däremellan får mönstret stickas in en gång, skall ej upprepas. Storlek som blir bra för vagn eller vagga. Tack på förhand. Med vänlig hälsning, Ann Brorsdotter.
17.02.2021 - 18:51DROPS Design answered:
Hej Ann, Ja du kan strikke en babyfilt i bomuld, eller så kan du strikke den i DROPS Baby Merino som kan strikkes på samme opskrifter som Safran. Du må prøve at gange antal nøgler op med størrelsen på dit babytæppe :)
23.02.2021 - 09:58
![]() Franzke wrote:
Franzke wrote:
Hallo, ich habe nochmal eine kurze Frage: der Topflappen wird in Runden gestrickt? Ich sehe in der Anleitung nirgends die Bemerkung, dass die aufgenommenen Maschen zu einer Runde geschlossen werden. Oder wird der Topflappen als Rechteck gestrickt und dann oben und unten und die eine Seitennaht geschlossen? Habe ich in der Anleitung etwas übersehen? Bin etwas verwirrt. Danke für Ihre Rückmeldung.
17.02.2021 - 08:00DROPS Design answered:
Liebe Frau Franzke, es wird kurz davor beschrieben: Der Topflappen wird in Runden auf der Rundnadel gestrickt.. (in älteren Modellen wurde es etwas anders beschrieben als in den neueren), so wird man in der Runde, nur mit rechte Maschen stricken, mit nur 1 Naht oben und unten am Ende. Viel Spaß beim stricken!
17.02.2021 - 08:31
|
||||||||||||||||
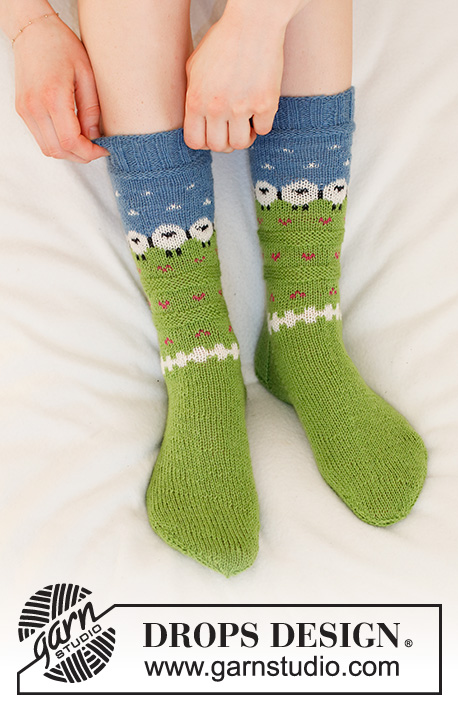
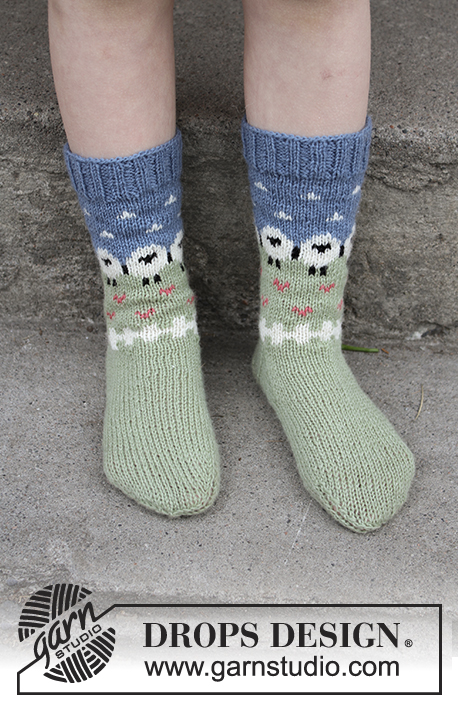
Summer Grazing Potholder#summergrazingpotholder |
||||||||||||||||
|
|
||||||||||||||||
Knitted potholder with multi-colored pattern in DROPS Safran.
DROPS 178-20 |
||||||||||||||||
|
PATTERN: See diagram A.1. RIDGE/GARTER STITCH (worked in the round): 1 ridge = 2 rounds. Knit 1 round and purl 1 round. -------------------------------------------------------- The oven cloth is worked in the round with circular needle. POTHOLDER: Cast on 96 stitches with circular needle size 3 mm / US 2.5 and lime. Work 2 RIDGES – see description above. Insert 1 marker thread at the beginning of the round and 1 marker thread after 48 stitches (= marks the sides). Continue by working A.1 over all the stitches (= 12 repeats in width). When A.1 has been completed 1 time in height, work 2 ridges with light blue purple. Knit 1 round, at the end of the round cast on 20 new stitches on the needle. Turn the piece, bind off the 20 stitches which were cast on and then bind off the remaining 96 stitches from the wrong side. Fold the potholder double so that the marker threads are in the sides. Sew the potholder together at the top and bottom with small stitches. |
||||||||||||||||
Diagram explanations |
||||||||||||||||
|
||||||||||||||||

|
||||||||||||||||
Have you finished this pattern?Tag your pictures with #dropspattern #summergrazingpotholder or submit them to the #dropsfan gallery. Do you need help with this pattern?You'll find 21 tutorial videos, a Comments/Questions area and more by visiting the pattern on garnstudio.com. © 1982-2025 DROPS Design A/S. We reserve all rights. This document, including all its sub-sections, has copyrights. Read more about what you can do with our patterns at the bottom of each pattern on our site. |
||||||||||||||||


With over 40 years in knitting and crochet design, DROPS Design offers one of the most extensive collections of free patterns on the internet - translated to 17 languages. As of today we count 314 catalogs and 11822 patterns - 11812 of which are translated into English (US/in).
We work hard to bring you the best knitting and crochet have to offer, inspiration and advice as well as great quality yarns at incredible prices! Would you like to use our patterns for other than personal use? You can read what you are allowed to do in the Copyright text at the bottom of all our patterns. Happy crafting!
Post a comment to pattern DROPS 178-20
We would love to hear what you have to say about this pattern!
If you want to leave a question, please make sure you select the correct category in the form below, to speed up the answering process. Required fields are marked *.