
Looking for a yarn?


Comments / Questions (11)
![]() Mari Färnefors wrote:
Mari Färnefors wrote:
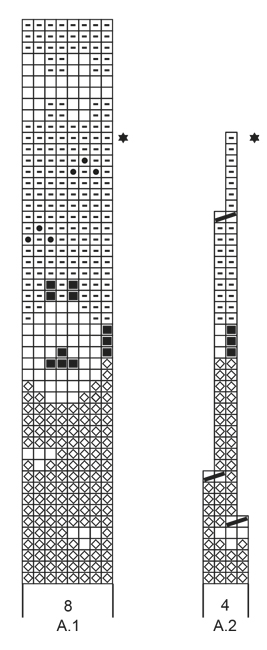
Får det inte att gå ihop! Lägg upp 64 maskor. Minska sen 12, det blir 52 kvar. Sticka mönster A1 6ggr som är 8 maskor . Det är 48 maskor. Vad gör jag av de 4 maskor som är kvar då?
31.10.2022 - 12:23DROPS Design answered:
Hei Mari. Du må også strikke A.2 (4 masker). Altså strikk: A.1 (= 8 masker) 6 ganger i bredden = 48 masker og så strikkes det A.2 (= 4 masker) = 48+4= 52 masker, som du har på pinnen. mvh DROPS Design
31.10.2022 - 13:48
![]() Silje wrote:
Silje wrote:
Hei. Er det bare jeg som ikke forstår dette eller stemmer de ikke med antall masker i mønster A1? 8m × 6 ganger er jo 48 å du skal jo ha 52 masker på pinne. Jeg får ikke dette til å stemme?
08.08.2022 - 22:40DROPS Design answered:
Hei Silje, Etter du har strikket A.1 x 6 skal du strikke A.2 (4 masker). Da har du 52 masker. God fornøyelse!
09.08.2022 - 07:07
![]() Rochelle wrote:
Rochelle wrote:
Do you have instructions for adult sizes?
16.10.2021 - 05:43DROPS Design answered:
Dear Rochelle, unfortunately we do not have this pattern in adult sizes, but you can follow a plain sock pattern, adjust it to the appropriate stitch number and use the diagrams. Happy Stitching!
17.10.2021 - 00:22
![]() Michaela wrote:
Michaela wrote:
Ich stricke erst 6x A1 und dann die 4 Maschen von A2? Oder 6x A1 und A2?
23.01.2021 - 21:44DROPS Design answered:
Liebe Michaela, A.2 wird nur am Ende der Runde gestrickt, dh Sie wiederholen zuerst 6 Mal die 8 Maschen von A.1 dann enden Sie die Runde mit A.2. Viel Spaß beim stricken!
25.01.2021 - 09:10
![]() Delacroix Jacqueline wrote:
Delacroix Jacqueline wrote:
Bonjour J ai décelé une erreur dans les explication du modèle de chaussettes 28_10. En effet il y a 2 fois trop de diminutions au début du pied de la chaussettes. A savoir 6 ou 10 3 et 5 suffisent. Bonne journée
21.11.2020 - 09:20DROPS Design answered:
Bonjour Mme Delacroix, quand vous avez relevé toutes les mailles pour le pied (après les diminutions du talon: 10-10-12-12 m) + les 11-12-13-13 m relevées de chaque côté + les 22-22-30-32 m du dessus du pied = 54-56-68-70 m - 2 m x 6-6-10-10 (= moins 12-12-20-20 m) = 42-44-48-50 m. Bon tricot!
23.11.2020 - 10:59
![]() Emma wrote:
Emma wrote:
Thankyou for answering my questions, I really will try my best to make these socks. Thankyou for the pattern
24.06.2019 - 01:03
![]() Emma wrote:
Emma wrote:
Also is charts read left t right or all from right to left
22.06.2019 - 15:44DROPS Design answered:
Dear Emma, knitting patterns (especially those knitted on teh round) should be always knitted from right to left just as you knit the stitches from the needles from right to left. Happy Knitting!
23.06.2019 - 08:51
![]() Emma wrote:
Emma wrote:
So do you knit 1row of a1 then 4stiches of a2. I'm confused
22.06.2019 - 15:35DROPS Design answered:
Dear Emma, when you start to knit the pattern, you should knit pattern A.1 6 or 7 times (depending on the size) and the 4 stitches of pattern A.2 in the same round to finish the round. Happy Knitting!
23.06.2019 - 08:49
![]() Jasmin Braun wrote:
Jasmin Braun wrote:
Ich stricke die Gr 32/34 und sie ist meine Tochter zu eng, obwohl sie sehr schmal ist und Gr 31 trägt. Das Bündchen passt aber dann wird es eng. Gibt es eine Umrechnungstabelle..bei 4fädrige Sockenwolle habe ich auch die gleiche Maschenzahl und diese passt. Woran liegt das?
13.06.2019 - 21:23DROPS Design answered:
Liebe Frau Braun, stimmt Ihre Maschenproben? Sie sollen 26 M = 10 cm haben. Vielleicht ist der Anschlagsrand etwas zu eng? Die Maschen können Sie dann z.B. mit einer größeren Nadel anschlagen, dann weiter mit der Nadel (mit der Sie die 26 M = 10 cm bekommen). Viel Spaß beim stricken!
14.06.2019 - 07:19
![]() Donna wrote:
Donna wrote:
You have the wrong pattern this is not theTriangle Scarf Crochet in Drops Flora Please send me the correct site
25.03.2018 - 15:47DROPS Design answered:
Dear Donna, are you looking for this pattern? Happy crocheting!
26.03.2018 - 11:30
|
||||||||||||||||||||||
Summer Grazing for Kids#summergrazingsocks |
||||||||||||||||||||||
|
|
||||||||||||||||||||||
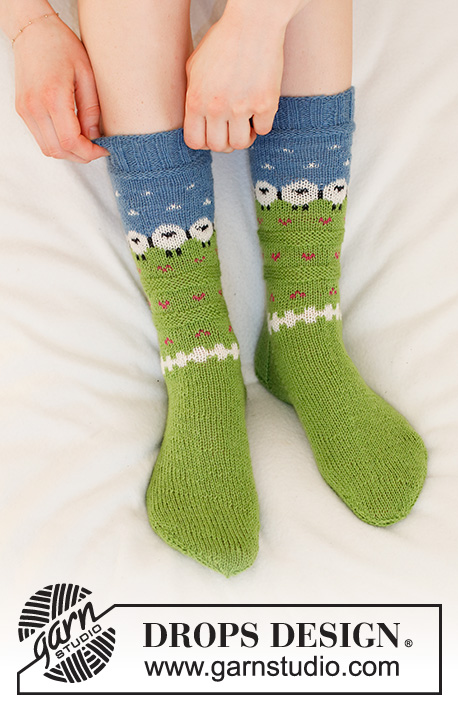
Children socks with sheeps in DROPS Flora.
DROPS Children 28-10 |
||||||||||||||||||||||
|
PATTERN: See diagrams A.1 and A.2. The diagrams show all rows in the pattern seen from the right side. HEEL DECREASE (worked in stockinette stitch): ROW 1 (= right side): Work until (7-7-8-8) stitches remain, slip the next stitch as if to knit, knit 1, pass the slipped stitch over, turn the piece. ROW 2 (= wrong side): Work until (7-7-8-8) stitches remain, slip the next stitch as if to purl, purl 1, pass the slipped stitch over, turn the piece. ROW 3 (= right side): Work until (6-6-7-7) stitches remain, slip the next stitch as if to knit, knit 1, pass the slipped stitch over, turn the piece. ROW 4 (= wrong side): Work until (6-6-7-7) stitches remain, slip the next stitch as if to purl, purl 1, pass the slipped stitch over, turn the piece. Continue to decrease like this with 1 stitch less before each decrease until there are (10-10-12-12) stitches left on the needle. DECREASE TIP: Decrease as follows before the marker thread: Knit 2 together. Decrease as follows after the marker thread: Knit 2 stitches twisted together. ---------------------------------------------------------- SOCK: The piece is worked in the round with double pointed needles from the top of the sock down to the toe. Cast on 64-64-72-72 stitches evenly divided between the double pointed needles size 2.5 mm / US 1.5 with denim blue. Knit 1 round. Then work rib (knit 2/ purl 2) for 3-3-3-3 cm / 1"-1"-1"-1". Knit 1 round where you decrease 12-12-12-12 stitches evenly on the round = 52-52-60-60 stitches. Now work pattern as follows: Work A.1 (= 8 stitches) 6-6-7-7 times in width, work A.2 (= 4 stitches). NOTE: on rounds 6,10 and 33, 1 stitch is decreased in diagram A.2 = 49-49-57-57 stitches. On round 40 (= the round with the star) decrease 1 stitch evenly along the round = 48-48-56-56 stitches. REMEMBER THE GAUGE! Continue by working A.1 (= 6-6-7-7 times on the round). On the last round of A.1 adjust the number of stitches to 44-44-56-58 stitches. The sock is now finished with pistachio. Keep the first 11-11-13-13 stitches on the needle, place the next 22-22-30-32 stitches on 1 thread (= mid top of foot) and keep the last 11-11-13-13 stitches on the needle = 22-22-26-26 stitches for the heel. Work stockinette stitch back and forth over the heel stitches for 4½-4½-5-5 cm / 1¾"-1¾"-2"-2". Insert a marker thread in the middle of the heel stitches (= 11-11-13-13 stitches on each side of the marker thread). The marker thread follows the piece until you start decreasing for the toe. This makes it easier to get the decreases for the toe in the right place. Continue by decreasing for the heel – SEE HEEL DECREASE! After you have decreased for the heel, knit up 11-12-13-13 stitches on each side of the heel and the 22-22-30-32 stitches from the thread are placed back on the needle = 54-56-68-70 stitches. Insert 1 marker thread on each side of the 22-22-30-32 stitches mid top of foot. Continue working stockinette stitch, AT THE SAME TIME as you decrease in each side as follows: Knit the last 2 stitches before the 22-22-30-32 stitches mid top of foot twisted together (i.e. you work in the back of the stitch instead of the front), the first 2 stitches after the 22-22-30-32 stitches are knitted together. Decrease in this way every 2nd round a total of 6-6-10-10 times = 42-44-48-50 stitches. Continue working until the piece measures 11-13-14-16 cm / 4½"-5"-5½"-6¼" from the marker thread on the heel – there is 4-4-4-4 cm / 1½"-1½"-1½"-1½" left until finished length. Insert 1 marker thread in the middle of each side so that there are 21-22-24-25 stitches between the marker threads (the marker thread in the heel is mid under the foot). Continue by decreasing for the toe on each side of both marker threads – READ DECREASE TIP! Repeat the decreases in each side every 2nd round a total of 6-6-5-5 times and then every round 2-2-4-4 times = 10-12-12-14 stitches left on the needle. On the next round, knit 2 and 2 stitches together. Cut the strand and pull it through the remaining stitches, pull tight and fasten the strand well. Work 1 more sock in the same way. |
||||||||||||||||||||||
Diagram explanations |
||||||||||||||||||||||
|
||||||||||||||||||||||
|
||||||||||||||||||||||
Have you finished this pattern?Tag your pictures with #dropspattern #summergrazingsocks or submit them to the #dropsfan gallery. Do you need help with this pattern?You'll find 23 tutorial videos, a Comments/Questions area and more by visiting the pattern on garnstudio.com. © 1982-2025 DROPS Design A/S. We reserve all rights. This document, including all its sub-sections, has copyrights. Read more about what you can do with our patterns at the bottom of each pattern on our site. |
||||||||||||||||||||||


With over 40 years in knitting and crochet design, DROPS Design offers one of the most extensive collections of free patterns on the internet - translated to 17 languages. As of today we count 314 catalogs and 11822 patterns - 11812 of which are translated into English (US/in).
We work hard to bring you the best knitting and crochet have to offer, inspiration and advice as well as great quality yarns at incredible prices! Would you like to use our patterns for other than personal use? You can read what you are allowed to do in the Copyright text at the bottom of all our patterns. Happy crafting!
Post a comment to pattern DROPS Children 28-10
We would love to hear what you have to say about this pattern!
If you want to leave a question, please make sure you select the correct category in the form below, to speed up the answering process. Required fields are marked *.