
Looking for a yarn?


Comments / Questions (34)
![]() Laurie wrote:
Laurie wrote:
I love this pattern as it is the only one with a detachable hood and long sleeves. Given the number of increases in the poncho pattern, I am now having to use two sets of circular needles (4 needles and two cords) to continue the pattern. You may wish to add this to the pattern so that the user has this material at hand when beginning the pattern. You may also wish to recommend another yarn that can be used to knit the two strands methods. Your substitution chart is complicated for beginners
29.03.2025 - 12:56
![]() Karine A wrote:
Karine A wrote:
Bonjour, Est-il possible de faire ce modèle en points autre que le point de riz (trop lourd pour moi)
11.01.2025 - 14:29DROPS Design answered:
Bonjour Karine A, tant que vous avez la même tension en largeur et en hauteur alors probablement oui, sinon il vous faudra sans doute faire quelques ajustements. Bon tricot!
13.01.2025 - 08:53
![]() Sílvia Passos wrote:
Sílvia Passos wrote:
Olá Onde posso comprar as vossas lãs em Portugal? Obrigada
10.01.2025 - 17:33DROPS Design answered:
Bom dia, Basta aceder ao site português e consultar o separador lojas. Deixamos o link directo aqui: https://www.garnstudio.com/findastore.php?id=28&cid=28 Bons tricôs/crochés!
17.01.2025 - 11:29
![]() B De Kort De Kort wrote:
B De Kort De Kort wrote:
Poncho paars 172_25
20.09.2024 - 00:03
![]() Lilian wrote:
Lilian wrote:
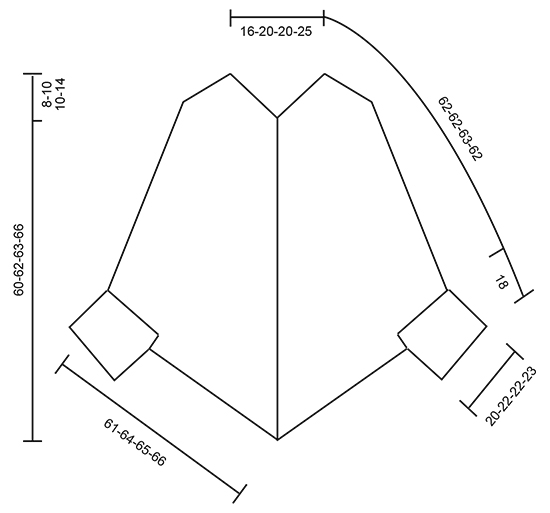
Los valores que estan puestos en el diadrama son cm o cantidad de puntos? el ancho de la diagonal desde la mitad del frente para un talle XXL seria 65cm?
24.02.2024 - 14:31DROPS Design answered:
Hola Lilian, las medidas en el esquema de medidas son en cm. La línea diagonal desde la punta inferior en el centro del delantero hasta el lado del poncho serían 65cm, es decir, el ancho del delantero, pero en diagonal.
26.02.2024 - 22:39
![]() Angela Borneman wrote:
Angela Borneman wrote:
I am confused. Isn’t the poncho knit in its entirety I’m the round? Specifying “Front” and “Back” has thrown me a bit! 🥰
22.05.2022 - 21:30DROPS Design answered:
Dear Mrs Borneman, this poncho is worked top down in the round until you divide piece for sleeves, then you will continue each part: back piece/front piece and sleeves separately. Happy knitting!
23.05.2022 - 08:59
![]() Angela F Borneman wrote:
Angela F Borneman wrote:
Do you have any suggestions for how to make the hem longer, more like a poncho mini sweater dress?
10.05.2022 - 23:29DROPS Design answered:
Dear Mrs Borneman, we are unfortunately unable to adapt every pattern to every single request, but you will find all our patterns for poncho-sweater (swonchos) here, it might help or inspire you . Happy knitting!
11.05.2022 - 08:34
![]() Andrine wrote:
Andrine wrote:
Hei! Ved øking fra halsen (etter man har satt fire merker). Skal disse fire merkene strikkes rett konsekvent, mens det rundt tilpasses perlestrikk? Altså der man øker fra 32 til 80 masker. Skal disse merkene strikkes rett hele veien ned/ut?
30.11.2020 - 11:23DROPS Design answered:
Hei Andrine. Det strikkes perlestrikk hele veien. Økningene/kastene strikkes vridd rett eller vridd vrang slik at den nye maskene passer inn i perlestrikk. God Fornøyelse!
30.11.2020 - 13:38
![]() Mabel wrote:
Mabel wrote:
Hi, I'm in this part of the pattern: ... divide piece in front piece, back piece and sleeve as follows... My K sts are not in the middle of the work when I divide them Am I doing it right, or am I making a mistake? Thanks for your help
01.07.2020 - 04:28DROPS Design answered:
Dear Mabel, check that the increases have been worked as explained, you should have 59-63-65-67 sts for front and back piece with the K stitch in the middle (= 29-31-32-33 sts, Knit 1, 29-31-32-33 sts) and 9 sts in all sizes for each shoulder. Happy knitting!
01.07.2020 - 08:42
![]() Lisard Yolene wrote:
Lisard Yolene wrote:
Bonjour j'aimerais m'abonner a votre blog est ce gratuit comment faire merci
01.05.2020 - 18:19DROPS Design answered:
Bonjour Mme Lisard, merci pour votre message; vous pouvez vous abonner à notre newsletter en cliquant ici - vous pouvez nous suivre également sur les différents réseaux sociaux - cf liens sur chacune de nos pages. Bon tricot!
04.05.2020 - 11:02
|
|
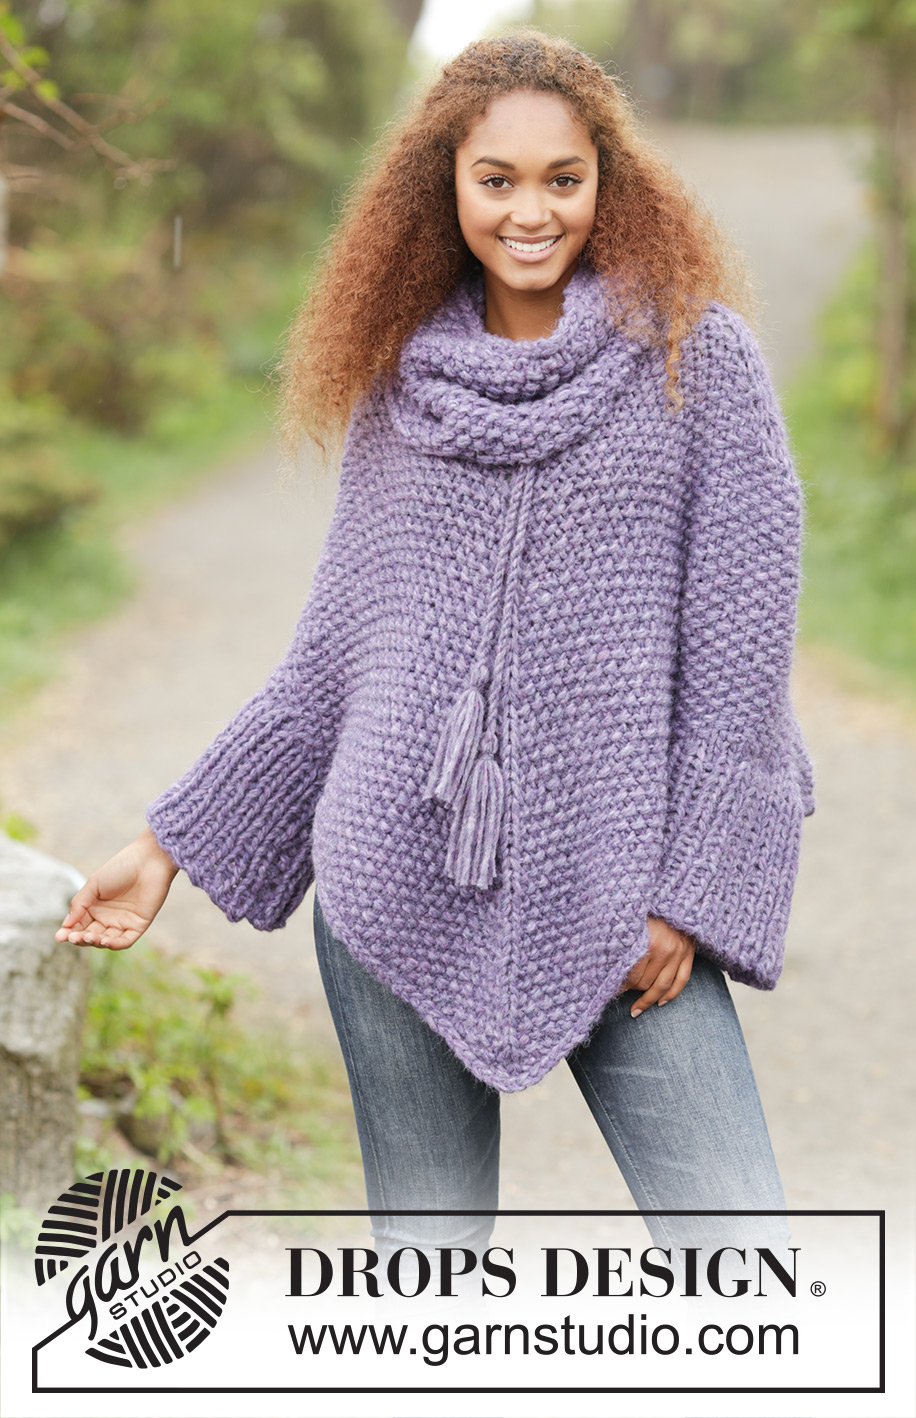
Lavender Grove#lavendergroveponcho |
|
|
|
|
Knitted DROPS poncho in seed st, detachable collar, worked top down in 2 strands Cloud or 4 strands Air. Size S-XXXL.
DROPS 172-25 |
|
|
GARTER ST (worked in the round): 1 ridge = 2 rounds. * K 1 round and P 1 round *, repeat from *-*. GARTER ST (back and forth): K all rows. 1 ridge = K2 rows. SEED ST: Round/row 1: * K 1, P 1 *, repeat from *-* and finish with K 1. Round/row 2: K over P and P over K. Repeat 2nd round/row. INCREASE TIP: First inc 8 sts on round. When inc on each shoulder/side are done, inc 4 sts on round. Inc 1 st by making a YO. On next round work YO twisted to avoid holes. Work YO twisted K or twisted P so that new sts fit in seed st. ---------------------------------------------------------- PONCHO: Worked in the round on circular needle, top down. Cast on 32-40-40-48 sts with 2 strands Cloud or 4 strands Air on circular needle size 15 mm / US 19. Work 1 ridge in GARTER ST - see explanation above. Work next round as follows * K 2 tog, 1 YO *, repeat from *-* the rest of round. On next round K all sts and YOs to make holes. Now insert 4 markers in the piece and work pattern as follows: K 1, insert 1st marker in this st (= right shoulder/side), work SEED ST - see explanation above, over the next 7-9-9-11 sts, K 1, insert 2nd marker in this st (= mid front), seed st over the next 7-9-9-11 sts, K 1, insert 3rd marker in this st (= left shoulder/side), seed st over the next 7-9-9-11 sts, K 1, insert 4th marker in this st (= mid back), work seed st over the remaining 7-9-9-11 sts. Continue like this in the round. On next round inc 1 st on each side of every K st with marker - Read INCREASE TIP! Inc like this every other round 6 times in total = 80-88-88-96 sts. REMEMBER THE KNITTING GAUGE Then work inc mid front and mid back every other round 16-16-17-16 more times, AT THE SAME TIME inc on each shoulder/side every 4th round 2 more times = 152-160-164-168 sts. Piece now measures approx. 44-44-45-44 cm / 17¼"-17¼"-17¾"-17¼" measured along K sts mid front. Now continue inc on each side of K sts mid front and mid back and divide piece in front piece, back piece and sleeve as follows: Work the first 10-11-11-12 sts and slip them on a stitch holder (= half sleeve), work the next 57-59-61-61 sts and slip these sts on a stitch holder (= front piece), then work the next 19-21-21-23 sts before slipping them on a stitch holder (= sleeve), work the next 57-59-61-61 sts (= back piece) and keep them on the needle, work the remaining 9-10-10-11 sts (= half sleeve) and slip the on the same stitch holder as the first 10-11-11-12 sts on round (= sleeve). Cut the yarn. BACK PIECE: = 59-61-63-63 sts. Continue back and forth over sts on back piece as follows: Beg from WS and work seed st back and forth, continue inc on each side of the K sts with marker on every row from RS 3 more times = 65-67-69-69 sts. P 1 row from WS, and bind off with K from RS. FRONT PIECE: Slip the 59-61-63-63 sts from stitch holder back on circular needle size 15 mm / US 19. Beg from WS and work as back piece. CUFF: Worked back and forth on circular needle. Now measure the piece from here. Cast on 8 sts with 2 strands Cloud on circular needle size 15 mm / US 19. Work the 19-21-21-23 sts in seed st from one of the stitch holders for sleeve on to needle, cast on 8 new sts at the end of row = 35-37-37-39 sts. Work next row from WS as follows: 1 edge st in garter st, * P 1, K 1 *, repeat from *-* until 2 sts remain, P 1, 1 edge st in garter st. Continue rib with K over K and P over P with 1 edge st in garter st in each side until piece measures 18 cm / 7". Bind off sts with K over K and P over P. Work the other cuff the same way. ASSEMBLY: Sew cuff tog inside 1 edge st in garter st in each side, then sew the new sts that where cast on under sleeve to each side of front/back piece of the poncho. Repeat in the other side. TWINED STRING WITH TASSELS: Cut 2 lengths of 3 metres/3.25 yds each. Twine the strands tog until they resist, fold the string double so that they twines again. Make a knot at each end. Beg mid front on poncho and thread tie up and down through eyelet row. Cut 10 lengths of yarn of 30 cm / 11¾". Thread them through end on the twined string and distribute so that they are even. Place a strand around the tassel, tighten and make a knot. Repeat in the other end of string. DETACHABLE COLLAR: Worked in the round on circular needle. Cast on 49 sts with 2 strands Cloud on circular needle size 15 mm / US 19. K 1 round. Now work SEED ST - see explanation above! When piece measures 30 cm / 11¾", K 1 round. Bind off while working K. |
|
|
|
Have you finished this pattern?Tag your pictures with #dropspattern #lavendergroveponcho or submit them to the #dropsfan gallery. Do you need help with this pattern?You'll find 30 tutorial videos, a Comments/Questions area and more by visiting the pattern on garnstudio.com. © 1982-2025 DROPS Design A/S. We reserve all rights. This document, including all its sub-sections, has copyrights. Read more about what you can do with our patterns at the bottom of each pattern on our site. |


With over 40 years in knitting and crochet design, DROPS Design offers one of the most extensive collections of free patterns on the internet - translated to 17 languages. As of today we count 314 catalogs and 11822 patterns - 11812 of which are translated into English (US/in).
We work hard to bring you the best knitting and crochet have to offer, inspiration and advice as well as great quality yarns at incredible prices! Would you like to use our patterns for other than personal use? You can read what you are allowed to do in the Copyright text at the bottom of all our patterns. Happy crafting!
Post a comment to pattern DROPS 172-25
We would love to hear what you have to say about this pattern!
If you want to leave a question, please make sure you select the correct category in the form below, to speed up the answering process. Required fields are marked *.