
Looking for a yarn?


Comments / Questions (149)
![]() Sheila wrote:
Sheila wrote:
The patterns, M1 and M2 are shown from the right side. Does that mean that when knitting from the wrong side, you reverse the stitches [(ie purl where it says knit, and knit where it says purl) so that you end up with a stockinette stitch? Or do you want a garter stitch?
25.03.2025 - 17:10DROPS Design answered:
Dear Sheila, socks are worked in the round so diagrams will always be worked from the right side, read them from the right towards the left on every round. This means first cable is worked on 3rd row then every 6th round. And stitches are worked as shown in diagram on every round; P over P and K over K. Happy knitting!
26.03.2025 - 07:44
![]() Cherie wrote:
Cherie wrote:
Your answer to my question on where to out the markers didn’t answer my question “on each side of the foot with 19-19-21 stitches for under foot and 17-19-21 stitches for top of foot” do they go before and after the 19 stitches? Or are there 4 markers on each side of the 19 stitches under and top? Repeating what’s already written on the pattern isn’t helping. Need very clear placement of where the markers are going
18.03.2025 - 14:39
![]() Cherie wrote:
Cherie wrote:
On the toe decrease it says insert marker on each side. Each side of what? Between what stitches do they go? Horribly written pattern I must say.
18.03.2025 - 03:25DROPS Design answered:
Dear Cherie, these markers should be inserted on each side of the foot with 19-19-21 stitches for under foot and 17-19-21 stitches for top of foot. Hope it can help. Happy knitting!
18.03.2025 - 10:28
![]() Sheila wrote:
Sheila wrote:
Hi. I am confused about the rows of HEEL DECREASES. with 23 stitches, I am instructed to knit until 7 stitches remain, then slip a stitches, K1, psso, which leaves 5 stitches not yet knit on the needle. But then it says to turn piece. I assume then you go on to Row 2 of the heel decreases. But what happens to the 5 stitches not yet knit on the needle?
16.03.2025 - 22:52DROPS Design answered:
Dear Sheila, these 5 stitches are left unworked for now but, in the next row, when you knit until less stitches remain, you will be taking 1 of these unworked stitches for the final decreases. Hereis a video example on how these decreases are worked. Happy knitting!
16.03.2025 - 23:43
![]() Anja wrote:
Anja wrote:
Hei:) veldig fint mønster:) jeg synes det er vanskelig å forstå følgende: etter jeg har strikket vrangbord og M1 en gang, skal jeg da fortsette med bare M1 en rapport til eller gå rett over til M2, og når skal jeg isåfall begynne å strikke M2? beklager om jeg spør "dumt"? På forhånd takk for svar:)
11.03.2025 - 17:45DROPS Design answered:
Hei Anja, Når du har strikket 4 cm med vrangbord og M.1, strikker du videre kun på hælen. Og da strikker du vrangbord, fram og tilbake over hælmaskene. Når du setter sammen maskene til foten, fortsetter du med 1 rapport av M.1 over maskene på toppen av foten. Du begynner med M.2 etter den ene rapporten av M.1. God fornøyelse!
12.03.2025 - 06:22
![]() Rasha wrote:
Rasha wrote:
Dear Droos Designs, I’m working the part before the decrease for size 7.5-9 where it says “ 1 st in each of the K4-section by K2 tog.” this part is not clear, there is no k4 part in the work and also now I have 27 sts on the needle that should be decreased to 23 sts, it is not clear how I should do it, can you explain how many stitched and how many rows I should decrease? Thank you
29.12.2024 - 18:57DROPS Design answered:
Dear Rasha, there is a typo in the pattern. It should say in each of the 4 K-sections. So in every K3/P3 in the 24 rib stitches for the heel you will decrease 1 knit stitch in each K3 by working k2tog, to get a K2/P3 rib. This way you will decrease 4 stitches, from 27 to 23. These stitches are all decreased in the same row. Happy knitting!
30.12.2024 - 23:38
![]() Rasha wrote:
Rasha wrote:
Dear Drops designs, I am currently working on this beautiful piece but I got confused by the part where it says “ Continue like this until piece measures 4 cm / 1½" for all sizes” Do you mean 4 cm from the beginning or 4 cm from the start of M1? Thank you
29.12.2024 - 08:56DROPS Design answered:
Dear Rasha, this mean whole piece, i.e.4 cm from beginning. Happy knitting!
29.12.2024 - 11:22
![]() Omama wrote:
Omama wrote:
Hallo, Frage ... warum die gleiche Maschenzahl für die beiden größeren Modelle? Habe die mittlere Grösse angeschlagen 48 M, viel zu weit für die Füsslänge 24. Habe schon viel gestrickt aber die gleiche Maschenzahl für zwei verschiedene Größen hatte ich noch nie. Und die Maschenprobe stimmte. Ich brauche für Schuhgröße 37, Fusslänge 24, da sind 48 M der Wahnsinn. Ist das ein Druckfehler bitte? LG
18.12.2024 - 19:56DROPS Design answered:
Liebe Frau Omama, Schuhgröße 37 ist lieber 1. Größe, dann können Sie den Fuß stricken, bis die Arbeit 20 cm (anstatt 18 cm) stricken, und dann die Spitze wie bei der 1. Größe stricken, so wird die Arbeit schmaler aber trotzdem genügend lang. Viel Spaß beim Stricken!
19.12.2024 - 09:17
![]() Annette wrote:
Annette wrote:
Hallo nochmal liebes Drops-Team, ich habe es jetzt doch verstanden. In Gr. 41 /43 rechts und links von den 15 Maschen des Musters 1 jeweils 5 Maschen daneben die Markierungen setzen... Mit meinen Dänischkenntnissen konnte ich die norwegische Anleitung verstehen ;-)
15.02.2024 - 16:25
![]() Annette wrote:
Annette wrote:
Hallo liebes Drops-Team, ich stricke Gr.41/43 und verstehe nach der Fersenabnahme und dem Auffassen der Maschen nicht wo die Markierungen hin sollen. Welche 25 Maschen sind gemeint? Ich habe die 21 Maschen des Fußrückens die vorher stillgelegt waren, dann 2 Nadeln mit je 12 aufgefassten seitlichen Maschen und 1 Nadel mit den 11 Fersenmaschen. Durch die anderen Chats und die tollen Videos konnte ich leider keine Antwort ableiten. Danke für eure Hilfe, Annette
15.02.2024 - 15:59DROPS Design answered:
Liebe Annette, diese 25 Maschen bestehen aus die stillgelegten 21 Maschen + 2 Maschen beidseitig, dh 2 aufgefassenen Maschen + 21 Maschen + 2 aufgelassenen Maschen, bzw 5 Maschen glatt rechts, M.1, 5 Maschen glatt rechts. Viel Spaß beim stricken!
16.02.2024 - 07:38
|
|||||||||||||||||||||||||
Alaskan Cables |
|||||||||||||||||||||||||
 |
 |
||||||||||||||||||||||||
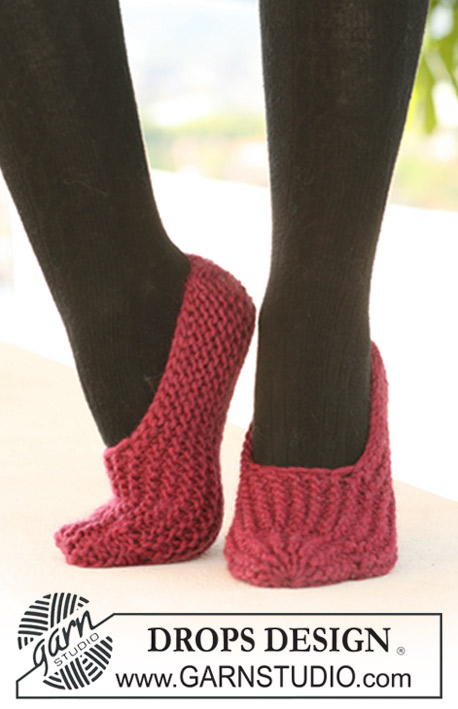
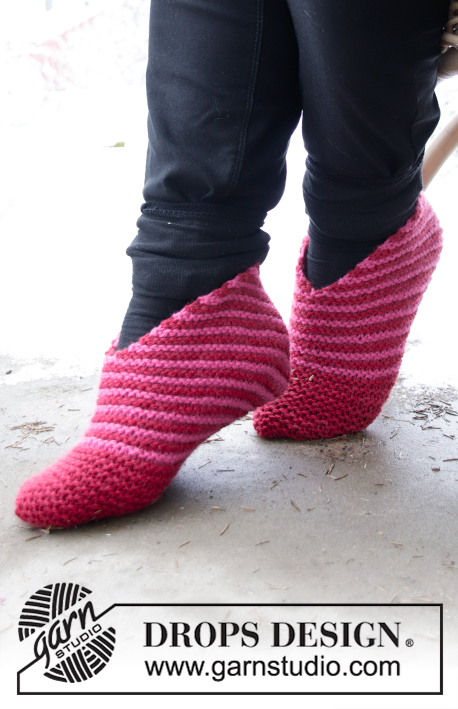
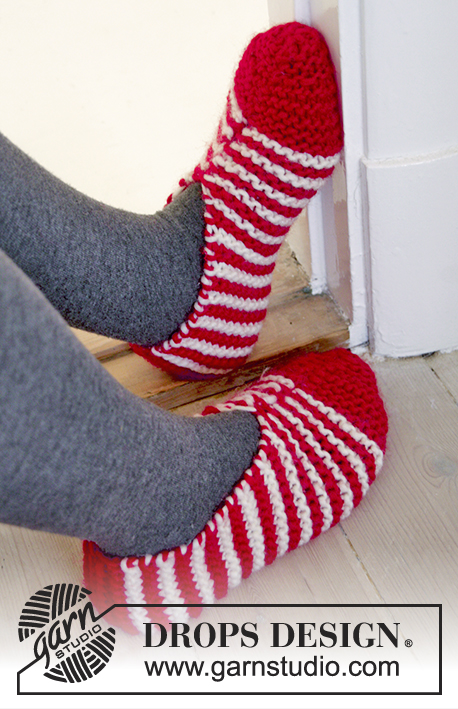
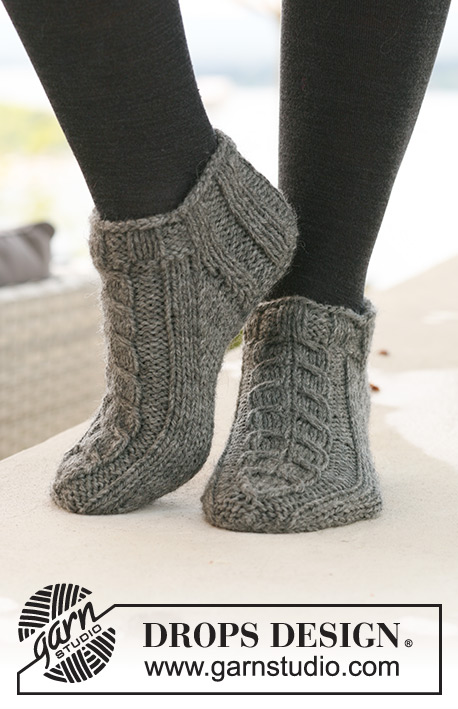
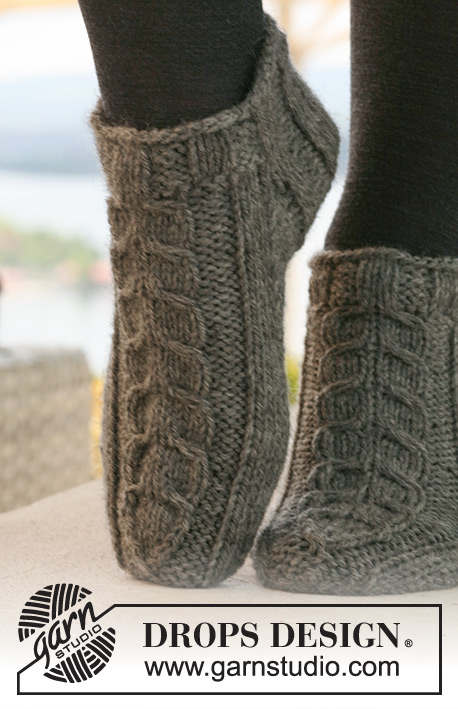
DROPS short Socks with cables in ”Alaska”.
DROPS 125-15 |
|||||||||||||||||||||||||
|
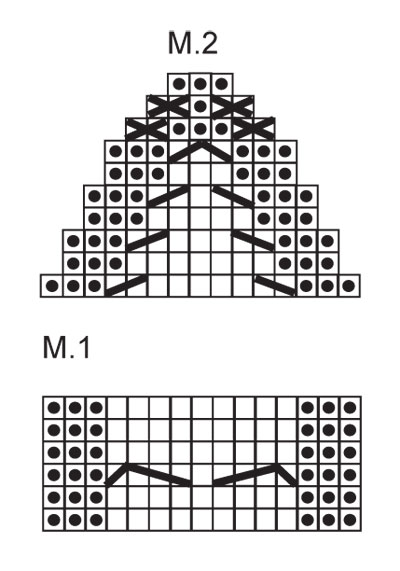
PATTERN: See diagram M.1 (= 15 sts) and M.2 (= 15 sts). Diagram shows the pattern from RS. HEEL DECREASES (worked in stockinette st): Row 1 (= RS): Work row until 6-7-7 sts remain, slip next st as it to K, K1, psso, turn piece. Row 2 (= WS): Work row until 6-7-7 sts remain, slip next st as it to P, P1, psso, turn piece. Row 3 (= RS): Work row until 5-6-6 sts remain, slip next st as it to K, K1, psso, turn piece. Row 4 (= WS): Work row until 5-6-6 sts remain, slip next st as it to P, P1, psso, turn piece. Continue dec like this with 1 less st before each dec until there are 9-11-11 sts on needle. -------------------------------------------------------- SOCK: Worked in the round. Cast on 42-48-48 sts on double pointed needles size 4.5 mm / US 7 with Alaska. K 2 rounds and work 5 rounds rib, K3/P3. On next round work PATTERN - see above - as follows: Continue in rib K3/P3 on the first 18-24-24 sts, K 6-6-6 sts, M.1 (= 15 sts), K 3-3-3 sts. REMEMBER THE GAUGE! Continue like this until piece measures 4 cm / 1½" for all sizes. Now keep the first 21-27-27 sts on needle for heel and slip the last 21-21-21 sts on a stitch holder (= mid upper foot). Work rib back and forth on heel sts for 5-5.5-6 cm / 2"-2¼"-2⅜". NOTE! On last row from WS dec as follows: Size 5/6½ / 35/37: 1 st in the first and last K-section by K2 tog. Size 7½/9 and 9½/10½ / 38/40 and 41/43: 1 st in each of the K4-section by K2 tog. All Sizes: = 19-23-23 sts. Insert a marker in piece. Now work HEEL DECREASES – see above! After heel dec pick up 9-10-12 sts each side of heel and slip the 21-21-21 sts from stitch holder back on needle = 48-52-56 sts. Insert a marker each side of the middle 21-23-25 sts on upper foot (= 3-4-5 sts each side of M.1). Continue in stockinette st and M.1 - AT THE SAME TIME dec each side as follows: K tog into back of loop the 2 last sts before first marker on upper foot and K tog the first 2 sts after second marker on upper foot. Repeat the dec on every other round a total of 6-7-7 times = 36-38-42 sts. Continue until piece measures 18-20-22 cm / 7"-8"-8¾" from marker on heel – adjust to after a full repeat of M.1 (= approx 4-4-5 cm / 1½"-1½"-2" remain). Insert a marker each side with 19-19-21 sts under foot and 17-19-21 sts on upper foot (= 1-2-3 sts each side of M.1). Now dec for toes. READ ALL OF THE FOLLOWING SECTION BEFORE CONTINUING: (NOTE! dec differently under foot and upper foot but make the dec on the same rounds). Dec under foot as follows: K tog into back of loop the 2 sts after marker and K tog the 2 sts before marker. Repeat the dec on every other round a total of 4-4-4 times, then on every round a total of 3-3-4 times. AT THE SAME TIME dec on upper foot as follows: Work M.2 over M.1 (1-2-3 sts each side of M.1 worked in stockinette st as before). Finish with P the 3 last sts on last round for Size 9½/10½ / 41/43 = 10-12-14 sts left on needle. Cut the thread, pull it through remaining sts and fasten. |
|||||||||||||||||||||||||
Diagram explanations |
|||||||||||||||||||||||||
|
|||||||||||||||||||||||||
|
|||||||||||||||||||||||||
Have you finished this pattern?Tag your pictures with #dropspattern or submit them to the #dropsfan gallery. Do you need help with this pattern?You'll find 19 tutorial videos, a Comments/Questions area and more by visiting the pattern on garnstudio.com. © 1982-2025 DROPS Design A/S. We reserve all rights. This document, including all its sub-sections, has copyrights. Read more about what you can do with our patterns at the bottom of each pattern on our site. |
|||||||||||||||||||||||||


With over 40 years in knitting and crochet design, DROPS Design offers one of the most extensive collections of free patterns on the internet - translated to 17 languages. As of today we count 314 catalogs and 11822 patterns - 11812 of which are translated into English (US/in).
We work hard to bring you the best knitting and crochet have to offer, inspiration and advice as well as great quality yarns at incredible prices! Would you like to use our patterns for other than personal use? You can read what you are allowed to do in the Copyright text at the bottom of all our patterns. Happy crafting!
Post a comment to pattern DROPS 125-15
We would love to hear what you have to say about this pattern!
If you want to leave a question, please make sure you select the correct category in the form below, to speed up the answering process. Required fields are marked *.