
Popular categories
Looking for a yarn?


Comments / Questions (83)
![]() Michaela Schenk wrote:
Michaela Schenk wrote:
Wie ist das mit der Maschen Probe gemeint, 16 M mal 22 I'm Loch muster ergeben 10mal 10 cm...
05.05.2025 - 16:08DROPS Design answered:
Liebe Frau Schenk, für die Maschenprobe sollen 16 Maschen in der Breite und 22 Reihen in der Höhe im Lochmuster 10 cm in der Breite und 10 cm in der Höhe messen. Viel Spaß beim Stricken !
06.05.2025 - 09:26
![]() Victor wrote:
Victor wrote:
Hello, I have some clarifying questions based on my last comment. Am I working the 9 sts on the holder at the same time with the bind off instructions? how does that work if so? I am redoing the right front piece and I previously tried to finish based on my understanding but I did not work those 9 sts. I am planning on decreasing based on the back piece instructions (every other row each side), but I am still confused about when to bind off (the 3sts every x times etc. part?)
21.03.2025 - 18:05DROPS Design answered:
Dear Victor, the 9 sts on the holder are left on the holder and will be used at the very end, when working the NECKLINE section. Now you will work over the remaining stitches. You will cast off at the beginning of the rows that start from the mid-front and cast off as needed for your size: 3 stitches in the each of the first 1-2-2-2-3-4 rows, and 1 stitch in 0-0-9-8-7-13 rows. Then cast off in alternate rows from the mid-front:1 st 3-3-2-3-4-1 times and then, every 3rd row from the mid-front until all stitches are decreased or cast off. The decreases for the raglan are apart from these and worked as specified in the back piece. Happy knitting!
23.03.2025 - 19:16
![]() Victor wrote:
Victor wrote:
Hello, I am starting the decreases on the right front and I’m a bit confused. I worked the 9 mid front stitches and they're on a stitch holder. I am decreasing but it says to bind off, is that the same? The bind off instructions do not make sense. I know i am supposed to bind off at the mid front but does this include the 9 stitches on the holder? If not, do I still decrease on both sides of row or just midfront? am i supposed to decrease by binding off? it says raglan decrease so i dont know
18.03.2025 - 21:15DROPS Design answered:
Hi Victor, Decreasing is as described under the Decrease Tip at the top. Binding off is the same method used when you bind off at the end of the piece, so the bound off stitches form the bottom of the armhole. You are not binding off mid-front but at the side of the front piece which will be joined to the back piece later. You increase (rather than decrease) mid-front to shape the neckline. Hope this helps and happy knitting!
19.03.2025 - 05:31
![]() Carol wrote:
Carol wrote:
When shaping the neckline on right front, what do you mean by mid front?
31.07.2024 - 02:26DROPS Design answered:
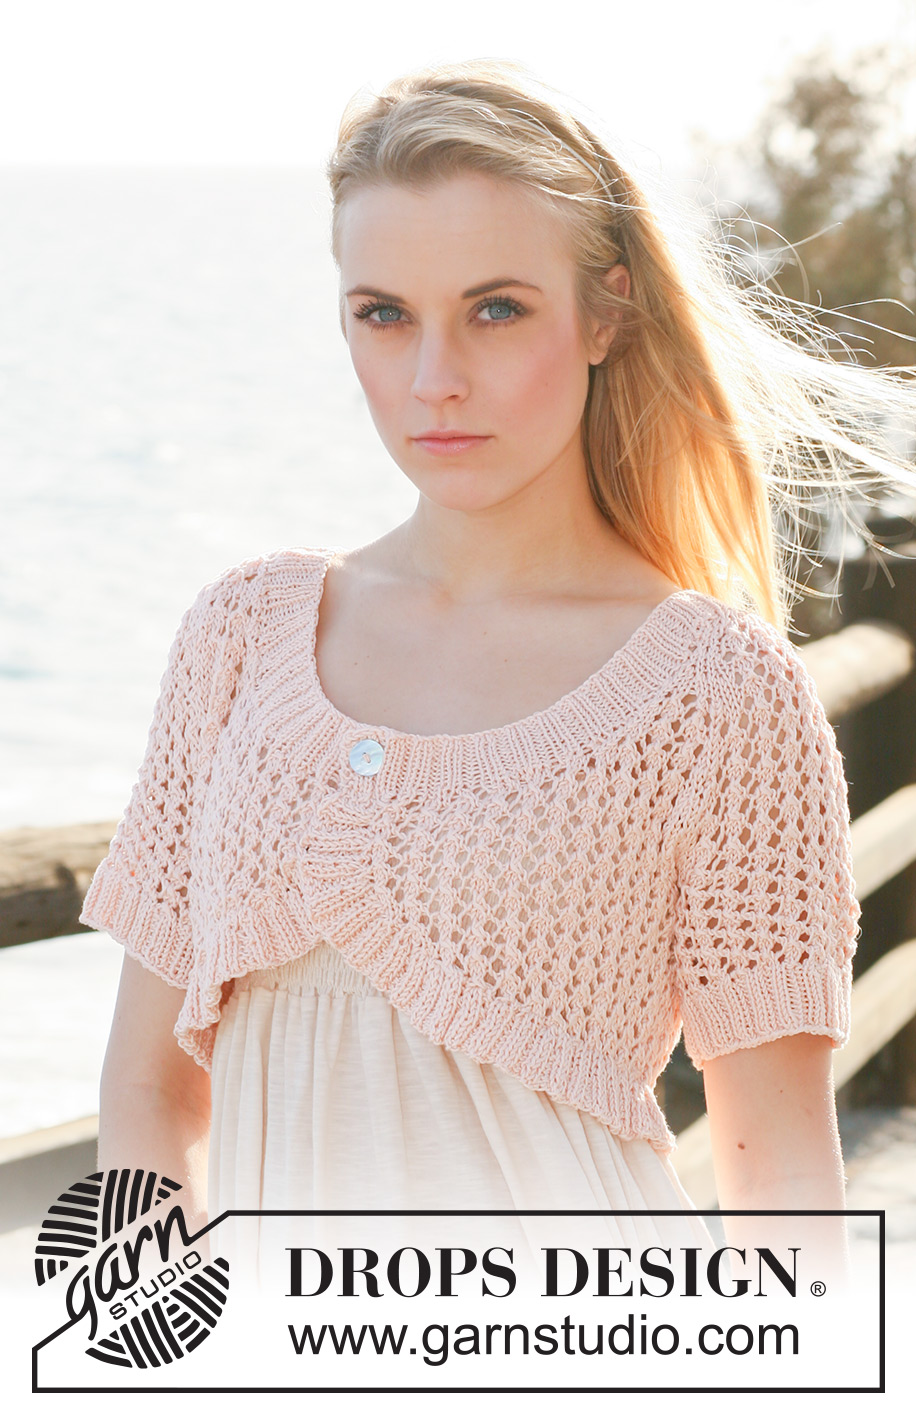
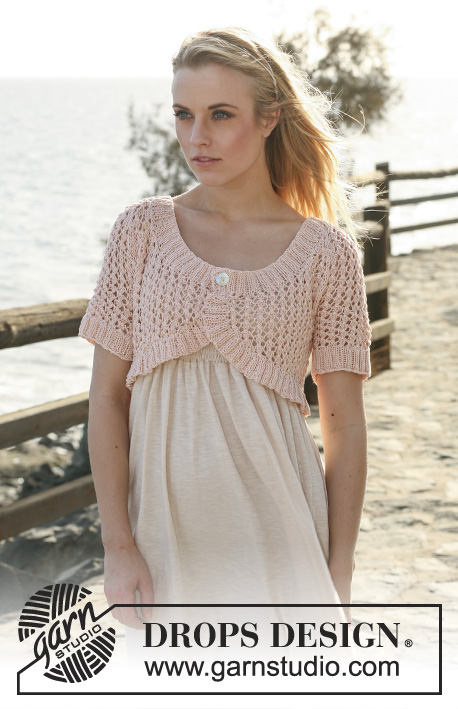
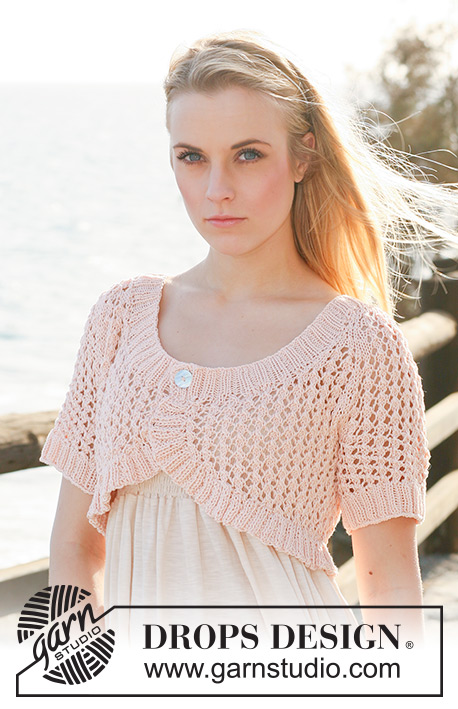
Hi Carol, Mid-front is where the button is in the photo. Happy knitting!
31.07.2024 - 06:28
![]() Céline Blais wrote:
Céline Blais wrote:
Bonjour, les diminutions devant droit ''tous les rangs à partir du milieu devant , puis tous les 2 rangs à partir du milieu devant '' donc ce serait aux 2 rangs et ensuite aux 3 rangs ?
03.03.2024 - 13:24DROPS Design answered:
Bonjour Mme Blais, quand vous rabattez pour l'encolure tous les rangs à partir du milieu devant, vous rabattez au début de chaque rang à partir de l'encolure (= tous les 2 rangs) puis quand vous rabattez tous les 2 rangs à partir du milieu devant, vous rabattrez tous les 4 rangs, puis tous les 3 rangs à partir du milieu devant = tous les 6 rangs, mais toujours du même côté = début de rang sur l'endroit pour le devant droit (sur l'envers pour le devant gauche). Bon tricot!
04.03.2024 - 10:26
![]() Céline Blais wrote:
Céline Blais wrote:
Bonjour, lorsque je commence le devant gauche , je tricote donc le premier rang endroit, est-ce à dire que je commence le schéma tout de suite sur le premier rang ?
23.02.2024 - 16:47DROPS Design answered:
Bonjour Mme B lais, tricotez 1 rang envers sur l'envers comme pour le devant droit, et tricotez les diagrammes comme pour le devant droit, mais augmentez maintenant pour l'arrondi du devant en fin de rang sur l'endroit (et pas en fin de rang sur l'envers comme pour le devant droit); l'emmanchure sera en début de rang sur l'endroit. Bon tricot!
23.02.2024 - 17:11
![]() Annalisa wrote:
Annalisa wrote:
Buongiorno come aumentare due maglie per ferro ? Grazie
02.05.2023 - 06:23DROPS Design answered:
Buonasera Annalisa, può scegliere il modo che preferisce per aumentare le maglie. Buon lavoro!
03.05.2023 - 22:15
![]() Andrea Richter wrote:
Andrea Richter wrote:
Hallo, ich hatte eine Frage zur Anleitung 119-27 Was bedeutet Abnahme total in jede 2. Reihe bei Raglan.
17.11.2021 - 14:06DROPS Design answered:
Liebe Frau Richter, für den Raglan stricken Sie 1 Hinreihe und nehmen Sie 1 Masche beidseitig ab, dann stricken Sie die Rückreihe ohne Abnahmen, diese 2 Reihen so wiederholen bis alle Abnahmen in jede 2. Reihe gestrickt sind. Dannn stricken Sie 3 Reihen zwischen jeder Reihe mit Abnahmen (= in jeder 4. Reihe = in jeder 2. Hinreihe). Viel Spaß beim stricken!
17.11.2021 - 16:46
![]() Anna wrote:
Anna wrote:
Buonasera, avrei una domanda da porle. Dopo aver avviato le maglie la spiegazione dice di lavorare un ferro al rovescio dal rovescio del lavoro, ma io in quel momento sono dal dritto del lavoro e non dal rovescio. Come faccio? Grazie
03.06.2021 - 20:50DROPS Design answered:
Buonasera Anna, il 1° ferro dopo aver avviato le maglie sarà il suo rovescio del lavoro: prosegue da li la lavorazione. Buon lavoro!
03.06.2021 - 23:09
![]() Pam wrote:
Pam wrote:
Just wanted to start out right. Immediately after cast on, the pattern says to purl a row, but does not mention the edge stitch in garter stitch. So all stitches should be purled on that row? Or is the first stitch a knit stitch?
21.05.2021 - 05:14DROPS Design answered:
Dear Pam, on the very first row, purl all stitches without any edge stitches, then work pattern with 1 edge stitch in garter stitch on each side. Happy knitting!
21.05.2021 - 07:56
|
|||||||
Marcia#marciabolero |
|||||||
 |
 |
||||||
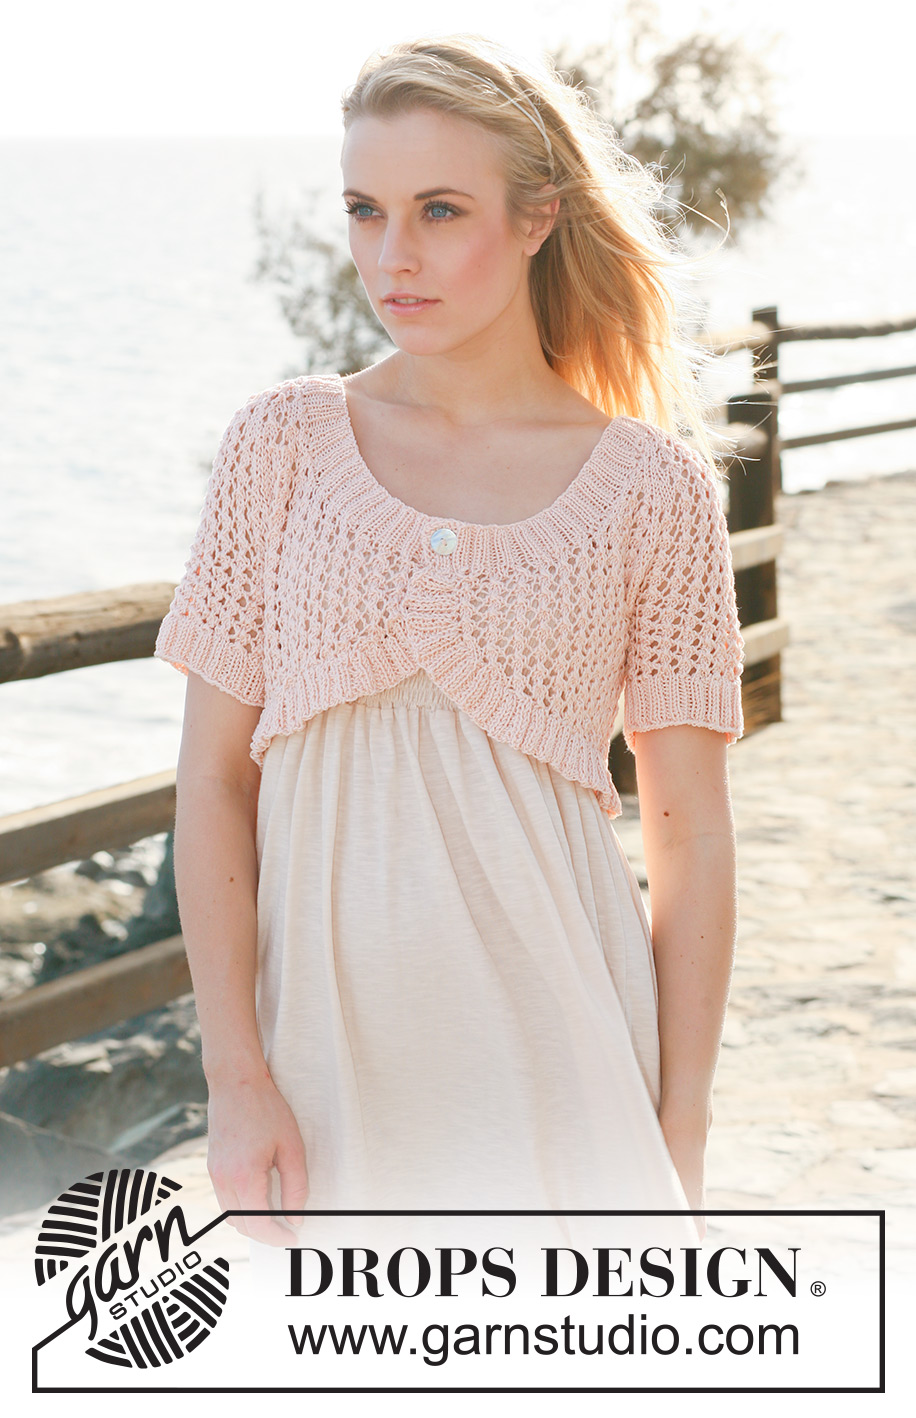
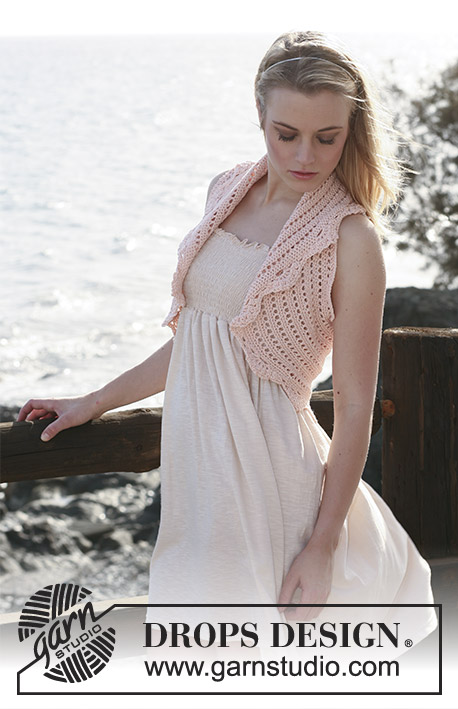
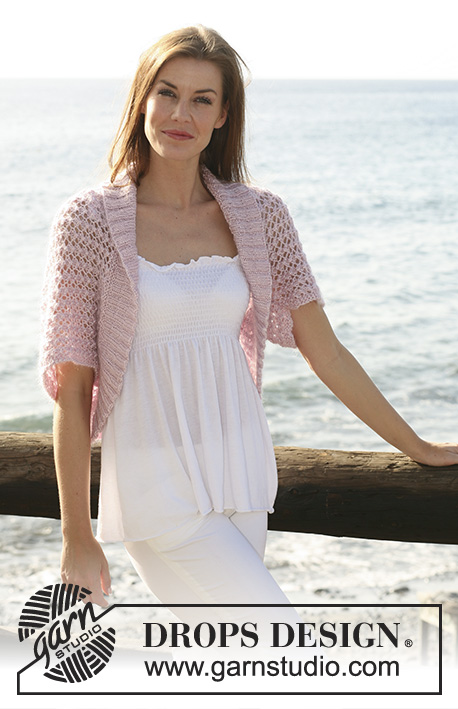
Knitted DROPS bolero in lace pattern with short raglan sleeve in ”Muskat”. Size XS/S to XXXL
DROPS 119-27 |
|||||||
|
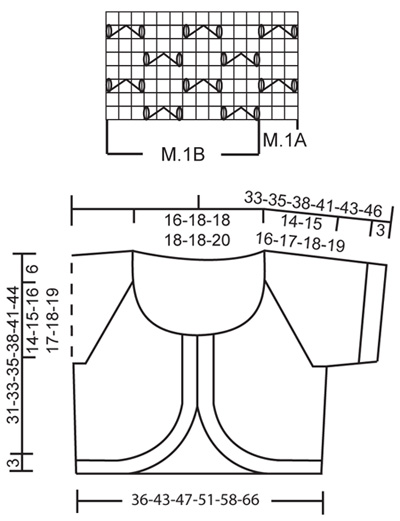
GARTER ST (back and forth on needle): K all rows. PATTERN: See diagram M.1 – Diagram shows the pattern from RS (first row = RS). DECREASING TIP (applies to raglan): Dec 1 st inside 1 garter st along raglan: FROM RS: After 1 garter st: slip 1 st as if to K, K1, psso. 2 sts before 1 garter st: K2 tog. FROM WS: After 1 garter st: P2 tog. 2 sts before 1 garter st: P2 tog into back of loop. --------------------------------------------------------- --------------------------------------------------------- BOLERO: BACK PIECE: Cast on 59-71-77-83-95-107 sts (includes 1 edge st each side) on needle size 4 mm / US 6 with Muskat. P 1 row from WS and work next row as follows from RS: 1 edge st in GARTER ST - see above, M.1A (= 3 sts), M.1B until 1 st remain and finish with 1 edge st in GARTER ST. Continue in pattern like this. When piece measures 11-12-13-15-17-19 cm / 4⅜"-4¾"-5⅛"-6"-6¾"-7½" - adjust so that next row is from RS – bind off 3 sts for armhole at the beg of the next 2 rows. On next row from RS dec 1 st each side for raglan - see DECREASING TIP, and repeat the dec on every other row a total of 2-7-6-5-10-9 times and then on every 4th row a total of 7-5-6-7-5-6 times = 35-41-47-53-59-71 sts – NOTE: Work sts not fitting into pattern in stockinette st until they fit pattern. Slip sts on a stitch holder, piece measures approx 25-27-29-32-35-38 cm / 9¾"-10⅝"-11⅜"-12½"-13¾"-15". RIGHT FRONT PIECE: Cast on 17-23-29-29-35-41 sts (includes 1 edge st each side) on needle size 4 mm / US 6 with Muskat. P 1 row from WS and work next row as follows from RS (= from mid front): 1 edge st in garter st, M.1A (= 3 sts), M.1B until 1 st remain and finish with 1 edge st in garter st. Continue in pattern like this, AT THE SAME TIME cast on new sts at the end of every row from WS (= towards mid front) as follows: 1 st 2 times and then 2 sts a total of 5 times = 29-35-41-41-47-53 sts - NOTE: work inc sts not fitting into pattern in stockinette st until they fit pattern, with 1 edge st in garter st. When piece measures 11-12-13-15-17-19 cm / 4⅜"-4¾"-5⅛"-6"-6¾"-7½" - adjust so that next row is from WS - bind off 3 sts at the side for armhole. On next row dec for raglan as described for back piece. AT THE SAME TIME when piece measures 12-13-14-16-18-20 cm / 4¾"-5⅛"-5½"-6¼"-7"-8" slip 9 sts towards mid front on a stitch holder for neck and bind off to shape the neckline at the beg of every row from mid front: 3 sts 1-2-2-2-3-4 times and 1 st 0-0-9-8-7-13 times, then on every other row from mid front: 1 st 3-3-2-3-4-1 times and then on every 3rd row from mid front: 1 st 2-2-0-0-0-0 times (i.e. all sts have been dec) – work sts not fitting into pattern in stockinette st until they fit pattern again. LEFT FRONT PIECE: Like right front piece, but mirrored, i.e. work first row from RS from the side towards mid front, cast on new sts towards mid front at the end of every row from RS (instead of WS). Bind off 3 sts for armhole at the beg of row from RS and bind off for neckline at the beg of row from WS (instead of RS). SLEEVE: Worked back and forth on needle. LOOSELY cast on 74-78-78-82-82-86 sts (includes 1 edge st each side) on circular needle size 3.5 mm / US 4 with Muskat. P 1 row from WS and continue in rib, K2/P2, with 1 garter st each side. When rib measures 3 cm / 1⅛" P 1 row from WS, AT THE SAME TIME dec 18-16-16-14-14-12 sts evenly = 56-62-62-68-68-74 sts. Change to needle size 4 mm / US 6 and continue in M.1B with 1 edge st each side (first row = RS). When piece measures 7-7-9-11-12-13 cm / 2¾"-2¾"-3½"-4⅜"-4¾"-5⅛" - adjust so that next row is from RS and finish on the same row in M.1 as on back piece to make pattern fit when body piece and sleeve are sewn tog – bind off 3 sts at the beg of the next 2 rows = 50-56-56-62-62-68 sts. On next row from RS dec 1 st each side for raglan – see DECREASING TIP, and repeat the dec on every other row a total of 15-15-18-16-18-18 times and then on every row a total of 0-3-0-5-3-6 times = 20 sts left on needle for all sizes. Slip sts on a stitch holder, piece measures approx 21-22-25-28-30-32 cm / 8¼"-8¾"-9¾"-11"-11¾"-12½". ASSEMBLY: Sew raglan seams inside 1 edge st. RIB BORDER: Pick up approx 198-234-258-290-330-378 sts (= approx 22 sts on 10 cm / 4", number of sts should be divisible by 4 + 2) from RS inside 1 edge st along opening of bolero (do not pick up round neckline) on circular needle size 3.5 mm / US 4 with Muskat – make sure to pick up enough sts on the rounded front pieces. P 1 row from WS and continue in rib back and forth on needle as follows (first row = RS): 2 edge sts in garter st, * K2, P2 *, repeat from *-* and finish with K2 and 2 edge sts in garter st. Bind off LOOSELY with K over K, P over P and garter st over garter st when rib measures 3 cm / 1⅛". NECKLINE: Slip sts from stitch holders back on circular needle size 3.5 mm / US 4, AT THE SAME TIME pick up approx 40 to 55 sts along neckline from RS on each front piece (also pick up on rib mid front and include sts from stitch holders mid front) = approx 155 to 221 sts on needle. P 1 row from WS, AT THE SAME TIME dec evenly to approx 150-154-158-162-166-174 sts (number of sts divisible by 4 + 2). Continue in rib as follows (first row = RS): 2 edge sts in garter st, * K2, P2 *, repeat from *-* and finish with K2 and 2 edge sts in garter st. AT THE SAME TIME after 1 cm / ⅜" make 1 buttonhole on right side of piece (as seen from RS) as follows: bind off 4th st from mid front and cast on 1 new st on next row. Bind off with K over K, P over P and garter st over garter st when rib measures 3 cm / 1⅛". Sew on button. |
|||||||
Diagram explanations |
|||||||
|
|||||||
|
|||||||
Have you finished this pattern?Tag your pictures with #dropspattern #marciabolero or submit them to the #dropsfan gallery. Do you need help with this pattern?You'll find 18 tutorial videos, a Comments/Questions area and more by visiting the pattern on garnstudio.com. © 1982-2025 DROPS Design A/S. We reserve all rights. This document, including all its sub-sections, has copyrights. Read more about what you can do with our patterns at the bottom of each pattern on our site. |
|||||||


With over 40 years in knitting and crochet design, DROPS Design offers one of the most extensive collections of free patterns on the internet - translated to 17 languages. As of today we count 314 catalogs and 11822 patterns - 11812 of which are translated into English (US/in).
We work hard to bring you the best knitting and crochet have to offer, inspiration and advice as well as great quality yarns at incredible prices! Would you like to use our patterns for other than personal use? You can read what you are allowed to do in the Copyright text at the bottom of all our patterns. Happy crafting!
Post a comment to pattern DROPS 119-27
We would love to hear what you have to say about this pattern!
If you want to leave a question, please make sure you select the correct category in the form below, to speed up the answering process. Required fields are marked *.