DROPS Muskat
DROPS Muskat
100% Cotton
from 2.80 $ /50g
Get the yarn to make this pattern from 16.80$.

The yarn cost is calculated from the pattern’s smallest size and the yarn’s cheapest product type. Looking for an even better price? You might find it on the DROPS Deals!

DROPS SS24

Think Blue

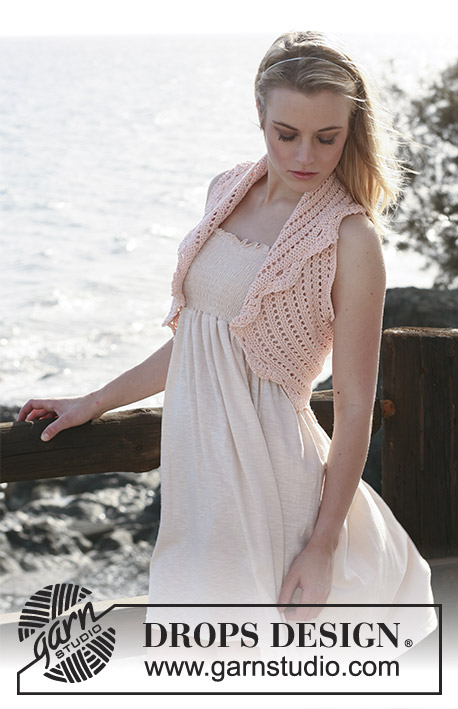
Knitted DROPS bolero with short sleeves and rib in ”Muskat ”. Size S - XXXL

DROPS 119-26
DROPS design: Pattern no R-571
--------------------------------------------------------
Size: S - M - L - XL - XXL - XXXL
NOTE: Because of the rib the garment will be very elastic and therefore seem smaller them measurements in chart. Knit your usual size.

Materials: DROPS MUSKAT from Garnstudio
color no 15, blue: 300-350-400-450-500-550 g

DROPS POINTED NEEDLES size 4 mm / US 6 – or size needed to get 21 sts x 28 rows in stockinette st = 10 x 10 cm / 4" x 4".

-------------------------------------------------------

Alternative Yarn – See how to change yarns here
Yarn Groups A to F – Use the same pattern and change the yarn here
Yarn usage using an alternative yarn – Use our yarn converter here

-------------------------------------------------------

DROPS Muskat
DROPS Muskat
100% Cotton
from 2.80 $ /50g
Get the yarn to make this pattern from 16.80$.

The yarn cost is calculated from the pattern’s smallest size and the yarn’s cheapest product type. Looking for an even better price? You might find it on the DROPS Deals!

Pattern instructions

NOTE: This pattern is written in American English. All measurements in charts are in cm. For conversion from inches to cm - click here. There are different terms for crocheting in American and British English. If this pattern includes crochet, click for "crochet terms" here. For this pattern in British English, please click here.
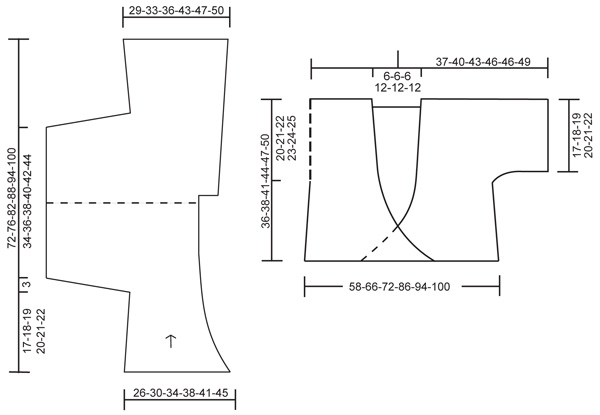
GARTER ST (back and forth on needle): K all rows.
--------------------------------------------------------
--------------------------------------------------------

BOLERO:
Worked in 2 pieces. Beg at bottom of right front piece, inc for sleeve at the side, continue over shoulder, dec sleeve sts and work back piece. Knit the left piece in the same way, but mirrored and sew the two pieces tog

RIGHT FRONT PIECE:
Read all of the pattern before beginning! Cast on 56-64-72-80-88-96 sts (includes 1 edge st at the side) on needle size 4 mm / US 6 with Muskat. P 1 row from WS, and work next row as follows from RS (= from mid front): 1 edge st in GARTER ST - see above, * K3/P5 *, repeat from *-* a total of 6-7-8-9-10-11 times, K3, P3 and 1 edge st in GARTER ST. Continue in rib like this. REMEMBER THE GAUGE! When piece measures 8-9-10-11-12-13 cm / 3⅛"-3½"-4"-4⅜"-4¾"-5⅛" dec 1 st in each of the 7-8-9-10-11-12 P-sections (as seen from RS) = 49-56-63-70-77-84 sts. Repeat the dec when piece measures 16-17-19-21-23-25 cm / 6¼"-6¾"-7½"-8¼"-9"-9¾" - adjust to dec from RS = 42-48-54-60-66-72 sts. AT THE SAME TIME at the end of this row cast on 3 new sts towards the side for sleeve, and cast on new sts at the end of every row from RS as follows: 3 sts 0-0-0-0-1-1 time, 6 sts 1-1-1-2-1-1 time, 8 sts 1-1-1-0-0-0 time and 12-12-12-8-5-5 sts 1 time = 71-77-83-83-83-89 sts – incorporate inc sts in rib as you go along to make K3/P3 with K3 and 1 edge st in garter st each side. When piece measures 36-38-41-44-47-50 cm / 14¼"-15"-16⅛"-17¼"-18½"-19¾" insert a marker in piece (= mid shoulder). Continue until piece measures 2 cm / ¾" from marker. Now cast on 8-8-8-14-14-14 new sts at the end of row from WS (= towards mid back) = 79-85-91-97-97-103 sts. Work 2 rows garter st on 9-9-9-15-15-15 sts towards mid back (with remaining sts as before). Now work next rows as follows from RS: 1 edge st in garter st, P2, * K3, P3 *, repeat from *-* until 4 sts remain and finish with K3 and 1 edge st in garter st. When piece measures 17-18-19-20-21-22 cm / 6¾"-7"-7½"-8"-8¼"-8¾" from marker on shoulder bind off sleeve sts at the beg of every row from WS: 12-12-12-8-5-5 sts 1 time, 8 sts 1-1-1-0-0-0 time, 6 sts 1-1-1-2-1-1 time and 3 sts 1-1-1-1-2-2 times = 50-56-62-74-80-86 sts (rib K3/P3 with 1 edge st in garter st and P2 towards mid back and 1 edge st in garter st and P1 towards the side). Continue in rib, AT THE SAME TIME on first row from RS inc 1 st in each P-section (also inc in the P st towards the side) = 59-66-73-87-94-101 sts. When piece measures 28-29-31-33-35-37 cm / 11"-11⅜"-12¼"-13"-13¾"-14½" from marker (piece measures 64-67-72-77-82-87 cm / 25¼"-26⅜"-28⅜"-30⅜"-32¼"-34¼" from cast on row) inc 1 st in every other P-section (as seen from RS) = 4-5-5-6-6-7 inc sts = 63-71-78-93-100-108 sts in total. Continue with K over K, P over P and 1 edge st in garter st each side. When 1 row remains before piece measures 36-38-41-44-47-50 cm / 14¼"-15"-16⅛"-17¼"-18½"-19¾" from marker on shoulder work 1 row stockinette st (as seen from RS) and then bind off all sts. Piece measures approx 72-76-82-88-94-100 cm / 28⅜"-30"-32¼"-34⅝"-37"-39⅜" from cast on row.

LEFT FRONT PIECE:
Cast on and work like right front piece, but mirrored - i.e. rib worked from the side, cast on new sts for sleeve at the end of every from WS, cast on sts mid back at the end of row from RS and bind off sleeve sts at the beg of every row from RS.

ASSEMBLY:
Sew seam mid back inside 1 edge st. Sew sleeve and side seams inside 1 edge st. Close bolero tog with a pin.

Diagram

All measurements in charts are in cm.

symbols = knitting direction
diagram
Do you have a question? See a list of frequently asked questions (FAQ)

Knitting tension is what determines the final measurements of your work, and is usually measured per 10 x 10 cm. It is provided like so: number of stitches in width x number of rows in height - eg: 19 stitches x 26 rows = 10 x 10 cm.

The knitting tension is very individual; some people knit/crochet loosely while others work tightly. You adjust the knitting tension with the needle size, which is why the suggested needle size only serve as a guide! You need to adjust this (up or down) to ensure that YOUR knitting tension matches the knitting tension provided in the pattern. If you work with a different knitting tension than provided you will have a different yarn consumption, and your work will have different measurements than what the pattern suggests.

The knitting tension also determines which yarns can replace each other. As long as you achieve the same knitting tension you can replace one yarn with another.

See DROPS lesson: How to measure your tension/gauge

See DROPS video: How to make a gauge tension swatch

The required amount of yarn is provided in grams, eg: 450 g. To calculate how many balls you’ll need you first need to know how many grams are in 1 ball (25g, 50g or 100g). This information is available if you click on the individual yarn quality on our pages. Divide the amount required with the amount of each ball. For example, if each ball is 50g (the most common amount), the calculation will be as follows: 450 / 50 = 9 balls.

The important thing when changing from one yarn to another is that the knitting/crochet tension remains the same. This is so that the measurements of the finished piece will be the same as on the sketch provided. It is easier to achieve the same knitting tension using yarns from the same yarn group. It is also possible to work with multiple strands of a thinner yarn to achieve the knitting tension of a thicker one. Please try our yarn converter. We recommend you to always work a test swatch.

Please NOTE: when changing yarn the garment might have a different look and feel to the garment in the photo, due to individual properties and qualities of each yarn.

See DROPS lesson: Can I use a different yarn than the one mentioned in the pattern?

All our yarns are categorised into yarn groups (from A to F) according to thickness and knitting tension – group A contains the thinnest yarns and group F the thickest. This makes it easier for you to find alternative yarns to our patterns, should you wish to switch yarn. All yarns within the same group have a similar knitting tension and can easily replace each other. However, different yarn qualities have different structures and properties which will give the finished work a unique look and feel.

Click here for an overview of the yarns in each yarn group

At the top of all our patterns you’ll find a link to our yarn converter, which is a helpful tool should you wish to use a different yarn than suggested. By filling in the yarn quality you wish to replace, the amount (in your size) and number of strands, the converter will present good alternative yarns with the same knitting tension. Additionally it will tell you how much you’ll require in the new qualities and whether you’ll need to work with multiple strands. Most skeins are 50g (some are 25g or 100g).

If the pattern is worked with multiple colours, every colour will have to be converted separately. Similarly, if the pattern is worked with several strands of different yarns (for example 1 strand Alpaca and 1 strand Kid-Silk) you will have to find alternatives for each, individually.

Click here to see our yarn converter

Since different yarns have different qualities and textures we have chosen to keep the original yarn in our patterns. However, you can easily find options among our available qualities by using our yarn converter, or simply pick a yarn from the same yarn group.

It is possible that some retailers still have discontinued yarns in stock, or that someone has a few skeins at home that they would like to find patterns for.

The yarn converter will provide both alternative yarn as well as required amount in the new quality.

If you think it's hard to decide what size to make, it can be a good idea to measure a garment you own already and like the size of. Then you can pick the size by comparing those measures with the ones available in the pattern's size chart.

You'll find the size chart at the bottom of the pattern.

See DROPS lesson: How to read size chart

The needle size provided in the pattern serves only as a guide, the important thing is to follow the knitting tension. And since knitting tension is very individual, you will have to adjust the needle size to ensure that YOUR tension is the same as in the pattern – maybe you’ll have to adjust 1, or even 2 needle sizes, up or down to achieve the correct tension. For this, we recommend that you work test swatches.

Should you work with a different knitting tension than the one provided, the measurements of the finished garment might deviate from the measurement sketch.

See DROPS lesson: How to measure your tension/gauge

See DROPS video: How to make a gauge tension swatch

Working a garment top-down provides more flexibility and room for personal adjustment. For example it is easier to try the garment on while working, as well as making adjustments to length of yoke and shoulder caps.

The instructions are carefully explaining every step, in the correct order. Diagrams are adjusted to the knitting direction and are worked as usual.

The diagram depicts all rows/rounds, and every stitch seen from the right side. It is read from bottom to top, from right to left. 1 square = 1 stitch.

When working back and forth, every other row is worked from the right side and every other row is worked from the wrong side. When working from the wrong side, the diagram will have to be worked reversed: from left to right, knit stitches are purled, purl stitches are knit etc.

When working in the round every round is worked from the right side and the diagram are worked from right to left on all rounds.

See DROPS lesson: How to read knitting diagrams

The diagram depicts all rows/rounds, and every stitch seen from the right side. It is worked from bottom to top, from right to left.

When working back and forth every other row is worked from the right side: from right to left and every other row is worked from the wrong side: from left to right.

When working in the round, every row in the diagram are worked from the right side, from right to left.

When working a circular diagram you start in the middle and work your way outwards, counter clockwise, row by row.

The rows usually start with a given number of chain stitches (equivalent to the height of the following stitch), this will either be depicted in the diagram or explained in the pattern.

See DROPS lesson: How to read crochet diagrams

Instructions for working several diagrams after each other on the same row/round, will often be written like so: “work A.1, A.2, A.3 a total of 0-0-2-3-4 times". This means you work A.1 once, then A.2 is worked once, and A.3 is repeated (in width) the number of times provided for your size – in this case like so: S = 0 times, M = 0 times, L=2 times, XL= 3 times and XXL = 4 times.

The diagrams are worked as usual: begin with the first row in A.1, then work the first row in A.2 etc.

See DROPS lesson: How to read knitting diagrams

See DROPS lesson: How to read crochet diagrams

The total width of the garment (from wrist-to-wrist) will be larger in the larger sizes, despite the actual sleeves being shorter. The larger sizes have longer sleeve caps and wider shoulders, so there will be a good fit in all sizes.

The measurement sketch/schematic drawing provides information regarding the full length of the garment. If it’s a jumper or a jacket the length is measured from the highest point on the shoulder (usually closest to the neckline), and straight down to the bottom of the garment. It is NOT measured from the tip of shoulder. Similarly, the length of yoke is measured from the highest point on the shoulder and down to where yoke is split into body and sleeves.

See DROPS lesson: How to read a schematic drawing

Diagrams are often repeated on the round or in height. 1 repeat is the diagram the way it appears in the pattern. If it says to work 5 repeats of A.1 in the round, then you work A.1 a total of 5 times after/next to each other in the round. If it says to work 2 repeats of A.1 vertically/in height you work the entire diagram once, then begin again at the start and work the entire diagram one more time.

Chain stitches are slightly narrower than other stitches and to avoid working the cast-on edge too tight, we simply chain more stitches to begin with. The stitch count will be adjusted on the following row to fit the pattern and measurement sketch.

The rib edge is more elastic and will contract slightly compared to, for example, stocking stitch. By increasing before the rib edge, you avoid a visible difference in width between the rib edge and the rest of the body.

It’s very easy to cast off too tightly, and by making yarn overs while casting off (and simultaneously casting these off) you avoid a too tight cast off edge.

See DROPS video: How to bind off with yarn overs (yo)

To achieve an even increase (or decrease) you can increase on, for example: every 3rd and 4th row alternately, like so: work 2 rows and increase on the 3rd row, work 3 rows and increase on the 4th. Repeat this until the increase is complete.

See DROPS lesson: Increase or decrease 1 st on every 3rd and 4th row alternately

Should you prefer to work in the round instead of back and forth, you may of course adjust the pattern. You’ll need to add steeks mid-front (usually 5 stitches), and follow the instructions. When you would normally turn and work from the wrong side, simply work across the steek and continue in the round. At the end you’ll cut the piece open, pick up stitches to work bands, and cover the cut edges.

See DROPS video: How to knit steeks and cut open

Should you prefer to work back and forth instead of in the round, you may of course adjust the pattern so you work the pieces separately and then assemble them at the end. Divide the stitches for the body in 2, add 1 edge stitch in each side (for sewing) and work the front and back pieces separately.

See DROPS lesson: Can I adapt a pattern for circular needles into straight needles?

Pattern repeats can vary slightly in the different sizes, in order to get the correct proportions. If you’re not working the exact same size as the garment in the photo, yours might deviate slightly. This has been carefully developed and adjusted so that the complete impression of the garment is the same in all sizes.

Make sure to follow instructions and diagrams for your size!

If you have found a pattern you like which is available in women’s size it’s not very difficult to convert it to men’s size. The biggest difference will be the length of sleeves and body. Start working on the women size that you think would fit across the chest. The additional length will be worked right before you cast off for the armhole/sleeve cap. If the pattern is worked top-down you can add the length right after the armhole or before the first decrease on sleeve.

Regarding additional yarn amount, this will depend on how much length you add, but it is better with a skein too many than too few.

All yarns will have excess fibres (from production) that might come off as lint or shedding. Brushed yarns (ie hairier yarns) have more of these loose, excess fibres, causing more shedding.

Shedding also depends on what is worn under or over the garment, and whether this pulls at the yarn fibres. It’s therefore not possible to guarantee that there will be no shedding

Below are some tips on how to get the best result when working with hairier yarns:

1. When the garment is finished (before you wash it) shake it vigorously so the looser hairs come off. NOTE: do NOT use a lint roller, brush or any method that pulls at the yarn.

2. Place the garment in a plastic bag and put it in your freezer - the temperature will cause the fibres to become less attached to each other, and excess fibres will come off easier.

3. Leave in the freezer for a few hours before taking it out and shaking it again.

4. Wash the garment according to the instructions on the yarn label.

Pilling is a natural process that happens to even the most exclusive of fibers. It's a natural sign of wear and tear that is hard to avoid, and that is most visible in high friction areas of your garment like a sweater's arms and cuffs.

You can make your garment look as new by removing the pilling, using a fabric comb or a pill/lint remover.

Still can't find the answer you need? Then scroll down and leave your question so one of our experts can try to help you. This will be done normally within 5 to 10 working days.
In the meantime, you can read the questions and answers that others have left to this pattern or join the DROPS Workshop on Facebook to get help from fellow knitters/crocheters!

You might also like...

Post a comment to pattern DROPS 119-26

We would love to hear what you have to say about this pattern!

If you want to leave a question, please make sure you select the correct category in the form below, to speed up the answering process. Required fields are marked *.

Comments / Questions (44)

country flag Katharina wrote:

Stusser litt i begynnelsen av oppskriften: 1 kantmaske, RILLE - er det 1. og 2.pinne? 3.pinne er da: 3r 5vr 4.og5 RILLE? Eller blir "1 kantm RILLE - se forkl over, * 3 r, 5 vr *, gjenta fra *-* totalt 6-7-8-9-10-11 ganger, 3 r, 3 vr og 1 kantm RILLE." en og samme pinne?

02.04.2023 - 10:17

DROPS Design answered:

Hei Katharina, Det er bare kantmaskene (1 maske på hver side av arbeidet) som er strikket i rille, og disse kantmasker er strikket i rille videre oppover. Maskene mellom kantmaskene er strikket 3 r, 5 vr (vrangbord) til vrangborden måler riktige mål for din størrelse . God fornøyelse!

03.04.2023 - 06:52

country flag Cristiana Camboni wrote:

Ciao, non riesco a capire il passaggio "Ripetere le diminuzioni quando il lavoro misura 16-17-19-21-23-25 cm – aggiustarlo alle diminuzioni dal diritto del lavoro = 42-48-54-60-66-72 m.", è possibile avere un video tutorial o altri dettagli? Grazie.

21.01.2022 - 12:26

DROPS Design answered:

Buonasera Cristiana, abbiamo modificato quel punto nel testo per renderlo più comprensibile. Buon lavoro!

22.01.2022 - 18:33

country flag Le Goff wrote:

Bonjour il y a une erreur si on veux arriver des cotes 3mend 3menv apres les diminution il faut diminuer dans la section des 5menv et non des 3m donc erreur ici "diminuer 1 m dans chacune des 7- 8-9-10-11-12 sections 3 m env (vu sur l'end)"

30.03.2020 - 16:34

DROPS Design answered:

Bonjour Mme Le Goff, tout à fait et merci, correction faite. Bon tricot!

30.03.2020 - 17:21

country flag Karlinski wrote:

Wenn die Maschen für den Nacken aufgenommen sind wende ich die Arbeit und teile die Maschen wie ein? Ich verstehe die Anleitung an der Stelle nicht und kann nicht weiterstricken da ich nicht weiß wie das Muster jetzt gestrickt wird.Die Anleitung erschließt sich mir nicht.Danke

22.06.2019 - 21:36

DROPS Design answered:

Liebe Frau Karlinski, nachdem Sie die neuen 8-14 Maschen für den Hals (Rücktenteil) angeschlagen haben, stricken Sie die 2 nächsten Reihen mit Krausrechten Maschen über die 9-15 Maschen am Hals, die anderen Maschen (= Vorderteil und Ärmel werden wie zuvor im Bündchen gestrickt), dann stricken Sie im Bündchen wie zuvor aber über alle Maschen, mit 1 Randmasche krausrechts beidseitig. Viel Spaß beim stricken!

24.06.2019 - 07:53

country flag Maike Halama wrote:

Super schöner Bolero! Es sind nur keine Rückreihen beschrieben, sind diese dann wie sie erscheinen? Lg

10.07.2015 - 11:45

DROPS Design answered:

Ja, Sie stricken die Rück-R entsprechend, sodass sich das Rippenmuster ergibt und am Rand stricken Sie jeweils 1 Rand-M kraus re.

13.07.2015 - 09:03

country flag Stella wrote:

Hello there, You specify the sizes as S-M-L-... but do not give an idea of how large they actually are. Would you have some guidelines for the size of bust (or high bust) each garment size is supposed to fit? From the sizes in the diagram at the end of the pattern it looks like size S is 58cm flat, from side to side, at the bust. This would correspond to a bust size 116cm in circumference. Is that correct? Thank you, Stella

20.10.2014 - 12:33

DROPS Design answered:

Dear Stella, the garment will be very elastic because of rib and may seem smaller than in chart. You can knit in that case your usual size following measurements in chart. Happy knitting!

28.10.2014 - 16:33

country flag Roberta wrote:

Looking for a sizing chart, that will advise me how many inches are in S-M-L.

25.07.2014 - 19:31

DROPS Design answered:

Dear Roberta, you will find at the bottom of the pattern a measurement chart with all measurements in cm taken flat, from side to side - compare this to a similar garment to find out the size - convert these here into inches. Happy knitting!

26.07.2014 - 09:40

country flag Ulrike wrote:

Beim Zusammenähen gefällt mir die Naht nicht so gut, kann der Bolero nicht auch rückseitig in einem Teil gestrickt werden?

22.05.2014 - 23:15

DROPS Design answered:

Liebe Ulrike, dazu müsste die Anleitung zu stark umgeändert werden. Haben Sie sich zum Zusammennähen unsere Videos angeschaut? Vielleicht hilft Ihnen davon eins für eine schönere Naht weiter, unter "Tipps & Hilfe => Technikvideos => fertigstellen" sind mehrere Videos zum Fertigstellen zu finden.

23.05.2014 - 17:25

country flag Stipps Regina wrote:

Sehr geehrte Damen, ich komme leider mit ihrer Erklärung in der Anleitung zu dem Stricken des Bolero nicht klar. Was heißt in "jeder linken partie " beim abnehmen der Maschen, können sie mir das bitte etwas genauer beschreiben. Reihe oder Abschnitt oder was? Ich komme da nicht weiter. Es soll doch auch am Rand schön aussehen. vielleicht können Sie mir das etwas genauer beschreiben. Vielen dank im vorraus Frau stipps

25.03.2013 - 18:17

DROPS Design answered:

Hallo Frau Stipps, die Randmasche ist in der Anleitung beschrieben: sie wird in Krausrippe, also immer rechts, gestrickt. Beim Rippenmuster haben Sie ja linke und rechte „Streifen“ – in diesen linken Streifen wird abgenommen.

26.03.2013 - 09:08

country flag Nana wrote:

Har fundet ud af det :-) skulle bare gøre det i stedet for at tænke :-D

01.04.2012 - 19:10