
Looking for a yarn?


Comments / Questions (144)
![]() Hélène ESCANDE wrote:
Hélène ESCANDE wrote:
Bonjour, j 'ai enfin compris ce problème de symétrie de couleur !! je viens préciser que la symétrie parfaite n'arrive qu'au 11ieme rang du M1, après la 1ière diminution de l'encolure. Veuillez excuser mon insistance !! et merci pour ce que vous faites
13.06.2025 - 08:28
![]() Hélène ESCANDE wrote:
Hélène ESCANDE wrote:
Merci beaucoup pour votre réponse !! Vous m'indiquez une nouvelle fois la technique bien comprise ! Considérant que l'axe de symétrie est le devant, la partie gauche n'est pas la même que la partie droite pour la position des couleurs bien-sûr !!... Pas grave : on ne doit pas se comprendre !! Merci quand même
10.06.2025 - 10:27
![]() Hélène ESCANDE wrote:
Hélène ESCANDE wrote:
Bonjour, J'ai la même réflexion de Mme Preschey !! Je ne vois pas la symétrie !! Au départ j'ai 1 lisière + 6 noires +1 blanche A l'arrivée j'ai 1 blanche +5 noires +1 lisière Je ne vois pas la symétrie !! Eclairez moi Merci
08.06.2025 - 10:15DROPS Design answered:
Bonjour Mme Escande, lorsque vous répétez les mailles de A.1, il va vous rester 2 mailles à la fin du rang, tricotez la 1ère maille de A.1 (vu sur l'endroit), et terminez par 1 m lisière (pensez à bien lire les diagrammes de bas en haut, autrement dit, M.1 se tricote en commençant par 11 mailles, puis on diminue aux endroits indiqués dans chaque M.1 pour terminer par 4 mailles dans chaque A.1). Bon tricot!
09.06.2025 - 10:02
![]() PRESCHEY wrote:
PRESCHEY wrote:
Bonjour Pour effectuer l'empiècement, arrivé en coloris noir une fois les diminutions faites, restent 388 m. Le diagramme est de 11m + 1 m lisière à chacune des extrémités . 11 m X 35 fois le digramme = 387 m . + 2 m lisières = 389 m . Que dois-je comprendre ? Pouvez-vous m'éclairer ? Merci pour votre retour
19.03.2025 - 15:48DROPS Design answered:
Bonjour Mme Preschey, tricotez ces 388 mailles ainsi: 1 m lisière, puis répétez 35 fois les 11 mailles de M.1 (385 m), tricotez la 1ère maille de M.1 (pour que le motif soit symétrique) et 1 m lisière soit 1+385+1+1=388. Bon tricot!
20.03.2025 - 09:06
![]() Sally wrote:
Sally wrote:
When I click on the picture for the pattern, it is a short sleeved top, but the pattern is for a cardigan. How do I find instructions for the top please
13.03.2025 - 17:16DROPS Design answered:
Hi Sally, There is no short sleeved top corresponding to this pattern. Write "short sleeved top" in the search box and our range of patterns for tops will come up, which you can then choose from. Happy crafting!
13.03.2025 - 17:45
![]() Lauren wrote:
Lauren wrote:
Hi. Can I ask which method you used for the cast on? Is it the Italian CO or just an long tail CO?
05.03.2025 - 09:13DROPS Design answered:
Dear Lauren, we usually use the continental method but feel free to use your favorite cast-on method, just make sure it's not too tight to avoid a tight edge. Happy knitting!
05.03.2025 - 13:38
![]() Lauren wrote:
Lauren wrote:
Hello. I don’t see a black color in DROPS glitter yarn. Is it not on sale anymore? If it’s no longer on sale, what yarn can I use instead?
30.01.2025 - 07:41DROPS Design answered:
Dear Lauren, DROPS Glitter is not available anymore in black, you can use instead gold or silver, or just keep it away, Glitter is a very thin thread that doesn't alter the tension. Happy knitting!
30.01.2025 - 10:23
![]() VICKY wrote:
VICKY wrote:
Merci pour votre réponse Bonne journée
10.01.2025 - 13:08
![]() Vicky wrote:
Vicky wrote:
Bonjour, Pourquoi monter les mailles avec 2 fils de couleur différentes, les côtes sont unies . et jusquà l'empiècement Merci pour votre aide
09.01.2025 - 18:23DROPS Design answered:
Bonjour Vicky, on tricote ici avec 1 fil Fabel noir + 1 fil Glitter = 1 fil tout fin qui apporte juste de la brillance sans surépaisseur, vous pouvez aussi tricoter simplement avec 1 fil Alpaca tant que vous avez la bonne tension. Bon tricot!
10.01.2025 - 08:07
![]() Helene wrote:
Helene wrote:
Hej! Jag tänkte sticka mönstret som en tröja istället för en kofta som ”dropsfan gallery” bilderna, men undrar hur jag ska göra med framstycket . Är det bara att upprepa mönsterrapporten eller måste jag lägga till/dra ifrån maskor från mönstret för att mönstret ska bli rätt? Stickar i storlek L, alternativt XL.
09.01.2025 - 18:11DROPS Design answered:
Hei Helene. Sjekk maskeantallet i str. L uten stolpemaskene og rätst og se om diagrammet går opp og at det er like mange masker foran og bak. mvh DROPS design
13.01.2025 - 13:34
|
||||||||||
Winter Fantasy |
||||||||||
 |
 |
|||||||||
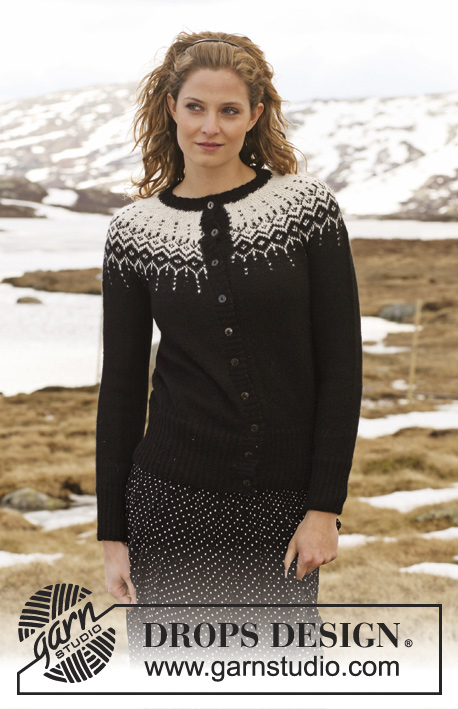
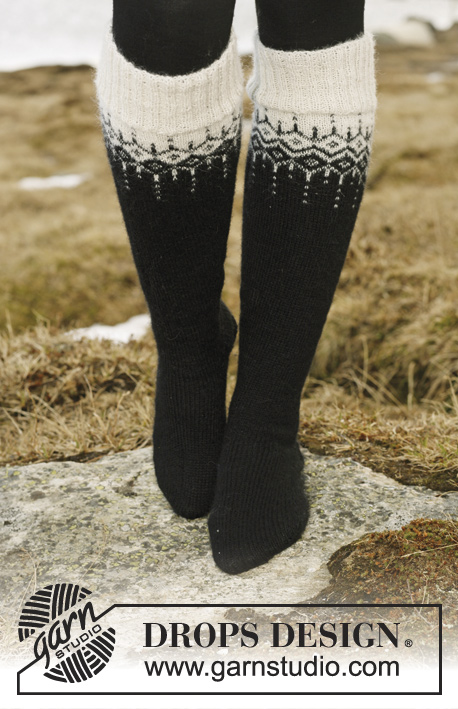
DROPS Jacket in ”Alpaca” and ”Glitter” with 2-colour pattern in round yoke. Size S to XXXL. Long socks in ”Fabel” with the same pattern.
DROPS 116-1 |
||||||||||
|
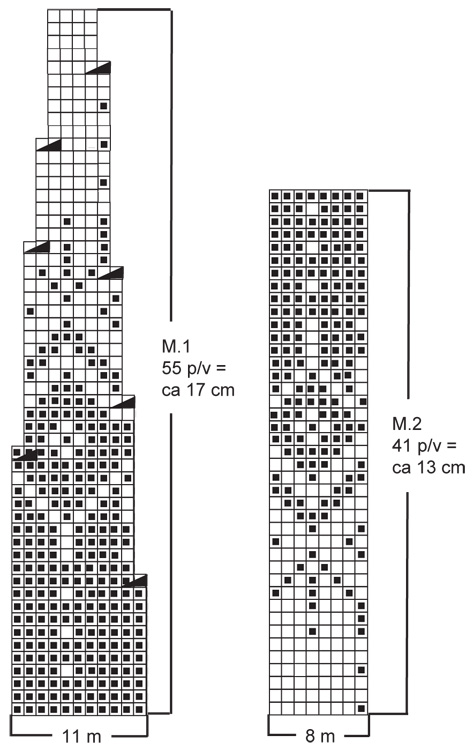
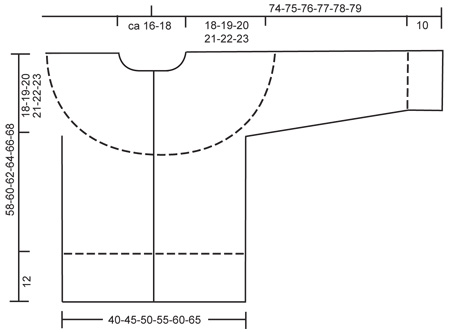
SOCKS: Size: 5/6½ - 7½/9 – 9½/10½ (US sizes) 35/37 - 38/40 – 41/43 (EU sizes) 3/4 – 5/6½ – 7/8 (Uk sizes) Foot length: 22-24-27 cm / 8¾"-9½"-10⅝" Leg length: 42-44-46 cm / 16½"-17¼"-18" Materials: DROPS FABEL from Garnstudio 150 g for all sizes color no 400, black 50 g for all sizes color no 100, off-white DROPS DOUBLE POINTED NEEDLES size 2.5 mm / US 1 – or size needed to get 26 sts x 34 rows in stockinette st = 10 x 10 cm / 4" x 4". ---------------------------------------------------------- ---------------------------------------------------------- JACKET: PATTERN: See diagram M.1 – diagram is seen from RS and shows 1 pattern repeat. GARTER ST (back and forth on needle): K all rows. ---------------------------------------------------------- ---------------------------------------------------------- BODY PIECE: Worked back and forth on circular needle from mid front. Cast on 314-354-394-434-474-514 sts on circular needle size 2.5 mm / US 1 with 1 thread black Alpaca + 1 thread Glitter. Work rib as follows (first row = RS): 1 edge st in GARTER ST – see above, * K2 / P3 *, repeat from *-* until 3 sts remain, K2, 1 edge st in GARTER ST. Continue like this until piece measures 2 cm / ¾", now dec all P3 to P2 (as seen from RS) = 252-284-316-348-380-412 sts. Continue in rib, K2 / P2, with 1 edge st in garter st each side. When piece measures 12 cm / 4¾" dec all P2 to P1 (as seen from RS) = 190-214-238-262-286-310 sts. Change to circular needle size 3 mm / US 2or3 and continue in stockinette st. REMEMBER THE GAUGE! When piece measures 40-41-42-43-44-45 cm / 15¾"-16⅛"-16½"-17"-17¼"-17¾" work next row as follows from RS: 41-47-54-59-65-71 sts (= front piece), bind off 12 sts for armhole, 84-96-106-120-132-144 sts (= back piece), bind off 12 sts for armhole, 41-47-54-59-65-71 sts (= front piece) = 166-190-214-238-262-286 sts left on needle. Put piece aside and knit the sleeves. SLEEVE: Worked in the round on double pointed needles. Cast on 80-80-80-88-88-88 sts on double pointed needles size 2.5 mm / US 1 with 1 thread black Alpaca + 1 thread Glitter. Work rib, K2 / P2. When piece measures 10 cm / 4" dec all P2 to P1 = 60-60-60-66-66-66 sts. Insert a marker at beg of round. Change to double pointed needles size 3 mm / US 2or3 and continue in stockinette st. When piece measures 11-11-11-14-14-14 cm inc 1 st each side of marker mid under sleeve, repeat the inc on every 4.5-3.5-2.5-2.5-2-2 cm / 1¾"-1¼"-⅞"-⅞"-¾"-¾" a total of 8-11-14-13-15-17 times = 76-82-88-92-96-100 sts. When piece measures 48 cm / 19" bind off 12 sts mid under sleeve = 64-70-76-80-84-88 sts left on needle. Put piece aside and knit the other sleeve. YOKE: Slip sleeves on the same circular needle size 3 mm / US 2or3 as body piece where bind off for armhole = 294-330-366-398-430-462 sts. Work 3-5-9-13-15-17 rows stockinette st with black Alpaca + Glitter, AT THE SAME TIME on first row dec 5-8-11-10-9-8 sts evenly = 289-322-355-388-421-454 sts. Now continue in M.1 (first row = RS) with 1 edge st in garter st each side, work the last but 1 st on row like first st in M.1, but without the dec, to make the pattern identical on both front pieces. When all dec are complete there are 107-119-131-143-155-167 sts on needle and piece measures approx 58-60-62-64-66-68 cm / 22¾"-23⅝"-24⅜"-25¼"-26"-26¾". Work 1 row with off-white (from WS), AT THE SAME TIME dec 15-19-23-27-31-35 sts evenly = 92-100-108-116-124-132 sts. Now work shortened rows mid back with off-white as follows: Work 56-60-64-68-72-76 sts, turn, work 20 sts, turn, work 30 sts, turn, work 40 sts. Continue like this with 10 more sts before each turn until you have worked shortened rows on a total of 60-80-80-100-120 sts, turn and work return row and work 1 row on all sts. Slip sts on a stitch holder. LEFT FRONT BAND: Pick up approx 180 to 212 sts (divisible by 4) inside 1 edge st along left front piece with 1 thread black Alpaca + 1 thread Glitter on circular needle size 2.5 mm. Work rib as follows (first row = WS): 1 edge st in garter st, * P2 / K2 *, repeat from *-* and finish with P2 and 1 edge st in garter st. Continue with K over K and P over P until rib measures 3 cm / 1⅛", bind off loosely. RIGHT FRONT BAND: Like left front band, but after 1 cm / ⅜" make 9 buttonholes evenly distributed (make buttonholes in P-sections as seen from RS). 1 BUTTONHOLE = P2 tog and make 1 YO – place the bottom buttonhole in the 2nd P-section and the top one approx 6 cm / 2⅜" from neckline (the last buttonhole is made on the neck). NECK: Worked with 1 thread black Alpaca + 1 thread Glitter on circular needle size 2.5 mm / US 1 as follows: Pick up 8 sts on right front band (inside 1 edge st), work the 92-100-108-116-124-132 sts from stitch holder back on needle and pick up 8 sts on left front band = 108-116-124-132-140-148 sts. P 1 row from WS, AT THE SAME TIME inc 20 sts evenly = 128-136-144-152-160-168 sts. Continue in rib as follows (from RS): 1 edge st in garter st, * K2 / P2 *, repeat from *-* and finish with K2 and 1 edge st in garter st. Continue with K over K and P over P. When neck measures 1 cm / ⅜" make 1 buttonhole in line with the others on front band. When neck measures 3 cm / 1⅛" bind off with K over K and P over P. ASSEMBLY: Sew on buttons. Sew openings under sleeves. ---------------------------------------------------------- SOCKS: PATTERN: See diagram M.2 – diagram shows 1 pattern repeat. We knitted the socks without Glitter. DECREASING TIP: Dec as follows before marker: K2 tog. Dec as follows after marker: K2 tog into back of loop. HEEL DECREASES: Row 1 (= RS): Work row until 8-9-9 sts remain, K2 tog into back of loop, turn piece. Row 2 (= WS): Work row until 8-9-9 sts remain, P2 tog, turn piece. Row 3 (= RS): Work row until 7-8-8 sts remain, K2 tog into back of loop, turn piece. Row 4 (= WS): Work row until 7-8-8 sts remain, P2 tog, turn piece. Continue dec like this with 1 less st before each dec until there are 14-14-16 sts on needle. ---------------------------------------------------------- ---------------------------------------------------------- SOCKS: Worked in the round on double pointed needles. Cast on 108-108-116 sts on double pointed needles size 2.5 mm / US 1 with off-white. Work rib, K2 / P2 for 8 cm / 3⅛". K 1 round, AT THE SAME TIME dec 20 sts evenly = 88-88-96 sts. Continue in M.2. REMEMBER THE GAUGE! After M.2 piece measures approx 21 cm / 8¼". Insert a marker at beg of round. Continue in black stockinette st, AT THE SAME TIME dec 1 st each side of marker – SEE DECREASING TIP, and repeat the dec on every 4-5-5 round a total of 16-14-16 times = 56-60-64 sts. When piece measures 42-44-46 cm / 16½"-17¼"-18" keep the first 28-30-32 sts on needle for heel and slip the remaining 28-30-32 sts on a stitch holder (= mid upper foot). Continue in stockinette st back and forth on heel-sts for 5-5.5-6 cm / 2"-2¼"-2⅜" - insert a marker. Now work HEEL DECREASES – see above. After heel dec pick up 13-14-16 sts each side of heel and slip the 28-30-32 sts from stitch holder back on needle = 68-72-80 sts. Insert a marker each side of the 28-30-32 sts on upper foot. Continue in stockinette st in the round, AT THE SAME TIME dec each side as follows: K tog into back of loop the last 2 sts BEFORE first marker on upper foot, and K tog the first 2 sts AFTER the second marker on upper foot. Repeat the dec on every other round a total of 8-8-10 times = 52-56-60 sts. Continue until piece measures 18-19-22 cm / 7"-7½"-8¾" from marker on heel (= approx 4-5-5 cm / 1½"-2"-2" remain). Insert a marker each side with 26-28-30 sts on upper foot and 26-28-30 sts under foot. Continue in stockinette st AT THE SAME TIME dec for toes each side of both markers as follows: Before marker: K2 tog. After marker: K2 tog into back of loop. Repeat the dec on every other round a total of 4-5-5 times and then on every round 7-7-8 times = 8 sts left on needle. Cut the thread, pull it through remaining sts, tighten and fasten. |
||||||||||
Diagram explanations |
||||||||||
|
||||||||||
|
||||||||||
|
||||||||||
Have you finished this pattern?Tag your pictures with #dropspattern or submit them to the #dropsfan gallery. Do you need help with this pattern?You'll find 31 tutorial videos, a Comments/Questions area and more by visiting the pattern on garnstudio.com. © 1982-2025 DROPS Design A/S. We reserve all rights. This document, including all its sub-sections, has copyrights. Read more about what you can do with our patterns at the bottom of each pattern on our site. |
||||||||||


With over 40 years in knitting and crochet design, DROPS Design offers one of the most extensive collections of free patterns on the internet - translated to 17 languages. As of today we count 314 catalogs and 11822 patterns - 11812 of which are translated into English (US/in).
We work hard to bring you the best knitting and crochet have to offer, inspiration and advice as well as great quality yarns at incredible prices! Would you like to use our patterns for other than personal use? You can read what you are allowed to do in the Copyright text at the bottom of all our patterns. Happy crafting!
Post a comment to pattern DROPS 116-1
We would love to hear what you have to say about this pattern!
If you want to leave a question, please make sure you select the correct category in the form below, to speed up the answering process. Required fields are marked *.