
Looking for a yarn?


Comments / Questions (123)
![]() Ute wrote:
Ute wrote:
Ich habe eine Frage zur Mütze. Wenn ich nach den 11 cm immer 3 und 2 Maschen zusammenstricke, bleiben nur 40 und keine 84 Maschen übrig. Wie ist das zu verstehen?
25.05.2025 - 21:01DROPS Design answered:
Liebe Uta, in die 1. Größe nimmt mal nach 11 cm so ab: (3 li, *2 li zusammen)x20 (20*5=100), so werden 20 M abgenommen: 100-20=80 M übrig; in die 2. Größe nimmt mal nach 12 cm so ab: (3 li, 2 li zusammen)x20 + 4 li (5x20)100+4=104 M), so werden 20 M abgenommen und 4x20+4=84 M übrig. Viel Spaß beim Stricken!
26.05.2025 - 09:57
![]() ZRIHEN FORTUNE wrote:
ZRIHEN FORTUNE wrote:
Pour la 1ere fois, je vais faire un modele DROPS . Pour le modele qui suit, puis-je utiliser des aiguilles normales au lieu des circulaires (pas tres confortable avec les aiguilles circulaires!). Les instructions seront-elles les memes? "Baby Dove Ensemble au tricot pour bébé et enfant: Poncho, Bonnet et Chaussettes assorties, avec torsades, en DROPS Merino Extra Fine ". En espérant avoir de vos nouvelles,
01.03.2025 - 00:58DROPS Design answered:
Bonjour Mme Zrihen, le poncho et le bonnet, tout comme les chaussettes, se tricotent ici en rond sur aiguilles circulaire. Si vous souhaitez adapter les explications sur des aiguilles droites, vous trouverez ici quelques astuces. Bon tricot!
03.03.2025 - 08:38
![]() Inger wrote:
Inger wrote:
Jeg er i gang med at strikke ponchoen. Jeg undre mig over at der i opskriften står følgende: strik M1, 30 masker vrang, M2, 30 masker vrang. Er dette ikke en fejl. Det er vel kun M2 der skal bruges til ponchoen eller ?
11.01.2025 - 10:44DROPS Design answered:
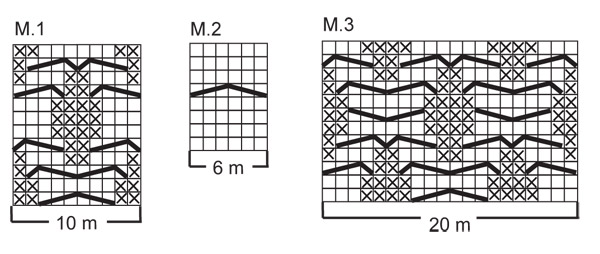
Hej Inger, den lidt større snoning som du ser midt foran lidt til højre i billedet er lidt større og den er strikket ifølge M.1, den anden er strikket ifølge M.2 :)
14.01.2025 - 12:32
![]() Hannelore wrote:
Hannelore wrote:
Vielen Dank, jetzt verstehe ich es. Mit der Anleitung konnte ich nichts anfangen. Anregung für die Formulierung: Gleichzeitig in jeder 2. Reihe abnehmen. Die Abnahmen erfolgen in den linken Maschen zwischen M1 und M2 bzw. zwischen M2 und M2. Beim ersten Abnehmen die ersten beiden, beim nächsten Abnehmen die letzten beiden linken Maschen links zusammenstricken.
06.11.2024 - 13:23
![]() Hannelore wrote:
Hannelore wrote:
Beim Poncho heißt es, ich solle auf der linken Seite jeder li-Partie 2 M li zusammenstricken. Was ist mit "Partie" gemeint?
06.11.2024 - 10:42DROPS Design answered:
Liebe Hannelore, die linken Maschen werden abgenommen, dh zuerst die 2 letzten von jedem Linken Maschen Parti/Gruppen zusammenstricken; dann bei der nächsten Abnahme die 2 ersten von jedem Linken Maschen Parti/Gruppen zusammenstricken und so weiterabnehmen. Viel Spaß beim Stricken!
06.11.2024 - 12:18
![]() Vijialuxmi wrote:
Vijialuxmi wrote:
Hi, what do I do when the pattern says M.1. Do I make a stitch but that doesn’t seem right. Please help I’m referring to “ M.1, P 28-30-32 (26-28), M.2, P 28-30-32 (26-28) *, repeat from *-* a total of 3-3-3 (4-4) times.
20.09.2024 - 20:16DROPS Design answered:
Dear Vijialuxmi, M.1, M.2 and M.3 are the knitting charts, which you will find after the pattern instructions. You can find here more information on how to read these charts: https://www.garnstudio.com/lesson.php?id=68&cid=19. Happy knitting!
23.09.2024 - 00:16
![]() Alexandra Jacob wrote:
Alexandra Jacob wrote:
Design for 3 and baby kan umulig være 272 på pinne 3,5. Sjekker dere Drops design 17-5 baby dove poncho og lue
28.06.2024 - 16:46DROPS Design answered:
Hei Alexandra. Maskeantallene og målene stemmer med det som står i oppskriften, sjekk strikkefastheten og målene på målskissen (ikke vrangbord og pinne 3,5). Men kan nok bli stor til en liten baby, men husk vrangborden trekker arbeidet sammen, det samme gjør flettene. mvh DROPS Design
01.07.2024 - 12:57
![]() Suzy Crenshaw wrote:
Suzy Crenshaw wrote:
I am making the 2nd size in this pattern 6/9mos. I have just reduced my stitches from 288 to 228. Now I come to this sentence ( Work next round as follows: * M.1, P 28-30-32 (26-28), M.2, P 28-30-32 (26-28) *, repeat from *-* a total of 3-3-3 (4-4) times.) As I read this, I am working the M.1 and M.2 charts which for my pattern would use 30 + 30 sts and repeat 3 times. This adds up to 180 sts. I have 48 sts left. What do I do with these? I believe there is a mistake in this pattern.
21.05.2024 - 19:46DROPS Design answered:
Dear Suzy, in that row you knit : [M.1 (= 10 stitch) + P 30 + M.2 (= 6 stitch) + P 30 = 76 stitch ] * 3 times = 76*3 = 228 stitch. There is no mistake in the pattern. I hope this helps. Happy Knitting!
21.05.2024 - 23:11
![]() Donna Woods wrote:
Donna Woods wrote:
The pattern says to decrease on the right and left of the purl sections alternately every 3rd row. Does this mean I need to decrease only on the left side on one decrease row and then on the next only on the right side of the purl sections?
13.04.2024 - 16:23DROPS Design answered:
Dear Donna, yes, that is exactly what it means. Happy Knitting!
13.04.2024 - 20:34
![]() Khadijah wrote:
Khadijah wrote:
Hi, how is the size of poncho measured for baby dove poncho pattern? for size 1-3 its 50/56cm but how is that measurement taken?
26.02.2024 - 22:54DROPS Design answered:
Dear Khadijah, the measurements of the poncho are indicated in the size chart at the end of the pattern; please see more information on how to read it here: https://www.garnstudio.com/lesson.php?id=24&cid=19. 50/56cm is the child's length in cm which was used when making size estimates of this pattern, so is the suppossed length of the child. If the child has different measurements than those indicated for their age, work a different size which fits their measurements. Happy knitting!
26.02.2024 - 23:09
|
|||||||||||||||||||
Baby Dove#babydoveset |
|||||||||||||||||||
|
|
|||||||||||||||||||
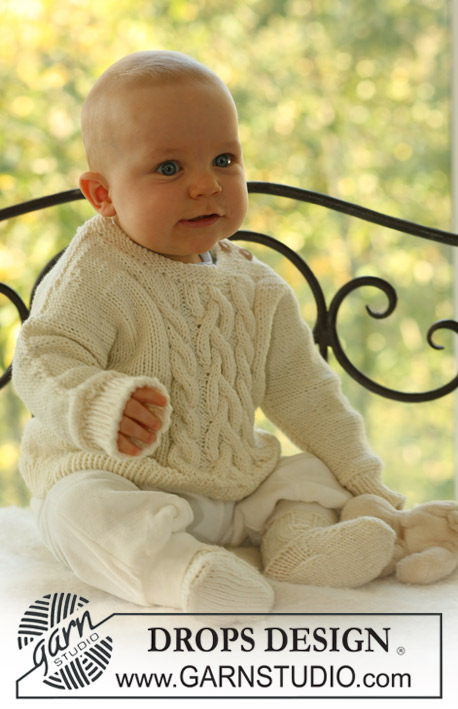
Set of knitted poncho and hat with cables plus socks for baby and children in DROPS Merino Extra Fine
DROPS Baby 17-5 |
|||||||||||||||||||
|
PONCHO: PATTERN: See diagram M.1 and M.2. The diagrams show the pattern from the RS. PONCHO: Worked from the bottom and up in the round on circular needle. Cast on 272-288-300 (340-360) sts on circular needle size 3.5 mm [US 4] with Merino Extra Fine. Work 4 cm [1½"] rib, K2/P2. Change to circular needle size 4 mm [US 6] and K 1 round, AT THE SAME TIME dec 56-60-60 (68-72) sts evenly = 216-228-240 (272-288) sts. Work next round as follows: * M.1, P 28-30-32 (26-28), M.2, P 28-30-32 (26-28) *, repeat from *-* a total of 3-3-3 (4-4) times. REMEMBER THE KNITTING GAUGE! Continue in pattern like this, AT THE SAME TIME on second round dec 1 st on the left side of each P-section by P2 tog. Repeat the dec on every 2-2-2 (3-3) round on the right and left side of each P-section alternately a total of 22-23-25 (20-21) times = 84-90-90 (112-120) sts. Now K 1 round, AT THE SAME TIME dec 3 sts on all M.1 and M.2 repeats = 66-72-72 (88-96) sts. K 1 round, AT THE SAME TIME inc 10-12-16 (12-12) sts evenly = 76-84-88 (100-108) sts. Piece now measures approx 20-21-23 (26-27) cm [8"-8¼"-9" (10¼"-10⅝")]. Change to circular needle size 3.5 mm [US 4] and work 3-4-4 (5-6) cm [1⅛"-1½"-1½" (2"-2⅜")] rib, K2/P2. Bind off in rib. Poncho measures approx 23-25-27 (31-33) cm [9"-9¾"-10⅝" (12¼"-13")]. ---------------------------------------------------------- HAT: Head circumference: 40/42 - 44/46 - 46/48 (48/50 - 50/52) cm [16"-17½"-18½" (19"-20")]. PATTERN: See diagram M.2 and M.3. The diagrams show the pattern from the RS. ---------------------------------------------------------- HAT: Worked in the round on circular needle. Cast on 96-100-100 (104-112) sts on circular needle size 3.5 mm [US 4] with Merino Extra Fine. K 1 round and continue in rib, K2/P2. When rib measures 4-4-5 (5-5) cm [1½"-1½"-2" (2"-2")] change to circular needle size 4 mm [US 6], K 1 round, P 1 round and then K 1 round, AT THE SAME TIME inc 4-4-8 (8-8) sts evenly = 100-104-108 (112-120) sts. Continue as follows: P 3-3-3 (4-5), M.2, P 6-7-8 (8-9), M.3, P 6-7-8 (8-9), M.2, P 6-6-6 (8-10), M.2, P 6-7-8 (8-9), M.3, P 6-7-8 (8-9), M.2, P 3-3-3 (4-5). When piece measures approx 11-12-13 (14-15) cm [4⅜"-4¾"-5⅛" (5½"-6")] work next round as follows: * P3, P2 tog *, repeat from *-* until 0-4-3 (2-0) sts remain, P these = 80-84-87 (90-96) sts. Now P all sts, AT THE SAME TIME dec 17-18-19 (20-21) sts evenly on every other round a total of 4 times = 12-12-11 (10-12) sts. NOTE: change to double pointed needles when sts no longer fit circular needle. Cut the thread, pull through remaining sts and fasten. Hat measures approx 14-15-16 (17-18) cm [5½"-6"-6¼" (6¾"-7")]. ---------------------------------------------------------- SOCK: HEEL DECREASES: Row 1 (= RS): Work row until 5-5-5 (6-6) sts remain, slip next st as if to K, K1, psso, turn piece, Row 2 (= WS): Work row until 5-5-5 (6-6) sts remain, slip next st as if to P, P1, psso, turn piece, Row 3 ( = RS): Work row until 4-4-4 (5-5) sts remain, slip next st as if to K, K1, psso, turn piece, Row 4 (= WS): Work row until 4-4-4 (5-5) sts remain, slip next st as if to P, P1, psso, turn piece. Continue dec like this with 1 less st between each dec until there are 7-9-9 (9-9) sts on row. DECREASING TIP: Dec as follows before marker: K2 tog. Dec as follows after marker: slip 1 st as if to K, K1, psso. -------------------------------------------------------- SOCK: Worked in the round on double pointed needles. Cast on 30-30-36 (36-36) sts on double pointed needles size 3 mm [US 2or3] with Merino Extra Fine. Work 8-8-9 (9-10) cm [3⅛"-3⅛"-3½" (3½"-4")] rib, K3/P3, and then K 1 round, AT THE SAME TIME dec 2-0-4 (2-0) sts evenly = 28-30-32 (34-36) sts. P 1 round, K 1 round and P 1 round. Now keep the first 15-17-17 (19-19) sts on needle for heel and slip the remaining 13-13-15 (15-17) sts on a stitch holder = upper foot. Work 3-3.5-4 (4-4.5) cm [1⅛"-1¼"-1½" (1½"-1¾")] stockinette st on heel sts. Insert a marker in piece and now dec for heel – SEE ABOVE. After heel dec pick up 7-8-9 (9-10) sts on each side of heel and slip sts from stitch holder back on needles = 34-38-42 (42-46) sts. Continue in stockinette st on all sts, AT THE SAME TIME dec 1 st on each side of the 13-13-15 (15-17) sts on upper foot as follows: K tog the 2 sts before the 13-13-15 (15-17) sts into back of loop and K tog the 2 sts after the 13-13-15 (15-17) sts. Repeat the dec on every other round a total of 4-6-6 (6-6) times = 26-26-30 (30-34) sts. Continue until piece measures approx 8-9-9.5 (11.5-12.5) cm [3⅛"-3½"-3¾" (4½"-4⅞")] from marker on heel (approx 2-2-2.5 (2.5-3.5) cm [3/4"-¾"-⅞" (7/8"-1¼")] remain). Now insert a marker each side with 13-13-15 (15-17) sts on upper foot and 13-13-15 (15-17) sts under foot. Continue in stockinette st, AT THE SAME TIME dec 1 st on each side of both markers – SEE DECREASING TIP - on every other round 2-2-3 (3-5) times and then on every round 3-3-3 (3-2) times = 6 sts left. Cut the thread, pull through remaining sts and fasten. Sock measures approx 10-11-12 (14-16) cm [4"-4⅜"-4¾" (5½"-6¼")]. |
|||||||||||||||||||
Diagram explanations |
|||||||||||||||||||
|
|||||||||||||||||||
|
|||||||||||||||||||

|
|||||||||||||||||||
Have you finished this pattern?Tag your pictures with #dropspattern #babydoveset or submit them to the #dropsfan gallery. Do you need help with this pattern?You'll find 20 tutorial videos, a Comments/Questions area and more by visiting the pattern on garnstudio.com. © 1982-2025 DROPS Design A/S. We reserve all rights. This document, including all its sub-sections, has copyrights. Read more about what you can do with our patterns at the bottom of each pattern on our site. |
|||||||||||||||||||


With over 40 years in knitting and crochet design, DROPS Design offers one of the most extensive collections of free patterns on the internet - translated to 17 languages. As of today we count 314 catalogs and 11822 patterns - 11812 of which are translated into English (US/in).
We work hard to bring you the best knitting and crochet have to offer, inspiration and advice as well as great quality yarns at incredible prices! Would you like to use our patterns for other than personal use? You can read what you are allowed to do in the Copyright text at the bottom of all our patterns. Happy crafting!
Post a comment to pattern DROPS Baby 17-5
We would love to hear what you have to say about this pattern!
If you want to leave a question, please make sure you select the correct category in the form below, to speed up the answering process. Required fields are marked *.