
Looking for a yarn?


Comments / Questions (23)
![]() Jannie wrote:
Jannie wrote:
I need to increase 60 sts. If I do that per instructions my sleeve will be many inches longer than the US 15 inches the pattern calls for. 3 rd and 4th does no work. Please help me. I want a whole sweater. Thank you.
30.06.2025 - 17:14DROPS Design answered:
Dear Jannie, you are working size S woman, correct? Then after the 5 cm rib start increasing as follows: (work 2 rounds without increasing, 1 round with increasing, 3 rounds without, 1 round with increasing), repeat these 7 rounds a total of 15 times = you have worked a total of 105 rounds (7 rounds x 15 times) and increased 60 sts (2 sts increased x 15 times 2 sts each repeat of the 7 rounds), sleeve measures approx. 35 cm + 5 cm ribbing, continue in pattern as explained but without increasing to the requested length. Happy knitting!
01.07.2025 - 08:00
![]() Jannie wrote:
Jannie wrote:
Sleeves are way too long. For every 3rd row I increased a round, then knit 2 rows and increased on round 4, etc. Every 4th row I knit 3 plain and then an increase row. Does not work. Can you help me? Thanks.
30.06.2025 - 14:52DROPS Design answered:
Dear Jannie, in this lesson we explain how to increase alternately every 3rd and 4th round, could this help?
30.06.2025 - 15:19
![]() Jannie wrote:
Jannie wrote:
I cannot figure out how to increase and stay in the pattern on the sleeves. Can someone help me?
14.05.2025 - 03:17DROPS Design answered:
Dear Jannie, use your favorite technique to increase - see some basic techniques here - at the beg of the round work the new stitches as the next stitch in diagram, reading from the left towards the right and at the end of the round work the new stitches as the next stitch in diagram, reading from the right towards the left. Happy knitting!
14.05.2025 - 09:36
![]() Henriette Kooiman wrote:
Henriette Kooiman wrote:
Is dit patroon eenvoudig te vergroten naar bijv xxl?? Ik hou van deze trui en wil m graag gaan breien maar heb geen maat l en voordat ik de wol ga bestellen wil ik weten of het aan te passen is Dank alvast voor t antwoord Groet Henriette Kooiman
14.01.2025 - 13:07DROPS Design answered:
Dag Henriette,
Helaas is dit patroon er alleen tot en met maat L. Je zou misschien wat meer steken op kunnen zetten (even kijken naar andere patronen met dezelfde stekenverhouding) en het ingebreide patroon wat breder maken.
14.01.2025 - 20:41
![]() Mima Suvalija wrote:
Mima Suvalija wrote:
Navne forslag ' Stjernenatt' Er det mulig å få utskrifta på denne genseren tilsendt i posten?
19.04.2024 - 21:44
![]() Anna wrote:
Anna wrote:
Pour les mailles steek des manches, est ce que je dois les tricoter en gris ou blanc sur toute la hauteur ou cela depend de la couleur du motif?
08.02.2023 - 00:41DROPS Design answered:
Bonjour Anna, vous pouvez les tricoter alternativement dans l'une et l'autre couleur par ex; au 1er tour: (1 m coloris A, 1 m coloris B)x4, 1 m coloris A et au 2ème tour: (1 m coloris B, 1 m coloris A)x4, 1 m coloris B - en utilisant les même couleurs que celles du tour. Bon tricot!
08.02.2023 - 09:10
![]() Nina wrote:
Nina wrote:
The quantity of Yarn is not calculated correctly for the medium size, I have not even finished front and back and need to order at least 5 more. Note that I am knitting with a regular tension and it is not my first time with this type of project! Please update the yarn quantity. Thanks
03.01.2023 - 03:19DROPS Design answered:
Dear Nina, we are very sorry to hear that, can you please tell us which yarn you are working with and can you give us your tension in both width (stitches) and height (rows) as well as which size you are working (M woman or S/M or M/L man) - thank you!
03.01.2023 - 16:57
![]() Ingegärd Enroth wrote:
Ingegärd Enroth wrote:
Var kan jag köpa Kari-hake nr 600?
15.12.2022 - 09:45DROPS Design answered:
Hej Ingegärd, dem har vi desværre ikke i vores sortiment længre. Du kan søge på "hake och hyska" Lycka till :)
15.12.2022 - 12:11
![]() Emmy Peters wrote:
Emmy Peters wrote:
Ik heb dit patroon gebreid en de trui is prachtig geworden. Ik heb de aangegeven hoeveelheid Karisma gekocht, maar moest van alle kleuren bollen bijkopen omdat ik te kort kwam. Maar het resultaat mag er zijn.
09.03.2022 - 22:05
![]() Desiree Sundman wrote:
Desiree Sundman wrote:
Hej! Kan jag beställa hakar till en norsk tröja av er? Kari nr 600. Skulle behöva 4 par. Hittar ingenstans jag kunde göra en beställning. Mvh. Désirée
04.12.2020 - 20:35DROPS Design answered:
Hej Desiree. Vi har dessvärre inte hakar i vårt sortiment längre, men om du söker på google så finns det flera som säljer de i andra märken ser jag. Mvh DROPS Design
08.12.2020 - 07:48
|
|||||||||||||
DROPS 47-10 |
|||||||||||||
 |
 |
||||||||||||
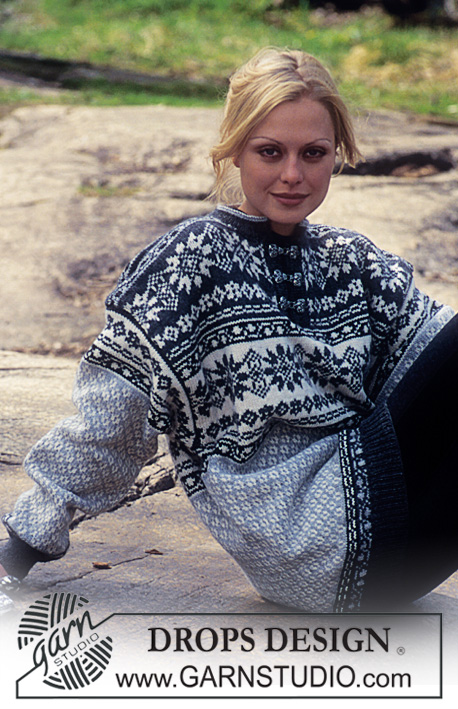
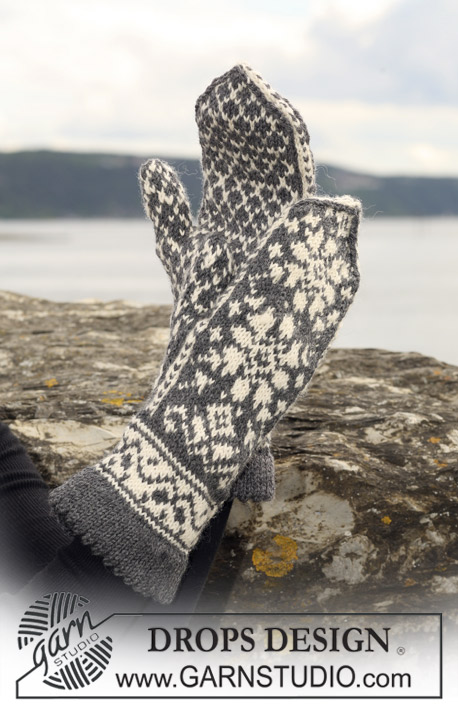
DROPS Jumper and mittens with star pattern in Karisma Superwash
DROPS 47-10 |
|||||||||||||
|
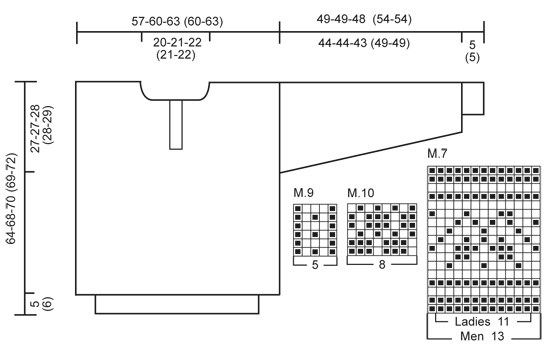
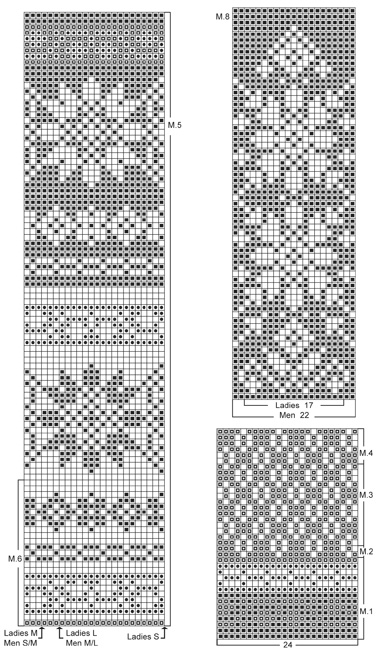
JUMPER: Knitting gauge: 21 sts x 28 rows on needle size 3.5 mm / US 4 in pattern = 4" x 4" (10 x 10 cm). Rib: *K1, P1*, repeat from *-*. Edge: K 3 cm / 1" stockinette sts, P 1 row (= folding edge, measure piece from here), K 3 cm / 1" stockinette sts. Pattern: See diagrams M1-M.6. 1 diagram = 1 repeat. The diagrams are seen from the RS. Back and front piece: The jumper is knitted round on circular needles and cut for armholes and neck split afterwards. Numbers in ( ) refer to men’s sizes. Cast on 188-192-200 (200-208) sts on circular needle size 2.5 mm / US 1.5 with gray and knit 5 (6) cm Rib. Change to circular needle size 3.5 mm / US 4 and work M.1, at the same time inc 52-60-64 (52-56) sts evenly on 1st row = 240-252-264 (252-264) sts. After M.1 knit M.2 and then M.3 until piece measures 25-29-31 (30-33) cm. After M.3 knit M.4 and finish the piece in M.5 – beg by arrow for appropriate size and knit M.5 over front piece = 120-126-132 (126-132) sts, beg at appropriate arrow again and knit M.5 over back piece = 120-126-132 (126-132) sts. Remember the knitting gauge. At the same time when piece measures 37-41-42 (41-43) cm inc 5 sts each side (to be cut for armholes afterwards and not incorporated in pattern but knitted in stockinette sts). When there are 46 rows left of M.5 - piece measures approx 48-52-54 (53-56) cm - bind off 12 sts mid front for split. On next row cast on 5 new sts over the bind off sts – these are to be cut for neck split afterwards and not incorporated in pattern. When there are 11 rows left of M.5 – piece measures approx 60-64-66 (65-68) cm - bind off the middle 14-16-18 (16-18) sts + the 5 sts to be cut at front for neck and finish the piece back and forth on needle. Bind off to shape the neckline each side on every other row: 4 sts 1 time, 2 sts 1 time and 1 st 2 times. At the same time when piece measures 62-66-68 (67-70) cm bind off the middle 38-40-42 (40-42) sts mid back for neck and dec 2 sts each side on next row. Bind off when piece measures 64-68-70 (69-72) cm. Sleeves: Cast on 48-48-52 (52-56) sts on double pointed needles size 2.5 mm / US 1.5 with gray and knit 5 cm / 2" Rib, inc 6-8-4 (4-2) sts evenly on the last round = 54-56-56 (56-58) sts. Change to needle size 3.5 mm / US 4 and work M.1, M.2 and then continue in M.3 until piece measures 38-38-37 (43-43) cm. At the same time, after the Rib inc 2 sts mid under arm 30-29-31 (31-32) times as follows: Ladies size S + L: alternate between 3rd and 4th round, Ladies size M and Men’s size S/M + M/L: every 4th round = 114-114-118 (118-122) sts. After M.3 knit M.4 and continue in M.6. After 1 repeat of M.6 knit 2 rounds in gray and finish with 2 cm / ¾" reverse stockinette sts = edge for sewing on sleeve to body pieces. Bind off and knit the other sleeve. Assembly: Insert a marking thread in the middle of the inc sts for armhole each side and mid front of body piece. Make 2 seams each side and mid front on your sewing machine, the first seam ½ st from the marking thread and the other one ½ st from the first one. Cut the piece between these. Sew shoulder seams. Edge round the front split: Pick up approx 30 sts along the left side of neck split on needle size 2.5 mm / US 1.5 with gray and knit Edge – see above. Repeat along the right side. Fold edges towards the WS and attach. Sew the edges at bottom from RS with neat mattress sts. Neckline: Pick up approx 73-79 sts round the neck on needle size 2.5 mm / US 1.5 with gray and knit 2.5 cm / ⅞" stockinette sts, change to light gray and knit 2 rows stockinette sts, P 1 row (= folding edge) and K 1 row. Change back to gray and knit 2.5 cm / ⅞" in stockinette sts. Bind off. Fold the edge double towards the WS and attach. Set in sleeves from the RS as follows: sew in the last row before the edge in reverse stockinette sts on sleeves to the first row after the seam in the sts for cutting on body pieces. Turn the jumper inside out and sew the piece in stockinette sts over the cutting edge on body pieces. Sew on clasps. --------------------------------------- MITTENS: Pattern: See diagram M.7 to M.10. Diagram shows the pattern from the RS. Work the entire pattern in stockinette st. Right mitten: Worked in the round on double pointed needles. Cast on 48-56 sts on double pointed needles size 3.5 mm / US 4 with dark gray and work 3 cm / 1" stockinette st. Work next round as follows: * K2 tog, 1 YO *, repeat from *-* (= folding edge). Work 3 cm / 1" stockinette st and now continue in M.7 (= 11-13 sts), at the same time dec 4-4 sts evenly on first round = 44-52 sts. After M.7 work next round as follows: M.9 (= 5 sts), M.8 (= 17-21 sts), M.9, M.10 on the next 17-21 sts, (M.8 = upper hand). Insert a marker in st 28-32 (= first st in M.10) to mark the thumb and now measure piece from here. REMEMBER THE GAUGE! When piece measures 1 cm / ⅜" inc 1 st on each side of st with marker on every 3 round a total of 6-7 times = 56-66 sts – incorporate the inc sts in M.10 as you go along. When piece measures 6.5-7 cm / 2½"-2¾" slip the 12-14 inc sts + st with marker (=13-15 sts) on a stitch holder. On next round cast on 1 new st behind stitch holder = 44-52 sts. Continue in pattern until piece measures 17-18 cm (3-4 cm left) and now dec on both sides of M.9 on every round by K 2 tog each side (= 4 dec per round) a total of 10-11 times = 4-8 sts left. Cut the thread, pull through remaining sts and fasten. Thumb: Slip the 13-15 thumb sts back on double pointed needles and pick up 1 st behind thumb. Work M.10, at the same time inc 2-4 sts evenly on first round = 16-20 sts. Work 6.5-7 cm / 2½"-2¾" of M.10, on next round K all sts tog 2 by 2, cut the thread, pull through remaining sts and fasten. Left mitten: Cast on and work like right mitten, but mirrored, i.e. insert marker for thumb in the last st in M.10. |
|||||||||||||
Diagram explanations |
|||||||||||||
|
|||||||||||||
|
|||||||||||||
|
|||||||||||||
Have you finished this pattern?Tag your pictures with #dropspattern or submit them to the #dropsfan gallery. Do you need help with this pattern?You'll find 30 tutorial videos, a Comments/Questions area and more by visiting the pattern on garnstudio.com. © 1982-2025 DROPS Design A/S. We reserve all rights. This document, including all its sub-sections, has copyrights. Read more about what you can do with our patterns at the bottom of each pattern on our site. |
|||||||||||||


With over 40 years in knitting and crochet design, DROPS Design offers one of the most extensive collections of free patterns on the internet - translated to 17 languages. As of today we count 314 catalogs and 11822 patterns - 11812 of which are translated into English (US/in).
We work hard to bring you the best knitting and crochet have to offer, inspiration and advice as well as great quality yarns at incredible prices! Would you like to use our patterns for other than personal use? You can read what you are allowed to do in the Copyright text at the bottom of all our patterns. Happy crafting!
Post a comment to pattern DROPS 47-10
We would love to hear what you have to say about this pattern!
If you want to leave a question, please make sure you select the correct category in the form below, to speed up the answering process. Required fields are marked *.