DROPS Karisma
DROPS Karisma
100% Wool
from 3.00 $ /50g
DROPS SS24
DROPS 47-9
Size: 3/4 - 5/6 – 7/8 – (9/10 – 11/12 – 13/14) years

Materials: DROPS Karisma Superwash from Garnstudio
200-200-250 (250-250-300) g color no 50, green mix
100-150-150 (150-150-200) g color no 01, off-white
50-50-50- (50-50-50) g color no 36, green

DROPS circular and double pointed needles size 2.5 and 3.5 mm / US 1.5 and 4

DROPS buttons, Trollgubbe no 606, 5-5-5 (5-6-6) pcs.

-------------------------------------------------------

Alternative Yarn – See how to change yarns here
Yarn Groups A to F – Use the same pattern and change the yarn here
Yarn usage using an alternative yarn – Use our yarn converter here

-------------------------------------------------------

DROPS Karisma
DROPS Karisma
100% Wool
from 3.00 $ /50g

Pattern instructions

NOTE: This pattern is written in American English. All measurements in charts are in cm. For conversion from inches to cm - click here. There are different terms for crocheting in American and British English. If this pattern includes crochet, click for "crochet terms" here. For this pattern in British English, please click here.
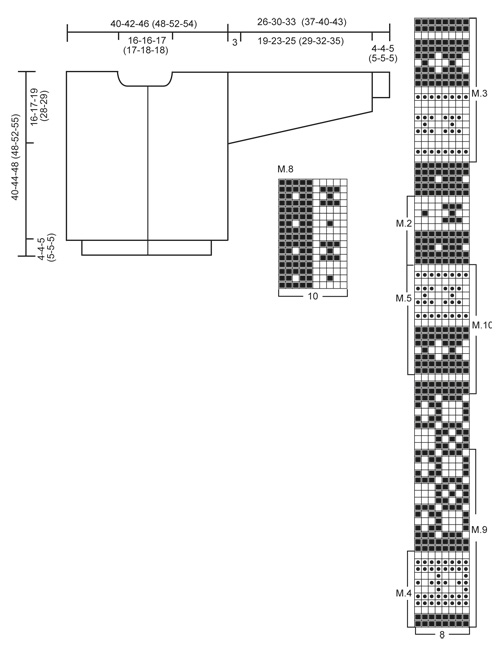
Knitting gauge: 21 sts x 28 rows on needle size 3.5 mm / US 4 in pattern = 4" x 4" (10 x 10 cm).

Rib: *K1, P1*, repeat from *-*.

Pattern: See diagrams M1-M.10. 1 diagram = 1 repeat. The diagrams are seen from the RS.

Back and front piece:
The cardigan is knitted back and forth on circular needles. Cast on 171-179-195 (203-219-227 sts (includes 1 edge st each side towards mid front) on circular needle size 2.5 mm / US 1.5 with green mix and knit 4-4-5 (5-5-5) cm Rib with 1 edge st each side in garter sts.
Change to circular needle size 3.5 mm / US 4 and knit M.9, then M.10 and continue in M.2 – knit all patterns with 1 edge st each side in garter sts. At the same time when piece measures 24-27-29 (28-31-33) cm divide the piece as follows from the RS: 43-45-49 (51-55-57) sts = front piece, 85-89-97 (101-109-113) sts = back piece, 43-45-49 (51-55-57) sts = front piece and finish each piece separately.

Front piece: = 43-45-49 (51-55-57) sts.
When piece measures 32.5-36.5-40.5 (40.5-44.5-47.5) cm – adjust to after a full stripe in green mix – knit M.3.
At the same time when piece measures 36-40-43 (43-47-50) cm bind off for neck on every other row: 13-13-14 (14-15-15) sts 1 time, 2 sts 1 time and 1 st 2 times.
Bind off after M.3, piece measures approx 40-44-48 (48-52-55) cm.

Back piece: = 85-89-97 (101-109-113) sts. Knit pattern as for front piece.
When piece measures 38-43-46 (46-50-53) cm bind off the middle 29-29-31 (31-33-33) sts for neck and dec 2 sts on neckline on next row.
Bind off after M.3, piece measures approx 40-44-48 (48-52-55) cm.

Sleeves: Cast on 36-36-38 (40-42-44) sts on double pointed needles size 2.5 mm / US 1.5 with green mix and knit 4-4-5 (5-5-5) cm Rib, inc 6-10-12 (10-10-8) sts evenly on last round = 42-46-50 (50-52-52) sts. Change to needle size 3.5 mm / US 4 and knit M.4, then M.5 and finish the sleeve in M.2.
At the same time, after the Rib inc 2 sts mid under arm 13-13-15 (17-18-20) times as follows: Size 3/4 years: alternate between every 3rd and 4th round, size 5/6 + 9/10 + 11/12 +13/14 years: alternate between every 4th and 5th round, size 7/8 years: every 4th round = 68-72-80 (84-88-92) sts.
When piece measures 23-27-30 (34-37-40) cm bind off 4 sts mid under arm and finish the sleeve back and forth on needle. Bind off for sleeve cap each side on every other row: 7-7-8 (8-9-9) sts 3 times. Bind off when piece measures approx 36-30-33 (37-40-43) cm – adjust after a full stripe in M.2

Assembly: Sew shoulder seams.
Front edges: Pick up approx 90-125 sts along left front piece on needle size 2.5 mm / US 1.5 with green mix and knit 3 cm / 1⅛" Rib. Bind off.
Repeat along right front piece, but after 1 cm / ⅜" make 5-5-5 (5-6-6) buttonholes evenly distributed. 1 buttonhole = bind off 2 sts and cast on 2 sts on the return row.
Neckline: Pick up approx 86-100 sts round the neck on needle size 2.5 mm / US 1.5 with green mix and knit 6 cm / 2⅜" Rib. Bind off and fold edge double towards WS and sew. Sew on buttons.


HAT:

HAT:
Size: 3/4 - 5/6 -7/8 (9/10 – 11/12 – 13/14) years
To fit head circumference: 50-50-50(53-53-53) cm

Materials: Garnstudio’s Karisma
50 g for all sizes color no 50, green mix
50 g for all sizes color no 01, off-white
50 g for all sizes color no 36, green

DROPS circular needle size 3.5 mm / US 4
Crochet hook size 3.5 mm/E/4

Knitting gauge: 21 sts x 28 rows on needle size 3.5 mm / US 4 in stockinette sts = 4" x 4" (10 x 10 cm).

Rib: *K1, P1*, repeat from *-*.

Cast on 104-104-104 (112-112-112) sts on circular needle size 3.5 mm / US 4 with green mix and knit 2 cm / ¾" Rib. Continue in M.9, then M.10 and finish the hat in green mix. Bind off when piece measures 19-20-20 (21-21-22) cm. Fold the hat double and sew tog with neat sts from RS.
Make 2 pompons in off-white and attach to each top corner of the hat .

Earflaps: Cast on 3 sts on needle size 3.5 mm / US 4 with green mix and knit garter sts. Inc 1 st each side on every other row a total of 9-9-10 (10-11-11) times - on right side: knit 2 sts in first st, on left side: knit 2 sts in last st = 21-21-23 (23-25-25) sts. Continue until piece measures 9-9-10 (11-11-11) cm and bind off.
Crochet a chain, approx 25 cm long, with crochet hook size 3.5 mm/E/4and green mix and attach to the middle of earflap at bottom. Sew on earflaps to hat from the WS in the last row of Rib with approx 11-11-12 (13-13-13) cm between the earflaps mid back.


SOCKS:

Size: 3/4 - 5/6 -7/8 (9/10 – 11/12 – 13/14) years
Foot length in cm: 17-19-21-22-23-25

Materials: DROPS Karisma from Garnstudio
100-150-150 (150-150-200) g color no 50, green mix
50-50-100 (100-100-100) g color no 01, off-white
50-50-50 (50-50-50) g color no 36, green

DROPS double pointed circular needles size 2.5 and 3 mm / US 1.5 and 2.5

Knitting gauge: 22 sts x 30 rows on needle size 3 mm / US 2.5 in stockinette sts = 4" x 4" (10 x 10 cm).

Rib: *K1, P1*, repeat from *-*.

Cast on 44-46-48 (50-52-60) sts on double pointed needles size 2.5 with green mix and knit 5 cm / 2" Rib.
Change to needle size 3 mm / US 2.5 and knit M.3 – but from top down – at the same time inc 4-6-4(6-4-8) sts evenly on the first round = 48-52-52(56-56-58) sts. REMEMBER THE GAUGE!
After M.3 continue in M.8 – start mid back with 1 st in green mix - at the same time dec/inc evenly to 46-46-56 (56-56-66) sts on the first row.
When piece measures 11-12-12 (13-13-14) cm dec 1 st each side of the green mix st mid back 3-2-6 (6-5-10) times on every 19-30-11 (11-15-7) row (first dec after 19-30-11 (11-15-7) rows) = 40-42-44 (44-46-46) sts.
When piece measures 30-32-34 (36-38-40) cm finish the sock in green mix and continue as follows: Knit 5-5-5 (6-6-6) cm stockinette sts over the middle 18 sts mid back (put the upper 22-24-26-26-28-28 sts on a thread).
Now dec for heel:
1st row (RS): knit 10 sts, K2 tog into back of st, K1, turn
2nd row: (WS): slip 1 st as if to knit, P4, P2 tog, P1, turn
3rd row: slip 1 st as if to knit, K5, K2 tog into back of st, K1, turn
4th row: slip 1 st as if to knit, P6, P2 tog, P1, turn
5th row: slip 1 st as if to knit, K7, K2 tog into back of st, K1, turn
6th row: slip 1 st as if to knit, P8, P2 tog, P1, turn
7th row: K2 tog, K8, K2 tog into back of sts = 10 sts left on needle.
Pick up 11-11-11 (13-13-13) sts on each side of heel and put all sts back on needles = 54-56-58 (62-64-64) sts. Dec 1 st on each side of the upper 22-24-26 (26-28-28) sts on every other row a total of 6-6-5 (7-7-7) times = 42-44-48 (48-50-50) sts.
When foot measures 13-15-16 (17-18-20) cm from the heel insert a marking thread each side and dec for toe as follows: dec 1 st on each side of marking threads (4 dec per round) on every and every other row alternately a total of 8-8-10 (10-10-10) times = 10-12-8 (8-10-10) sts.
Cut the thread and pull through remaining sts. Sew tight.

Diagram

All measurements in charts are in cm.

symbols = green mix
symbols = off-white
symbols = green
diagram

Each of our patterns has specific tutorial videos to help you.

Do you have a question? See a list of frequently asked questions (FAQ)

Knitting tension is what determines the final measurements of your work, and is usually measured per 10 x 10 cm. It is provided like so: number of stitches in width x number of rows in height - eg: 19 stitches x 26 rows = 10 x 10 cm.

The knitting tension is very individual; some people knit/crochet loosely while others work tightly. You adjust the knitting tension with the needle size, which is why the suggested needle size only serve as a guide! You need to adjust this (up or down) to ensure that YOUR knitting tension matches the knitting tension provided in the pattern. If you work with a different knitting tension than provided you will have a different yarn consumption, and your work will have different measurements than what the pattern suggests.

The knitting tension also determines which yarns can replace each other. As long as you achieve the same knitting tension you can replace one yarn with another.

See DROPS lesson: How to measure your tension/gauge

See DROPS video: How to make a gauge tension swatch

The required amount of yarn is provided in grams, eg: 450 g. To calculate how many balls you’ll need you first need to know how many grams are in 1 ball (25g, 50g or 100g). This information is available if you click on the individual yarn quality on our pages. Divide the amount required with the amount of each ball. For example, if each ball is 50g (the most common amount), the calculation will be as follows: 450 / 50 = 9 balls.

The important thing when changing from one yarn to another is that the knitting/crochet tension remains the same. This is so that the measurements of the finished piece will be the same as on the sketch provided. It is easier to achieve the same knitting tension using yarns from the same yarn group. It is also possible to work with multiple strands of a thinner yarn to achieve the knitting tension of a thicker one. Please try our yarn converter. We recommend you to always work a test swatch.

Please NOTE: when changing yarn the garment might have a different look and feel to the garment in the photo, due to individual properties and qualities of each yarn.

See DROPS lesson: Can I use a different yarn than the one mentioned in the pattern?

All our yarns are categorised into yarn groups (from A to F) according to thickness and knitting tension – group A contains the thinnest yarns and group F the thickest. This makes it easier for you to find alternative yarns to our patterns, should you wish to switch yarn. All yarns within the same group have a similar knitting tension and can easily replace each other. However, different yarn qualities have different structures and properties which will give the finished work a unique look and feel.

Click here for an overview of the yarns in each yarn group

At the top of all our patterns you’ll find a link to our yarn converter, which is a helpful tool should you wish to use a different yarn than suggested. By filling in the yarn quality you wish to replace, the amount (in your size) and number of strands, the converter will present good alternative yarns with the same knitting tension. Additionally it will tell you how much you’ll require in the new qualities and whether you’ll need to work with multiple strands. Most skeins are 50g (some are 25g or 100g).

If the pattern is worked with multiple colours, every colour will have to be converted separately. Similarly, if the pattern is worked with several strands of different yarns (for example 1 strand Alpaca and 1 strand Kid-Silk) you will have to find alternatives for each, individually.

Click here to see our yarn converter

Since different yarns have different qualities and textures we have chosen to keep the original yarn in our patterns. However, you can easily find options among our available qualities by using our yarn converter, or simply pick a yarn from the same yarn group.

It is possible that some retailers still have discontinued yarns in stock, or that someone has a few skeins at home that they would like to find patterns for.

The yarn converter will provide both alternative yarn as well as required amount in the new quality.

If you think it's hard to decide what size to make, it can be a good idea to measure a garment you own already and like the size of. Then you can pick the size by comparing those measures with the ones available in the pattern's size chart.

You'll find the size chart at the bottom of the pattern.

See DROPS lesson: How to read size chart

The needle size provided in the pattern serves only as a guide, the important thing is to follow the knitting tension. And since knitting tension is very individual, you will have to adjust the needle size to ensure that YOUR tension is the same as in the pattern – maybe you’ll have to adjust 1, or even 2 needle sizes, up or down to achieve the correct tension. For this, we recommend that you work test swatches.

Should you work with a different knitting tension than the one provided, the measurements of the finished garment might deviate from the measurement sketch.

See DROPS lesson: How to measure your tension/gauge

See DROPS video: How to make a gauge tension swatch

Working a garment top-down provides more flexibility and room for personal adjustment. For example it is easier to try the garment on while working, as well as making adjustments to length of yoke and shoulder caps.

The instructions are carefully explaining every step, in the correct order. Diagrams are adjusted to the knitting direction and are worked as usual.

The diagram depicts all rows/rounds, and every stitch seen from the right side. It is read from bottom to top, from right to left. 1 square = 1 stitch.

When working back and forth, every other row is worked from the right side and every other row is worked from the wrong side. When working from the wrong side, the diagram will have to be worked reversed: from left to right, knit stitches are purled, purl stitches are knit etc.

When working in the round every round is worked from the right side and the diagram are worked from right to left on all rounds.

See DROPS lesson: How to read knitting diagrams

The diagram depicts all rows/rounds, and every stitch seen from the right side. It is worked from bottom to top, from right to left.

When working back and forth every other row is worked from the right side: from right to left and every other row is worked from the wrong side: from left to right.

When working in the round, every row in the diagram are worked from the right side, from right to left.

When working a circular diagram you start in the middle and work your way outwards, counter clockwise, row by row.

The rows usually start with a given number of chain stitches (equivalent to the height of the following stitch), this will either be depicted in the diagram or explained in the pattern.

See DROPS lesson: How to read crochet diagrams

Instructions for working several diagrams after each other on the same row/round, will often be written like so: “work A.1, A.2, A.3 a total of 0-0-2-3-4 times". This means you work A.1 once, then A.2 is worked once, and A.3 is repeated (in width) the number of times provided for your size – in this case like so: S = 0 times, M = 0 times, L=2 times, XL= 3 times and XXL = 4 times.

The diagrams are worked as usual: begin with the first row in A.1, then work the first row in A.2 etc.

See DROPS lesson: How to read knitting diagrams

See DROPS lesson: How to read crochet diagrams

The total width of the garment (from wrist-to-wrist) will be larger in the larger sizes, despite the actual sleeves being shorter. The larger sizes have longer sleeve caps and wider shoulders, so there will be a good fit in all sizes.

The measurement sketch/schematic drawing provides information regarding the full length of the garment. If it’s a jumper or a jacket the length is measured from the highest point on the shoulder (usually closest to the neckline), and straight down to the bottom of the garment. It is NOT measured from the tip of shoulder. Similarly, the length of yoke is measured from the highest point on the shoulder and down to where yoke is split into body and sleeves.

See DROPS lesson: How to read a schematic drawing

Diagrams are often repeated on the round or in height. 1 repeat is the diagram the way it appears in the pattern. If it says to work 5 repeats of A.1 in the round, then you work A.1 a total of 5 times after/next to each other in the round. If it says to work 2 repeats of A.1 vertically/in height you work the entire diagram once, then begin again at the start and work the entire diagram one more time.

Chain stitches are slightly narrower than other stitches and to avoid working the cast-on edge too tight, we simply chain more stitches to begin with. The stitch count will be adjusted on the following row to fit the pattern and measurement sketch.

The rib edge is more elastic and will contract slightly compared to, for example, stocking stitch. By increasing before the rib edge, you avoid a visible difference in width between the rib edge and the rest of the body.

It’s very easy to cast off too tightly, and by making yarn overs while casting off (and simultaneously casting these off) you avoid a too tight cast off edge.

See DROPS video: How to bind off with yarn overs (yo)

To achieve an even increase (or decrease) you can increase on, for example: every 3rd and 4th row alternately, like so: work 2 rows and increase on the 3rd row, work 3 rows and increase on the 4th. Repeat this until the increase is complete.

See DROPS lesson: Increase or decrease 1 st on every 3rd and 4th row alternately

Should you prefer to work in the round instead of back and forth, you may of course adjust the pattern. You’ll need to add steeks mid-front (usually 5 stitches), and follow the instructions. When you would normally turn and work from the wrong side, simply work across the steek and continue in the round. At the end you’ll cut the piece open, pick up stitches to work bands, and cover the cut edges.

See DROPS video: How to knit steeks and cut open

Should you prefer to work back and forth instead of in the round, you may of course adjust the pattern so you work the pieces separately and then assemble them at the end. Divide the stitches for the body in 2, add 1 edge stitch in each side (for sewing) and work the front and back pieces separately.

See DROPS lesson: Can I adapt a pattern for circular needles into straight needles?

Pattern repeats can vary slightly in the different sizes, in order to get the correct proportions. If you’re not working the exact same size as the garment in the photo, yours might deviate slightly. This has been carefully developed and adjusted so that the complete impression of the garment is the same in all sizes.

Make sure to follow instructions and diagrams for your size!

If you have found a pattern you like which is available in women’s size it’s not very difficult to convert it to men’s size. The biggest difference will be the length of sleeves and body. Start working on the women size that you think would fit across the chest. The additional length will be worked right before you cast off for the armhole/sleeve cap. If the pattern is worked top-down you can add the length right after the armhole or before the first decrease on sleeve.

Regarding additional yarn amount, this will depend on how much length you add, but it is better with a skein too many than too few.

All yarns will have excess fibres (from production) that might come off as lint or shedding. Brushed yarns (ie hairier yarns) have more of these loose, excess fibres, causing more shedding.

Shedding also depends on what is worn under or over the garment, and whether this pulls at the yarn fibres. It’s therefore not possible to guarantee that there will be no shedding

Below are some tips on how to get the best result when working with hairier yarns:

1. When the garment is finished (before you wash it) shake it vigorously so the looser hairs come off. NOTE: do NOT use a lint roller, brush or any method that pulls at the yarn.

2. Place the garment in a plastic bag and put it in your freezer - the temperature will cause the fibres to become less attached to each other, and excess fibres will come off easier.

3. Leave in the freezer for a few hours before taking it out and shaking it again.

4. Wash the garment according to the instructions on the yarn label.

Pilling is a natural process that happens to even the most exclusive of fibers. It's a natural sign of wear and tear that is hard to avoid, and that is most visible in high friction areas of your garment like a sweater's arms and cuffs.

You can make your garment look as new by removing the pilling, using a fabric comb or a pill/lint remover.

Still can't find the answer you need? Then scroll down and leave your question so one of our experts can try to help you. This will be done normally within 5 to 10 working days.
In the meantime, you can read the questions and answers that others have left to this pattern or join the DROPS Workshop on Facebook to get help from fellow knitters/crocheters!

You might also like...

Post a comment to pattern DROPS 47-9

We would love to hear what you have to say about this pattern!

If you want to leave a question, please make sure you select the correct category in the form below, to speed up the answering process. Required fields are marked *.

Comments / Questions (14)

country flag Pascale wrote:

Bonjour et bravo pour vos modèles. Vos tutoriels sont parfaits pour nous perfectionner. Avez-vous un tutoriel pour le montage des manches sur mailles lisières svp ? D’avance merci. Pascale

13.12.2023 - 06:02

DROPS Design answered:

Bonjour Pascale et merci, est-ce que cette vidéo pourrait vous aider? Bon assemblage!

13.12.2023 - 08:15

country flag Janine wrote:

Hello Is the schematic correct on this pattern? The age 2 size seems to read as 40cm across the chest which I would expect to be more like age 9-10 years. Other drops patterns have this chest size for approx age 9 - 10.

28.11.2022 - 16:11

DROPS Design answered:

Dear Janine, schematic are right, at this time the trend was to have oversized garments - you will find the lattest jackets for children with nordic pattern here to inspire you. Happy knitting!

29.11.2022 - 09:55

country flag Julie Burnie wrote:

Under front piece where you start to cast off the 13 neck stitches every other row…1 time 2 sts 1 time and 1st 2 times???? Do you cast off 2 stitches then 1 stitch after that?

06.09.2022 - 22:24

DROPS Design answered:

Dear Mrs Burnie, on the front piece you will cast off for neck at the beginning of every row from neck towards armhole (= from right side on right front piece/from wrong side on left front piece) 13 sts 1 time, then 2 sts 1 time and 1 stitch 2 times. Happy knitting!

07.09.2022 - 08:18

country flag Renu wrote:

1. Do I cast off 4 stitches for mid underarm in total or 4 stitches each side on sleeve I.e 8 stitches total .? 2. Do I cast off 7 stitches each side for sleeves just after the cast off stitches mid under arm or the final rows before the final cast off for sleeves...

28.08.2021 - 07:18

DROPS Design answered:

Dear Reni, for the sleeve, cast off 4 stitch for the underarm (ie. 2 stitch of each side of the marker), then 7 stitches EACH side, three times. Happy Stitching!

28.08.2021 - 18:29

country flag Renu wrote:

In size s , if on RS two stitches are left at end ( after 169 stitches ) then on the WS do we start pattern on the 3 rd stitch . .?

13.08.2021 - 17:11

DROPS Design answered:

Dear Renu, diagrams are always showing the patterns fron the right side. If you have 2 stitches left after the last whole pattern repeat, then from the other side, you should start with the last two stotches of the diagram, and then deom the beginning. Happy Stitching!

15.08.2021 - 23:27

country flag Selam Arstad wrote:

Im sorry but you do not seem to understand my question.what does this mean? begging of the front piece ? #At the same time when piece measures (28-) cm divide the piece as follows from the RS: (51-) sts = front piece, (101-) sts = back piece, (51). t Front piece: = (51-) sts. When piece measures (40.5-cm – adjust to after a full stripe in green mix – knit M.3. when I separated my work measure 28cm do I continue in M2 or do I go straight to M3? between 28 cm and 40.5 cm?

05.01.2021 - 22:34

DROPS Design answered:

Dear Mrs Arstad, you continue working M.2 until piece measures 40.5 cm (4th size), ie after dividing piece (= 28 cm), you continue working M.2 and work M.3 only when piece measures 40.5 cm and cast off after M.3 = piece measures 48 cm. Happy knitting!

06.01.2021 - 08:03

country flag Selam Arstad wrote:

DROPS Design 03.01.2021 kl. 02:11: """Dear Selam Arstad! After you divide your work to separated pieces when piece measured 24-27-29 (28-31-33) cm, you continue knitting front piece until piece measures 40.5 cm. Happy knitting!""" OK , which Pattern do I work in M4, from 28cm to 40.5 cm ?? what does exactly mean continue working? which pattern exactly? Thanks.

03.01.2021 - 22:44

DROPS Design answered:

Dear Mrs Arstad, after you have worked M.9 then M.10, you continue working M.2 until pattern says to work M.3 (short before binding off). Happy knitting!

05.01.2021 - 09:49

country flag Selam Arstad wrote:

Hello, I have just finished M2 and divided the pieces it says: "Front piece: = 43-45-49 (51-55-57) sts. When piece measures 32.5-36.5-40.5 (40.5-44.5-47.5) cm – adjust to after a full stripe in green mix" Which pattern do I work to reach 40.5 cm?

02.01.2021 - 23:54

DROPS Design answered:

Dear Selam Arstad! After you divide your work to separated pieces when piece measured 24-27-29 (28-31-33) cm, you continue knitting front piece until piece measures 40.5 cm. Happy knitting!

03.01.2021 - 02:11

country flag Lyne Marcotte wrote:

Bonjour,\\\\r\\\\nJ’aimerais faire ce bonnet. Par contre je ne comprends pas que le tour de la tête soit en point mousse . Quand je regarde la photo ça m’apparait plutôt comme des côtes. Il me semble qu’en point mousse ça ne serrera pas la tête suffisamment et que le bonnet se déplacera . Pouvez- vous me donner plus de renseignements sur ce bonnet ?

19.08.2020 - 14:54

DROPS Design answered:

Bonjour Mme Marcotte, il fallait effectivement lire "côtes", la correction a été faite, merci pour votre retour. Bon tricot!

19.08.2020 - 16:06

country flag Fiona Murphy wrote:

Re Child's cardigan with borders. Instructions are to cast on 171 sts for S size back and front piece (including 1 edge st each side), but the pattern repeat is 8 sts, which would require a total of 170 sts. Have I misundertood the instructions?

18.04.2019 - 14:22

DROPS Design answered:

Hello Fiona. You work as follow, for size S: First st in garter st (edge st) , repeat diagram M9 (8 sts) 21 times over the next 168 sts (you are left with 2 sts); work the next st as the first st of diagram M9 and work the last st in garter st (edge st). This way the pattern will be symmetrical on the two sides of the front opening. Happy knitting!

18.04.2019 - 15:53