
Looking for a yarn?


Comments / Questions (10)
![]() Liz wrote:
Liz wrote:
I love this pattern but want to knit it in an 8ply DK Question 1. Do you have the same pattern but in DK weight? Question 2. If not how do I do the calculations? especially for sleeves/armholes etc Thank you
01.07.2025 - 04:46DROPS Design answered:
Dear Liz, as long as you get the right tension, ie 14 sts x 17 rows in stocking stitch = 10 x10 cm you can follow the pattern, but if you don't get this tension, you might have to adjust to your own tension or to find a pattern matching your own tension. Happy knitting!
01.07.2025 - 13:14
![]() Karen wrote:
Karen wrote:
Na het breien van het linkervoorpand wordt er niet gesproken over het rechtervoorpand, ik neem aan dat dit ook gebreid moet worden alvorens de voor- en achterpanden samen te voegen?
06.06.2025 - 14:26DROPS Design answered:
Dag Karen,
Nadat je de rechter schouder hebt gebreid en aansluitend het eerste deel van het rechter voorpand, plaats je de steken op een hulpdraad en brei je het linker voorpand zoals beschreven in de daarop volgende paragraaf. Als je dat gedaan hebt zet je het voorpand en achterpand op 1 naald .
08.06.2025 - 21:02
![]() Sophie wrote:
Sophie wrote:
Je pense qu'il y a une erreur pour le DOS: -> RANG 3 (sur l’envers): Voir AUGMENTATIONS-2. Tricoter 3 mailles envers, augmenter 1 maille inclinée à gauche, tricoter à l’endroit... Il faut tricoter à l'envers sinon on obtient du point mousse, j'ai défait mon ouvrage car cela ne semblait pas correspondre au modèle.
25.03.2025 - 11:16DROPS Design answered:
Bonjour Sophie et merci, vous avez raison, la correction a été faite. Bon tricot!
25.03.2025 - 12:07
![]() Fran wrote:
Fran wrote:
There seems to be an instruction missing for the back yoke. As written there is no depth to the back yoke post shoulder line, leaving you with an armhole that appears to be about three inches around?
03.03.2025 - 11:57DROPS Design answered:
Dear Fran, you will find related videos showing how to work this kind of jumper under tab "Videos" at the top of the page, read first how to start back piece, then how to work both shoulders on back piece then how to pick up stitches for sleeve and work raglan increases and then how to continue and divide piece. Happy knitting!
03.03.2025 - 16:05
![]() Lydia wrote:
Lydia wrote:
Hallo, ich liebe die Farben des neuen Garns! Der Pullober sieht toll aus, die Anleitung ist für mich jedoch eine kleine Herausforderung. Folgendes Problem habe ich: die Schultern sollen 9cm + 4 Reihen lang sein. Dadurch habe ich beim Aufnehmen der neuen Maschen am Armausschnitt aber viel mehr Maschen als 16. Wie löse ich das? Vielen Dank!
02.03.2025 - 11:15DROPS Design answered:
Liebe Lydia, Schulter sind ja 9 cm + 4 Reihen = ca 2 cm = so insgesamt 11 cm, mit 14 M = 10 cm sollen Sie über diese 11 cm ca 16 Maschen aufnehmen können. Könnte Ihnen dieses Video helfen? Viel Spaß beim Stricken!
03.03.2025 - 09:56
![]() Wren wrote:
Wren wrote:
Hello, What does folded double over at the shoulder mean?
01.03.2025 - 22:49DROPS Design answered:
Dear Wren, when measuring the front piece, it indicates "when the jumper is folded double at the shoulder...". This means: from where the jumper is folded double at the shoulder, at this point of the front piece, it should measure..... This measurement is the top of the shoulder, not where the stitches where picked up in the back piece shoulder (you can see in the photos that you first knitted up stitches from the back shoulders, worked up to the upper edge of the shoulder and then worked from here down for the front piece. You should start measuring from the top of the shoulder, no the knitted up row. Happy knitting!
02.03.2025 - 19:17
![]() Franziska wrote:
Franziska wrote:
I love the drops garn! and garnstudio site! Blushing rainbow seems the perfect pullover with professional pattern! I understand that the armholes are knitted directly to the front and back piece. However: How do I pick up the stitches? I miss that video? Would be great to know!!!
17.02.2025 - 08:20DROPS Design answered:
Dear Franziska, thanks for you feedback. For sleeves you will have to pick up stitches as in this video along rows worked for front pieces. Happy knitting!
17.02.2025 - 14:06
![]() Missy wrote:
Missy wrote:
Door welke kleur Brushed alpaca silk kan ik Kid Silk 53 en 01 het beste vervangen? Brushed alpaca silk 20 of juist 37?
13.02.2025 - 11:10DROPS Design answered:
Dag Missy,
Ik denk dat DROPS Brushed alpaca silk 20 het meest in de buurt komt, omdat het lichter is. Bij de aangegeven combinatie in Kid-Silk wordt wit en roze gecombineerd, dus dit maakt de roze ook vrij licht.
15.02.2025 - 10:48
![]() Simona wrote:
Simona wrote:
Buongiorno, mi dite per favore altri abbinamenti di colore con gli stessi filati usati per realizzare questo maglione? Grazie mille
12.02.2025 - 08:08DROPS Design answered:
Buonasera Simona, per un'assistenza così personalizzata può rivolgersi al suo rivenditore DROPS di fiducia. Buon lavoro!
13.02.2025 - 22:29
![]() Anna wrote:
Anna wrote:
Wunderschöne neue Anleitungen! Leider vertrage ich Kid Silk nicht. Kann ich stattdessen 1 Faden Brushed Alpaca Silk verwenden?
11.02.2025 - 17:35DROPS Design answered:
Liebe Anna, ja genau, da man hier 2 Fäden Kid-Silk strickt können Sie anstatt 1 Faden Brushed Alpaca Silk (auch mit 1 Faden Fiesta zusammen) stricken. Benutzen Sie den Garnumrechner um die neue Garnmenge kalkulieren zu lassen. Viel Spaß beim Stricken!
12.02.2025 - 09:13
|
|
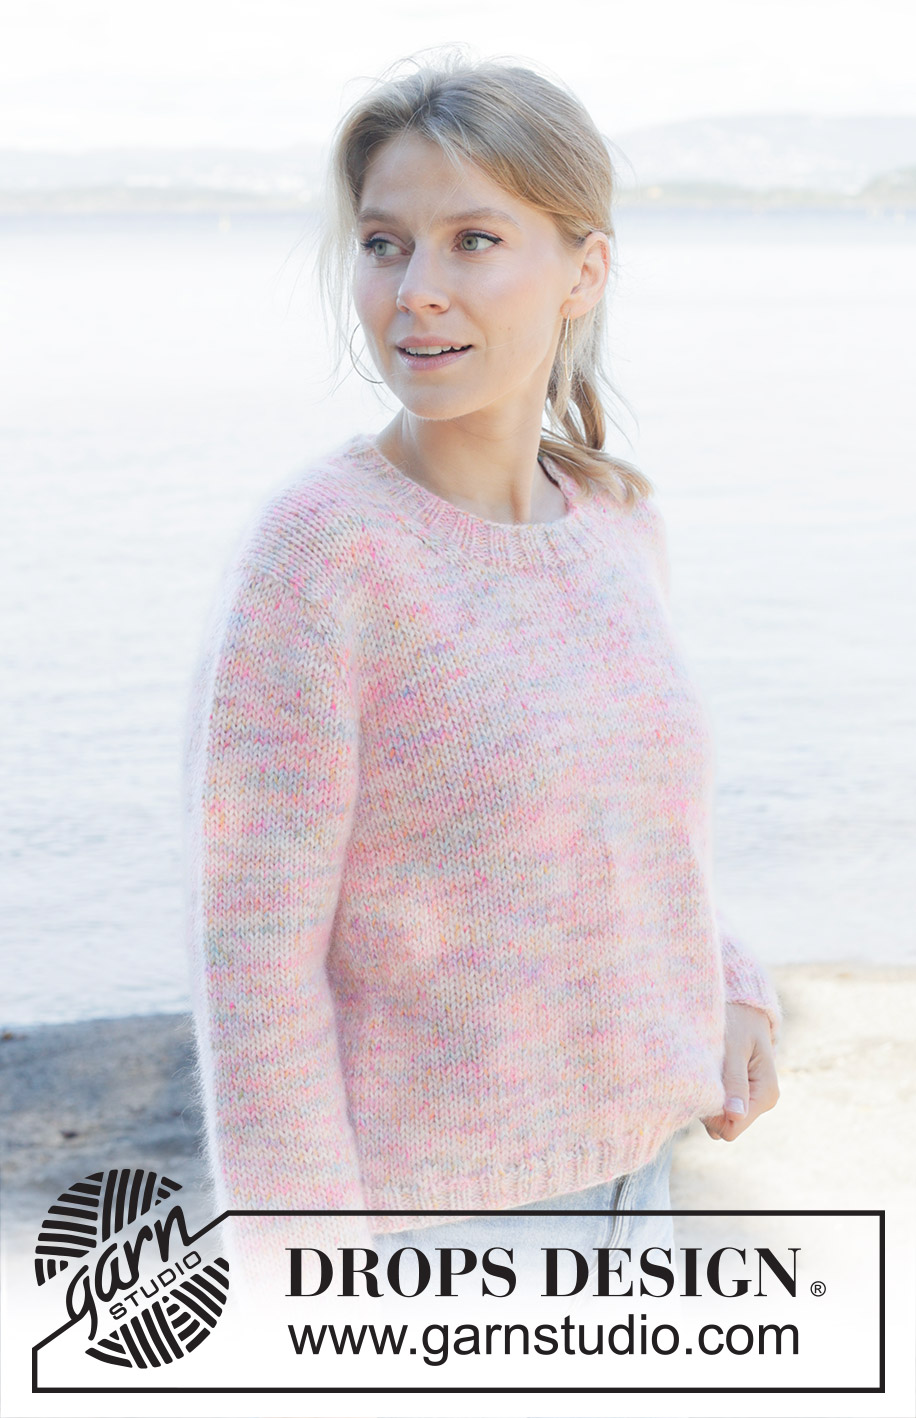
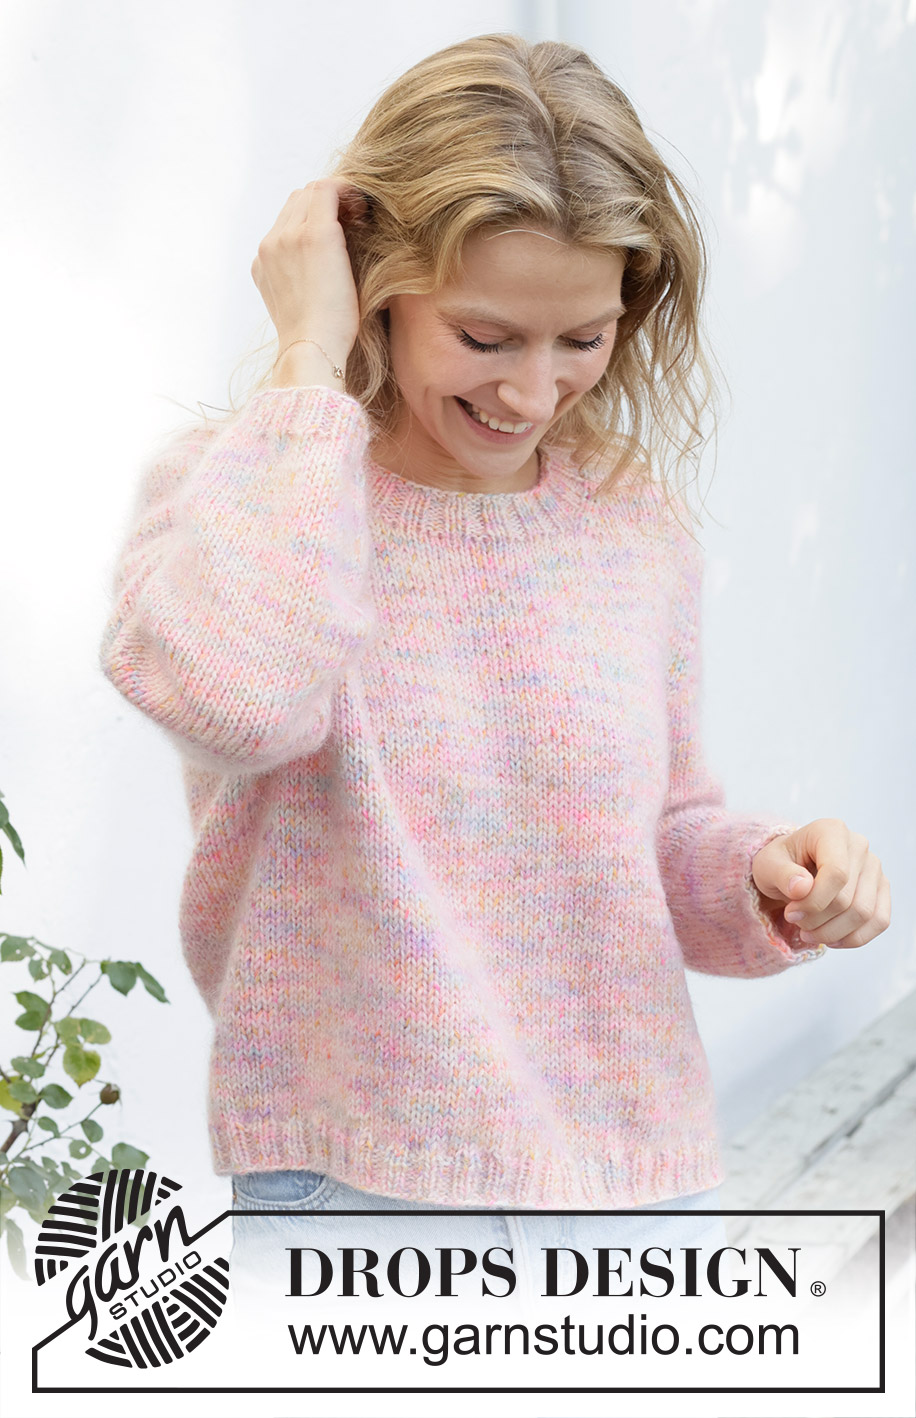
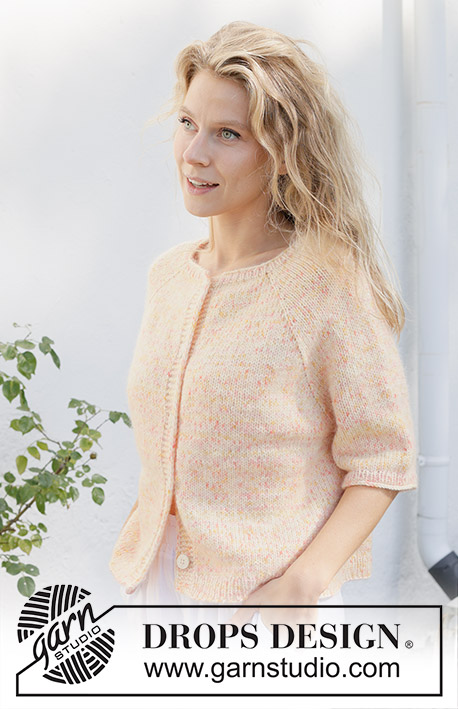
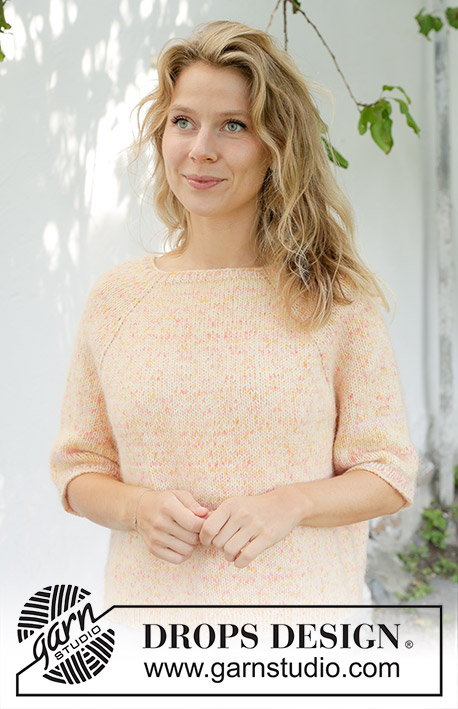
Blushing Rainbow#blushingrainbowsweater |
|
 |
 |
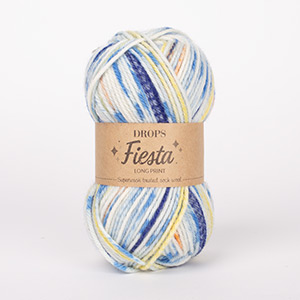
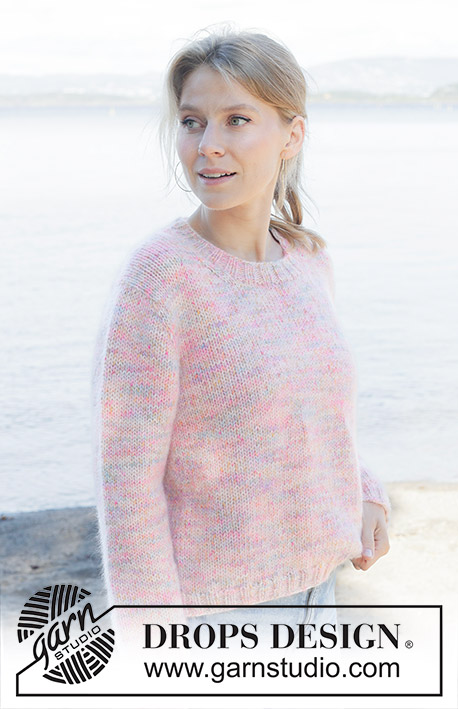
Knitted sweater in 1 strand DROPS Fiesta and 2 strands DROPS Kid-Silk. The piece is worked top down with European yoke. Sizes S - XXXL.
DROPS 257-15 |
|
|
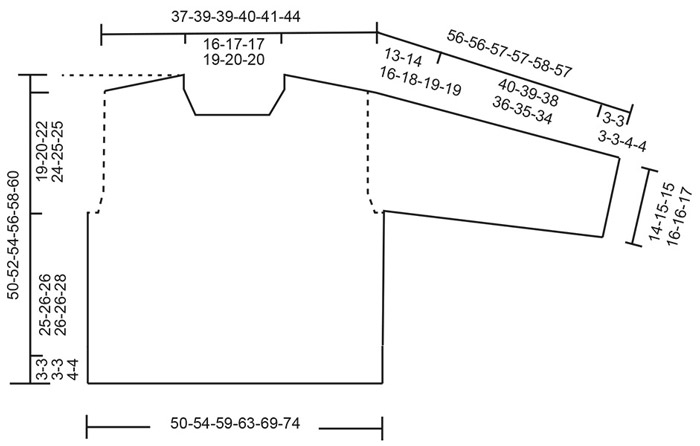
------------------------------------------------------- EXPLANATIONS FOR THE PATTERN: ------------------------------------------------------- INCREASE TIP-1: INCREASE 1 STITCH TOWARDS LEFT – from right side: Use the left needle to pick up the strand between 2 stitches from the previous row, pick up strand from the front and knit the back loop. INCREASE 1 STITCH TOWARDS RIGHT – from right side: Use the left needle to pick up the strand between 2 stitches from the previous row, pick up strand from the back and knit the front loop. INCREASE TIP-2: INCREASE 1 STITCH TOWARDS LEFT – from wrong side: Use the left needle to pick up the strand between 2 stitches from the previous row, pick up strand from the back and purl the front loop. INCREASE 1 STITCH TOWARDS RIGHT – from wrong side: Use the left needle to pick up the strand between 2 stitches from the previous row, pick up strand from the front and purl the back loop. DECREASE TIP: Decrease 1 stitch on each side of the marker-thread as follows: Work until there are 3 stitches left before the marker-thread, knit 2 together, knit 2 (marker-thread sits between these 2 stitches), slip 1 stitch knit-wise, knit 1 and pass the slipped stitch over the knitted stitch (2 stitches decreased). SLEEVE TIP: When knitting up stitches under the sleeve, you can get a small hole in the transition between stitches on the body and sleeve. This hole can be closed by picking up the strand between 2 stitches and working this strand twisted together with the first stitch between body and sleeve. ------------------------------------------------------- START THE PIECE HERE: ------------------------------------------------------- SWEATER – SHORT OVERVIEW OF THE PIECE: The pattern uses both long and short needles; start with the length which fits the number of stitches and change when necessary. The piece is started back and forth, casting on stitches at the back of the neck and working the back piece top down while increasing stitches on each side for the shoulders, which become slightly diagonal. The front piece is then worked in 2 sections, knitting up stitches along 1 back shoulder, working and increasing for the neckline. This is repeated on the other shoulder. Stitches are knitted up along the front pieces for the sleeve caps and the back piece is placed on the same needle. Yoke is worked back and forth until all increases for neck are done. New stitches are cast on for neck are done. New stitches are cast on for the neckline and the yoke is continued in the round. Then stitches are increased on each sleeve and finally on both the sleeves and the body. When the yoke is finished it is divided for the body and sleeves, the body is continued in the round while the sleeves wait. Then the sleeves are worked in the round, top down. The neck is worked in the round to finish. BACK PIECE: The piece is worked back and forth. Cast on 24-26-26-28-30-30 stitches with circular needle size 6 MM = US 10, 1 strand DROPS Fiesta and 1 strand of each color DROPS Kid-Silk (= 3 strands). ROW 1 (wrong side): Purl. ROW 2 (right side): Read INCREASE TIP-1. Knit 3, increase 1 stitch towards the left, knit until there are 3 stitches left on the row, increase 1 stitch towards the right, knit 3. ROW 3 (wrong side): Read INCREASE TIP-2. Purl 3, increase 1 stitch towards the left, purl until there are 3 stitches left on the row, increase 1 stitch towards the right, purl 3. Work ROWS 2 and 3 a total of 7-7-7-7-7-8 times (= 14-14-14-14-14-16 worked rows). There are 52-54-54-56-58-62 stitches. Cut the strand and place the stitches on a stitch holder. RIGHT SHOULDER: Find the right back shoulder as follows: Lay the back piece flat, right side up, with the stitch holder towards you; right side of piece = right shoulder. Stitches are knitted up along the right shoulder, starting from the right side by the armhole and working towards the neckline as follows: Knit up 1 stitch in each worked row inside 1 stitch = 14-14-14-14-14-16 stitches. All length-measurements on the front piece are taken from this knitted-up row. Work stockinette stitch back and forth (first row from the wrong side). When the piece measures 9 cm = 3½", increase for the neckline as follows: ROW 1 (right side): Knit until there are 3 stitches left on the row, increase 1 stitch towards the right, knit 3 - remember INCREASE TIP-1. ROW 2 (wrong side): Purl. Work ROWS 1 and 2 a total of 2 times (= 4 worked rows) = 16-16-16-16-16-18 stitches. At the end of the last row from the wrong side, purl the last 2 stitches together 15-15-15-15-15-17 stitches. Place the stitches on a stitch holder and work the left front piece. LEFT FRONT PIECE: Knit up 1 stitch in each worked row along the left back shoulder, inside 1 stitch and starting from the right side by the neckline, working towards the armhole = 14-14-14-14-14-16 stitches. All length-measurements on the front piece are taken from this knitted-up row. Work stockinette stitch back and forth (first row from the wrong side). When the piece measures 9 cm = 3½", increase for the neckline as follows: ROW 1 (right side): Knit 3, increase 1 stitch towards the left, knit to end of row - remember INCREASE TIP-1. ROW 2 (wrong side): Purl. Work ROWS 1 and 2 a total of 2 times (= 4 worked rows) = 16-16-16-16-16-18 stitches. At the beginning of the last row from the wrong side, purl the first 2 stitches twisted together = 15-15-15-15-15-17 stitches. The front and back pieces are now joined and stitches are knitted up for the sleeve caps as follows: ROW 1: Start from the right side on the left front piece, knit 3, increase 1 stitch towards the left, knit the remaining stitches on the front piece, insert 1 marker here, knit up 16 stitches for the sleeve cap along the side of the left front piece (inside the outermost stitch), insert 1 marker, knit together the first 2 stitches on the back piece (= 1 stitch decreased), work until there are 2 stitches left on the back piece, slip 1 stitch, knit 1 and pass the slipped stitch over ( = 1 stitch decreased), insert 1 marker, knit up 16 stitches for the sleeve cap along the side of the right front piece inside the outermost stitch, insert 1 marker, knit across the right front piece until there are 3 stitches left, increase 1 stitch towards the right, knit 3 = 114-116-116-118-120-128 stitches. ROW 2 (wrong side): Purl all stitches. ROW 3 (right side): Knit 3, increase 1 stitch towards the left, knit as far as the first marker, move the marker to the right needle, increase 1 stitch towards the left, knit 16, increase 1 stitch towards the right, move the marker to the right needle, knit to the next marker, move the marker to the right needle, increase 1 stitch towards the left, knit 16, increase 1 stitch towards the right, move the marker to the right needle, knit until there are 3 stitches left, increase 1 stitch towards the right, knit 3 = 120-122-122-124-126-134 stitches. The increases mid-front are finished. ROW 4 (wrong side): Purl. ROW 5 (right side): Knit as far as the first marker, move the marker to the right needle, increase 1 stitch towards the left, knit 18, increase 1 stitch towards the right, move the marker to the right needle, knit to the next marker, move the marker to the right needle, increase 1 stitch towards the left, knit 18, increase 1 stitch towards the right, move the marker to the right needle, knit to end of row, then cast on 16-18-18-20-22-22 stitches for the neckline = 140-144-144-148-152-160 stitches. The piece is now continued in the round. ROUND 1: Knit all stitches. ROUND 2: Knit all stitches, increasing 1 stitch on each side of each sleeve as before – remember INCREASE TIP-1, the stitch count on the sleeves increases but stays the same on the front and back pieces. Work these 2 rounds 2-2-2-2-1-1 times (you have increased a total of 4-4-4-4-3-3 times on the sleeves = 24-24-24-24-22-22 stitches on each sleeve and 50-52-52-54-56-60 stitches on the front and back pieces) = 148-152-152-156-156-164 stitches. Knit 1 round. Now work as follows: ROUND 1: Knit until there are 2 stitches left before the first marker, increase 1 stitch towards the right, knit 2, move the marker to the right needle, increase 1 stitch towards the left, knit the 24-24-24-24-22-22 sleeve-stitches, increase 1 stitch towards the right, move the marker to the right needle, knit 2, increase 1 stitch towards the left, knit 46-48-48-50-52-56, increase 1 stitch towards the right, knit 2, move the marker to the right needle, increase 1 stitch towards the left, knit the 24-24-24-24-22-22 sleeve-stitches, increase 1 stitch towards the right, move the marker to the right needle, knit 2, increase 1 stitch towards the left, knit to end of round (= 1 stitch increased on each side of 2 stitches in each transition between body and sleeves = 8 increased stitches). ROUND 2: Knit. Repeat these 2 rounds until you have increased 7-8-10-11-13-14 times on the body and sleeves. You have increased a total of 11-12-14-15-16-17 times on sleeves = 204-216-232-244-260-276 stitches. The piece measures approx. 13-14-16-18-19-19 cm = 5⅛"-5½"-6¼"-7"-7½"-7½" from the knitted-up row measured mid-sleeve. When the sweater is folded double at the shoulder, the piece measures approx. 19-20-22-24-25-25 cm = 7½"-8"-8¾"-9½"-9¾"-9¾" along the armhole. Work to the first marker (between front piece and left sleeve). Now divide for the body and sleeves. DIVIDE FOR BODY AND SLEEVES: Place the first 38-40-44-46-48-50 stitches on a thread for the sleeve, cast on 6-8-10-12-14-16 stitches (under sleeve), knit 64-68-72-76-82-88 (= back piece), place the next 38-40-44-46-48-50 stitches on a thread for the sleeve, cast on 6-8-10-12-14-16 stitches (under sleeve), knit the last 64-68-72-76-82-88 stitches (= front piece). The body and sleeves are finished separately. BODY: = 140-152-164-176-192-208 stitches. Work stockinette stitch in the round until the piece measures 25-26-26-26-26-28 cm = 9¾"-10¼"-10¼"-10¼"-10¼"-11" from the cast-on stitches under the sleeve. Change to circular needle size 5 MM = US 8. Work rib (knit 2, purl 2) and increase AT THE SAME TIME 20-20-24-24-28-28 stitches evenly on the first round = 160-172-188-200-220-236 stitches. When the rib measures 3-3-3-3-4-4 cm = 1⅛"-1⅛"-1⅛"-1⅛"-1½"-1½", bind off. The sweater measures approx. 50-52-54-56-58-60 cm = 19¾"-20½"-21¼"-22"-22¾"-23⅝". SLEEVES: Place the 38-40-44-46-48-50 sleeve-stitches from one thread on circular needle size 6 MM = US 10 and knit up 1 stitch in each of the 6-8-10-12-14-16 stitches cast on under the sleeve – read SLEEVE TIP = 44-48-54-58-62-66 stitches. Insert a marker-thread in the middle of the 6-8-10-12-14-16 stitches under the sleeve. Start at the marker-thread and work stockinette stitch in the round. When the sleeve measures 3 cm = 1⅛", decrease 2 stitches under the sleeve – read DECREASE TIP. Decrease like this every 10-10-5-4-3½-3½ cm = 4"-4"-2"-1½"-1¼"-1¼" a total of 2-3-6-7-9-9 times = 40-42-42-44-44-48 stitches. Continue working until the sleeve measures 40-39-38-36-35-34 cm = 15¾"-15¼"-15"-14¼"-13¾"-13⅜" from the division. Change to double pointed needles size 5 MM = US 8. Work rib (knit 2, purl 2), AT THE SAME TIME increase 4-6-6-8-8-8 stitches evenly on the first round = 44-48-48-52-52-56 stitches. When the rib measures 3-3-3-3-4-4 cm = 1⅛"-1⅛"-1⅛"-1⅛"-1½"-1½", bind off. The sleeve measures approx. 56-56-57-57-58-57 cm = 22"-22"-22½"-22½"-22¾"-22½" from the shoulder. NECK: Start from the right side on one shoulder-line. Knit up 74 to 88 stitches around the neckline with circular needle size 5 MM = US 8. Work rib in the round (knit 2, purl 2) for 3 cm = 1⅛". Bind off with knit. |
|
|
|
Have you finished this pattern?Tag your pictures with #dropspattern #blushingrainbowsweater or submit them to the #dropsfan gallery. Do you need help with this pattern?You'll find 29 tutorial videos, a Comments/Questions area and more by visiting the pattern on garnstudio.com. © 1982-2025 DROPS Design A/S. We reserve all rights. This document, including all its sub-sections, has copyrights. Read more about what you can do with our patterns at the bottom of each pattern on our site. |
|


With over 40 years in knitting and crochet design, DROPS Design offers one of the most extensive collections of free patterns on the internet - translated to 17 languages. As of today we count 314 catalogs and 11822 patterns - 11812 of which are translated into English (US/in).
We work hard to bring you the best knitting and crochet have to offer, inspiration and advice as well as great quality yarns at incredible prices! Would you like to use our patterns for other than personal use? You can read what you are allowed to do in the Copyright text at the bottom of all our patterns. Happy crafting!
Post a comment to pattern DROPS 257-15
We would love to hear what you have to say about this pattern!
If you want to leave a question, please make sure you select the correct category in the form below, to speed up the answering process. Required fields are marked *.